|
|
|
||||||||||||||||||||||||


Paw and Fur - Hunting Elite Quest: mudanças entre as edições
| [edição aprovada] | [edição aprovada] |
m |
m |
||
| (30 revisões intermediárias por 7 usuários não estão sendo mostradas) | |||
| Linha 1: | Linha 1: | ||
{{Infobox_Quest|List={{{1|}}}|GetValue={{{GetValue|}}} | {{Infobox_Quest|List={{{1|}}}|GetValue={{{GetValue|}}} | ||
| name = Paw and Fur - Hunting Elite Quest | | name = Paw and Fur - Hunting Elite Quest | ||
| reward = [[Experiência]], [[gp| | | reward = [[Experiência]], [[gp|Dinheiro]], [[Achievements]], habilidade de matar bosses, começar outra quest e negociar com NPC [[Grizzly Adams]]. | ||
| location = [[Port Hope]]<noinclude>, na [[Paw and Fur Society]], ({{mapa|32693,32768,7: | | location = [[Port Hope]]<noinclude>, na [[Paw and Fur Society]], ({{mapa|32693,32768,7:2|aqui}}).</noinclude> | ||
| lvl = | | questloc = Mainland | ||
| lvlreq = | | lvl = Váriavel | ||
| premium = sim | | lvlreq = | ||
| dangers = Muitas criaturas. | | premium = sim | ||
| team = 1 personagem | | dangers = Muitas criaturas. | ||
| teamnote = | | team = 1 personagem | ||
| duration = Longa | | teamnote = | ||
| dif = 1 | | duration = Longa | ||
| imgleg = Brown Bear Fur | | dif = 1 | ||
| quests = | | imgleg = Brown Bear Fur | ||
| legend = Desde a criação do Tibia até os dias atuais, várias criaturas apareceram com o passar dos tempos. Algumas bem poderosas, outras inteligentes a ponto de formar sociedades e terem líderes, outras se reproduziram rapidamente e em grande número. Muitas delas se tornaram um grande problema, chegando a ameaçar outros seres vivos e o equilíbrio natural que a paz trouxe. Algumas pessoas podem precisar de alguma ajuda para lidar com estas criaturas... | | quests = | ||
| legend = Desde a criação do Tibia até os dias atuais, várias criaturas apareceram com o passar dos tempos. Algumas bem poderosas, outras inteligentes a ponto de formar sociedades e terem líderes, outras se reproduziram rapidamente e em grande número. Muitas delas se tornaram um grande problema, chegando a ameaçar outros seres vivos e o equilíbrio natural que a paz trouxe. Algumas pessoas podem precisar de alguma ajuda para lidar com estas criaturas... | |||
|implemented = 8.5 | |implemented = 8.5 | ||
| spoiler = | | spoiler = | ||
{{TOC left}} | |||
{{clear}} | |||
= Método = | = Método = | ||
== Iniciando Tasks == | == Iniciando Tasks == | ||
* Você deve ir até o NPC [[Grizzly Adams]], ({{mapa|32694,32772,7: | * Você deve ir até o NPC [[Grizzly Adams]], ({{mapa|32694,32772,7:2|aqui}}), aceitar o convite para fazer parte da Paw & Fur Society e pedir por '''''task''''' ou '''''mission'''''; | ||
* Você pode ter, no máximo, '''três tasks''' abertas; | * Você pode ter, no máximo, '''três tasks''' abertas; | ||
| Linha 41: | Linha 43: | ||
** possuírem menos de 70 ''Paw & Fur Points'', receberão 1 ponto bônus. | ** possuírem menos de 70 ''Paw & Fur Points'', receberão 1 ponto bônus. | ||
'''Nota:''' Ao completar 100 ''Paw & Fur Points'' você pode pedir todos os bosses de ''ranks'' inferiores ao seu. Observe que você só poderá matar aqueles que ainda não matou, e além disso é necessário pelo menos 1 ''Boss Point'' para poder fazer isto. | {{DASH|'''Nota:''' Ao completar 100 ''Paw & Fur Points'' você pode pedir todos os bosses de ''ranks'' inferiores ao seu. Observe que você só poderá matar aqueles que ainda não matou, e além disso é necessário pelo menos 1 ''Boss Point'' para poder fazer isto.}} | ||
== Sistema de Ranks == | == Sistema de Ranks == | ||
| Linha 66: | Linha 66: | ||
{{!}}align="center"{{!}}6 | {{!}}align="center"{{!}}6 | ||
{{!}}align="center"{{!}}8 000 | {{!}}align="center"{{!}}8 000 | ||
{{!}}Habilidade de viajar com [[Lorek]] para [[Banuta]], [[Chor]] e para perto | {{!}}Habilidade de viajar com [[Lorek]] para [[Banuta]], [[Chor]] e para perto das [[Kha'zeel Mountains]] | ||
{{!}}- | {{!}}- | ||
{{!}}align="center"{{!}}Big Game Hunter | {{!}}align="center"{{!}}Big Game Hunter | ||
| Linha 89: | Linha 89: | ||
{{{!}} border="0" width="800px" | {{{!}} border="0" width="800px" | ||
{{!}}- | {{!}}- | ||
{{!}}colspan="5" bgcolor="#CEDFF2"{{!}}< | {{!}}colspan="5" bgcolor="#CEDFF2"{{!}}<span class="titulo-quest">'''Tasks Especiais'''</span> | ||
{{!}}- | {{!}}- | ||
{{!}}rowspan="2" bgcolor="#CEDFF2"{{!}}'''Task''' | {{!}}rowspan="2" bgcolor="#CEDFF2"{{!}}'''Task''' | ||
| Linha 119: | Linha 119: | ||
{{DASH| | {{DASH| | ||
[[Arquivo:Achievement.gif|link=]] Após atingir o Rank Huntsman, você receberá o achievement '''"{{Achievement|Huntsman}}"'''.<br> | [[Arquivo:Achievement.gif|link=]] Após atingir o Rank Huntsman, você receberá o achievement '''"{{Achievement|Huntsman}}"'''.</br> | ||
[[Arquivo:Achievement.gif|link=]] Após atingir o Rank Elite Hunter, você receberá o achievement '''"{{Achievement|Elite Hunter}}"'''.<br> | [[Arquivo:Achievement.gif|link=]] Após atingir o Rank Elite Hunter, você receberá o achievement '''"{{Achievement|Elite Hunter}}"'''.</br> | ||
[[Arquivo:Achievement.gif|link=]] Após matar todos os bosses disponíveis antes do [[Updates/9.5|Update 9.5]], você receberá o achievement '''"{{Achievement|Pwned a Lot of Fur}}"'''.<br> | [[Arquivo:Achievement.gif|link=]] Após matar todos os bosses disponíveis antes do [[Updates/9.5|Update 9.5]], você receberá o achievement '''"{{Achievement|Pwned a Lot of Fur}}"'''.</br> | ||
[[Arquivo:Achievement.gif|link=]] Após matar todos os bosses, você receberá o achievement '''"{{Achievement|Pwned All Fur}}"'''.}} | [[Arquivo:Achievement.gif|link=]] Após matar todos os bosses, você receberá o achievement '''"{{Achievement|Pwned All Fur}}"'''.}} | ||
== Cancelando Tasks == | == Cancelando Tasks == | ||
Você pode a qualquer momento cancelar uma task que não lhe agrade. Para isto, você deve ter três task em aberto. Caso você tenha três task e queria cancelar uma para pegar outra, basta ir no NPC [[Grizzly Adams]] e falar: | Você pode a qualquer momento cancelar uma task que não lhe agrade. Para isto, você deve ter três task em aberto. Caso você tenha três task e queria cancelar uma para pegar outra, basta ir no NPC [[Grizzly Adams]] e falar: | ||
{{transcrições|npc=Grizzly Adams|texto= | {{transcrições|npc=Grizzly Adams|texto= | ||
'''Personagem:''' Hi<br> | '''Personagem:''' Hi</br> | ||
[[Grizzly Adams]]: Welcome to the 'Paw and Fur - Hunting Elite' <personagem>. Feel free to do tasks for us.<br> | [[Grizzly Adams]]: Welcome to the 'Paw and Fur - Hunting Elite' <personagem>. Feel free to do tasks for us.</br> | ||
'''Personagem:''' task<br> | '''Personagem:''' task</br> | ||
[[Grizzly Adams]]: You've three unfinished tasks running old chap. If you want to accept a new one, you have to delete one of your old ones. Do you want to delete a task?<br> | [[Grizzly Adams]]: You've three unfinished tasks running old chap. If you want to accept a new one, you have to delete one of your old ones. Do you want to delete a task?</br> | ||
'''Personagem:''' yes<br> | '''Personagem:''' yes</br> | ||
[[Grizzly Adams]]: Well, which one do you want to delete? Please name the monster that you don't want to hunt.<br> | [[Grizzly Adams]]: Well, which one do you want to delete? Please name the monster that you don't want to hunt.</br> | ||
'''Personagem:''' <Nome da task que você quer deletar> (exemplo: Tarantulas, Ice Golems, Hellspawns...)<br> | '''Personagem:''' <Nome da task que você quer deletar> (exemplo: Tarantulas, Ice Golems, Hellspawns...)</br> | ||
[[Grizzly Adams]]: Do you really want to delete this task?<br> | [[Grizzly Adams]]: Do you really want to delete this task?</br> | ||
'''Personagem:''' yes<br> | '''Personagem:''' yes</br> | ||
[[Grizzly Adams]]: As you wish. Ask me for a new task old chap.<br> | [[Grizzly Adams]]: As you wish. Ask me for a new task old chap.</br> | ||
}} | }} | ||
Agora você pode escolher outra task para fazer, desde que não tenha sido feita três vezes e esteja na sua faixa de | Agora você pode escolher outra task para fazer, desde que não tenha sido feita três vezes e esteja na sua faixa de level. | ||
== Hunting Tasks == | == Hunting Tasks == | ||
{{Menu Quest | |||
| qtdBtn = 4 | |||
| altura = 15 | |||
| boss = não | |||
<!-------------------------------------------------------------------------------------------------------------------------------> | |||
| imgBtn01 = Carniphila | |||
| imgBtnSize01 = 50 | |||
| txtBtn01 = Level 6-49 | |||
| tituloTxtBtn01 = Level 6-49 | |||
| spoilerTxtBtn01 = | |||
<!------------------------------- INÍCIO DO TEXTO DO SPOILER P/ O BOTÂO Nº 01 ---------------------------------------------------> | |||
{{{!}}width="100%" height="35px" class="sortable" | |||
{{{!}}width="100%" height="35px" | |||
{{!}}- | {{!}}- | ||
!width="200px" align="center" bgcolor="#CEDFF2"{{!}}'''Task''' | |||
!width="200px" align="center" bgcolor="#CEDFF2"{{!}} | |||
!width="200px" align="center" bgcolor="#CEDFF2"{{!}}'''Quantidade''' | |||
!width="200px" align="center" bgcolor="#CEDFF2"{{!}}'''Experiência''' | |||
!width="200px" align="center" bgcolor="#CEDFF2"{{!}}'''Task Points''' | |||
!width="200px" align="center" bgcolor="#CEDFF2"{{!}}'''Boss''' | |||
!width="200px" align="center" bgcolor="#CEDFF2"{{!}}'''Localização''' | |||
{{!}}- | {{!}}- | ||
{{!}}width="200px" height="70px" align="center" bgcolor="#CEDFF2"{{!}}[[Badger]] | {{!}}width="200px" height="70px" align="center" bgcolor="#CEDFF2"{{!}}[[Badger]] | ||
| Linha 210: | Linha 177: | ||
{{!}}width="200px" height="70px" align="center" bgcolor="#E8F2F8"{{!}}3 | {{!}}width="200px" height="70px" align="center" bgcolor="#E8F2F8"{{!}}3 | ||
{{!}}width="200px" height="70px" align="center" bgcolor="#E8F2F8"{{!}}[[Deathbine]] | {{!}}width="200px" height="70px" align="center" bgcolor="#E8F2F8"{{!}}[[Deathbine]] | ||
{{!}}width="200px" height="70px" align="center" bgcolor="#E8F2F8"{{!}}[[Tiquanda]] | {{!}}width="200px" height="70px" align="center" bgcolor="#E8F2F8"{{!}}[[Tiquanda]] ({{mapa|32722,32762,8:2|aqui}}) | ||
{{!}}- | {{!}}- | ||
{{!}}width="200px" height="70px" align="center" bgcolor="#CEDFF2"{{!}}[[Crocodile]] | {{!}}width="200px" height="70px" align="center" bgcolor="#CEDFF2"{{!}}[[Crocodile]] | ||
| Linha 218: | Linha 185: | ||
{{!}}width="200px" height="70px" align="center" bgcolor="#E8F2F8"{{!}}1 | {{!}}width="200px" height="70px" align="center" bgcolor="#E8F2F8"{{!}}1 | ||
{{!}}width="200px" height="70px" align="center" bgcolor="#E8F2F8"{{!}}[[The Snapper]] | {{!}}width="200px" height="70px" align="center" bgcolor="#E8F2F8"{{!}}[[The Snapper]] | ||
{{!}}width="200px" height="70px" align="center" bgcolor="#E8F2F8"{{!}}[[Tiquanda]] | {{!}}width="200px" height="70px" align="center" bgcolor="#E8F2F8"{{!}}[[Tiquanda]] ({{mapa|32608,32714,8:2|aqui}}) | ||
{{!}}- | {{!}}- | ||
{{!}}width="200px" height="70px" align="center" bgcolor="#CEDFF2"{{!}}[[Gargoyle]] | {{!}}width="200px" height="70px" align="center" bgcolor="#CEDFF2"{{!}}[[Gargoyle]] | ||
| Linha 242: | Linha 209: | ||
{{!}}width="200px" height="70px" align="center" bgcolor="#E8F2F8"{{!}}3 | {{!}}width="200px" height="70px" align="center" bgcolor="#E8F2F8"{{!}}3 | ||
{{!}}width="200px" height="70px" align="center" bgcolor="#E8F2F8"{{!}}[[The Bloodtusk]] | {{!}}width="200px" height="70px" align="center" bgcolor="#E8F2F8"{{!}}[[The Bloodtusk]] | ||
{{!}}width="200px" height="70px" align="center" bgcolor="#E8F2F8"{{!}}[[Svargrond]] | {{!}}width="200px" height="70px" align="center" bgcolor="#E8F2F8"{{!}}[[Svargrond]] ({{mapa|32104,31116,2:2|aqui}}) | ||
{{!}}- | {{!}}- | ||
{{!}}width="200px" height="70px" align="center" bgcolor="#CEDFF2"{{!}} | {{!}}width="200px" height="70px" align="center" bgcolor="#CEDFF2"{{!}}Primatas | ||
{{!}}width="200px" height="70px" align="center" bgcolor="#E8F2F8"{{!}}[[Arquivo:Kongra.gif|link=]] | {{!}}width="200px" height="70px" align="center" bgcolor="#E8F2F8"{{!}}[[Arquivo:Kongra.gif|link=]] | ||
{{!}}width="200px" height="70px" align="center" bgcolor="#E8F2F8"{{!}}300 | {{!}}width="200px" height="70px" align="center" bgcolor="#E8F2F8"{{!}}300 | ||
| Linha 266: | Linha 233: | ||
{{!}}width="200px" height="70px" align="center" bgcolor="#E8F2F8"{{!}}2 | {{!}}width="200px" height="70px" align="center" bgcolor="#E8F2F8"{{!}}2 | ||
{{!}}width="200px" height="70px" align="center" bgcolor="#E8F2F8"{{!}}[[Hide]] | {{!}}width="200px" height="70px" align="center" bgcolor="#E8F2F8"{{!}}[[Hide]] | ||
{{!}}width="200px" height="70px" align="center" bgcolor="#E8F2F8"{{!}}[[Tiquanda]] | {{!}}width="200px" height="70px" align="center" bgcolor="#E8F2F8"{{!}}[[Tiquanda]] ({{mapa|32822,32693,8:2|aqui}}) | ||
{{!}}- | {{!}}- | ||
{{!}}width="200px" height="70px" align="center" bgcolor="#CEDFF2"{{!}}[[Terramite]] | {{!}}width="200px" height="70px" align="center" bgcolor="#CEDFF2"{{!}}[[Terramite]] | ||
| Linha 284: | Linha 251: | ||
{{!}}width="200px" height="70px" align="center" bgcolor="#E8F2F8"{{!}}-- | {{!}}width="200px" height="70px" align="center" bgcolor="#E8F2F8"{{!}}-- | ||
{{!}}} | {{!}}} | ||
<!--------------------------------- FIM DO TEXTO DO SPOILER P/ O BOTÂO Nº 01 ----------------------------------------------------> | |||
| imgBtn02 = Ancient Scarab | |||
</ | | imgBtnSize02 = 50 | ||
| txtBtn02 = Level 50-79 | |||
| tituloTxtBtn02 = Level 50-79 | |||
{{{!}}width="100%" height="35px" | | spoilerTxtBtn02 = | ||
<!------------------------------- INÍCIO DO TEXTO DO SPOILER P/ O BOTÂO Nº 02 ---------------------------------------------------> | |||
{{{!}}width="100%" height="35px" class="sortable" | |||
{{!}}- | {{!}}- | ||
!width="200px" align="center" bgcolor="#CEDFF2"{{!}}'''Task''' | |||
!width="200px" align="center" bgcolor="#CEDFF2"{{!}} | |||
!width="200px" align="center" bgcolor="#CEDFF2"{{!}}'''Quantidade''' | |||
!width="200px" align="center" bgcolor="#CEDFF2"{{!}}'''Experiência''' | |||
!width="200px" align="center" bgcolor="#CEDFF2"{{!}}'''Task Points''' | |||
!width="200px" align="center" bgcolor="#CEDFF2"{{!}}'''Boss''' | |||
!width="200px" align="center" bgcolor="#CEDFF2"{{!}}'''Localização''' | |||
{{!}}- | {{!}}- | ||
{{!}}width="200px" height="70px" align="center" bgcolor="#CEDFF2"{{!}}[[Ancient Scarab]] | {{!}}width="200px" height="70px" align="center" bgcolor="#CEDFF2"{{!}}[[Ancient Scarab]] | ||
| Linha 307: | Linha 274: | ||
{{!}}width="200px" height="70px" align="center" bgcolor="#E8F2F8"{{!}}2 | {{!}}width="200px" height="70px" align="center" bgcolor="#E8F2F8"{{!}}2 | ||
{{!}}width="200px" height="70px" align="center" bgcolor="#E8F2F8"{{!}}[[Fleshcrawler]] | {{!}}width="200px" height="70px" align="center" bgcolor="#E8F2F8"{{!}}[[Fleshcrawler]] | ||
{{!}}width="200px" height="70px" align="center" bgcolor="#E8F2F8"{{!}}[[ | {{!}}width="200px" height="70px" align="center" bgcolor="#E8F2F8"{{!}}[[Daramian Scarab Caves]] ({{mapa|33044,32794,11:2|aqui}}) | ||
{{!}}- | {{!}}- | ||
{{!}}width="200px" height="70px" align="center" bgcolor="#CEDFF2"{{!}}[[Bonebeast]] | {{!}}width="200px" height="70px" align="center" bgcolor="#CEDFF2"{{!}}[[Bonebeast]] | ||
| Linha 315: | Linha 282: | ||
{{!}}width="200px" height="70px" align="center" bgcolor="#E8F2F8"{{!}}2 | {{!}}width="200px" height="70px" align="center" bgcolor="#E8F2F8"{{!}}2 | ||
{{!}}width="200px" height="70px" align="center" bgcolor="#E8F2F8"{{!}}[[Ribstride]] | {{!}}width="200px" height="70px" align="center" bgcolor="#E8F2F8"{{!}}[[Ribstride]] | ||
{{!}}width="200px" height="70px" align="center" bgcolor="#E8F2F8"{{!}}[[Omruc Tomb]] | {{!}}width="200px" height="70px" align="center" bgcolor="#E8F2F8"{{!}}[[Ankrahmun Pharaoh Tombs (Peninsula)|Omruc Tomb]] ({{mapa|33109,32803,13:2|aqui}}) | ||
{{!}}- | {{!}}- | ||
{{!}}width="200px" height="70px" align="center" bgcolor="#CEDFF2"{{!}}[[Crystal Spider]] | {{!}}width="200px" height="70px" align="center" bgcolor="#CEDFF2"{{!}}[[Crystal Spider]] | ||
| Linha 323: | Linha 290: | ||
{{!}}width="200px" height="70px" align="center" bgcolor="#E8F2F8"{{!}}3 | {{!}}width="200px" height="70px" align="center" bgcolor="#E8F2F8"{{!}}3 | ||
{{!}}width="200px" height="70px" align="center" bgcolor="#E8F2F8"{{!}}[[The Bloodweb]] | {{!}}width="200px" height="70px" align="center" bgcolor="#E8F2F8"{{!}}[[The Bloodweb]] | ||
{{!}}width="200px" height="70px" align="center" bgcolor="#E8F2F8"{{!}}[[Svargrond]] | {{!}}width="200px" height="70px" align="center" bgcolor="#E8F2F8"{{!}}[[Svargrond]] ({{mapa|32122,31188,4:2|aqui}}) | ||
{{!}}- | {{!}}- | ||
{{!}}width="200px" height="70px" align="center" bgcolor="#CEDFF2"{{!}}[[Ice Golem]] | {{!}}width="200px" height="70px" align="center" bgcolor="#CEDFF2"{{!}}[[Ice Golem]] | ||
| Linha 331: | Linha 298: | ||
{{!}}width="200px" height="70px" align="center" bgcolor="#E8F2F8"{{!}}2 | {{!}}width="200px" height="70px" align="center" bgcolor="#E8F2F8"{{!}}2 | ||
{{!}}width="200px" height="70px" align="center" bgcolor="#E8F2F8"{{!}}[[Shardhead]] | {{!}}width="200px" height="70px" align="center" bgcolor="#E8F2F8"{{!}}[[Shardhead]] | ||
{{!}}width="200px" height="70px" align="center" bgcolor="#E8F2F8"{{!}}[[Svargrond]] | {{!}}width="200px" height="70px" align="center" bgcolor="#E8F2F8"{{!}}[[Svargrond]] ({{mapa|32141,31144,3:2|aqui}}) | ||
{{!}}- | {{!}}- | ||
{{!}}width="200px" height="70px" align="center" bgcolor="#CEDFF2"{{!}}[[Killer Caiman]] | {{!}}width="200px" height="70px" align="center" bgcolor="#CEDFF2"{{!}}[[Killer Caiman]] | ||
| Linha 355: | Linha 322: | ||
{{!}}width="200px" height="70px" align="center" bgcolor="#E8F2F8"{{!}}2 | {{!}}width="200px" height="70px" align="center" bgcolor="#E8F2F8"{{!}}2 | ||
{{!}}width="200px" height="70px" align="center" bgcolor="#E8F2F8"{{!}}[[Esmeralda]] | {{!}}width="200px" height="70px" align="center" bgcolor="#E8F2F8"{{!}}[[Esmeralda]] | ||
{{!}}width="200px" height="70px" align="center" bgcolor="#E8F2F8"{{!}}[[Yalahar]] | {{!}}width="200px" height="70px" align="center" bgcolor="#E8F2F8"{{!}}[[Yalahar]] ({{mapa|32758,31245,9:2|aqui}}) | ||
{{!}}- | {{!}}- | ||
{{!}}width="200px" height="70px" align="center" bgcolor="#CEDFF2"{{!}}[[Mutated Tiger]] | {{!}}width="200px" height="70px" align="center" bgcolor="#CEDFF2"{{!}}[[Mutated Tiger]] | ||
| Linha 365: | Linha 332: | ||
{{!}}width="200px" height="70px" align="center" bgcolor="#E8F2F8"{{!}}-- | {{!}}width="200px" height="70px" align="center" bgcolor="#E8F2F8"{{!}}-- | ||
{{!}}- | {{!}}- | ||
{{!}}width="200px" height="70px" align="center" bgcolor="#CEDFF2"{{!}} | {{!}}width="200px" height="70px" align="center" bgcolor="#CEDFF2"{{!}}Quara Scouts | ||
{{!}}width="200px" height="70px" align="center" bgcolor="#E8F2F8"{{!}}[[Arquivo:Quara | {{!}}width="200px" height="70px" align="center" bgcolor="#E8F2F8"{{!}}[[Arquivo:Quara Mantassin.gif|link=]] | ||
{{!}}width="200px" height="70px" align="center" bgcolor="#E8F2F8"{{!}}400 | {{!}}width="200px" height="70px" align="center" bgcolor="#E8F2F8"{{!}}400 | ||
{{!}}width="200px" height="70px" align="center" bgcolor="#E8F2F8"{{!}}10000 | {{!}}width="200px" height="70px" align="center" bgcolor="#E8F2F8"{{!}}10000 | ||
| Linha 389: | Linha 356: | ||
{{!}}width="200px" height="70px" align="center" bgcolor="#E8F2F8"{{!}}-- | {{!}}width="200px" height="70px" align="center" bgcolor="#E8F2F8"{{!}}-- | ||
{{!}}} | {{!}}} | ||
<!--------------------------------- FIM DO TEXTO DO SPOILER P/ O BOTÂO Nº 02 ----------------------------------------------------> | |||
| imgBtn03 = Giant Spider | |||
</ | | imgBtnSize03 = 50 | ||
| txtBtn03 = Level 80-129 | |||
| tituloTxtBtn03 = Level 80-129 | |||
{{{!}}width="100%" height="35px" | | spoilerTxtBtn03 = | ||
<!------------------------------- INÍCIO DO TEXTO DO SPOILER P/ O BOTÂO Nº 03 ---------------------------------------------------> | |||
{{{!}}width="100%" height="35px" class="sortable" | |||
{{!}}- | {{!}}- | ||
!width="200px" align="center" bgcolor="#CEDFF2"{{!}}'''Task''' | |||
!width="200px" align="center" bgcolor="#CEDFF2"{{!}} | |||
!width="200px" align="center" bgcolor="#CEDFF2"{{!}}'''Quantidade''' | |||
!width="200px" align="center" bgcolor="#CEDFF2"{{!}}'''Experiência''' | |||
!width="200px" align="center" bgcolor="#CEDFF2"{{!}}'''Task Points''' | |||
!width="200px" align="center" bgcolor="#CEDFF2"{{!}}'''Boss''' | |||
!width="200px" align="center" bgcolor="#CEDFF2"{{!}}'''Localização''' | |||
{{!}}- | {{!}}- | ||
{{!}}width="200px" height="70px" align="center" bgcolor="#CEDFF2"{{!}}[[Brimstone Bug]] | {{!}}width="200px" height="70px" align="center" bgcolor="#CEDFF2"{{!}}[[Brimstone Bug]] | ||
| Linha 412: | Linha 379: | ||
{{!}}width="200px" height="70px" align="center" bgcolor="#E8F2F8"{{!}}3 | {{!}}width="200px" height="70px" align="center" bgcolor="#E8F2F8"{{!}}3 | ||
{{!}}width="200px" height="70px" align="center" bgcolor="#E8F2F8"{{!}}[[Sulphur Scuttler]] | {{!}}width="200px" height="70px" align="center" bgcolor="#E8F2F8"{{!}}[[Sulphur Scuttler]] | ||
{{!}}width="200px" height="70px" align="center" bgcolor="#E8F2F8"{{!}}[[Zao]] | {{!}}width="200px" height="70px" align="center" bgcolor="#E8F2F8"{{!}}[[Zao]] ({{mapa|33286,31112,8:2|aqui}}) | ||
{{!}}- | {{!}}- | ||
{{!}}width="200px" height="70px" align="center" bgcolor="#CEDFF2"{{!}}[[Giant Spider]] | {{!}}width="200px" height="70px" align="center" bgcolor="#CEDFF2"{{!}}[[Giant Spider]] | ||
| Linha 420: | Linha 387: | ||
{{!}}width="200px" height="70px" align="center" bgcolor="#E8F2F8"{{!}}3 | {{!}}width="200px" height="70px" align="center" bgcolor="#E8F2F8"{{!}}3 | ||
{{!}}width="200px" height="70px" align="center" bgcolor="#E8F2F8"{{!}}[[The Old Widow]] | {{!}}width="200px" height="70px" align="center" bgcolor="#E8F2F8"{{!}}[[The Old Widow]] | ||
{{!}}width="200px" height="70px" align="center" bgcolor="#E8F2F8"{{!}}[[Plains of Havoc]] | {{!}}width="200px" height="70px" align="center" bgcolor="#E8F2F8"{{!}}[[Plains of Havoc]] ({{mapa|32814,32280,8:2|aqui}}) | ||
{{!}}- | {{!}}- | ||
{{!}}width="200px" height="70px" align="center" bgcolor="#CEDFF2"{{!}}[[Hellspawn]] | {{!}}width="200px" height="70px" align="center" bgcolor="#CEDFF2"{{!}}[[Hellspawn]] | ||
| Linha 428: | Linha 395: | ||
{{!}}width="200px" height="70px" align="center" bgcolor="#E8F2F8"{{!}}4 | {{!}}width="200px" height="70px" align="center" bgcolor="#E8F2F8"{{!}}4 | ||
{{!}}width="200px" height="70px" align="center" bgcolor="#E8F2F8"{{!}}[[Flameborn]] | {{!}}width="200px" height="70px" align="center" bgcolor="#E8F2F8"{{!}}[[Flameborn]] | ||
{{!}}width="200px" height="70px" align="center" bgcolor="#E8F2F8"{{!}}[[Yalahar]] | {{!}}width="200px" height="70px" align="center" bgcolor="#E8F2F8"{{!}}[[Yalahar]] ({{mapa|32816,31026,7:2|aqui}}) | ||
{{!}}- | {{!}}- | ||
{{!}}width="200px" height="70px" align="center" bgcolor="#CEDFF2"{{!}} | {{!}}width="200px" height="70px" align="center" bgcolor="#CEDFF2"{{!}}High Class Lizards | ||
{{!}}width="200px" height="70px" align="center" bgcolor="#E8F2F8"{{!}}[[Arquivo:Lizard Zaogun.gif|link=]] | {{!}}width="200px" height="70px" align="center" bgcolor="#E8F2F8"{{!}}[[Arquivo:Lizard Zaogun.gif|link=]] | ||
{{!}}width="200px" height="70px" align="center" bgcolor="#E8F2F8"{{!}}800 | {{!}}width="200px" height="70px" align="center" bgcolor="#E8F2F8"{{!}}800 | ||
| Linha 436: | Linha 403: | ||
{{!}}width="200px" height="70px" align="center" bgcolor="#E8F2F8"{{!}}3 | {{!}}width="200px" height="70px" align="center" bgcolor="#E8F2F8"{{!}}3 | ||
{{!}}width="200px" height="70px" align="center" bgcolor="#E8F2F8"{{!}}[[Fazzrah]] | {{!}}width="200px" height="70px" align="center" bgcolor="#E8F2F8"{{!}}[[Fazzrah]] | ||
{{!}}width="200px" height="70px" align="center" bgcolor="#E8F2F8"{{!}}[[Zao]] | {{!}}width="200px" height="70px" align="center" bgcolor="#E8F2F8"{{!}}[[Zao]] ({{mapa|33310,31183,7:2|aqui}}) | ||
{{!}}- | {{!}}- | ||
{{!}}width="200px" height="70px" align="center" bgcolor="#CEDFF2"{{!}}[[Mutated Bat]] | {{!}}width="200px" height="70px" align="center" bgcolor="#CEDFF2"{{!}}[[Mutated Bat]] | ||
| Linha 444: | Linha 411: | ||
{{!}}width="200px" height="70px" align="center" bgcolor="#E8F2F8"{{!}}2 | {{!}}width="200px" height="70px" align="center" bgcolor="#E8F2F8"{{!}}2 | ||
{{!}}width="200px" height="70px" align="center" bgcolor="#E8F2F8"{{!}}[[Bruise Payne]] | {{!}}width="200px" height="70px" align="center" bgcolor="#E8F2F8"{{!}}[[Bruise Payne]] | ||
{{!}}width="200px" height="70px" align="center" bgcolor="#E8F2F8"{{!}}[[Yalahar]] | {{!}}width="200px" height="70px" align="center" bgcolor="#E8F2F8"{{!}}[[Yalahar]] ({{mapa|32679,31114,3:2|aqui}}) | ||
{{!}}- | {{!}}- | ||
{{!}}width="200px" height="70px" align="center" bgcolor="#CEDFF2"{{!}}[[Nightmare]] | {{!}}width="200px" height="70px" align="center" bgcolor="#CEDFF2"{{!}}[[Nightmare]] | ||
| Linha 452: | Linha 419: | ||
{{!}}width="200px" height="70px" align="center" bgcolor="#E8F2F8"{{!}}3 | {{!}}width="200px" height="70px" align="center" bgcolor="#E8F2F8"{{!}}3 | ||
{{!}}width="200px" height="70px" align="center" bgcolor="#E8F2F8"{{!}}[[Tormentor]] | {{!}}width="200px" height="70px" align="center" bgcolor="#E8F2F8"{{!}}[[Tormentor]] | ||
{{!}}width="200px" height="70px" align="center" bgcolor="#E8F2F8"{{!}}[[Svargrond]] | {{!}}width="200px" height="70px" align="center" bgcolor="#E8F2F8"{{!}}[[Svargrond]] ({{mapa|32072,31283,10:2|aqui}}) | ||
{{!}}- | {{!}}- | ||
{{!}}width="200px" height="70px" align="center" bgcolor="#CEDFF2"{{!}} | {{!}}width="200px" height="70px" align="center" bgcolor="#CEDFF2"{{!}}Quaras | ||
{{!}}width="200px" height="70px" align="center" bgcolor="#E8F2F8"{{!}}[[Arquivo:Quara | {{!}}width="200px" height="70px" align="center" bgcolor="#E8F2F8"{{!}}[[Arquivo:Quara Constrictor.gif|link=]] | ||
{{!}}width="200px" height="70px" align="center" bgcolor="#E8F2F8"{{!}}600 | {{!}}width="200px" height="70px" align="center" bgcolor="#E8F2F8"{{!}}600 | ||
{{!}}width="200px" height="70px" align="center" bgcolor="#E8F2F8"{{!}}15000 | {{!}}width="200px" height="70px" align="center" bgcolor="#E8F2F8"{{!}}15000 | ||
{{!}}width="200px" height="70px" align="center" bgcolor="#E8F2F8"{{!}}3 | {{!}}width="200px" height="70px" align="center" bgcolor="#E8F2F8"{{!}}3 | ||
{{!}}width="200px" height="70px" align="center" bgcolor="#E8F2F8"{{!}}[[Thul]] | {{!}}width="200px" height="70px" align="center" bgcolor="#E8F2F8"{{!}}[[Thul]] | ||
{{!}}width="200px" height="70px" align="center" bgcolor="#E8F2F8"{{!}}[[Calassa]] | {{!}}width="200px" height="70px" align="center" bgcolor="#E8F2F8"{{!}}[[Calassa]] ({{mapa|32085,32782,12:2|aqui}}) | ||
{{!}}- | {{!}}- | ||
{{!}}width="200px" height="70px" align="center" bgcolor="#CEDFF2"{{!}}[[Stampor]] | {{!}}width="200px" height="70px" align="center" bgcolor="#CEDFF2"{{!}}[[Stampor]] | ||
| Linha 468: | Linha 435: | ||
{{!}}width="200px" height="70px" align="center" bgcolor="#E8F2F8"{{!}}3 | {{!}}width="200px" height="70px" align="center" bgcolor="#E8F2F8"{{!}}3 | ||
{{!}}width="200px" height="70px" align="center" bgcolor="#E8F2F8"{{!}}[[Tromphonyte]] | {{!}}width="200px" height="70px" align="center" bgcolor="#E8F2F8"{{!}}[[Tromphonyte]] | ||
{{!}}width="200px" height="70px" align="center" bgcolor="#E8F2F8"{{!}}[[Zao]] | {{!}}width="200px" height="70px" align="center" bgcolor="#E8F2F8"{{!}}[[Zao]] ({{mapa|33136,31186,8:2|aqui}}) | ||
{{!}}- | {{!}}- | ||
{{!}}width="200px" height="70px" align="center" bgcolor="#CEDFF2"{{!}}[[Werewolf]] | {{!}}width="200px" height="70px" align="center" bgcolor="#CEDFF2"{{!}}[[Werewolf]] | ||
| Linha 476: | Linha 443: | ||
{{!}}width="200px" height="70px" align="center" bgcolor="#E8F2F8"{{!}}4 | {{!}}width="200px" height="70px" align="center" bgcolor="#E8F2F8"{{!}}4 | ||
{{!}}width="200px" height="70px" align="center" bgcolor="#E8F2F8"{{!}}[[Hemming]] | {{!}}width="200px" height="70px" align="center" bgcolor="#E8F2F8"{{!}}[[Hemming]] | ||
{{!}}width="200px" height="70px" align="center" bgcolor="#E8F2F8"{{!}}[[Vengoth]] | {{!}}width="200px" height="70px" align="center" bgcolor="#E8F2F8"{{!}}[[Vengoth]] ({{mapa|32992,31443,7:2|aqui}}) | ||
{{!}}} | {{!}}} | ||
<!--------------------------------- FIM DO TEXTO DO SPOILER P/ O BOTÂO Nº 03 ----------------------------------------------------> | |||
| imgBtn04 = Medusa | |||
</ | | imgBtnSize04 = 50 | ||
| txtBtn04 = Level 130+ | |||
| tituloTxtBtn04 = Level 130 | |||
| spoilerTxtBtn04 = | |||
<!------------------------------- INÍCIO DO TEXTO DO SPOILER P/ O BOTÂO Nº 04 ---------------------------------------------------> | |||
{{!}} | {{{!}}width="100%" height="35px" class="sortable" | ||
{{!}}- | {{!}}- | ||
!width="200px" align="center" bgcolor="#CEDFF2"{{!}}'''Task''' | |||
!width="200px" align="center" bgcolor="#CEDFF2"{{!}} | |||
!width="200px" align="center" bgcolor="#CEDFF2"{{!}}'''Quantidade''' | |||
!width="200px" align="center" bgcolor="#CEDFF2"{{!}}'''Experiência''' | |||
!width="200px" align="center" bgcolor="#CEDFF2"{{!}}'''Task Points''' | |||
!width="200px" align="center" bgcolor="#CEDFF2"{{!}}'''Boss''' | |||
!width="200px" align="center" bgcolor="#CEDFF2"{{!}}'''Localização''' | |||
{{!}}- | {{!}}- | ||
{{!}}width="200px" height="70px" align="center" bgcolor="#CEDFF2"{{!}}[[Behemoth]] | {{!}}width="200px" height="70px" align="center" bgcolor="#CEDFF2"{{!}}[[Behemoth]] | ||
| Linha 501: | Linha 468: | ||
{{!}}width="200px" height="70px" align="center" bgcolor="#E8F2F8"{{!}}4 | {{!}}width="200px" height="70px" align="center" bgcolor="#E8F2F8"{{!}}4 | ||
{{!}}width="200px" height="70px" align="center" bgcolor="#E8F2F8"{{!}}[[Stonecracker]] | {{!}}width="200px" height="70px" align="center" bgcolor="#E8F2F8"{{!}}[[Stonecracker]] | ||
{{!}}width="200px" height="70px" align="center" bgcolor="#E8F2F8"{{!}}[[Cyclopolis]] | {{!}}width="200px" height="70px" align="center" bgcolor="#E8F2F8"{{!}}[[Cyclopolis]] ({{mapa|33251,31719,14:2|aqui}}) | ||
{{!}}- | {{!}}- | ||
{{!}}width="200px" height="70px" align="center" bgcolor="#CEDFF2"{{!}}[[Destroyer]] | {{!}}width="200px" height="70px" align="center" bgcolor="#CEDFF2"{{!}}[[Destroyer]] | ||
| Linha 509: | Linha 476: | ||
{{!}}width="200px" height="70px" align="center" bgcolor="#E8F2F8"{{!}}4 | {{!}}width="200px" height="70px" align="center" bgcolor="#E8F2F8"{{!}}4 | ||
{{!}}width="200px" height="70px" align="center" bgcolor="#E8F2F8"{{!}}[[Bretzecutioner]] | {{!}}width="200px" height="70px" align="center" bgcolor="#E8F2F8"{{!}}[[Bretzecutioner]] | ||
{{!}}width="200px" height="70px" align="center" bgcolor="#E8F2F8"{{!}}[[Svargrond]] | {{!}}width="200px" height="70px" align="center" bgcolor="#E8F2F8"{{!}}[[Svargrond]] ({{mapa|32003,31189,10:2|aqui}}) | ||
{{!}}- | {{!}}- | ||
{{!}}width="200px" height="70px" align="center" bgcolor="#CEDFF2"{{!}} | {{!}}width="200px" height="70px" align="center" bgcolor="#CEDFF2"{{!}}Drakens | ||
{{!}}width="200px" height="70px" align="center" bgcolor="#E8F2F8"{{!}}[[Arquivo:Draken Elite.gif|link=]] | {{!}}width="200px" height="70px" align="center" bgcolor="#E8F2F8"{{!}}[[Arquivo:Draken Elite.gif|link=]] | ||
{{!}}width="200px" height="70px" align="center" bgcolor="#E8F2F8"{{!}}900 | {{!}}width="200px" height="70px" align="center" bgcolor="#E8F2F8"{{!}}900 | ||
| Linha 517: | Linha 484: | ||
{{!}}width="200px" height="70px" align="center" bgcolor="#E8F2F8"{{!}}3 | {{!}}width="200px" height="70px" align="center" bgcolor="#E8F2F8"{{!}}3 | ||
{{!}}width="200px" height="70px" align="center" bgcolor="#E8F2F8"{{!}}[[Paiz the Pauperizer]] | {{!}}width="200px" height="70px" align="center" bgcolor="#E8F2F8"{{!}}[[Paiz the Pauperizer]] | ||
{{!}}width="200px" height="70px" align="center" bgcolor="#E8F2F8"{{!}}[[Zao]] | {{!}}width="200px" height="70px" align="center" bgcolor="#E8F2F8"{{!}}[[Zao]] ({{mapa|33066,31103,2:2|aqui}}) | ||
{{!}}- | {{!}}- | ||
{{!}}width="200px" height="70px" align="center" bgcolor="#CEDFF2"{{!}}[[Ghastly Dragon]] | {{!}}width="200px" height="70px" align="center" bgcolor="#CEDFF2"{{!}}[[Ghastly Dragon]] | ||
| Linha 525: | Linha 492: | ||
{{!}}width="200px" height="70px" align="center" bgcolor="#E8F2F8"{{!}}5 | {{!}}width="200px" height="70px" align="center" bgcolor="#E8F2F8"{{!}}5 | ||
{{!}}width="200px" height="70px" align="center" bgcolor="#E8F2F8"{{!}}[[Ethershreck]] | {{!}}width="200px" height="70px" align="center" bgcolor="#E8F2F8"{{!}}[[Ethershreck]] | ||
{{!}}width="200px" height="70px" align="center" bgcolor="#E8F2F8"{{!}}[[Zao]] | {{!}}width="200px" height="70px" align="center" bgcolor="#E8F2F8"{{!}}[[Zao]] ({{mapa|33115,31004,8:2|aqui}}) | ||
{{!}}- | {{!}}- | ||
{{!}}width="200px" height="70px" align="center" bgcolor="#CEDFF2"{{!}}[[Hellhound]] | {{!}}width="200px" height="70px" align="center" bgcolor="#CEDFF2"{{!}}[[Hellhound]] | ||
| Linha 533: | Linha 500: | ||
{{!}}width="200px" height="70px" align="center" bgcolor="#E8F2F8"{{!}}5 | {{!}}width="200px" height="70px" align="center" bgcolor="#E8F2F8"{{!}}5 | ||
{{!}}width="200px" height="70px" align="center" bgcolor="#E8F2F8"{{!}}[[Kerberos]] | {{!}}width="200px" height="70px" align="center" bgcolor="#E8F2F8"{{!}}[[Kerberos]] | ||
{{!}}width="200px" height="70px" align="center" bgcolor="#E8F2F8"{{!}}[[Goroma]] | {{!}}width="200px" height="70px" align="center" bgcolor="#E8F2F8"{{!}}[[Goroma]] ({{mapa|32044,32547,14:2|aqui}}) | ||
{{!}}- | {{!}}- | ||
{{!}}width="200px" height="70px" align="center" bgcolor="#CEDFF2"{{!}}[[Hydra]] | {{!}}width="200px" height="70px" align="center" bgcolor="#CEDFF2"{{!}}[[Hydra]] | ||
| Linha 541: | Linha 508: | ||
{{!}}width="200px" height="70px" align="center" bgcolor="#E8F2F8"{{!}}3 | {{!}}width="200px" height="70px" align="center" bgcolor="#E8F2F8"{{!}}3 | ||
{{!}}width="200px" height="70px" align="center" bgcolor="#E8F2F8"{{!}}[[The Many]] | {{!}}width="200px" height="70px" align="center" bgcolor="#E8F2F8"{{!}}[[The Many]] | ||
{{!}}width="200px" height="70px" align="center" bgcolor="#E8F2F8"{{!}}[[Chor]] | {{!}}width="200px" height="70px" align="center" bgcolor="#E8F2F8"{{!}}[[Chor]] ({{mapa|32920,32883,8:2|aqui}}) | ||
{{!}}- | {{!}}- | ||
{{!}}width="200px" height="70px" align="center" bgcolor="#CEDFF2"{{!}}[[Medusa]] | {{!}}width="200px" height="70px" align="center" bgcolor="#CEDFF2"{{!}}[[Medusa]] | ||
| Linha 549: | Linha 516: | ||
{{!}}width="200px" height="70px" align="center" bgcolor="#E8F2F8"{{!}}5 | {{!}}width="200px" height="70px" align="center" bgcolor="#E8F2F8"{{!}}5 | ||
{{!}}width="200px" height="70px" align="center" bgcolor="#E8F2F8"{{!}}[[Gorgo]] | {{!}}width="200px" height="70px" align="center" bgcolor="#E8F2F8"{{!}}[[Gorgo]] | ||
{{!}}width="200px" height="70px" align="center" bgcolor="#E8F2F8"{{!}}[[ | {{!}}width="200px" height="70px" align="center" bgcolor="#E8F2F8"{{!}}[[Banuta]] ({{mapa|32799,32501,11:2|aqui}}) | ||
{{!}}- | {{!}}- | ||
{{!}}width="200px" height="70px" align="center" bgcolor="#CEDFF2"{{!}}[[Sea Serpent]]<br>&<br>[[Young Sea Serpent]] | {{!}}width="200px" height="70px" align="center" bgcolor="#CEDFF2"{{!}}[[Sea Serpent]]</br>&</br>[[Young Sea Serpent]] | ||
{{!}}width="200px" height="70px" align="center" bgcolor="#E8F2F8"{{!}}[[Arquivo:Sea Serpent.gif|link=]] | {{!}}width="200px" height="70px" align="center" bgcolor="#E8F2F8"{{!}}[[Arquivo:Sea Serpent.gif|link=]] | ||
{{!}}width="200px" height="70px" align="center" bgcolor="#E8F2F8"{{!}}900 | {{!}}width="200px" height="70px" align="center" bgcolor="#E8F2F8"{{!}}900 | ||
{{!}}width="200px" height="70px" align="center" bgcolor="#E8F2F8"{{!}}30000 | {{!}}width="200px" height="70px" align="center" bgcolor="#E8F2F8"{{!}}30000 | ||
{{!}}width="200px" height="70px" align="center" bgcolor="#E8F2F8"{{!}} | {{!}}width="200px" height="70px" align="center" bgcolor="#E8F2F8"{{!}}5 | ||
{{!}}width="200px" height="70px" align="center" bgcolor="#E8F2F8"{{!}}[[Leviathan]] | {{!}}width="200px" height="70px" align="center" bgcolor="#E8F2F8"{{!}}[[Leviathan]] | ||
{{!}}width="200px" height="70px" align="center" bgcolor="#E8F2F8"{{!}}[[Sea Serpent Area]] | {{!}}width="200px" height="70px" align="center" bgcolor="#E8F2F8"{{!}}[[Sea Serpent Area]] ({{mapa|31926,31071,10:2|aqui}}) | ||
{{!}}- | {{!}}- | ||
{{!}}width="200px" height="70px" align="center" bgcolor="#CEDFF2"{{!}}[[Serpent Spawn]] | {{!}}width="200px" height="70px" align="center" bgcolor="#CEDFF2"{{!}}[[Serpent Spawn]] | ||
| Linha 565: | Linha 532: | ||
{{!}}width="200px" height="70px" align="center" bgcolor="#E8F2F8"{{!}}4 | {{!}}width="200px" height="70px" align="center" bgcolor="#E8F2F8"{{!}}4 | ||
{{!}}width="200px" height="70px" align="center" bgcolor="#E8F2F8"{{!}}[[The Noxious Spawn]] | {{!}}width="200px" height="70px" align="center" bgcolor="#E8F2F8"{{!}}[[The Noxious Spawn]] | ||
{{!}}width="200px" height="70px" align="center" bgcolor="#E8F2F8"{{!}}[[ | {{!}}width="200px" height="70px" align="center" bgcolor="#E8F2F8"{{!}}[[Banuta]] ({{mapa|32842,32660,11:2|aqui}}) | ||
{{!}}- | {{!}}- | ||
{{!}}width="200px" height="70px" align="center" bgcolor="#CEDFF2"{{!}}[[Undead Dragon]] | {{!}}width="200px" height="70px" align="center" bgcolor="#CEDFF2"{{!}}[[Undead Dragon]] | ||
| Linha 573: | Linha 540: | ||
{{!}}width="200px" height="70px" align="center" bgcolor="#E8F2F8"{{!}}6 | {{!}}width="200px" height="70px" align="center" bgcolor="#E8F2F8"{{!}}6 | ||
{{!}}width="200px" height="70px" align="center" bgcolor="#E8F2F8"{{!}}[[Zanakeph]] | {{!}}width="200px" height="70px" align="center" bgcolor="#E8F2F8"{{!}}[[Zanakeph]] | ||
{{!}}width="200px" height="70px" align="center" bgcolor="#E8F2F8"{{!}}[[Zao]] | {{!}}width="200px" height="70px" align="center" bgcolor="#E8F2F8"{{!}}[[Zao]] ({{mapa|33095,31075,12:2|aqui}}) | ||
{{!}}} | {{!}}} | ||
<!--------------------------------- FIM DO TEXTO DO SPOILER P/ O BOTÂO Nº 04 ----------------------------------------------------> | |||
}} | |||
== Rotas para os Bosses == | == Rotas para os Bosses == | ||
{{Menu Quest | |||
| qtdBtn = 4 | |||
| altura = 15 | |||
| boss = não | |||
<!-------------------------------------------------------------------------------------------------------------------------------> | |||
| imgBtn01 = Map (Colour) | |||
| imgBtnSize01 = 32 | |||
| txtBtn01 = Mapas - Level 6-49 | |||
| tituloTxtBtn01 = Mapas - Level 6-49 | |||
| spoilerTxtBtn01 = | |||
<!------------------------------- INÍCIO DO TEXTO DO SPOILER P/ O BOTÂO Nº 01 ---------------------------------------------------> | |||
<span class="titulo-quest">'''The Snapper'''</span> [[Arquivo:Crocodile.gif|link=]]</br> | |||
<gallery mode="nolines" widths="246px" heights="246px"> | |||
<gallery mode="nolines"> | |||
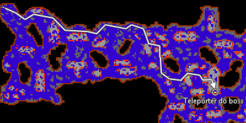
Arquivo:PaFHEQ Snapper Rota01.png|Partindo do depot de Port Hope, vá para o norte e desça na caverna indicada. | Arquivo:PaFHEQ Snapper Rota01.png|Partindo do depot de Port Hope, vá para o norte e desça na caverna indicada. | ||
Arquivo:PaFHEQ Snapper Rota02.png|O portal está logo ao sul. | Arquivo:PaFHEQ Snapper Rota02.png|O portal está logo ao sul. | ||
</gallery> | </gallery> | ||
< | <span class="titulo-quest">'''Hide'''</span> [[Arquivo:Hide.gif|link=]]</br> | ||
<gallery mode="nolines" widths="246px" heights="246px"> | |||
<gallery mode="nolines"> | |||
Arquivo:PaFHEQ Hide Rota01.png|Partindo do depot de Port Hope, ou do Grizzly Adams, vá para oeste, até chegar na segunda ponte improvisada. Dela, vá para o norte e desça na caverna indicada. | Arquivo:PaFHEQ Hide Rota01.png|Partindo do depot de Port Hope, ou do Grizzly Adams, vá para oeste, até chegar na segunda ponte improvisada. Dela, vá para o norte e desça na caverna indicada. | ||
Arquivo:PaFHEQ Hide Rota02.png|O portal está logo na entrada da caverna. | Arquivo:PaFHEQ Hide Rota02.png|O portal está logo na entrada da caverna. | ||
</gallery> | </gallery> | ||
< | <span class="titulo-quest">'''Deathbine'''</span> [[Arquivo:Deathbine.gif|link=]]</br> | ||
<gallery mode="nolines" widths="246px" heights="246px"> | |||
<gallery mode="nolines"> | |||
Arquivo:PaFHEQ Deathbine Rota01.png|Partindo do Grizzly Adams, vá para oeste e desça na caverna indicada. O portal está logo à esquerda. | Arquivo:PaFHEQ Deathbine Rota01.png|Partindo do Grizzly Adams, vá para oeste e desça na caverna indicada. O portal está logo à esquerda. | ||
</gallery> | </gallery> | ||
< | <span class="titulo-quest">'''The Bloodstusk'''</span> [[Arquivo:Mammoth.gif|link=]]</br> | ||
<gallery mode="nolines" widths="246px" heights="246px"> | |||
<gallery mode="nolines"> | Arquivo:The Ice Islands Rota Formorgar Mines 1-1-B.png|Do depot de Svargrond, vá para o norte, indo em direção ao tapete mágico. | ||
Arquivo:Rota Formorgar | |||
Arquivo:PaFHEQ The Bloodstusk Rota01.png|No andar em que tem a escada do tapete mágico, vá para oeste e use a magia [[Levitate]] 3 vezes no local indicado. | Arquivo:PaFHEQ The Bloodstusk Rota01.png|No andar em que tem a escada do tapete mágico, vá para oeste e use a magia [[Levitate]] 3 vezes no local indicado. | ||
Arquivo:PaFHEQ The Bloodstusk Rota02.png|Vá para o sudoeste, para encontrar o portal próximo da montanha. | Arquivo:PaFHEQ The Bloodstusk Rota02.png|Vá para o sudoeste, para encontrar o portal próximo da montanha. | ||
</gallery> | </gallery> | ||
<!--------------------------------- FIM DO TEXTO DO SPOILER P/ O BOTÂO Nº 01 ----------------------------------------------------> | |||
| imgBtn02 = Map (Colour) | |||
</ | | imgBtnSize02 = 32 | ||
| txtBtn02 = Mapas - Level 50-79 | |||
| tituloTxtBtn02 = Mapas - Level 50-79 | |||
< | | spoilerTxtBtn02 = | ||
<!------------------------------- INÍCIO DO TEXTO DO SPOILER P/ O BOTÂO Nº 02 ---------------------------------------------------> | |||
Você precisará do acesso a [[ | <span class="titulo-quest">'''Esmeralda'''</span> [[Arquivo:Esmeralda.gif|link=]]</br> | ||
<gallery mode="nolines"> | Você precisará do acesso a [[Yalahar]]. | ||
<gallery mode="nolines" widths="246px" heights="246px"> | |||
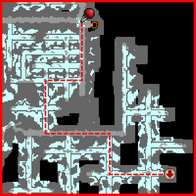
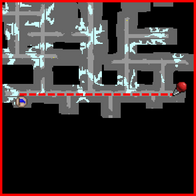
Arquivo:PaFHEQ The Esmeralda Rota01.png|Do depot de Yalahar, vá até os esgostos, entrando pelo [[sewer]] um pouco ao norte da entrada. | Arquivo:PaFHEQ The Esmeralda Rota01.png|Do depot de Yalahar, vá até os esgostos, entrando pelo [[sewer]] um pouco ao norte da entrada. | ||
Arquivo:PaFHEQ The Esmeralda Rota02.png|Siga a rota indicada e desça a escada. Após descer, basta ir para o sul por este único caminho para chegar ao portal. | Arquivo:PaFHEQ The Esmeralda Rota02.png|Siga a rota indicada e desça a escada. Após descer, basta ir para o sul por este único caminho para chegar ao portal. | ||
</gallery> | </gallery> | ||
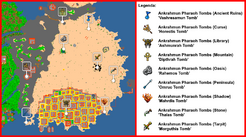
< | <span class="titulo-quest">'''Ribstride'''</span> [[Arquivo:Ribstride.gif|link=]]</br> | ||
<gallery mode="nolines" widths="246px" heights="246px"> | |||
<gallery mode="nolines"> | Arquivo:Tumbas de Ankrahmun.png|Vá para Ormuc Tomb, ela fica à oeste de [[Ankrahmun]]. | ||
Arquivo:Tumbas de Ankrahmun.png|Vá para Ormuc Tomb, ela fica à oeste de [[ | |||
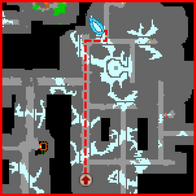
Arquivo:PaFHEQ Ribstride Rota01.png|Você deverá descer várias escadas que estão umas próximas das outras, até chegar neste andar. Você deve seguir o caminho para chegar no teleporter da tumba. Você precisará de um [[Scarab Coin]]. | Arquivo:PaFHEQ Ribstride Rota01.png|Você deverá descer várias escadas que estão umas próximas das outras, até chegar neste andar. Você deve seguir o caminho para chegar no teleporter da tumba. Você precisará de um [[Scarab Coin]]. | ||
Arquivo:PaFHEQ Ribstride Rota02.png|Após atravessar o teleporter do scarab coin, siga a rota indicada para chegar no portal do boss. | Arquivo:PaFHEQ Ribstride Rota02.png|Após atravessar o teleporter do scarab coin, siga a rota indicada para chegar no portal do boss. | ||
</gallery> | </gallery> | ||
< | <span class="titulo-quest">'''The Bloodweb'''</span> [[Arquivo:The Bloodweb.gif|link=]]</br> | ||
<gallery mode="nolines" widths="246px" heights="246px"> | |||
<gallery mode="nolines"> | Arquivo:The Ice Islands Rota Formorgar Mines 1-1-B.png|Do depot de Svargrond, vá para o norte, indo em direção ao tapete mágico. | ||
Arquivo:Rota Formorgar | Arquivo:BloodWeb Caminho 1.png|No andar em que tem a escada do tapete mágico, vá para oeste suba a rampa. | ||
Arquivo: | |||
Arquivo:PaFHEQ The Bloodweb Rota01.png|Ao subir, vá para o sul, seguindo o caminho indicado. Você precisará subir e descer por outro lado para chegar no portal do boss. Há Crystal Spiders próximo ao portal. | Arquivo:PaFHEQ The Bloodweb Rota01.png|Ao subir, vá para o sul, seguindo o caminho indicado. Você precisará subir e descer por outro lado para chegar no portal do boss. Há Crystal Spiders próximo ao portal. | ||
</gallery> | </gallery> | ||
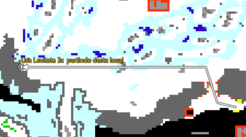
< | <span class="titulo-quest">'''Shardhead'''</span> [[Arquivo:Shardhead.gif|link=]]</br> | ||
<gallery mode="nolines"> | <gallery mode="nolines" widths="246px" heights="246px"> | ||
Arquivo:Shardhead01.png | Arquivo:Shardhead01.png | ||
Arquivo:Shardhead02.png | Arquivo:Shardhead02.png | ||
| Linha 682: | Linha 616: | ||
Arquivo:Shardhead04.png | Arquivo:Shardhead04.png | ||
</gallery> | </gallery> | ||
<!--------------------------------- FIM DO TEXTO DO SPOILER P/ O BOTÂO Nº 02 ----------------------------------------------------> | |||
| imgBtn03 = Map (Colour) | |||
</ | | imgBtnSize03 = 32 | ||
| txtBtn03 = Mapas - Level 80-129 | |||
| tituloTxtBtn03 = Mapas - Level 80-129 | |||
< | | spoilerTxtBtn03 = | ||
<!------------------------------- INÍCIO DO TEXTO DO SPOILER P/ O BOTÂO Nº 03 ---------------------------------------------------> | |||
<gallery mode="nolines"> | <span class="titulo-quest">'''Bruise Payne'''</span> [[Arquivo:Bruise Payne.gif|link=]]</br> | ||
<gallery mode="nolines" widths="246px" heights="246px"> | |||
Arquivo:Bruise_Payne_map.png|[[Yalahar]] | Arquivo:Bruise_Payne_map.png|[[Yalahar]] | ||
</gallery> | </gallery> | ||
< | <span class="titulo-quest">'''Fazzrah'''</span> [[Arquivo:Fazzrah.gif|link=]]</br> | ||
O acesso a este boss foi realocado para Muggy Plains. | O acesso a este boss foi realocado para Muggy Plains. | ||
<gallery mode="nolines"> | <gallery mode="nolines" widths="246px" heights="246px"> | ||
Arquivo:Novo_TP_Fazzrah.png|[[Muggy Plains]]. | Arquivo:Novo_TP_Fazzrah.png|[[Muggy Plains]]. | ||
</gallery> | </gallery> | ||
< | <span class="titulo-quest">'''Hemming'''</span> [[Arquivo:Hemming.gif|link=]]</br> | ||
Para acessar Vengoth, onde encontra-se este boss, é necessário haver ao menos iniciado a missão 4 da [[Blood Brothers Quest]]. | |||
<gallery mode="nolines"> | <gallery mode="nolines" widths="246px" heights="246px"> | ||
Arquivo:Hemming01.png|[[Vengoth]] | Arquivo:Hemming01.png|[[Vengoth]] | ||
</gallery> | </gallery> | ||
< | <span class="titulo-quest">'''Thul'''</span> [[Arquivo:Thul.gif|link=]]</br> | ||
Para chegar no boss, você precisará no mínimo da missão de Calassa da [[The Explorer Society Quest]] aberta para poder viajar para lá. Em [[Liberty Bay]], vá até o [[Captain Max]] e fale "Calassa". Ele te levará até o local. | |||
<gallery mode="nolines" widths="246px" heights="246px"> | |||
<gallery mode="nolines"> | |||
Arquivo:Orientaoutfit3.jpg|Você precisará de um [[Helmet of the Deep]] para poder entrar na área submersa. | Arquivo:Orientaoutfit3.jpg|Você precisará de um [[Helmet of the Deep]] para poder entrar na área submersa. | ||
Arquivo:PaFHEQ Thul Rota01.png|Ao entrar na área você deverá ir pelo caminho indicado, com calma, pois há uma grande quantidade de criaturas. Chamar um amigo para ajudar pode ser uma boa opção. | Arquivo:PaFHEQ Thul Rota01.png|Ao entrar na área você deverá ir pelo caminho indicado, com calma, pois há uma grande quantidade de criaturas. Chamar um amigo para ajudar pode ser uma boa opção. | ||
</gallery> | </gallery> | ||
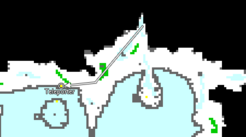
< | <span class="titulo-quest">'''Tormentor'''</span> [[Arquivo:Tormentor.gif|link=]]</br> | ||
Para chegar neste boss, você precisará saber a [[Rota:Formorgar Mines|rota para Formorgar Mines]] e o acesso às minas através da [[The Ice Islands Quest]]. Após atravessar a porta, você poderá seguir o caminho abaixo. | |||
<gallery mode="nolines" caption="Rota: Caminho Regular" widths="196px" heights="196px"> | |||
<gallery mode="nolines"> | Arquivo:The Ice Islands Formorgar Mines Hoist 1-1-A.png | ||
Arquivo: | Arquivo:The Ice Islands Paw & Fur Tormentor 1-1-A.png | ||
</gallery> | </gallery> | ||
<gallery mode="nolines" caption="Rota: Halls of Hope" widths="196px" heights="196px"> | |||
</ | Arquivo:The Ice Islands Quest Formorgar Mines 1-1-C.png | ||
Arquivo:The Ice Islands Quest Formorgar Mines 1-2-D.png | |||
Arquivo:The Ice Islands Formorgar Mines Hoist 1-3-B.png | |||
Arquivo:The Ice Islands Paw & Fur Tormentor 1-1-A.png | |||
</gallery> | |||
<!--------------------------------- FIM DO TEXTO DO SPOILER P/ O BOTÂO Nº 03 ----------------------------------------------------> | |||
| imgBtn04 = Map (Colour) | |||
| imgBtnSize04 = 32 | |||
| txtBtn04 = Mapas - Level 130+ | |||
| tituloTxtBtn04 = Mapas - Level 130 | |||
| spoilerTxtBtn04 = | |||
<!------------------------------- INÍCIO DO TEXTO DO SPOILER P/ O BOTÂO Nº 04 ---------------------------------------------------> | |||
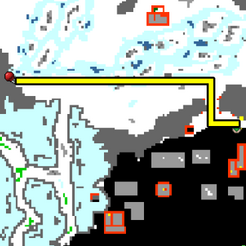
<span class="titulo-quest">'''Bretzecutioner'''</span> [[Arquivo:Bretzecutioner.gif|link=]]</br> | |||
Para chegar neste boss, você precisará saber a [[Rota:Formorgar Mines|rota para formorgar mines]] e o acesso a mina ([[The Ice Islands Quest]]). Após atravessar a porta, você poderá seguir o caminho abaixo. Há muitas criaturas perigosas, como [[Nightmare]]s, [[Destroyer]]s, [[Lost Soul]]s, [[Crystal Spider]]s, vários tipos de "Cults", podendo encontrar até [[Demon]]s. | |||
< | <gallery mode="nolines" caption="Rota: Caminho Regular" widths="196px" heights="196px"> | ||
Arquivo:The Ice Islands Quest Formorgar Mines 1-1-A.png | |||
Arquivo:The Ice Islands Quest Formorgar Mines 4-1-A.png | |||
Arquivo:The Ice Islands Formorgar Mines Hoist 1-5-A.png | |||
Arquivo:The Ice Islands Paw & Fur Bretzecutioner 1-1-A.png | |||
</gallery> | |||
<gallery mode="nolines"> | <gallery mode="nolines" caption="Rota: Halls of Hope" widths="196px" heights="196px"> | ||
Arquivo: | Arquivo:The Ice Islands Quest Formorgar Mines 1-1-C.png | ||
Arquivo: | Arquivo:The Ice Islands Quest Formorgar Mines 4-1-C.png | ||
Arquivo: | Arquivo:The Ice Islands Formorgar Mines Hoist 1-5-A.png | ||
Arquivo: | Arquivo:The Ice Islands Paw & Fur Bretzecutioner 1-1-A.png | ||
</gallery> | </gallery> | ||
< | <span class="titulo-quest">'''Kerberos'''</span> [[Arquivo:Kerberos.gif|link=]]</br> | ||
O portal que leva ao boss está nas profundidades de [[Goroma]]. A entrada da caverna é ({{mapa|32097, | O portal que leva ao boss está nas profundidades de [[Goroma]]. A entrada da caverna é ({{mapa|32097,32631,7:2|aqui}}). | ||
<gallery mode="nolines"> | |||
Arquivo: | <gallery mode="nolines" widths="196px" heights="196px"> | ||
Arquivo:Morgaroth World Raid Mapa 1-1.png | |||
Arquivo:Morgaroth World Raid Mapa 1-2.png | |||
Arquivo:Morgaroth World Raid Mapa 1-3.png | |||
Arquivo:Morgaroth World Raid Mapa 1-4.png | |||
Arquivo:Morgaroth World Raid Mapa 1-5.png | |||
Arquivo:Morgaroth World Raid Mapa 1-6.png | |||
Arquivo:Morgaroth World Raid Mapa 1-7.png | |||
Arquivo:Morgaroth World Raid Mapa 1-8.png | |||
Arquivo:Morgaroth World Raid Mapa 1-9-B.png | |||
Arquivo:Morgaroth World Raid Mapa 1-10-B.png | |||
</gallery> | </gallery> | ||
<!--------------------------------- FIM DO TEXTO DO SPOILER P/ O BOTÂO Nº 04 ----------------------------------------------------> | |||
}} | |||
== Transcrições == | |||
= Transcrições = | |||
Você pode encontrar todas as transcrições dos diálogos na página [[Paw and Fur - Hunting Elite Quest/Transcrições]]. | Você pode encontrar todas as transcrições dos diálogos na página [[Paw and Fur - Hunting Elite Quest/Transcrições]]. | ||
}} | }} | ||

Edição atual tal como às 18h23min de 28 de março de 2025
|
|
||||||||||||||||||||||||
| Recompensa: Experiência, Dinheiro, Achievements, habilidade de matar bosses, começar outra quest e negociar com NPC Grizzly Adams. |
||||||||||||||||||||||||
| Localização: Port Hope, na Paw and Fur Society, (aqui |
||||||||||||||||||||||||
| Você enfrentará: Muitas criaturas. |
||||||||||||||||||||||||
| Mini-Bosses: Nenhum. |
||||||||||||||||||||||||
| Bosses: Nenhum. |
||||||||||||||||||||||||
| Adicionado: Versão 8.5 (01 de julho de 2009) |
||||||||||||||||||||||||
|
||||||||||||||||||||||||
|
||||||||||||||||||||||||

Veja também: Quests.
Método
Iniciando Tasks
- Você deve ir até o NPC Grizzly Adams, (aqui
 ), aceitar o convite para fazer parte da Paw & Fur Society e pedir por task ou mission;
 - Você pode ter, no máximo, três tasks abertas;
- Você só pode fazer uma tarefa três vezes enquanto estiver na faixa de level requerida, com exceção das task do 130+;
- Para cada tarefa completada, você receberá Paw & Fur Points ou Task Points, que servirão para você subir de rank na quest (tanto as tarefas com boss ou sem, ganham os task points);
- Ao terminar uma tarefa que possui um boss, você ganhará além dos Task Points uma missão do Grizzly Adams para você matar o boss daquela tarefa.
- Caso você tenha atingido o rank máximo de sua faixa de level, cada task completa dessa faixa irá lhe dar 1 boss point, que poderá ser usado falando boss para o NPC, permitindo que você mate qualquer boss de sua faixa de level atual e das anteriores, desde que você tenha feito pelo menos alguma tarefa da faixa de level. (Muitos players costumam juntar boss points nas tasks de níveis mais baixos e usá-los para matar os bosses de tasks mais difíceis dos leveis acima).
- Atenção: Não é possível acumular uma quantidade muito grande de boss points para usar no futuro. Você não poderá se promover ao rank máximo da sua faixa de level caso tenha boss points acumulados. Será necessário gastá-los antes de pedir a promoção. (exemplo: Suponhamos que você é level 70 com 40 Paw and Fur points e tem 3 boss points que adquiriu antes do level 50 e nunca usou. Você terá que gastar os 3 boss points para que Grizzly Adams possa lhe promover ou dar outras tasks da mesma faixa de level.)
- Para acompanhar os Task Points e Boss Points do personagem, entre no Quest Log, selecione a opção Killing in the name of..., selecione a opção Paw and Fur - Hunting Elite. As pontuações serão informadas na parte inferior da janela;

- No level 130+ e com 100 Paw & Fur Points, você pode matar os bosses de ranks inferiores uma vez e desde que não o tenha matado anteriormente, sem usar seus Boss Points. Para isso, é necessário ter feito pelo menos uma tarefa desse level;
- Personagens de level 130+ que terminarem uma tarefa receberão pontos extra conforme seus Task Points:
- possuírem menos de 20 Paw & Fur Points, receberão 3 pontos bônus;
- possuírem menos de 40 Paw & Fur Points, receberão 2 pontos bônus;
- possuírem menos de 70 Paw & Fur Points, receberão 1 ponto bônus.
| Nota: Ao completar 100 Paw & Fur Points você pode pedir todos os bosses de ranks inferiores ao seu. Observe que você só poderá matar aqueles que ainda não matou, e além disso é necessário pelo menos 1 Boss Point para poder fazer isto. |
Sistema de Ranks
| Rank | Requisitos | Recompensas | ||
|---|---|---|---|---|
| Task Points | Level | Experiência | Habilidades | |
| Huntsman | 10 | 6 | 5 000 | Habilidade de comprar Slingshots e de vender Cyclops Trophies, Minotaur Trophies e alguns Produtos de Criaturas para o Grizzly Adams |
| Ranger | 20 | 6 | 8 000 | Habilidade de viajar com Lorek para Banuta, Chor e para perto das Kha'zeel Mountains |
| Big Game Hunter | 40 | 50 | 10 000 | Habilidade de vender Deer Trophies, Lion Trophies, Wolf Trophies e Bonebeast Trophies |
| Trophy Hunter | 70 | 80 (100 para Demodras) | 15 000 | Habilidade de vender Demon Trophies, Behemoth Trophies, Dragon Lord Trophies, Werebadger Trophies, Werebear Trophies, Wereboar Trophies, Werefox Trophies, de comprar Demon Backpacks e de fazer as tarefas especiais da Tiquandas Revenge e do Demodras (level 100). |
| Elite Hunter | 100 | 130 | 30 000 | Habilidade de fazer a tarefa especial dos Demons. |
| Tasks Especiais | ||||
| Task | Requisitos | Recompensa | ||
| Level | Rank | |||
| Tiquandas Revenge | 
|
90 | Trophy Hunter | Enfrentar a Tiquandas Revenge |
| Demodras | 
|
100 | Trophy Hunter | Enfrentar o Demodras |
| 6666 Demons | 
|
130 | Elite Hunter | Começar a missão The Demon Oak da The Ultimate Challenges Quest. |
|
Cancelando Tasks
Você pode a qualquer momento cancelar uma task que não lhe agrade. Para isto, você deve ter três task em aberto. Caso você tenha três task e queria cancelar uma para pegar outra, basta ir no NPC Grizzly Adams e falar:
 |
Personagem: Hi
Grizzly Adams: Welcome to the 'Paw and Fur - Hunting Elite' <personagem>. Feel free to do tasks for us. |
Agora você pode escolher outra task para fazer, desde que não tenha sido feita três vezes e esteja na sua faixa de level.
Hunting Tasks
|
|
|
|


| Task | Quantidade | Experiência | Task Points | Boss | Localização | |
|---|---|---|---|---|---|---|
| Badger | 
|
300 | 500 | 1 | -- | -- |
| Carniphila | 
|
150 | 2500 | 3 | Deathbine | Tiquanda (aqui |
| Crocodile | 
|
300 | 800 | 1 | The Snapper | Tiquanda (aqui |
| Gargoyle | 
|
200 | 1500 | 2 | -- | -- |
| Gnarlhound | 
|
300 | 1000 | 2 | -- | -- |
| Mammoth | 
|
300 | 5000 | 3 | The Bloodtusk | Svargrond (aqui |
| Primatas | 
|
300 | 1000 | 2 | -- | -- |
| Stone Golem | 
|
200 | 2000 | 3 | -- | -- |
| Tarantula | 
|
300 | 1500 | 2 | Hide | Tiquanda (aqui |
| Terramite | 
|
300 | 2500 | 2 | -- | -- |
| Thornback Tortoise | 
|
300 | 1500 | 2 | -- | -- |
| Task | Quantidade | Experiência | Task Points | Boss | Localização | |
|---|---|---|---|---|---|---|
| Ancient Scarab | 
|
250 | 15000 | 2 | Fleshcrawler | Daramian Scarab Caves (aqui |
| Bonebeast | 
|
300 | 12000 | 2 | Ribstride | Omruc Tomb (aqui |
| Crystal Spider | 
|
300 | 15000 | 3 | The Bloodweb | Svargrond (aqui |
| Ice Golem | 
|
300 | 12000 | 2 | Shardhead | Svargrond (aqui |
| Killer Caiman | 
|
250 | 10000 | 2 | -- | -- |
| Lancer Beetle | 
|
300 | 8000 | 2 | -- | -- |
| Mutated Rat | 
|
400 | 10000 | 2 | Esmeralda | Yalahar (aqui |
| Mutated Tiger | 
|
250 | 12000 | 3 | -- | -- |
| Quara Scouts | 
|
400 | 10000 | 2 | -- | -- |
| Wailing Widow | 
|
400 | 12000 | 3 | -- | -- |
| Wyvern | 
|
300 | 12000 | 2 | -- | -- |
| Task | Quantidade | Experiência | Task Points | Boss | Localização | |
|---|---|---|---|---|---|---|
| Brimstone Bug | 
|
500 | 15000 | 3 | Sulphur Scuttler | Zao (aqui |
| Giant Spider | 
|
500 | 20000 | 3 | The Old Widow | Plains of Havoc (aqui |
| Hellspawn | 
|
600 | 25000 | 4 | Flameborn | Yalahar (aqui |
| High Class Lizards | 
|
800 | 30000 | 3 | Fazzrah | Zao (aqui |
| Mutated Bat | 
|
400 | 20000 | 2 | Bruise Payne | Yalahar (aqui |
| Nightmare | 
|
400 | 25000 | 3 | Tormentor | Svargrond (aqui |
| Quaras | 
|
600 | 15000 | 3 | Thul | Calassa (aqui |
| Stampor | 
|
600 | 20000 | 3 | Tromphonyte | Zao (aqui |
| Werewolf | 
|
300 | 30000 | 4 | Hemming | Vengoth (aqui |
| Task | Quantidade | Experiência | Task Points | Boss | Localização | |
|---|---|---|---|---|---|---|
| Behemoth | 
|
700 | 30000 | 4 | Stonecracker | Cyclopolis (aqui |
| Destroyer | 
|
650 | 30000 | 4 | Bretzecutioner | Svargrond (aqui |
| Drakens | 
|
900 | 30000 | 3 | Paiz the Pauperizer | Zao (aqui |
| Ghastly Dragon | 
|
500 | 30000 | 5 | Ethershreck | Zao (aqui |
| Hellhound | 
|
250 | 40000 | 5 | Kerberos | Goroma (aqui |
| Hydra | 
|
650 | 30000 | 3 | The Many | Chor (aqui |
| Medusa | 
|
500 | 40000 | 5 | Gorgo | Banuta (aqui |
| Sea Serpent & Young Sea Serpent |

|
900 | 30000 | 5 | Leviathan | Sea Serpent Area (aqui |
| Serpent Spawn | 
|
800 | 30000 | 4 | The Noxious Spawn | Banuta (aqui |
| Undead Dragon | 
|
400 | 50000 | 6 | Zanakeph | Zao (aqui |
Rotas para os Bosses
|
|
|
|
The Snapper
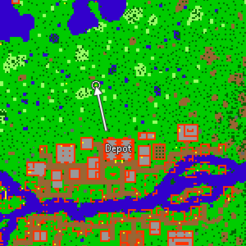
Partindo do depot de Port Hope, vá para o norte e desça na caverna indicada.
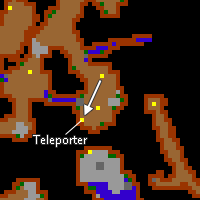
O portal está logo ao sul.


Hide 
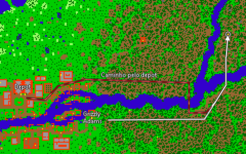
Partindo do depot de Port Hope, ou do Grizzly Adams, vá para oeste, até chegar na segunda ponte improvisada. Dela, vá para o norte e desça na caverna indicada.
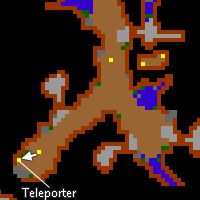
O portal está logo na entrada da caverna.


Deathbine 

Partindo do Grizzly Adams, vá para oeste e desça na caverna indicada. O portal está logo à esquerda.

The Bloodstusk

Do depot de Svargrond, vá para o norte, indo em direção ao tapete mágico.
No andar em que tem a escada do tapete mágico, vá para oeste e use a magia Levitate 3 vezes no local indicado.
Vá para o sudoeste, para encontrar o portal próximo da montanha.


Esmeralda 
Você precisará do acesso a Yalahar.

Do depot de Yalahar, vá até os esgostos, entrando pelo sewer um pouco ao norte da entrada.

Siga a rota indicada e desça a escada. Após descer, basta ir para o sul por este único caminho para chegar ao portal.


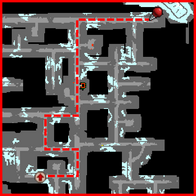
Ribstride 
Vá para Ormuc Tomb, ela fica à oeste de Ankrahmun.

Você deverá descer várias escadas que estão umas próximas das outras, até chegar neste andar. Você deve seguir o caminho para chegar no teleporter da tumba. Você precisará de um Scarab Coin.

Após atravessar o teleporter do scarab coin, siga a rota indicada para chegar no portal do boss.


The Bloodweb 
Do depot de Svargrond, vá para o norte, indo em direção ao tapete mágico.
No andar em que tem a escada do tapete mágico, vá para oeste suba a rampa.

Ao subir, vá para o sul, seguindo o caminho indicado. Você precisará subir e descer por outro lado para chegar no portal do boss. Há Crystal Spiders próximo ao portal.


Shardhead 


Bruise Payne 

Fazzrah 
O acesso a este boss foi realocado para Muggy Plains.

Hemming 
Para acessar Vengoth, onde encontra-se este boss, é necessário haver ao menos iniciado a missão 4 da Blood Brothers Quest.

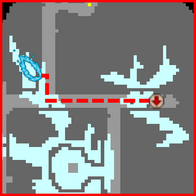
Thul 
Para chegar no boss, você precisará no mínimo da missão de Calassa da The Explorer Society Quest aberta para poder viajar para lá. Em Liberty Bay, vá até o Captain Max e fale "Calassa". Ele te levará até o local.

Você precisará de um Helmet of the Deep para poder entrar na área submersa.
Ao entrar na área você deverá ir pelo caminho indicado, com calma, pois há uma grande quantidade de criaturas. Chamar um amigo para ajudar pode ser uma boa opção.


Tormentor 
Para chegar neste boss, você precisará saber a rota para Formorgar Mines e o acesso às minas através da The Ice Islands Quest. Após atravessar a porta, você poderá seguir o caminho abaixo.
- Rota: Caminho Regular


- Rota: Halls of Hope


Bretzecutioner 
Para chegar neste boss, você precisará saber a rota para formorgar mines e o acesso a mina (The Ice Islands Quest). Após atravessar a porta, você poderá seguir o caminho abaixo. Há muitas criaturas perigosas, como Nightmares, Destroyers, Lost Souls, Crystal Spiders, vários tipos de "Cults", podendo encontrar até Demons.
- Rota: Caminho Regular


- Rota: Halls of Hope

Kerberos 
O portal que leva ao boss está nas profundidades de Goroma. A entrada da caverna é (aqui![]() ).
).


Transcrições
Você pode encontrar todas as transcrições dos diálogos na página Paw and Fur - Hunting Elite Quest/Transcrições.