|
|
|
||||||||||||||||||||||||


Secret Service Quest: mudanças entre as edições
| [edição aprovada] | [edição aprovada] |
m |
m |
||
| Linha 53: | Linha 53: | ||
{{{!}}width="100%" height="70px" | {{{!}}width="100%" height="70px" | ||
{{!}}- | {{!}}- | ||
{{!}}colspan="2" width=" | {{!}}colspan="2" width="32%" align="center" bgcolor="#CEDFF2"{{!}}'''Secret Agent Tool''' | ||
{{!}}colspan=" | {{!}}colspan="10" width="68%" align="center" bgcolor="#CEDFF2"{{!}}'''Tools''' | ||
{{!}}- | {{!}}- | ||
{{!}}width="310px" height="50px" align="center" bgcolor="#CEDFF2"{{!}}'''Nome''' | {{!}}width="310px" height="50px" align="center" bgcolor="#CEDFF2"{{!}}'''Nome''' | ||
{{!}}width=" | {{!}}width="80px" height="50px" align="center" bgcolor="#E8F2F8"{{!}} | ||
{{!}}width="200px" height="50px" align="center" bgcolor="#E8F2F8"{{!}}[[Arquivo:Crowbar.gif|link=]] | {{!}}width="200px" height="50px" align="center" bgcolor="#E8F2F8"{{!}}[[Arquivo:Crowbar.gif|link=]] | ||
{{!}}width="200px" height="50px" align="center" bgcolor="#E8F2F8"{{!}}[[Arquivo:Juice Squeezer.gif|link=]] | |||
{{!}}width="200px" height="50px" align="center" bgcolor="#E8F2F8"{{!}}[[Arquivo:Kitchen Knife.gif|link=]] | {{!}}width="200px" height="50px" align="center" bgcolor="#E8F2F8"{{!}}[[Arquivo:Kitchen Knife.gif|link=]] | ||
{{!}}width="200px" height="50px" align="center" bgcolor="#E8F2F8"{{!}}[[Arquivo:Machete.gif|link=]] | {{!}}width="200px" height="50px" align="center" bgcolor="#E8F2F8"{{!}}[[Arquivo:Machete.gif|link=]] | ||
| Linha 68: | Linha 69: | ||
{{!}}width="200px" height="50px" align="center" bgcolor="#E8F2F8"{{!}}[[Arquivo:Spoon.gif|link=]] | {{!}}width="200px" height="50px" align="center" bgcolor="#E8F2F8"{{!}}[[Arquivo:Spoon.gif|link=]] | ||
{{!}}- | {{!}}- | ||
{{!}}width="200px" height="50px" align="left" bgcolor="#CEDFF2"{{!}}[[Sneaky Stabber of Eliteness]] | {{!}}width="200px" height="50px" align="left" bgcolor="#CEDFF2" style="padding-left:4px;"{{!}}[[Sneaky Stabber of Eliteness]] | ||
{{!}}width="200px" height="50px" align="center" bgcolor="#E8F2F8"{{!}}[[Arquivo:Sneaky Stabber of Eliteness.gif|link=]] | {{!}}width="200px" height="50px" align="center" bgcolor="#E8F2F8"{{!}}[[Arquivo:Sneaky Stabber of Eliteness.gif|link=]] | ||
{{!}}width="200px" height="50px" align="center" bgcolor="#E8F2F8"{{!}}[[Arquivo:Cross.png|link=]] | |||
{{!}}width="200px" height="50px" align="center" bgcolor="#E8F2F8"{{!}}[[Arquivo:Cross.png|link=]] | {{!}}width="200px" height="50px" align="center" bgcolor="#E8F2F8"{{!}}[[Arquivo:Cross.png|link=]] | ||
{{!}}width="200px" height="50px" align="center" bgcolor="#E8F2F8"{{!}}[[Arquivo:Tick.png|link=]] | {{!}}width="200px" height="50px" align="center" bgcolor="#E8F2F8"{{!}}[[Arquivo:Tick.png|link=]] | ||
| Linha 80: | Linha 82: | ||
{{!}}width="200px" height="50px" align="center" bgcolor="#E8F2F8"{{!}}[[Arquivo:Tick.png|link=]] | {{!}}width="200px" height="50px" align="center" bgcolor="#E8F2F8"{{!}}[[Arquivo:Tick.png|link=]] | ||
{{!}}- | {{!}}- | ||
{{!}}width="200px" height="50px" align="left" bgcolor="#CEDFF2"{{!}}[[Squeezing Gear of Girlpower]] | {{!}}width="200px" height="50px" align="left" bgcolor="#CEDFF2" style="padding-left:4px;"{{!}}[[Squeezing Gear of Girlpower]] | ||
{{!}}width="200px" height="50px" align="center" bgcolor="#E8F2F8"{{!}}[[Arquivo:Squeezing Gear of Girlpower.gif|link=]] | {{!}}width="200px" height="50px" align="center" bgcolor="#E8F2F8"{{!}}[[Arquivo:Squeezing Gear of Girlpower.gif|link=]] | ||
{{!}}width="200px" height="50px" align="center" bgcolor="#E8F2F8"{{!}}[[Arquivo:Cross.png|link=]] | {{!}}width="200px" height="50px" align="center" bgcolor="#E8F2F8"{{!}}[[Arquivo:Cross.png|link=]] | ||
{{!}}width="200px" height="50px" align="center" bgcolor="#E8F2F8"{{!}}[[Arquivo:Tick.png|link=]] | |||
{{!}}width="200px" height="50px" align="center" bgcolor="#E8F2F8"{{!}}[[Arquivo:Cross.png|link=]] | {{!}}width="200px" height="50px" align="center" bgcolor="#E8F2F8"{{!}}[[Arquivo:Cross.png|link=]] | ||
{{!}}width="200px" height="50px" align="center" bgcolor="#E8F2F8"{{!}}[[Arquivo:Tick.png|link=]] | {{!}}width="200px" height="50px" align="center" bgcolor="#E8F2F8"{{!}}[[Arquivo:Tick.png|link=]] | ||
| Linha 92: | Linha 95: | ||
{{!}}width="200px" height="50px" align="center" bgcolor="#E8F2F8"{{!}}[[Arquivo:Cross.png|link=]] | {{!}}width="200px" height="50px" align="center" bgcolor="#E8F2F8"{{!}}[[Arquivo:Cross.png|link=]] | ||
{{!}}- | {{!}}- | ||
{{!}}width="200px" height="50px" align="left" bgcolor="#CEDFF2"{{!}}[[Whacking Driller of Fate]] | {{!}}width="200px" height="50px" align="left" bgcolor="#CEDFF2" style="padding-left:4px;"{{!}}[[Whacking Driller of Fate]] | ||
{{!}}width="200px" height="50px" align="center" bgcolor="#E8F2F8"{{!}}[[Arquivo:Whacking Driller of Fate.gif|link=]] | {{!}}width="200px" height="50px" align="center" bgcolor="#E8F2F8"{{!}}[[Arquivo:Whacking Driller of Fate.gif|link=]] | ||
{{!}}width="200px" height="50px" align="center" bgcolor="#E8F2F8"{{!}}[[Arquivo:Tick.png|link=]] | {{!}}width="200px" height="50px" align="center" bgcolor="#E8F2F8"{{!}}[[Arquivo:Tick.png|link=]] | ||
{{!}}width="200px" height="50px" align="center" bgcolor="#E8F2F8"{{!}}[[Arquivo:Cross.png|link=]] | |||
{{!}}width="200px" height="50px" align="center" bgcolor="#E8F2F8"{{!}}[[Arquivo:Tick.png|link=]] | {{!}}width="200px" height="50px" align="center" bgcolor="#E8F2F8"{{!}}[[Arquivo:Tick.png|link=]] | ||
{{!}}width="200px" height="50px" align="center" bgcolor="#E8F2F8"{{!}}[[Arquivo:Tick.png|link=]] | {{!}}width="200px" height="50px" align="center" bgcolor="#E8F2F8"{{!}}[[Arquivo:Tick.png|link=]] | ||

Edição das 14h56min de 7 de outubro de 2022
|
|
||||||||||||||||||||||||
| Recompensa: Achievement e Mysterious Package que dependendo da sua escolha poder conter: Sneaky Stabber of Eliteness, Squeezing Gear of Girlpower ou Whacking Driller of Fate. |
||||||||||||||||||||||||
| Localização: Vários locais. Você pode começar em Thais, (aqui |
||||||||||||||||||||||||
| Você enfrentará: Bonelords, Demon Skeletons, Dwarf Henchman, Ghouls, Mechanical Fighters, Stone Golems, Wyvern e mais dependendo da sua escolha:
|
||||||||||||||||||||||||
| Mini-Bosses: Nenhum. |
||||||||||||||||||||||||
| Bosses: Black Knight, Mad Technomancer e dependendo da sua escolha:
|
||||||||||||||||||||||||
| Adicionado: Versão 8.1 (11 de dezembro de 2007) |
||||||||||||||||||||||||
|
||||||||||||||||||||||||
|
||||||||||||||||||||||||

Veja também: Quests.
| Aviso: Caso você precise checar se esta quest já está completa, ela fica organizada no artigo de mesmo nome e Factions em seu Quest Log. |
Requerimentos
Missões para TBI (Thais):
Missões para AVIN (Venore):
- Key 5010.
- The White Raven Monastery Quest parcialmente completa (necessário o acesso à Isle of the Kings e conversa com o NPC Costello sobre "Brother Fugio").
Missões para CGB (Carlin):
- Key 5010.
- The White Raven Monastery Quest parcialmente completa (necessário o acesso à Isle of the Kings e conversa com o NPC Costello sobre "Brother Fugio").
- As três primeiras missões da The Ice Islands Quest completa (opcional - facilita o acesso ao local onde se encontra a NPC Freezhild, por meio do barco do NPC Buddel).
Método
Com o fortalecimento econômico, político e militar das grandes cidades, houve a necessidade de criar organizações que pudessem defender os interesses particulares dos governos. Estas organizações são núcleos inteligentes que buscam informações de caráter sigiloso de outros governos e organizações. Mas, somente um agente habilidoso e astuto é capaz de obter sucesso na busca de informações em solo hostil. Certamente ele contará com ferramentas especiais para o êxito de suas missões.
| Atenção: O jogador deve escolher apenas UM dos três serviços propostos: AVIN (Venore), CGB (Carlin) ou TBI (Thais) para realizar as missões. Um vez que você inicie as missões de uma das três organizações, não será possível mudar para outra. Todas têm a mesma missão final e as recompensas são similares. |
Secret Agent Tools
Confira na tabela abaixo, as funcionalidades de cada Secret Agent Tool, lembrando que você só receberá uma delas de acordo com a agência que escolher.
| Secret Agent Tool | Tools | ||||||||||
| Nome | |||||||||||
| Sneaky Stabber of Eliteness | |||||||||||
| Squeezing Gear of Girlpower | |||||||||||
| Whacking Driller of Fate | |||||||||||
Missões
|
|
|
AVIN - Venore
Para se juntar ao AVIN (Agency of Venorean Interest Negotiators), vá até o NPC Uncle, em Venore (aqui![]() ), ele está no sul do barco, 2 andares acima. Fale Hi - Join - Yes.
), ele está no sul do barco, 2 andares acima. Fale Hi - Join - Yes.
Falando com Uncle
|
Jogador: Hi
Uncle: Greetings. |

Missão 01: For Your Eyes Only
Fale Hi - Mission para Uncle, ele vai pedir para você entregar uma carta para o contado da agência me Thais, o NPC Gamel.
Falando com Uncle
You see a secret letter.
It weighs 0.50 oz.
Saindo do barco em Thais você encontrará Gamel na primeira casa ao Oeste do barco, um andar abaixo. Fale Hi para ele, Gamel irá summonar 02 Bandits, mate eles e fale Hi novamente e Letter e entregue a carta.
Falando com Gamel
|
Jogador: Hi
Gamel: I don't like the way you look. Help me boys! |
Gamel sumona 2 Bandits para lidarem com você.

Entregando a carta
Retorne até Uncle e relate sua missão.
Reportando a missão
Missão 02: A File Between Friends
Desta vez Uncle quer que você roube livro do castelo de Thais (O nome do documento é File AH-X17L89).
Falando com Uncle
|
Jogador: Hi
Uncle: Greetings. |
Agora vá até o castelo de Thais e consiga o arquivo, vá até o castelo de Thais. Na sala do Rei, você encontrará uma escada no canto esquerdo da sala. Suba. Você vai encontrar uma porta selada, entre, abra as gavetas e pegue o File AH-X17L89, depois retorne até Uncle e relate sua missão.

Reportando a missão
Missão 03: What Men are Made Of
Nesta missão ele quer que você entregue um Barrel of Beer (ele pesa 85 oz, então verifique se você tem cap para levar!) para Carlin, na Taverna Secreta no bueiro.
Falando com Uncles
|
Jogador: Hi
Uncle: Greetings. |
You see a barrel of beer.
It weighs 85.00 oz.
Caminho do Barco até o bueiro mais próximo da taverna.


Quando você descer em qualquer bueiro, duas Amazons serão sumonadas do seu lado, mate-as. Fale Hi - Barrel - Yes com Karl, o NPC que está no balcão. Depois de entregar o barril de cerveja, relate sua missão para Uncle.

Falando com Karl
 |
Volte reporte a missão para Uncle.
Reportando a missão
|
Jogador: Hi
Uncle: Greetings. |
Missão 04: Pawn Captures Knight
Fale hi - mission para Uncle, ele vai explicar que um certo cavaleiro se auto declarou lorde do pântano, ele e os regentes de Venore têm mantido uma relativa paz baseado na honra das duas partes, porém o tal cavaleiro tem se mostrado fora de controle recentemente e virou um incômodo para Venore então agora você deve matar esse cavaleiro, o problema é que o tal cavaleiro é ninguém menos que o Black Knight!
Falando com Uncle
|
Jogador: Hi
Uncle: Greetings. |
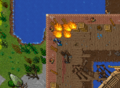
Para chegar até a Black Knight Villa com mais rapidez devemos ir para Venore e ir para a saída noroeste da cidade (aqui![]() ), em seguida vá para o norte até chegar à casa abandonada. Se desçer a escada (aqui
), em seguida vá para o norte até chegar à casa abandonada. Se desçer a escada (aqui![]() ), você verá um respawn de um Slime a esquerda e para o sul haverá uma porta trancada. Para abrir a porta vamos precisar da Key 5010, a chave pode ser encontrada em uma árvore ao oeste da vila (aqui
), você verá um respawn de um Slime a esquerda e para o sul haverá uma porta trancada. Para abrir a porta vamos precisar da Key 5010, a chave pode ser encontrada em uma árvore ao oeste da vila (aqui![]() ) e (aqui
) e (aqui![]() ).
).


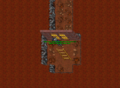
Com a chave em mãos, abra a porta e desça a escada, desça mais 1 andar e vá para a direita e desça novamente. Vá para o sul e suba, em seguida vá para o sul e prepare-se para enfrentar alguns Skeletons, depois entre em um dos buracos. Nesse andar existem quatro Bonelords. Os dois primeiros estão logo à frente da entrada. Os outros dois ficam espalhados pela caverna, mas podem ser lurados e te atacar em conjunto. Depois de derrota-los, desça e você irá encontrar uma porta para level 50+. Vá para o norte e mate o skeleton. Há também um respawn único de wyvern um pouco mais ao norte e dois Bonelords, um de cada lado. Mate todos e atravesse o teleport ao norte para enfrentar o Black Knight.


Portal de Level 50+
Portal para a sala do Black Knight


Black Knight 
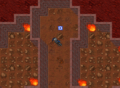
Essa é a famosa sala do Black Knight. Você entrará pelo extremo norte da sala, o Black Knight fica no centro, assim que entrar o boss já vira na sua direção, portanto é recomendável que o Knight entre primeiro. Dois scorpions e dois Bonelords também dão respawn lá dentro, é recomendado que os shooters foquem e matem os Bonelords para que estes não ataquem o knight que está blocando o boss.

O Boss Black Knight
Recompensas das Árvores


Essa sala é cercada de Fire Fields por todos os lados, a recompensa fica dentro das duas árvores mortas ao sul da sala, mas não há nada nas árvores ao norte. O teleport que traz de volta à sala anterior.
Recompensas
Missão 05: A Cryptic Mission
| Nota: Nesta missão você precisará da The White Raven Monastery Quest parcialmente completa para ter acesso à Isle of the Kings. |
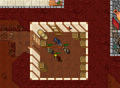
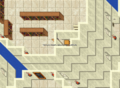
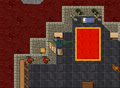
Você deve encontrar um anel, o Family Signet Ring. Ele está nas catacumbas na Isle of the Kings. Desça todas as escadas possíveis, até você chegar no último andar, que é uma caverna com vários Undeads junto com alguns Stalkers e Monks. Siga para Sudoeste. Você irá encontrar uma porta selada (ver a imagem abaixo). Pegue o anel e relate sua missão para Uncle.

Diálogos
Indo para Isle of the Kings com Dalbrect
 |
Voltando para Main com o capitão Jack
 |
Jogador: Hi
Captain Jack: Ahoy, matey. You are lucky to catch me here. I was preparing to set sail. |
Missão 06: A Little Bribe Won't Hurt
Uncle quer que você suborne um bárbaro no raid camp ao Sul de Svargrond, afim de ganhar um aliado contra Carlin. Ela é a NPC Freezhild dentro da Ice Witch Tower, no segundo andar. Fale com ela sobre a weapon crate e volte para reportar sua missão para Uncle em Venore.
Falando com Uncle
|
Jogador: Hi
Uncle: Greetings. |
Para chegar neste local, fale com o NPC Buddel em Svargrond para levar você para o raid camp. Note que ele está bêbado e pode acabar te levando para um lugar diferente do que você pediu, então certifique-se que você está mesmo em raid camp. Você deverá fazer um longo caminho até Freezhild, é aconselhável que traga várias runas GFB para evitar problemas com os bárbaros do local.
Falando com Freezhild
 |

Volte e reporte a missão para Uncle.
Reportando a missão
Missão 07: License to Kill
Uncle quer que você mate o Mad Technomancer em Kazordoon e depois entrege sua barba para ele.
Falando com Uncle
|
Jogador: Hi
Uncle: Greetings. |
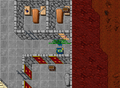
O Technomancer está em uma sala atrás de uma porta selada localizada (aqui![]() ), porém ele só aparece quando você puxa a alavanca localizada na sala. Depois de passar pela porta selada você já encontrará alguns Dwarf Henchmans, passe por eles e desça as escadas ao final do corredor, você estará em um andar cercado por lava.
), porém ele só aparece quando você puxa a alavanca localizada na sala. Depois de passar pela porta selada você já encontrará alguns Dwarf Henchmans, passe por eles e desça as escadas ao final do corredor, você estará em um andar cercado por lava.
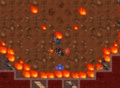
Conforme você andar para o norte, muitos Dwarf Henchmans e alguns Stone Golems irão aparecer, você deverá ir até o centro da sala e puxar a alavanca para que o Mad Technomancer apareça, é aconselhavel correr constantemente pela sala para não ficar cercado pelos anões (Nota: Os Henchman têm um respawn rápido pois são constamente sumonados pela sala.), uma sugestão é colocar runas de Fire Bomb no chão, formando um corredor para evitar ataques e ficar trapado pelos Dwarf Henchmans. Procure atacar somente o Mad Technomancer, quando ele morrer, você irá conseguir seu loot, a Technomancer Beard.


O boss Mad Technomancer

Ao entregar a barba para Uncle, ele irá lhe dar um pacote. Clique nele e pegue seu Sneaky Stabber of Eliteness.
Reportando a missão
|
Jogador: Hi
Uncle: Greetings. |
Recompensa

Sneaky Stabber of Eliteness.

You see a mysterious package.
It weighs 10.00 oz.
It bears the seal of the AVIN.
|
|
|
|
CGB - Carlin
Para se juntar ao CGB (Carlin's Girls Brigade), vá até a NPC Emma, em Carlin (aqui![]() ), ela está acima da prisão aonde está a xerife Shauna, leste da cidade. Fale Hi - Join - Yes.
), ela está acima da prisão aonde está a xerife Shauna, leste da cidade. Fale Hi - Join - Yes.
Falando com Emma
 |
Jogador: Hi
Emma: HAIL TO THE QUEEN! |
Se for para personagens masculinos
|
Jogador: Hi
Emma: HAIL TO THE QUEEN! |
Missão 01: Borrowed Knowledge
Fale Hi - Mission para Emma. Ela vai falar sobre a relação estreita que Carlin possui com Thais e que a Academia de Magia de Edron, financiada por Thais, se recusa a compartilhar o conhecimento com a guild de druidas de Carlin e pede que você encontre e roube um Nature Magic Spellbook ![]() na academia de Edron. Vá até a Ivory Library Tower e encontre o livro atrás da porta selada três andares acima do NPC Wyrdin, volte até Emma e relate sua missão.
na academia de Edron. Vá até a Ivory Library Tower e encontre o livro atrás da porta selada três andares acima do NPC Wyrdin, volte até Emma e relate sua missão.
Falando com Emma
|
Jogador: Hi
Emma: HAIL TO THE QUEEN! |
Obtendo o livro.
Nature Magic Spellbook


Reportando a missão
|
Missão 02: Codename:Lumberjack
Fale Hi - Mission para Emma, ela vai contar que um druida visitou o Green Claw Swamp recentemente e que enquanto coletava ervas ele notou uma presença maligna na região, ao procurar pela fonte daquele mal, ele encontrou uma antiga ruína e de repente foi atacado por Bonelords. Após algum tempo o druida chegou a conclusão que os Bonelords estão cultivando árvores da morte que estão carregadas de energia negativa, corrompendo toda área ao seu redor, então Emma quer que você vá até as rúinas no pântano ao noroeste de Venore e investigue o que ou quem está por trás de tudo isso e coloque um fim nessa história, o problema é que você téra que enfrentar ninguém menos que o Black Knight!.
Falando com Emma
|
Jogador: Hi
Emma: HAIL TO THE QUEEN! |
Para chegar até a Black Knight Villa com mais rapidez devemos ir para Venore e ir para a saída noroeste da cidade (aqui![]() ), em seguida vá para o norte até chegar à casa abandonada. Se desçer a escada (aqui
), em seguida vá para o norte até chegar à casa abandonada. Se desçer a escada (aqui![]() ), você verá um respawn de um Slime a esquerda e para o sul haverá uma porta trancada. Para abrir a porta vamos precisar da Key 5010, a chave pode ser encontrada em uma árvore ao oeste da vila (aqui
), você verá um respawn de um Slime a esquerda e para o sul haverá uma porta trancada. Para abrir a porta vamos precisar da Key 5010, a chave pode ser encontrada em uma árvore ao oeste da vila (aqui![]() ) e (aqui
) e (aqui![]() ).
).
Com a chave em mãos, abra a porta e desça a escada, desça mais 1 andar e vá para a direita e desça novamente. Vá para o sul e suba, em seguida vá para o sul e prepare-se para enfrentar alguns Skeletons, depois entre em um dos buracos. Nesse andar existem quatro Bonelords. Os dois primeiros estão logo à frente da entrada. Os outros dois ficam espalhados pela caverna, mas podem ser lurados e te atacar em conjunto. Depois de derrota-los, desça e você irá encontrar uma porta para level 50+. Vá para o norte e mate o skeleton. Há também um respawn único de wyvern um pouco mais ao norte e dois Bonelords, um de cada lado. Mate todos e atravesse o teleport ao norte para enfrentar o Black Knight.
Portal de Level 50+
Portal para a sala do Black Knight
Black Knight
Essa é a famosa sala do Black Knight. Você entrará pelo extremo norte da sala, o Black Knight fica no centro, assim que entrar o boss já vira na sua direção, portanto é recomendável que o Knight entre primeiro. Dois scorpions e dois Bonelords também dão respawn lá dentro, é recomendado que os shooters foquem e matem os Bonelords para que estes não ataquem o knight que está blocando o boss.
O Boss Black Knight
Recompensas das Árvores
Essa sala é cercada de Fire Fields por todos os lados, a recompensa fica dentro das duas árvores mortas ao sul da sala, mas não há nada nas árvores ao norte. O teleport que traz de volta à sala anterior.
Recompensas
Para interromper a criação dessas árvores malignas você deve obter o Rotten Heart of a Tree, ele está dentro da árvore próxima ao teleport atrás de uma porta selada, dê "use" na árvore e olhe em sua backpack para garantir que você recebeu o Rotten Heart of a Tree ![]() . Volte até Emma e relate sua missão.
. Volte até Emma e relate sua missão.

Reportando a missão
|
Missão 03: Rust In Peace
Desta vez Emma quer que você ataque a Ironhouse de Venore. Ela te da uma caixa de jóias com insetos e quer que você use no buraco da chave no porão da Ironhouse (aqui![]() ). Depois de fazê-la, volte até ela e relate sua missão.
). Depois de fazê-la, volte até ela e relate sua missão.
Falando com Emma
|
Jogador: Hi
Emma: HAIL TO THE QUEEN! |

Reportando a missão
|
Missão 04: Plot for A Plan
Emma quer que você vá até Venore. Ela quer os planos de um novo barco. Encontre os no estaleiro ao Noroeste de Venore. Após roubá-los relate sua missão para Emma.
Falando com Emma
|
Jogador: Hi
Emma: HAIL TO THE QUEEN! |
Vá para o estaleiro de Venore (aqui![]() ), ao chegar lá vá para sala com uma porta selada ao norte (aqui
), ao chegar lá vá para sala com uma porta selada ao norte (aqui![]() ), abra o baú para obter o documento Building Plans for a Ship
), abra o baú para obter o documento Building Plans for a Ship ![]() . Volte para Carlin e reporte a missão para Emma.
. Volte para Carlin e reporte a missão para Emma.


Obtendo o Building Plans for a Ship

Reportando a missão
|
Missão 05: No Admittance
Sua próxima missão secreta é encontrar dicas da ruínas de Dark Cathedral. Esteja preparado para encontrar todas as criaturas de Dark Cathedral.
Falando com Emmma
|
Jogador: Hi
Emma: HAIL TO THE QUEEN! |
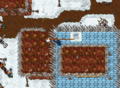
Vá para Dark Cathedral (aqui![]() ), ao chegar lá, desça e vá último nível inferior. Para obter acesso ao último nível você deve puxar todas as alavancas para ativar o teleport na sala central, ao puxar todas as alavancas você terá cerca de 5 minutos para passar pelo teleport. Na parte noroeste desde andar você encontrará um baú atrás de uma porta selada (aqui
), ao chegar lá, desça e vá último nível inferior. Para obter acesso ao último nível você deve puxar todas as alavancas para ativar o teleport na sala central, ao puxar todas as alavancas você terá cerca de 5 minutos para passar pelo teleport. Na parte noroeste desde andar você encontrará um baú atrás de uma porta selada (aqui![]() ) com os Suspicious Documents
) com os Suspicious Documents ![]() . Volte para Carlin e reporte a missão para Emma.
. Volte para Carlin e reporte a missão para Emma.


Obtendo o Suspicious Documents

Reportando a missão
|
Missão 06: News From the Past
Consiga um livro em Isle of the Kings. Vá até o White Raven Monastery, você não precisa ir até as cavernas profundas, o livro está numa cripta com alguns Ghouls, Skeletons, Stalkers e Demon Skeletons.
Falando com Emmma
|
Jogador: Hi
Emma: HAIL TO THE QUEEN! |
Vá para Isle of the Kings (aqui![]() ) pedindo passagem para o NPC Dalbrect (aqui
) pedindo passagem para o NPC Dalbrect (aqui![]() ), ao chegar lá, desça e vá para o 4º nível inferior aonde você encontrará um baú atrás de uma porta selada (aqui
), ao chegar lá, desça e vá para o 4º nível inferior aonde você encontrará um baú atrás de uma porta selada (aqui![]() ). Abra o baú para obter o livro Book (CGB)
). Abra o baú para obter o livro Book (CGB) ![]() . Volte para Carlin e reporte a missão para Emma.
. Volte para Carlin e reporte a missão para Emma.
Obtendo o livro.

Reportando a missão
|
Missão 07: License to Kill
Emma quer que você mate o Mad Technomancer em Kazordoon e depois entrege sua barba para ela.
Falando com Emma
|
Jogador: Hi
Emma: HAIL TO THE QUEEN! |
O Technomancer está em uma sala atrás de uma porta selada localizada (aqui![]() ), porém ele só aparece quando você puxa a alavanca localizada na sala. Depois de passar pela porta selada você já encontrará alguns Dwarf Henchmans, passe por eles e desça as escadas ao final do corredor, você estará em um andar cercado por lava.
), porém ele só aparece quando você puxa a alavanca localizada na sala. Depois de passar pela porta selada você já encontrará alguns Dwarf Henchmans, passe por eles e desça as escadas ao final do corredor, você estará em um andar cercado por lava.
Conforme você andar para o norte, muitos Dwarf Henchmans e alguns Stone Golems irão aparecer, você deverá ir até o centro da sala e puxar a alavanca para que o Mad Technomancer apareça, é aconselhavel correr constantemente pela sala para não ficar cercado pelos anões (Nota: Os Henchman têm um respawn rápido pois são constamente sumonados pela sala.), uma sugestão é colocar runas de Fire Bomb no chão, formando um corredor para evitar ataques e ficar trapado pelos Dwarf Henchmans. Procure atacar somente o Mad Technomancer, quando ele morrer, você irá conseguir seu loot, a Technomancer Beard.
O boss Mad Technomancer
Ao entregar a barba para Emma, ela irá lhe dar um pacote. Clique nele e pegue seu Squeezing Gear of Girlpower.
Reportando a missão
|
Jogador: Hi
Emma: HAIL TO THE QUEEN! |
Recompensa

Squeezing Gear of Girlpower.

You see a mysterious package.
It weighs 10.00 oz.
It bears the seal of the CGB.
|
|
|
|
TBI - Thais
Para se juntar ao TBI (Tibian Bureau of Investigation), vá até o NPC Chester Kahs, em Thais (aqui![]() ) e fale Hi - Join - Yes.
) e fale Hi - Join - Yes.
Falando com Chester Kahs
|
Jogador: Hi
Chester Kahs: Salutations, stranger. |
Missão 01: From Thais with Love
Fale Hi - Mission, agora Chester Kahs irá pedir para você conseguir um Fire Bug, e ir para o estaleiro de Venore (aqui![]() ). Quando estiver lá, vá para o canto noroeste. Use o fire bug no chão para a madeira pegar fogo. Retorne para Chester e fale sobre sua missão.
). Quando estiver lá, vá para o canto noroeste. Use o fire bug no chão para a madeira pegar fogo. Retorne para Chester e fale sobre sua missão.
Falando com Chester Kahs
|
Jogador: Hi
Chester Kahs: Salutations, stranger. |

Use o firebug aqui.


Volte a reporte a missão para Chester Kahs.
Reportando a missão
|
Jogador: Hi
Chester Kahs: Salutations, stranger. |
Missão 02: Operation Green Claw
Fale Hi - Mission, agora Chester Kahs vai dizer que sua próxima missão é uma assunto interno da agência e diz que se trata de um dos seus mais talentosos agentes que desapareceu décadas atrás no Green Claw Swamp. Chester diz que há relatos de coisas estranhas e ruínas misteriosas no pantâno e que você deve ir até lá para tentar encontrar alguma pista sobre este agente. Este agente é ninguém menos que o Black Knight!
Falando com Chester Kahs
|
Jogador: Hi
Chester Kahs: Salutations, stranger. |
Para chegar até a Black Knight Villa com mais rapidez devemos ir para Venore e ir para a saída noroeste da cidade (aqui![]() ), em seguida vá para o norte até chegar à casa abandonada. Se desçer a escada (aqui
), em seguida vá para o norte até chegar à casa abandonada. Se desçer a escada (aqui![]() ), você verá um respawn de um Slime a esquerda e para o sul haverá uma porta trancada. Para abrir a porta vamos precisar da Key 5010, a chave pode ser encontrada em uma árvore ao oeste da vila (aqui
), você verá um respawn de um Slime a esquerda e para o sul haverá uma porta trancada. Para abrir a porta vamos precisar da Key 5010, a chave pode ser encontrada em uma árvore ao oeste da vila (aqui![]() ) e (aqui
) e (aqui![]() ).
).
Com a chave em mãos, abra a porta e desça a escada, desça mais 1 andar e vá para a direita e desça novamente. Vá para o sul e suba, em seguida vá para o sul e prepare-se para enfrentar alguns Skeletons, depois entre em um dos buracos. Nesse andar existem quatro Bonelords. Os dois primeiros estão logo à frente da entrada. Os outros dois ficam espalhados pela caverna, mas podem ser lurados e te atacar em conjunto. Depois de derrota-los, desça e você irá encontrar uma porta para level 50+. Vá para o norte e mate o skeleton. Há também um respawn único de wyvern um pouco mais ao norte e dois Bonelords, um de cada lado. Mate todos e atravesse o teleport ao norte para enfrentar o Black Knight.
Portal de Level 50+
Portal para a sala do Black Knight
Black Knight
Essa é a famosa sala do Black Knight. Você entrará pelo extremo norte da sala, o Black Knight fica no centro, assim que entrar o boss já vira na sua direção, portanto é recomendável que o Knight entre primeiro. Dois scorpions e dois Bonelords também dão respawn lá dentro, é recomendado que os shooters foquem e matem os Bonelords para que estes não ataquem o knight que está blocando o boss.
O Boss Black Knight
Recompensas das Árvores
Essa sala é cercada de Fire Fields por todos os lados, a recompensa fica dentro das duas árvores mortas ao sul da sala, mas não há nada nas árvores ao norte. O teleport que traz de volta à sala anterior.
Recompensas
Além das recompensas, abra a porta selada com o baú. Você receberá um documento, uma carta do Black Knight ![]() . Retorne até o Chester para relatar sua missão.
. Retorne até o Chester para relatar sua missão.

Missão 03: Treachery in Port Hope
Fale Hi - Mission, agora Chester Kahs quer que você investigue os habitantes de Port Hope e procure por algum traidor. Vá para o depot de Port Hope. Nordeste do depot, você encontrará uma pequena construção, (aqui![]() ). Quando você entrar, será atacado por 02 Pirate Buccaneers. Depois de matá-los, pegue o Scroll (TBI)
). Quando você entrar, será atacado por 02 Pirate Buccaneers. Depois de matá-los, pegue o Scroll (TBI) ![]() no baú e volte até o Chester.
no baú e volte até o Chester.
Falando com Chester Kahs
|
Jogador: Hi
Chester Kahs: Salutations, stranger. |


Reportando a missão
|
Jogador: Hi
Chester Kahs: Salutations, stranger. |
Missão 04: Objective Hellgate
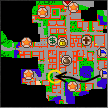
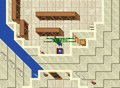
Fale Hi - Mission, agora Chester Kahs quer que você investigue alguns documentos no Hellgate. Vá para o Hellgate (você precisa da Chave 3012 para entrar) e encontre um corpo morto, ele está localizado no começo, com vários Ghouls, Skeletons e 2 Demon Skeletons. Tome cuidado por que as vezes o boss Zevelon Duskbringer aparece aqui junto com vampiros próximo da porta do túmulo. No mapa abaixo, você começa no ponto A e o corpo está no ponto B atrás de uma porta selada. Pegue o documento Intelligence Reports ![]() , saia do Hellgate e reporte a missão para Chester Kahs.
, saia do Hellgate e reporte a missão para Chester Kahs.
Falando com Chester Kahs
|
Jogador: Hi
Chester Kahs: Salutations, stranger. |


Reportando a missão
|
Jogador: Hi
Chester Kahs: Salutations, stranger. |
Missão 05: Coldfinger
Fale Hi - Mission, agora Chester Kahs quer que você viaje para o sul dos campos de bárbaros, se você tiver completado as três primeiras missões da The Ice Islands Quest, fale Hi - Passage - Barbarian Camp - No - Yes para Buddel em Svargrond, caso contrário você terá que ir andando até o Barbarian Camps. Ele pode levar você para o lugar errado, pois ele está bêbado. Fale passagem novamente para saber aonde você está. Quando você chegar lá, siga para o topo da torre da Ice Witch e use o Suspicious Signet Ring que Chester Kahs lhe deu na parte noroeste da sala (aqui![]() ). Depois, volte até Chester.
). Depois, volte até Chester.
Falando com Chester Kahs
|
Jogador: Hi
Chester Kahs: Salutations, stranger. |

Use o anel no sqm do canto superior esquerdo.
Mensagem após usar o anel.


Volte a reporte a missão para Chester Kahs.
Reportando a missão
|
Jogador: Hi
Chester Kahs: Salutations, stranger. |
Missão 06: The Weakest Spot
Fale Hi - Mission, agora Chester Kahs quer que você use seu kit de disfarce e use um Crowbar para destruir um barril na Taverna dos Bárbaros (em Svargrond) aqui (aqui![]() ). Use o kit de disfarce quando você estiver dentro da sala e use o Crowbar no barril à Nordeste.
). Use o kit de disfarce quando você estiver dentro da sala e use o Crowbar no barril à Nordeste.
Falando com Chester Kahs
|
Jogador: Hi
Chester Kahs: Salutations, stranger. |
| Nota: Seja cuidadoso: Se você usar o disfarce antes de executar sua missão, você pode comprar outro de Chester Kahs por 1000 gp (1k), se for necessário. |


Volte a reporte a missão para Chester Kahs.
Reportando a missão
|
Jogador: Hi
Chester Kahs: Salutations, stranger. |
Missão 07: License to Kill
Fale Hi - Mission, agora Chester Kahs quer que você mate o Mad Technomancer em Kazordoon e depois entregue sua barba para ele.
Falando com Chester Kahs
|
Jogador: Hi
Chester Kahs: Salutations, stranger. |
O Technomancer está em uma sala atrás de uma porta selada localizada (aqui![]() ), porém ele só aparece quando você puxa a alavanca localizada na sala. Depois de passar pela porta selada você já encontrará alguns Dwarf Henchmans, passe por eles e desça as escadas ao final do corredor, você estará em um andar cercado por lava.
), porém ele só aparece quando você puxa a alavanca localizada na sala. Depois de passar pela porta selada você já encontrará alguns Dwarf Henchmans, passe por eles e desça as escadas ao final do corredor, você estará em um andar cercado por lava.
Conforme você andar para o norte, muitos Dwarf Henchmans e alguns Stone Golems irão aparecer, você deverá ir até o centro da sala e puxar a alavanca para que o Mad Technomancer apareça, é aconselhavel correr constantemente pela sala para não ficar cercado pelos anões (Nota: Os Henchman têm um respawn rápido pois são constamente sumonados pela sala.), uma sugestão é colocar runas de Fire Bomb no chão, formando um corredor para evitar ataques e ficar trapado pelos Dwarf Henchmans. Procure atacar somente o Mad Technomancer, quando ele morrer, você irá conseguir seu loot, a Technomancer Beard.
O boss Mad Technomancer
- Ao entregar a barba para Chester, ele irá lhe dar um pacote. Clique nele e pegue seu Whacking Driller of Fate.
Reportando a missão
|
Jogador: Hi
Chester Kahs: Salutations, stranger. |
Recompensa

Whacking Driller of Fate.

You see a mysterious package.
It weighs 10.00 oz.
It bears the seal of the TBI.
|
|
|
|
Extras
Parabéns, você concluiu a quest!
Para se aliar a mais facções confira outros spoilers: