|
|
|
||||||||||||||||||||||||


Secret Service Quest: mudanças entre as edições
| [edição aprovada] | [edição aprovada] |
m |
 |
||
| (13 revisões intermediárias por 7 usuários não estão sendo mostradas) | |||
| Linha 2: | Linha 2: | ||
| name = Secret Service Quest | | name = Secret Service Quest | ||
| reward = [[Achievements|Achievement]] e [[Mysterious Package]] que dependendo da sua escolha poder conter: [[Sneaky Stabber of Eliteness]], [[Squeezing Gear of Girlpower]] ou [[Whacking Driller of Fate]]. | | reward = [[Achievements|Achievement]] e [[Mysterious Package]] que dependendo da sua escolha poder conter: [[Sneaky Stabber of Eliteness]], [[Squeezing Gear of Girlpower]] ou [[Whacking Driller of Fate]]. | ||
| location = Vários locais<noinclude>. Você pode começar em [[Thais]], ({{mapa|32349,32184,6: | | location = Vários locais<noinclude>. Você pode começar em [[Thais]], ({{mapa|32349,32184,6:2|aqui}}), [[Venore]], ({{mapa|32955,32040,4:2|aqui}}) ou [[Carlin]], ({{mapa|32388,31779,6:2|aqui}}), com missões nas cidades de [[Kazordoon]], [[Port Hope]], [[Ab'Dendriel]], [[Svargrond]] e [[Edron]] dentre outras</noinclude>. | ||
| lvl = 50 | | lvl = 50 | ||
| lvlreq = 70 | | lvlreq = 70 | ||
| Linha 41: | Linha 41: | ||
* [[Key 5010]]. | * [[Key 5010]]. | ||
* [[The White Raven Monastery Quest]] parcialmente completa (necessário o acesso à [[Isle of the Kings]] e conversa com o NPC [[Costello]] sobre "Brother Fugio"). | * [[The White Raven Monastery Quest]] parcialmente completa (necessário o acesso à [[Isle of the Kings]] e conversa com o NPC [[Costello]] sobre "Brother Fugio"). | ||
* As três primeiras missões da [[The Ice Islands Quest]] completa (opcional - facilita o acesso ao local onde se encontra a NPC [[Freezhild]], por meio do barco do NPC [[Buddel]]). | * Opcional: As três primeiras missões da [[The Ice Islands Quest]] completa (opcional - facilita o acesso ao local onde se encontra a NPC [[Freezhild]], por meio do barco do NPC [[Buddel]]). | ||
= Método = | = Método = | ||
| Linha 53: | Linha 53: | ||
{{{!}}width="100%" height="70px" | {{{!}}width="100%" height="70px" | ||
{{!}}- | {{!}}- | ||
{{!}}colspan="2" width=" | {{!}}colspan="2" width="32%" align="center" bgcolor="#CEDFF2"{{!}}'''Secret Agent Tool''' | ||
{{!}}colspan=" | {{!}}colspan="10" width="68%" align="center" bgcolor="#CEDFF2"{{!}}'''Ferramentas''' | ||
{{!}}- | {{!}}- | ||
{{!}}width="310px" height="50px" align="center" bgcolor="#CEDFF2"{{!}}'''Nome''' | {{!}}width="310px" height="50px" align="center" bgcolor="#CEDFF2"{{!}}'''Nome''' | ||
{{!}}width=" | {{!}}width="80px" height="50px" align="center" bgcolor="#E8F2F8"{{!}} | ||
{{!}}width="200px" height="50px" align="center" bgcolor="#E8F2F8"{{!}}[[Arquivo:Crowbar.gif|link=]] | {{!}}width="200px" height="50px" align="center" bgcolor="#E8F2F8"{{!}}[[Arquivo:Crowbar.gif|link=]] | ||
{{!}}width="200px" height="50px" align="center" bgcolor="#E8F2F8"{{!}}[[Arquivo:Juice Squeezer.gif|link=]] | |||
{{!}}width="200px" height="50px" align="center" bgcolor="#E8F2F8"{{!}}[[Arquivo:Kitchen Knife.gif|link=]] | {{!}}width="200px" height="50px" align="center" bgcolor="#E8F2F8"{{!}}[[Arquivo:Kitchen Knife.gif|link=]] | ||
{{!}}width="200px" height="50px" align="center" bgcolor="#E8F2F8"{{!}}[[Arquivo:Machete.gif|link=]] | {{!}}width="200px" height="50px" align="center" bgcolor="#E8F2F8"{{!}}[[Arquivo:Machete.gif|link=]] | ||
| Linha 64: | Linha 65: | ||
{{!}}width="200px" height="50px" align="center" bgcolor="#E8F2F8"{{!}}[[Arquivo:Rope.gif|link=]] | {{!}}width="200px" height="50px" align="center" bgcolor="#E8F2F8"{{!}}[[Arquivo:Rope.gif|link=]] | ||
{{!}}width="200px" height="50px" align="center" bgcolor="#E8F2F8"{{!}}[[Arquivo:Scythe.gif|link=]] | {{!}}width="200px" height="50px" align="center" bgcolor="#E8F2F8"{{!}}[[Arquivo:Scythe.gif|link=]] | ||
{{!}}width="200px" height="50px" align="center" bgcolor="#E8F2F8"{{!}}[[Arquivo:Shovel.gif|link=]] | |||
{{!}}width="200px" height="50px" align="center" bgcolor="#E8F2F8"{{!}}[[Arquivo:Sickle.gif|link=]] | {{!}}width="200px" height="50px" align="center" bgcolor="#E8F2F8"{{!}}[[Arquivo:Sickle.gif|link=]] | ||
{{!}}width="200px" height="50px" align="center" bgcolor="#E8F2F8"{{!}}[[Arquivo:Spoon.gif|link=]] | {{!}}width="200px" height="50px" align="center" bgcolor="#E8F2F8"{{!}}[[Arquivo:Spoon.gif|link=]] | ||
{{!}}- | {{!}}- | ||
{{!}}width="200px" height="50px" align="left" bgcolor="#CEDFF2"{{!}}[[Sneaky Stabber of Eliteness]] | {{!}}width="200px" height="50px" align="left" bgcolor="#CEDFF2" style="padding-left:4px;"{{!}}[[Sneaky Stabber of Eliteness]] | ||
{{!}}width="200px" height="50px" align="center" bgcolor="#E8F2F8"{{!}}[[Arquivo:Sneaky Stabber of Eliteness.gif|link=]] | {{!}}width="200px" height="50px" align="center" bgcolor="#E8F2F8"{{!}}[[Arquivo:Sneaky Stabber of Eliteness.gif|link=]] | ||
{{!}}width="200px" height="50px" align="center" bgcolor="#E8F2F8"{{!}}[[Arquivo:Cross.png|link=]] | |||
{{!}}width="200px" height="50px" align="center" bgcolor="#E8F2F8"{{!}}[[Arquivo:Cross.png|link=]] | {{!}}width="200px" height="50px" align="center" bgcolor="#E8F2F8"{{!}}[[Arquivo:Cross.png|link=]] | ||
{{!}}width="200px" height="50px" align="center" bgcolor="#E8F2F8"{{!}}[[Arquivo:Tick.png|link=]] | {{!}}width="200px" height="50px" align="center" bgcolor="#E8F2F8"{{!}}[[Arquivo:Tick.png|link=]] | ||
| Linha 76: | Linha 78: | ||
{{!}}width="200px" height="50px" align="center" bgcolor="#E8F2F8"{{!}}[[Arquivo:Tick.png|link=]] | {{!}}width="200px" height="50px" align="center" bgcolor="#E8F2F8"{{!}}[[Arquivo:Tick.png|link=]] | ||
{{!}}width="200px" height="50px" align="center" bgcolor="#E8F2F8"{{!}}[[Arquivo:Cross.png|link=]] | {{!}}width="200px" height="50px" align="center" bgcolor="#E8F2F8"{{!}}[[Arquivo:Cross.png|link=]] | ||
{{!}}width="200px" height="50px" align="center" bgcolor="#E8F2F8"{{!}}[[Arquivo:Tick.png|link=]] | |||
{{!}}width="200px" height="50px" align="center" bgcolor="#E8F2F8"{{!}}[[Arquivo:Cross.png|link=]] | {{!}}width="200px" height="50px" align="center" bgcolor="#E8F2F8"{{!}}[[Arquivo:Cross.png|link=]] | ||
{{!}}width="200px" height="50px" align="center" bgcolor="#E8F2F8"{{!}}[[Arquivo:Tick.png|link=]] | {{!}}width="200px" height="50px" align="center" bgcolor="#E8F2F8"{{!}}[[Arquivo:Tick.png|link=]] | ||
{{!}}- | {{!}}- | ||
{{!}}width="200px" height="50px" align="left" bgcolor="#CEDFF2"{{!}}[[Squeezing Gear of Girlpower]] | {{!}}width="200px" height="50px" align="left" bgcolor="#CEDFF2" style="padding-left:4px;"{{!}}[[Squeezing Gear of Girlpower]] | ||
{{!}}width="200px" height="50px" align="center" bgcolor="#E8F2F8"{{!}}[[Arquivo:Squeezing Gear of Girlpower.gif|link=]] | {{!}}width="200px" height="50px" align="center" bgcolor="#E8F2F8"{{!}}[[Arquivo:Squeezing Gear of Girlpower.gif|link=]] | ||
{{!}}width="200px" height="50px" align="center" bgcolor="#E8F2F8"{{!}}[[Arquivo:Cross.png|link=]] | {{!}}width="200px" height="50px" align="center" bgcolor="#E8F2F8"{{!}}[[Arquivo:Cross.png|link=]] | ||
{{!}}width="200px" height="50px" align="center" bgcolor="#E8F2F8"{{!}}[[Arquivo: | {{!}}width="200px" height="50px" align="center" bgcolor="#E8F2F8"{{!}}[[Arquivo:Tick.png|link=]] | ||
{{!}}width="200px" height="50px" align="center" bgcolor="#E8F2F8"{{!}}[[Arquivo:Tick.png|link=]] | |||
{{!}}width="200px" height="50px" align="center" bgcolor="#E8F2F8"{{!}}[[Arquivo:Tick.png|link=]] | {{!}}width="200px" height="50px" align="center" bgcolor="#E8F2F8"{{!}}[[Arquivo:Tick.png|link=]] | ||
{{!}}width="200px" height="50px" align="center" bgcolor="#E8F2F8"{{!}}[[Arquivo:Tick.png|link=]] | {{!}}width="200px" height="50px" align="center" bgcolor="#E8F2F8"{{!}}[[Arquivo:Tick.png|link=]] | ||
| Linha 92: | Linha 95: | ||
{{!}}width="200px" height="50px" align="center" bgcolor="#E8F2F8"{{!}}[[Arquivo:Cross.png|link=]] | {{!}}width="200px" height="50px" align="center" bgcolor="#E8F2F8"{{!}}[[Arquivo:Cross.png|link=]] | ||
{{!}}- | {{!}}- | ||
{{!}}width="200px" height="50px" align="left" bgcolor="#CEDFF2"{{!}}[[Whacking Driller of Fate]] | {{!}}width="200px" height="50px" align="left" bgcolor="#CEDFF2" style="padding-left:4px;"{{!}}[[Whacking Driller of Fate]] | ||
{{!}}width="200px" height="50px" align="center" bgcolor="#E8F2F8"{{!}}[[Arquivo:Whacking Driller of Fate.gif|link=]] | {{!}}width="200px" height="50px" align="center" bgcolor="#E8F2F8"{{!}}[[Arquivo:Whacking Driller of Fate.gif|link=]] | ||
{{!}}width="200px" height="50px" align="center" bgcolor="#E8F2F8"{{!}}[[Arquivo:Tick.png|link=]] | {{!}}width="200px" height="50px" align="center" bgcolor="#E8F2F8"{{!}}[[Arquivo:Tick.png|link=]] | ||
{{!}}width="200px" height="50px" align="center" bgcolor="#E8F2F8"{{!}}[[Arquivo:Cross.png|link=]] | |||
{{!}}width="200px" height="50px" align="center" bgcolor="#E8F2F8"{{!}}[[Arquivo:Tick.png|link=]] | {{!}}width="200px" height="50px" align="center" bgcolor="#E8F2F8"{{!}}[[Arquivo:Tick.png|link=]] | ||
{{!}}width="200px" height="50px" align="center" bgcolor="#E8F2F8"{{!}}[[Arquivo:Tick.png|link=]] | {{!}}width="200px" height="50px" align="center" bgcolor="#E8F2F8"{{!}}[[Arquivo:Tick.png|link=]] | ||
| Linha 100: | Linha 104: | ||
{{!}}width="200px" height="50px" align="center" bgcolor="#E8F2F8"{{!}}[[Arquivo:Tick.png|link=]] | {{!}}width="200px" height="50px" align="center" bgcolor="#E8F2F8"{{!}}[[Arquivo:Tick.png|link=]] | ||
{{!}}width="200px" height="50px" align="center" bgcolor="#E8F2F8"{{!}}[[Arquivo:Cross.png|link=]] | {{!}}width="200px" height="50px" align="center" bgcolor="#E8F2F8"{{!}}[[Arquivo:Cross.png|link=]] | ||
{{!}}width="200px" height="50px" align="center" bgcolor="#E8F2F8"{{!}}[[Arquivo:Tick.png|link=]] | |||
{{!}}width="200px" height="50px" align="center" bgcolor="#E8F2F8"{{!}}[[Arquivo:Cross.png|link=]] | {{!}}width="200px" height="50px" align="center" bgcolor="#E8F2F8"{{!}}[[Arquivo:Cross.png|link=]] | ||
{{!}}width="200px" height="50px" align="center" bgcolor="#E8F2F8"{{!}}[[Arquivo:Cross.png|link=]] | {{!}}width="200px" height="50px" align="center" bgcolor="#E8F2F8"{{!}}[[Arquivo:Cross.png|link=]] | ||
{{!}}- | {{!}}- | ||
| Linha 119: | Linha 123: | ||
<!------------------------------- INÍCIO DO TEXTO DO SPOILER P/ O BOTÂO Nº 01 ---------------------------------------------------> | <!------------------------------- INÍCIO DO TEXTO DO SPOILER P/ O BOTÂO Nº 01 ---------------------------------------------------> | ||
== AVIN - Venore == | == AVIN - Venore == | ||
Para se juntar ao '''AVIN''' (Agency of Venorean Interest Negotiators), vá até o NPC [[Uncle]], em [[Venore]] ({{mapa|32955,32040,4: | Para se juntar ao '''AVIN''' (Agency of Venorean Interest Negotiators), vá até o NPC [[Uncle]], em [[Venore]] ({{mapa|32955,32040,4:2|aqui}}), ele está no sul do barco, 2 andares acima. Fale '''Hi - Join - Yes'''. | ||
'''Falando com Uncle''' | '''Falando com Uncle''' | ||
{{transcrições|npc=Uncle|texto= | {{transcrições|npc=Uncle|texto= | ||
''Jogador:'' '''Hi'''<br> | |||
[[Uncle]]: Greetings.<br> | |||
''Jogador:'' '''Join'''<br> | ''Jogador:'' '''Join'''<br> | ||
[[Uncle]]: Well, well, well! As you might know, we are entrusted by the Venorean tradesmen to ensure the safety of their ventures ... This task often puts our representatives in rather dangerous and challenging situations. On the other hand, you can expect a generous compensation for your efforts on our behalf... Just keep in mind though that we expect quick action and that we are rather intolerant to needless questions and moral doubts ... If you join our ranks, you cannot join the service of another city! So do I understand you correctly, you want to join our small business?<br> | [[Uncle]]: Well, well, well! As you might know, we are entrusted by the Venorean tradesmen to ensure the safety of their ventures ... This task often puts our representatives in rather dangerous and challenging situations. On the other hand, you can expect a generous compensation for your efforts on our behalf... Just keep in mind though that we expect quick action and that we are rather intolerant to needless questions and moral doubts ... If you join our ranks, you cannot join the service of another city! So do I understand you correctly, you want to join our small business?<br> | ||
| Linha 139: | Linha 145: | ||
{{transcrições|npc=Uncle|texto= | {{transcrições|npc=Uncle|texto= | ||
''Jogador:'' '''Hi'''<br> | |||
[[Uncle]]: Greetings.<br> | |||
''Jogador:'' '''Mission'''<br> | ''Jogador:'' '''Mission'''<br> | ||
[[Uncle]]: Let's start with a rather simple job. There is a contact in Thais with that we need to get in touch again. Deliver this note to Gamel in Thais. Get an answer from him. If he is a bit reluctant, be 'persuasive'.}} | [[Uncle]]: Let's start with a rather simple job. There is a contact in Thais with that we need to get in touch again. Deliver this note to Gamel in Thais. Get an answer from him. If he is a bit reluctant, be 'persuasive'.}} | ||
| Linha 145: | Linha 153: | ||
''It weighs 0.50 oz.''<br> | ''It weighs 0.50 oz.''<br> | ||
Saindo do barco em [[Thais]] você encontrará [[Gamel]] na primeira casa ao | Saindo do barco em [[Thais]] você encontrará [[Gamel]] na primeira casa ao Leste do barco, um andar abaixo. Fale '''Hi''' para ele, [[Gamel]] irá summonar 02 [[Bandit]]s, mate eles e fale '''Hi''' novamente e '''Letter''' e entregue a carta. | ||
'''Falando com Gamel''' | '''Falando com Gamel''' | ||
| Linha 172: | Linha 180: | ||
{{transcrições|npc=Uncle|texto= | {{transcrições|npc=Uncle|texto= | ||
''Jogador:'' '''Hi'''<br> | |||
[[Uncle]]: Greetings.<br> | |||
''Jogador:'' '''Mission'''<br> | ''Jogador:'' '''Mission'''<br> | ||
[[Uncle]]: Do you have news to make old Uncle happy?<br> | [[Uncle]]: Do you have news to make old Uncle happy?<br> | ||
| Linha 183: | Linha 193: | ||
{{transcrições|npc=Uncle|texto= | {{transcrições|npc=Uncle|texto= | ||
''Jogador:'' '''Hi'''<br> | |||
[[Uncle]]: Greetings.<br> | |||
''Jogador:'' '''Mission'''<br> | ''Jogador:'' '''Mission'''<br> | ||
[[Uncle]]: Our Thaian allies are sometimes a bit forgetful. For this reason we are not always informed timely about certain activities. We won't insult our great king by pointing out this flaw ... Still, we are in dire need of these information so we are forced to take action on our own. Travel to the Thaian castle and 'find' the documents we need. They have the file name AH-X17L89.}} | [[Uncle]]: Our Thaian allies are sometimes a bit forgetful. For this reason we are not always informed timely about certain activities. We won't insult our great king by pointing out this flaw ... Still, we are in dire need of these information so we are forced to take action on our own. Travel to the Thaian castle and 'find' the documents we need. They have the file name AH-X17L89.}} | ||
| Linha 193: | Linha 205: | ||
{{transcrições|npc=Uncle|texto= | {{transcrições|npc=Uncle|texto= | ||
''Jogador:'' '''Hi'''<br> | |||
[[Uncle]]: Greetings.<br> | |||
''Jogador:'' '''Mission'''<br> | ''Jogador:'' '''Mission'''<br> | ||
[[Uncle]]: Do you have news to make old Uncle happy?<br> | [[Uncle]]: Do you have news to make old Uncle happy?<br> | ||
| Linha 204: | Linha 218: | ||
{{transcrições|npc=Uncle|texto= | {{transcrições|npc=Uncle|texto= | ||
''Jogador:'' '''Hi'''<br> | |||
[[Uncle]]: Greetings.<br> | |||
''Jogador:'' '''Mission'''<br> | ''Jogador:'' '''Mission'''<br> | ||
[[Uncle]]: The oppression of Carlin's men by their lunatic women is unbearable to some of our authorities. We see it as our honourable duty to support the male resistance in Carlin ... The poor guys have some speakeasy in the sewers. Bring them this barrel of beer with our kind regards to strengthen their resistance.}} | [[Uncle]]: The oppression of Carlin's men by their lunatic women is unbearable to some of our authorities. We see it as our honourable duty to support the male resistance in Carlin ... The poor guys have some speakeasy in the sewers. Bring them this barrel of beer with our kind regards to strengthen their resistance.}} | ||
| Linha 232: | Linha 248: | ||
{{transcrições|npc=Uncle|texto= | {{transcrições|npc=Uncle|texto= | ||
''Jogador:'' '''Hi'''<br> | |||
[[Uncle]]: Greetings.<br> | |||
''Jogador:'' '''Mission'''<br> | ''Jogador:'' '''Mission'''<br> | ||
[[Uncle]]: Do you have news to make old Uncle happy? Don't tell me you need another barrel of beer, though.<br> | [[Uncle]]: Do you have news to make old Uncle happy? Don't tell me you need another barrel of beer, though.<br> | ||
| Linha 243: | Linha 261: | ||
{{transcrições|npc=Uncle|texto= | {{transcrições|npc=Uncle|texto= | ||
''Jogador:'' '''Hi'''<br> | |||
[[Uncle]]: Greetings.<br> | |||
''Jogador:'' '''Mission'''<br> | ''Jogador:'' '''Mission'''<br> | ||
[[Uncle]]: As you know, our lovely city is a bastion of civilisation surrounded by numerous hazards. The nearby Plains of Havoc and the hostile elven town Shadowthorn are only a few of the obstacles we have to overcome on an almost daily basis ... Against all odds, we managed to gain some modest profit by exploiting these circumstances in one way or the other.<br> | [[Uncle]]: As you know, our lovely city is a bastion of civilisation surrounded by numerous hazards. The nearby Plains of Havoc and the hostile elven town Shadowthorn are only a few of the obstacles we have to overcome on an almost daily basis ... Against all odds, we managed to gain some modest profit by exploiting these circumstances in one way or the other.<br> | ||
| Linha 271: | Linha 291: | ||
{{transcrições|npc=Captain Jack|texto= | {{transcrições|npc=Captain Jack|texto= | ||
''Jogador:'' ''' | ''Jogador:'' '''Hi'''<br> | ||
[[Captain Jack]]: Ahoy, matey. You are lucky to catch me here. I was preparing to set sail.<br> | [[Captain Jack]]: Ahoy, matey. You are lucky to catch me here. I was preparing to set sail.<br> | ||
''Jogador:'' '''Tibia'''<br> | ''Jogador:'' '''Tibia'''<br> | ||
[[Captain Jack]]: Tibia is the main continent. Do you want a passage to the continent for 20 gold?<br> | [[Captain Jack]]: Tibia is the main continent. Do you want a passage to the continent for 20 gold?<br> | ||
''Jogador:'' ''' | ''Jogador:'' '''Yes'''<br> | ||
[[Captain Jack]]: Have a nice trip!}} | [[Captain Jack]]: Have a nice trip!}} | ||
| Linha 284: | Linha 304: | ||
{{transcrições|npc=Uncle|texto= | {{transcrições|npc=Uncle|texto= | ||
''Jogador:'' '''Hi'''<br> | |||
[[Uncle]]: Greetings.<br> | |||
''Jogador:'' '''Mission'''<br> | ''Jogador:'' '''Mission'''<br> | ||
[[Uncle]]: We try to establish new trade agreements with various potential customers. Sometimes we have to offer some presents in advance to ensure that trade is prospering and flourishing. It will be your task to deliver one of those little presents ...<br> | [[Uncle]]: We try to establish new trade agreements with various potential customers. Sometimes we have to offer some presents in advance to ensure that trade is prospering and flourishing. It will be your task to deliver one of those little presents ...<br> | ||
| Linha 309: | Linha 331: | ||
{{transcrições|npc=Uncle|texto= | {{transcrições|npc=Uncle|texto= | ||
''Jogador:'' '''Hi'''<br> | |||
[[Uncle]]: Greetings.<br> | |||
''Jogador:'' '''Mission'''<br> | ''Jogador:'' '''Mission'''<br> | ||
[[Uncle]]: Do you have news to make old Uncle happy?<br> | [[Uncle]]: Do you have news to make old Uncle happy?<br> | ||
| Linha 317: | Linha 341: | ||
[[Uncle]] quer que você mate o [[Mad Technomancer]] em [[Kazordoon]] e depois entrege sua barba para ele. | [[Uncle]] quer que você mate o [[Mad Technomancer]] em [[Kazordoon]] e depois entrege sua barba para ele. | ||
{{DASH|'''Nota: '''Caso você não se sinta confiante para eliminar o [[Mad Technomancer]], você pode comprar sua barba com o [[Black Bert]] e pular esta parte da missão.}} | |||
'''Falando com Uncle''' | '''Falando com Uncle''' | ||
{{transcrições|npc=Uncle|texto= | {{transcrições|npc=Uncle|texto= | ||
''Jogador:'' '''Hi'''<br> | |||
[[Uncle]]: Greetings.<br> | |||
''Jogador:'' '''Mission'''<br> | ''Jogador:'' '''Mission'''<br> | ||
[[Uncle]]: Some dwarven criminal called Blowbeard dares to blackmail our city. He threatens to destroy the whole city and demands an insane amount of gold ...<br> | [[Uncle]]: Some dwarven criminal called Blowbeard dares to blackmail our city. He threatens to destroy the whole city and demands an insane amount of gold ...<br> | ||
| Linha 325: | Linha 353: | ||
[[Uncle]]: His laboratory is near the technomancer hall. Bring me his beard as proof of his demise.}} | [[Uncle]]: His laboratory is near the technomancer hall. Bring me his beard as proof of his demise.}} | ||
O Technomancer está em uma sala atrás de uma porta selada localizada ({{mapa|32544,31908,12: | O Technomancer está em uma sala atrás de uma porta selada localizada ({{mapa|32544,31908,12:2|aqui}}), porém ele só aparece quando você puxa a alavanca localizada na sala. Depois de passar pela porta selada você já encontrará alguns [[Dwarf Henchman]]s, passe por eles e desça as escadas ao final do corredor, você estará em um andar cercado por lava. | ||
Conforme você andar para o norte, '''muitos''' [[Dwarf Henchman]]s e alguns [[Stone Golem]]s irão aparecer, você deverá ir até o centro da sala e puxar a alavanca para que o [[Mad Technomancer]] apareça, é aconselhavel correr constantemente pela sala para não ficar cercado pelos anões ('''Nota:''' Os Henchman têm um respawn rápido pois são constamente sumonados pela sala.), uma sugestão é colocar runas de [[Fire Bomb]] no chão, formando um corredor para evitar ataques e ficar trapado pelos [[Dwarf Henchman]]s. Procure atacar somente o Mad Technomancer, quando ele morrer, você irá conseguir seu loot, a [[Technomancer Beard]]. | Conforme você andar para o norte, '''muitos''' [[Dwarf Henchman]]s e alguns [[Stone Golem]]s irão aparecer, você deverá ir até o centro da sala e puxar a alavanca para que o [[Mad Technomancer]] apareça, é aconselhavel correr constantemente pela sala para não ficar cercado pelos anões ('''Nota:''' Os Henchman têm um respawn rápido pois são constamente sumonados pela sala.), uma sugestão é colocar runas de [[Fire Bomb]] no chão, formando um corredor para evitar ataques e ficar trapado pelos [[Dwarf Henchman]]s. Procure atacar somente o Mad Technomancer, quando ele morrer, você irá conseguir seu loot, a [[Technomancer Beard]]. | ||
<gallery mode="nolines" widths=" | <gallery mode="nolines" widths="240px" heights="240px"> | ||
Arquivo:Secret Service Mad Technomancer 1-1.png | Arquivo:Secret Service Mad Technomancer 1-1.png | ||
Arquivo:Secret Service Mad Technomancer 1-2.png | Arquivo:Secret Service Mad Technomancer 1-2.png | ||
| Linha 345: | Linha 373: | ||
{{transcrições|npc=Uncle|texto= | {{transcrições|npc=Uncle|texto= | ||
''Jogador:'' '''Hi'''<br> | |||
[[Uncle]]: Greetings.<br> | |||
''Jogador:'' '''Mission'''<br> | ''Jogador:'' '''Mission'''<br> | ||
[[Uncle]]: Do you have news to make old Uncle happy?<br> | [[Uncle]]: Do you have news to make old Uncle happy?<br> | ||
| Linha 371: | Linha 401: | ||
<!------------------------------- INÍCIO DO TEXTO DO SPOILER P/ O BOTÂO Nº 02 ---------------------------------------------------> | <!------------------------------- INÍCIO DO TEXTO DO SPOILER P/ O BOTÂO Nº 02 ---------------------------------------------------> | ||
== CGB - Carlin == | == CGB - Carlin == | ||
Para se juntar ao '''CGB''' (Carlin's Girls Brigade), vá até a NPC [[Emma]], em [[Carlin]] ({{mapa|32388,31779,6: | Para se juntar ao '''CGB''' (Carlin's Girls Brigade), vá até a NPC [[Emma]], em [[Carlin]] ({{mapa|32388,31779,6:2|aqui}}), ela está acima da prisão aonde está a xerife [[Shauna]], leste da cidade. Fale '''Hi - Join - Yes'''. | ||
'''Falando com Emma''' | '''Falando com Emma''' | ||
{{transcrições|npc=Emma|texto= | {{transcrições|npc=Emma|texto= | ||
''Jogador:'' '''Hi'''<br> | |||
[[Emma]]: HAIL TO THE QUEEN!<br> | |||
''Jogador:'' '''Join'''<br> | ''Jogador:'' '''Join'''<br> | ||
[[Emma]]: The girls brigade is the foremost front on which we fight the numerous enemies of our city ... It's a constant race to stay ahead of our enemies. Absolute loyalty and the willingness to put ones life at stake are attributes that are vital for this brigade ... If you join, you dedicate your service to Carlin alone! Do you truly think that you are girl enough to join the brigade?}} | [[Emma]]: The girls brigade is the foremost front on which we fight the numerous enemies of our city ... It's a constant race to stay ahead of our enemies. Absolute loyalty and the willingness to put ones life at stake are attributes that are vital for this brigade ... If you join, you dedicate your service to Carlin alone! Do you truly think that you are girl enough to join the brigade?<br> | ||
''Jogador:'' '''Yes''' | |||
[[Emma]]: I am still a bit sceptical, but well, welcome to the girls brigade.<br>}} | |||
'''Se for para personagens masculinos''' | '''Se for para personagens masculinos''' | ||
{{transcrições|npc=Emma|texto= | {{transcrições|npc=Emma|texto= | ||
''Jogador:'' '''Hi'''<br> | |||
[[Emma]]: HAIL TO THE QUEEN!<br> | |||
''Jogador:'' '''Join'''<br> | ''Jogador:'' '''Join'''<br> | ||
[[Emma]]: A man in the girls brigade? Come on this is hilarious, this is outright stupid, this is ... exactly what no one would expect. Mhm, on second thought the element of surprise might offset your male inferiority.<br> | [[Emma]]: A man in the girls brigade? Come on this is hilarious, this is outright stupid, this is ... exactly what no one would expect. Mhm, on second thought the element of surprise might offset your male inferiority.<br> | ||
''Jogador:'' '''Yes'''<br> | ''Jogador:'' '''Yes'''<br> | ||
[[Emma]]: I am still a bit sceptical, but well, welcome to the girls brigade.}} | [[Emma]]: I am still a bit sceptical, but well, welcome to the girls brigade.}}<br> | ||
=== <span style="font-size:18px">Missão 01: Borrowed Knowledge</span> === | === <span style="font-size:18px">Missão 01: Borrowed Knowledge</span> === | ||
Fale ''' | Fale '''Hi - Mission''' para [[Emma]]. Ela vai falar sobre a relação estreita que [[Carlin]] possui com [[Thais]] e que a [[Noodles Academy of Modern Magic|Academia de Magia de Edron]], financiada por [[Thais]], se recusa a compartilhar o conhecimento com a guild de druidas de [[Carlin]] e pede que você encontre e roube um [[Nature Magic Spellbook]] [[Arquivo:Nature Magic Spellbook.gif|link=]] na academia de [[Edron]]. Vá até a Ivory Library Tower e encontre o livro atrás da porta selada três andares acima do NPC [[Wyrdin]], volte até Emma e relate sua missão. | ||
'''Falando com Emma''' | '''Falando com Emma''' | ||
{{transcrições|npc=Emma|texto= | {{transcrições|npc=Emma|texto= | ||
''Jogador:'' '''Hi'''<br> | |||
[[Emma]]: HAIL TO THE QUEEN!<br> | |||
''Jogador:'' '''Mission'''<br> | ''Jogador:'' '''Mission'''<br> | ||
[[Emma]]: Our relations with Thais can be called strained at best. Therefore, it's not really astounding that the Thaian financed Edron's academy but refuse to share some knowledge with our druids ... But we won't accept this so easily. With the help of divination, we learnt that the knowledge our druids are looking for is found in a certain book ... It will be your task to enter the academy and to steal this book for us.}} | [[Emma]]: Our relations with Thais can be called strained at best. Therefore, it's not really astounding that the Thaian financed Edron's academy but refuse to share some knowledge with our druids ... But we won't accept this so easily. With the help of divination, we learnt that the knowledge our druids are looking for is found in a certain book ... It will be your task to enter the academy and to steal this book for us.}} | ||
| Linha 404: | Linha 444: | ||
{{transcrições|npc=Emma|texto= | {{transcrições|npc=Emma|texto= | ||
''Jogador:'' '''Hi'''<br> | |||
[[Emma]]: HAIL TO THE QUEEN!<br> | |||
''Jogador:'' '''Mission'''<br> | ''Jogador:'' '''Mission'''<br> | ||
[[Emma]]: Have you been successful?<br> | [[Emma]]: Have you been successful?<br> | ||
''Jogador:'' '''Yes'''<br> | ''Jogador:'' '''Yes'''<br> | ||
[[Emma]]: How unnecessarily complicated, but that's the way those Thaians are. In the end we got what we wanted and they can't do anything about it.}} | [[Emma]]: How unnecessarily complicated, but that's the way those Thaians are. In the end we got what we wanted and they can't do anything about it.}} | ||
{{DASH|'''Atenção:''' Caso você perca o '''Nature Magic Spellbook''', você poderá pegar outro retornando para '''Emma''' e falando: '''hi - mission - lost''' e assim ela dirá que os contatos dela informaram que o livro retornou para a '''Biblioteca de Edron'''.}} | |||
=== <span style="font-size:18px">Missão 02: Codename:Lumberjack</span> === | === <span style="font-size:18px">Missão 02: Codename:Lumberjack</span> === | ||
| Linha 415: | Linha 460: | ||
{{transcrições|npc=Emma|texto= | {{transcrições|npc=Emma|texto= | ||
''Jogador:'' '''Hi'''<br> | |||
[[Emma]]: HAIL TO THE QUEEN!<br> | |||
''Jogador:'' '''Mission'''<br> | ''Jogador:'' '''Mission'''<br> | ||
[[Emma]]: The druids have asked the brigade for a favour. Given that we heavily rely on their resources and they are important supporters of our cities, we can't deny them the request ... A wandering druid has recently visited the Green Claw Swamp, located north west of that corrupted hell hole Venore. While gathering herbs, he noticed some malignant presence in the said area ... Searching for the source of evil there, he detected some old ruin. Suddenly, he was attacked by bonelords and their undead minions.<br> | [[Emma]]: The druids have asked the brigade for a favour. Given that we heavily rely on their resources and they are important supporters of our cities, we can't deny them the request ... A wandering druid has recently visited the Green Claw Swamp, located north west of that corrupted hell hole Venore. While gathering herbs, he noticed some malignant presence in the said area ... Searching for the source of evil there, he detected some old ruin. Suddenly, he was attacked by bonelords and their undead minions.<br> | ||
| Linha 431: | Linha 478: | ||
{{transcrições|npc=Emma|texto= | {{transcrições|npc=Emma|texto= | ||
''Jogador:'' '''Hi'''<br> | |||
[[Emma]]: HAIL TO THE QUEEN!<br> | |||
''Jogador:'' '''Mission'''<br> | ''Jogador:'' '''Mission'''<br> | ||
[[Emma]]: Have you been successful?<br> | [[Emma]]: Have you been successful?<br> | ||
| Linha 442: | Linha 491: | ||
{{transcrições|npc=Emma|texto= | {{transcrições|npc=Emma|texto= | ||
''Jogador:'' '''Hi'''<br> | |||
[[Emma]]: HAIL TO THE QUEEN!<br> | |||
''Jogador:'' '''Mission'''<br> | ''Jogador:'' '''Mission'''<br> | ||
[[Emma]]: The scheming Venoreans are a constant thorn in our side. They supply our enemies with all kind of equipment to boost the threat they pose to our freedom. It will be your task to hinder future weapon deliveries significantly ... The druids have supplied us with some exotic bugs. They are called rust bugs and they did not receive this name for their colour ... Take this box of rust bugs and use them on the keyhole of the smithy in the Ironhouse. These 'pets' will ruin all metal there and it will take them a while to get rid of them.}} | [[Emma]]: The scheming Venoreans are a constant thorn in our side. They supply our enemies with all kind of equipment to boost the threat they pose to our freedom. It will be your task to hinder future weapon deliveries significantly ... The druids have supplied us with some exotic bugs. They are called rust bugs and they did not receive this name for their colour ... Take this box of rust bugs and use them on the keyhole of the smithy in the Ironhouse. These 'pets' will ruin all metal there and it will take them a while to get rid of them.}} | ||
| Linha 452: | Linha 503: | ||
{{transcrições|npc=Emma|texto= | {{transcrições|npc=Emma|texto= | ||
''Jogador:'' '''Hi'''<br> | |||
[[Emma]]: HAIL TO THE QUEEN!<br> | |||
''Jogador:'' '''Mission'''<br> | ''Jogador:'' '''Mission'''<br> | ||
[[Emma]]: Have you been successful?<br> | [[Emma]]: Have you been successful?<br> | ||
| Linha 463: | Linha 516: | ||
{{transcrições|npc=Emma|texto= | {{transcrições|npc=Emma|texto= | ||
''Jogador:'' '''Hi'''<br> | |||
[[Emma]]: HAIL TO THE QUEEN!<br> | |||
''Jogador:'' '''Mission'''<br> | ''Jogador:'' '''Mission'''<br> | ||
[[Emma]]: Venore has plans for a new kind of ship. It will be faster and more resilient than any other known ship. It will surely improve their dominance over the sea trade. Unless we get those plans for ourselves ... And this is where you come into play. Find the ship plans in the Venorean shipyard or perhaps at the harbour and bring them here immediately.}} | [[Emma]]: Venore has plans for a new kind of ship. It will be faster and more resilient than any other known ship. It will surely improve their dominance over the sea trade. Unless we get those plans for ourselves ... And this is where you come into play. Find the ship plans in the Venorean shipyard or perhaps at the harbour and bring them here immediately.}} | ||
| Linha 468: | Linha 523: | ||
Vá para o estaleiro de Venore ({{mapa|32897,32028,6:2|aqui}}), ao chegar lá vá para sala com uma porta selada ao norte ({{mapa|32906,32013,6:2|aqui}}), abra o baú para obter o documento [[Building Plans for a Ship]] [[Arquivo:Building Plans for a Ship.gif|link=]]. Volte para Carlin e reporte a missão para [[Emma]]. | Vá para o estaleiro de Venore ({{mapa|32897,32028,6:2|aqui}}), ao chegar lá vá para sala com uma porta selada ao norte ({{mapa|32906,32013,6:2|aqui}}), abra o baú para obter o documento [[Building Plans for a Ship]] [[Arquivo:Building Plans for a Ship.gif|link=]]. Volte para Carlin e reporte a missão para [[Emma]]. | ||
<gallery mode="nolines" widths=" | <gallery mode="nolines" widths="240px" heights="240px"> | ||
Arquivo:Secret Service CGB 4-1.png | Arquivo:Secret Service CGB 4-1.png | ||
</gallery> | </gallery> | ||
| Linha 479: | Linha 534: | ||
{{transcrições|npc=Emma|texto= | {{transcrições|npc=Emma|texto= | ||
''Jogador:'' '''Hi'''<br> | |||
[[Emma]]: HAIL TO THE QUEEN!<br> | |||
''Jogador:'' '''Mission'''<br> | ''Jogador:'' '''Mission'''<br> | ||
[[Emma]]: Have you been successful?<br> | [[Emma]]: Have you been successful?<br> | ||
| Linha 490: | Linha 547: | ||
{{transcrições|npc=Emma|texto= | {{transcrições|npc=Emma|texto= | ||
''Jogador:'' '''Hi'''<br> | |||
[[Emma]]: HAIL TO THE QUEEN!<br> | |||
''Jogador:'' '''Mission'''<br> | ''Jogador:'' '''Mission'''<br> | ||
[[Emma]]: Ruins of some ancient cathedral are found south west of Venore. It was a project that the Thaians never finished. However, our scouts reported some suspicious activities there ... There is a continual coming and going which hints on something big hiding there. We ask you to enter the ruins of the cathedral and to find out what all these people are doing there ... You might find several hints there, but I am sure you will know exactly when you have found what we are looking for.}} | [[Emma]]: Ruins of some ancient cathedral are found south west of Venore. It was a project that the Thaians never finished. However, our scouts reported some suspicious activities there ... There is a continual coming and going which hints on something big hiding there. We ask you to enter the ruins of the cathedral and to find out what all these people are doing there ... You might find several hints there, but I am sure you will know exactly when you have found what we are looking for.}} | ||
| Linha 495: | Linha 554: | ||
Vá para [[Dark Cathedral]] ({{mapa|32664,32342,7:2|aqui}}), ao chegar lá, desça e vá último nível inferior. Para obter acesso ao último nível você deve puxar todas as alavancas para ativar o teleport na sala central, ao puxar todas as alavancas você terá cerca de 5 minutos para passar pelo teleport. Na parte noroeste desde andar você encontrará um baú atrás de uma porta selada ({{mapa|32598,32380,10:2|aqui}}) com os [[Suspicious Documents]] [[Arquivo:Suspicious Documents.gif|link=]]. Volte para Carlin e reporte a missão para [[Emma]]. | Vá para [[Dark Cathedral]] ({{mapa|32664,32342,7:2|aqui}}), ao chegar lá, desça e vá último nível inferior. Para obter acesso ao último nível você deve puxar todas as alavancas para ativar o teleport na sala central, ao puxar todas as alavancas você terá cerca de 5 minutos para passar pelo teleport. Na parte noroeste desde andar você encontrará um baú atrás de uma porta selada ({{mapa|32598,32380,10:2|aqui}}) com os [[Suspicious Documents]] [[Arquivo:Suspicious Documents.gif|link=]]. Volte para Carlin e reporte a missão para [[Emma]]. | ||
<gallery mode="nolines" widths=" | <gallery mode="nolines" widths="240px" heights="240px"> | ||
Arquivo:Thieves Guild Quest Mission 8a.png | Arquivo:Thieves Guild Quest Mission 8a.png | ||
Arquivo:Thieves Guild Quest Mission 8b.png | Arquivo:Thieves Guild Quest Mission 8b.png | ||
| Linha 507: | Linha 566: | ||
{{transcrições|npc=Emma|texto= | {{transcrições|npc=Emma|texto= | ||
''Jogador:'' '''Hi'''<br> | |||
[[Emma]]: HAIL TO THE QUEEN!<br> | |||
''Jogador:'' '''Mission'''<br> | ''Jogador:'' '''Mission'''<br> | ||
[[Emma]]: Have you been successful?<br> | [[Emma]]: Have you been successful?<br> | ||
| Linha 518: | Linha 579: | ||
{{transcrições|npc=Emma|texto= | {{transcrições|npc=Emma|texto= | ||
''Jogador:'' '''Hi'''<br> | |||
[[Emma]]: HAIL TO THE QUEEN!<br> | |||
''Jogador:'' '''Mission'''<br> | ''Jogador:'' '''Mission'''<br> | ||
[[Emma]]: As you might know, once the old aristocracy of our city shared blood-ties with the noblemen of Thais. There are many unresolved claims for titles and family heirlooms and Thais does little to help in this matter ... Therefore, we will take matters into our own hands. There is a grave in the crypts on the Isle of the Kings in which we assume a book containing ancient family histories and family trees ... We need this book! We will not ask how you acquired it.}} | [[Emma]]: As you might know, once the old aristocracy of our city shared blood-ties with the noblemen of Thais. There are many unresolved claims for titles and family heirlooms and Thais does little to help in this matter ... Therefore, we will take matters into our own hands. There is a grave in the crypts on the Isle of the Kings in which we assume a book containing ancient family histories and family trees ... We need this book! We will not ask how you acquired it.}} | ||
| Linha 530: | Linha 593: | ||
{{transcrições|npc=Emma|texto= | {{transcrições|npc=Emma|texto= | ||
''Jogador:'' '''Hi'''<br> | |||
[[Emma]]: HAIL TO THE QUEEN!<br> | |||
''Jogador:'' '''Mission'''<br> | ''Jogador:'' '''Mission'''<br> | ||
[[Emma]]: Have you been successful?<br> | [[Emma]]: Have you been successful?<br> | ||
| Linha 541: | Linha 606: | ||
{{transcrições|npc=Emma|texto= | {{transcrições|npc=Emma|texto= | ||
''Jogador:'' '''Hi'''<br> | |||
[[Emma]]: HAIL TO THE QUEEN!<br> | |||
''Jogador:'' '''Mission'''<br> | ''Jogador:'' '''Mission'''<br> | ||
[[Emma]]: I have bad news: a mad dwarf threatens to destroy our beloved city. He claims to have invented some device that enables him to destroy the whole city ... He has a laboratory somewhere in Kazordoon, probably somewhere near the technomancer hall. Find him and kill him! Bring me his beard as a proof!}} | [[Emma]]: I have bad news: a mad dwarf threatens to destroy our beloved city. He claims to have invented some device that enables him to destroy the whole city ... He has a laboratory somewhere in Kazordoon, probably somewhere near the technomancer hall. Find him and kill him! Bring me his beard as a proof!}} | ||
O Technomancer está em uma sala atrás de uma porta selada localizada ({{mapa|32544,31908,12: | O Technomancer está em uma sala atrás de uma porta selada localizada ({{mapa|32544,31908,12:2|aqui}}), porém ele só aparece quando você puxa a alavanca localizada na sala. Depois de passar pela porta selada você já encontrará alguns [[Dwarf Henchman]]s, passe por eles e desça as escadas ao final do corredor, você estará em um andar cercado por lava. | ||
Conforme você andar para o norte, '''muitos''' [[Dwarf Henchman]]s e alguns [[Stone Golem]]s irão aparecer, você deverá ir até o centro da sala e puxar a alavanca para que o [[Mad Technomancer]] apareça, é aconselhavel correr constantemente pela sala para não ficar cercado pelos anões ('''Nota:''' Os Henchman têm um respawn rápido pois são constamente sumonados pela sala.), uma sugestão é colocar runas de [[Fire Bomb]] no chão, formando um corredor para evitar ataques e ficar trapado pelos [[Dwarf Henchman]]s. Procure atacar somente o Mad Technomancer, quando ele morrer, você irá conseguir seu loot, a [[Technomancer Beard]]. | Conforme você andar para o norte, '''muitos''' [[Dwarf Henchman]]s e alguns [[Stone Golem]]s irão aparecer, você deverá ir até o centro da sala e puxar a alavanca para que o [[Mad Technomancer]] apareça, é aconselhavel correr constantemente pela sala para não ficar cercado pelos anões ('''Nota:''' Os Henchman têm um respawn rápido pois são constamente sumonados pela sala.), uma sugestão é colocar runas de [[Fire Bomb]] no chão, formando um corredor para evitar ataques e ficar trapado pelos [[Dwarf Henchman]]s. Procure atacar somente o Mad Technomancer, quando ele morrer, você irá conseguir seu loot, a [[Technomancer Beard]]. | ||
<gallery mode="nolines" widths=" | <gallery mode="nolines" widths="240px" heights="240px"> | ||
Arquivo:Secret Service Mad Technomancer 1-1.png | Arquivo:Secret Service Mad Technomancer 1-1.png | ||
Arquivo:Secret Service Mad Technomancer 1-2.png | Arquivo:Secret Service Mad Technomancer 1-2.png | ||
| Linha 564: | Linha 631: | ||
{{transcrições|npc=Emma|texto= | {{transcrições|npc=Emma|texto= | ||
''Jogador:'' '''Hi'''<br> | |||
[[Emma]]: HAIL TO THE QUEEN!<br> | |||
''Jogador:'' '''Mission'''<br> | ''Jogador:'' '''Mission'''<br> | ||
[[Emma]]: Have you been successful?<br> | [[Emma]]: Have you been successful?<br> | ||
| Linha 589: | Linha 658: | ||
<!------------------------------- INÍCIO DO TEXTO DO SPOILER P/ O BOTÂO Nº 03 ---------------------------------------------------> | <!------------------------------- INÍCIO DO TEXTO DO SPOILER P/ O BOTÂO Nº 03 ---------------------------------------------------> | ||
== TBI - Thais == | == TBI - Thais == | ||
Para se juntar ao '''TBI''' (Tibian Bureau of Investigation), vá até o NPC [[Chester Kahs]], em [[Thais]] ({{mapa|32349,32184,6: | Para se juntar ao '''TBI''' (Tibian Bureau of Investigation), vá até o NPC [[Chester Kahs]], em [[Thais]] ({{mapa|32349,32184,6:2|aqui}}) e fale '''Hi - Join - Yes'''. | ||
'''Falando com Chester Kahs''' | '''Falando com Chester Kahs''' | ||
| Linha 602: | Linha 671: | ||
=== <span style="font-size:18px">Missão 01: From Thais with Love</span> === | === <span style="font-size:18px">Missão 01: From Thais with Love</span> === | ||
Fale '''Hi - Mission''', agora [[Chester Kahs]] irá pedir para você conseguir um [[Fire Bug]], e ir para o estaleiro de [[Venore]] ({{mapa|32893,32013,6: | Fale '''Hi - Mission''', agora [[Chester Kahs]] irá pedir para você conseguir um [[Fire Bug]], e ir para o estaleiro de [[Venore]] ({{mapa|32893,32013,6:2|aqui}}). Quando estiver lá, vá para o canto noroeste. Use o fire bug no chão para a madeira pegar fogo. Retorne para Chester e fale sobre sua missão. | ||
'''Falando com Chester Kahs''' | '''Falando com Chester Kahs''' | ||
| Linha 622: | Linha 691: | ||
{{transcrições|npc=Chester Kahs|texto= | {{transcrições|npc=Chester Kahs|texto= | ||
''Jogador:'' '''Hi'''<br> | |||
[[Chester Kahs]]: Salutations, stranger.<br> | |||
''Jogador:'' '''Mission'''<br> | ''Jogador:'' '''Mission'''<br> | ||
[[Chester Kahs]]:Have you fulfilled your current mission?<br> | [[Chester Kahs]]:Have you fulfilled your current mission?<br> | ||
| Linha 633: | Linha 704: | ||
{{transcrições|npc=Chester Kahs|texto= | {{transcrições|npc=Chester Kahs|texto= | ||
''Jogador:'' '''Hi'''<br> | |||
[[Chester Kahs]]: Salutations, stranger.<br> | |||
''Jogador:'' '''Mission'''<br> | ''Jogador:'' '''Mission'''<br> | ||
[[Chester Kahs]]: Your next mission concerns an internal matter for our agency. Some decades ago, one of our most talented field agents vanished in the Green Claw Swamp ...<br> | [[Chester Kahs]]: Your next mission concerns an internal matter for our agency. Some decades ago, one of our most talented field agents vanished in the Green Claw Swamp ...<br> | ||
| Linha 650: | Linha 723: | ||
=== <span style="font-size:18px">Missão 03: Treachery in Port Hope</span> === | === <span style="font-size:18px">Missão 03: Treachery in Port Hope</span> === | ||
Fale '''Hi - Mission''', agora [[Chester Kahs]] quer que você investigue os habitantes de [[Port Hope]] e procure por algum traidor. Vá para o depot de [[Port Hope]]. Nordeste do depot, você encontrará uma pequena construção, ({{mapa|32639,32735,7: | Fale '''Hi - Mission''', agora [[Chester Kahs]] quer que você investigue os habitantes de [[Port Hope]] e procure por algum traidor. Vá para o depot de [[Port Hope]]. Nordeste do depot, você encontrará uma pequena construção, ({{mapa|32639,32735,7:2|aqui}}). Quando você entrar, será atacado por 02 [[Pirate Buccaneer]]s. Depois de matá-los, pegue o [[Scroll (TBI)]] [[Arquivo:Scroll (TBI).gif|link=]] no baú e volte até o Chester. | ||
'''Falando com Chester Kahs''' | '''Falando com Chester Kahs''' | ||
{{transcrições|npc=Chester Kahs|texto= | {{transcrições|npc=Chester Kahs|texto= | ||
''Jogador:'' '''Hi'''<br> | |||
[[Chester Kahs]]: Salutations, stranger.<br> | |||
''Jogador:'' '''Mission'''<br> | ''Jogador:'' '''Mission'''<br> | ||
[[Chester Kahs]]: One of our agents is missing. He was investigating the cause for the slow growth of our colony Port Hope ... You will continue these investigations at the point where the information that the lost agent has sent us ends. Some of the traders in Port Hope must have connections to persons who are interested in sabotaging our efforts in Tiquanda ... Search their personal belongings to find some sort of evidence that we could | [[Chester Kahs]]: One of our agents is missing. He was investigating the cause for the slow growth of our colony Port Hope ... You will continue these investigations at the point where the information that the lost agent has sent us ends. Some of the traders in Port Hope must have connections to persons who are interested in sabotaging our efforts in Tiquanda ... Search their personal belongings to find some sort of evidence that we could use!}} | ||
<gallery mode="nolines"> | <gallery mode="nolines"> | ||
| Linha 666: | Linha 741: | ||
{{transcrições|npc=Chester Kahs|texto= | {{transcrições|npc=Chester Kahs|texto= | ||
''Jogador:'' '''Hi'''<br> | |||
[[Chester Kahs]]: Salutations, stranger.<br> | |||
''Jogador:'' '''Mission'''<br> | ''Jogador:'' '''Mission'''<br> | ||
[[Chester Kahs]]: Have you fulfilled your current mission?<br> | [[Chester Kahs]]: Have you fulfilled your current mission?<br> | ||
| Linha 677: | Linha 754: | ||
{{transcrições|npc=Chester Kahs|texto= | {{transcrições|npc=Chester Kahs|texto= | ||
''Jogador:'' '''Hi'''<br> | |||
[[Chester Kahs]]: Salutations, stranger.<br> | |||
''Jogador:'' '''Mission'''<br> | ''Jogador:'' '''Mission'''<br> | ||
[[Chester Kahs]]: Just recently we were able to secretly help our elven friends to exposure an agitator sent by Carlin to poison our connections with them. The elves' reaction was swift and without compromise ... They banished the delinquent in a place they call 'Hellgate'. Unfortunately, we learnt later that the convict was sent there with several of his belongings and it is very likely that he took vital papers with him ... These papers can tell us much about Carlin's plans in the North. We need you to enter 'Hellgate' and to retrieve the papers for us ... We don't care how you get them. Do whatever you think is necessary.}} | [[Chester Kahs]]: Just recently we were able to secretly help our elven friends to exposure an agitator sent by Carlin to poison our connections with them. The elves' reaction was swift and without compromise ... They banished the delinquent in a place they call 'Hellgate'. Unfortunately, we learnt later that the convict was sent there with several of his belongings and it is very likely that he took vital papers with him ... These papers can tell us much about Carlin's plans in the North. We need you to enter 'Hellgate' and to retrieve the papers for us ... We don't care how you get them. Do whatever you think is necessary.}} | ||
<gallery mode="nolines" widths=" | <gallery mode="nolines" widths="240px" heights="240px"> | ||
Arquivo:Tbihellgate.png | Arquivo:Tbihellgate.png | ||
</gallery> | </gallery> | ||
| Linha 692: | Linha 771: | ||
{{transcrições|npc=Chester Kahs|texto= | {{transcrições|npc=Chester Kahs|texto= | ||
''Jogador:'' '''Hi'''<br> | |||
[[Chester Kahs]]: Salutations, stranger.<br> | |||
''Jogador:'' '''Mission'''<br> | ''Jogador:'' '''Mission'''<br> | ||
[[Chester Kahs]]: Have you fulfilled your current mission?<br> | [[Chester Kahs]]: Have you fulfilled your current mission?<br> | ||
| Linha 698: | Linha 779: | ||
=== <span style="font-size:18px">Missão 05: Coldfinger</span> === | === <span style="font-size:18px">Missão 05: Coldfinger</span> === | ||
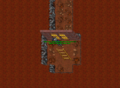
Fale '''Hi - Mission''', agora [[Chester Kahs]] quer que você viaje para o sul dos campos de bárbaros, se você tiver completado as três primeiras missões da [[The Ice Islands Quest]], fale '''Hi - Passage - Barbarian Camp - No - Yes''' para [[Buddel]] em [[Svargrond]], caso contrário você terá que ir andando até o [[Barbarian Camp]]s. Ele pode levar você para o lugar errado, pois ele está bêbado. Fale passagem novamente para saber aonde você está. Quando você chegar lá, siga para o topo da torre da [[Ice Witch]] e use o [[Suspicious Signet Ring]] que [[Chester Kahs]] lhe deu na parte noroeste da sala ({{mapa|32020,31439,1: | Fale '''Hi - Mission''', agora [[Chester Kahs]] quer que você viaje para o sul dos campos de bárbaros, se você tiver completado as três primeiras missões da [[The Ice Islands Quest]], fale '''Hi - Passage - Barbarian Camp - No - Yes''' para [[Buddel]] em [[Svargrond]], caso contrário você terá que ir andando até o [[Barbarian Camp]]s. Ele pode levar você para o lugar errado, pois ele está bêbado. Fale passagem novamente para saber aonde você está. Quando você chegar lá, siga para o topo da torre da [[Ice Witch]] e use o [[Suspicious Signet Ring]] que [[Chester Kahs]] lhe deu na parte noroeste da sala ({{mapa|32020,31439,1:2|aqui}}). Depois, volte até Chester. | ||
'''Falando com Chester Kahs''' | '''Falando com Chester Kahs''' | ||
{{transcrições|npc=Chester Kahs|texto= | {{transcrições|npc=Chester Kahs|texto= | ||
''Jogador:'' '''Hi'''<br> | |||
[[Chester Kahs]]: Salutations, stranger.<br> | |||
''Jogador:'' '''Mission'''<br> | ''Jogador:'' '''Mission'''<br> | ||
[[Chester Kahs]]: It's bad enough that Carlin got a solid foothold in the far North but now the Venoreans also try to move in. They try to gain influence on the barbarian raiders by bribing their leaders or making them great promises ... We want you to cause some bad blood in this relationship. Travel to their most southern camp, enter the ice tower of their leaders and kill some of them ... Here is a signet ring that the Venorean emissaries use to wear. 'Lose' the ring in the north-western corner of the highest level of the tower. They will surely find it there.}} | [[Chester Kahs]]: It's bad enough that Carlin got a solid foothold in the far North but now the Venoreans also try to move in. They try to gain influence on the barbarian raiders by bribing their leaders or making them great promises ... We want you to cause some bad blood in this relationship. Travel to their most southern camp, enter the ice tower of their leaders and kill some of them ... Here is a signet ring that the Venorean emissaries use to wear. 'Lose' the ring in the north-western corner of the highest level of the tower. They will surely find it there.}} | ||
| Linha 716: | Linha 799: | ||
{{transcrições|npc=Chester Kahs|texto= | {{transcrições|npc=Chester Kahs|texto= | ||
''Jogador:'' '''Hi'''<br> | |||
[[Chester Kahs]]: Salutations, stranger.<br> | |||
''Jogador:'' '''Mission'''<br> | ''Jogador:'' '''Mission'''<br> | ||
[[Chester Kahs]]: Have you fulfilled your current mission?<br> | [[Chester Kahs]]: Have you fulfilled your current mission?<br> | ||
| Linha 722: | Linha 807: | ||
=== <span style="font-size:18px">Missão 06: The Weakest Spot</span> === | === <span style="font-size:18px">Missão 06: The Weakest Spot</span> === | ||
Fale '''Hi - Mission''', agora [[Chester Kahs]] quer que você use seu [[Amazon Disguise Kit|kit de disfarce]] e use um [[Crowbar]] para destruir um barril na Taverna dos Bárbaros (em [[Svargrond]]) aqui ({{mapa|32201,31157,7: | Fale '''Hi - Mission''', agora [[Chester Kahs]] quer que você use seu [[Amazon Disguise Kit|kit de disfarce]] e use um [[Crowbar]] para destruir um barril na Taverna dos Bárbaros (em [[Svargrond]]) aqui ({{mapa|32201,31157,7:2|aqui}}). Use o [[Amazon Disguise Kit|kit de disfarce]] quando você estiver dentro da sala e use o [[Crowbar]] no barril à Nordeste. | ||
'''Falando com Chester Kahs''' | '''Falando com Chester Kahs''' | ||
{{transcrições|npc=Chester Kahs|texto= | {{transcrições|npc=Chester Kahs|texto= | ||
''Jogador:'' '''Hi'''<br> | |||
[[Chester Kahs]]: Salutations, stranger.<br> | |||
''Jogador:'' '''Mission'''<br> | ''Jogador:'' '''Mission'''<br> | ||
[[Chester Kahs]]: The women of Carlin have the northern city Svargrond in the firm grip of her manicured hands. At the moment, there is little we can do about it but there is one thing that plays into our hands ... The barbarians have surely at least heard about the fact that alcohol is outlawed in Carlin ... If some amazonian warrior would smash a beer or ale cask in front of some witnesses, the relationship would surely suffer a bit. So go and disguise yourself as an amazon. Then use a crowbar to destroy a cask.}} | [[Chester Kahs]]: The women of Carlin have the northern city Svargrond in the firm grip of her manicured hands. At the moment, there is little we can do about it but there is one thing that plays into our hands ... The barbarians have surely at least heard about the fact that alcohol is outlawed in Carlin ... If some amazonian warrior would smash a beer or ale cask in front of some witnesses, the relationship would surely suffer a bit. So go and disguise yourself as an amazon. Then use a crowbar to destroy a cask.}} | ||
| Linha 744: | Linha 831: | ||
{{transcrições|npc=Chester Kahs|texto= | {{transcrições|npc=Chester Kahs|texto= | ||
''Jogador:'' '''Hi'''<br> | |||
[[Chester Kahs]]: Salutations, stranger.<br> | |||
''Jogador:'' '''Mission'''<br> | ''Jogador:'' '''Mission'''<br> | ||
[[Chester Kahs]]: Have you fulfilled your current mission?<br> | [[Chester Kahs]]: Have you fulfilled your current mission?<br> | ||
| Linha 755: | Linha 844: | ||
{{transcrições|npc=Chester Kahs|texto= | {{transcrições|npc=Chester Kahs|texto= | ||
''Jogador:'' '''Hi'''<br> | |||
[[Chester Kahs]]: Salutations, stranger.<br> | |||
''Jogador:'' '''Mission'''<br> | ''Jogador:'' '''Mission'''<br> | ||
[[Chester Kahs]]: Great, you are here. We need your service in a mission of utmost urgency ...<br> | [[Chester Kahs]]: Great, you are here. We need your service in a mission of utmost urgency ...<br> | ||
| Linha 760: | Linha 851: | ||
[[Chester Kahs]]: We need you to find his base in Kazordoon and to kill him before he can use his infernal machine. Bring us his beard as proof of your success.}} | [[Chester Kahs]]: We need you to find his base in Kazordoon and to kill him before he can use his infernal machine. Bring us his beard as proof of your success.}} | ||
O Technomancer está em uma sala atrás de uma porta selada localizada ({{mapa|32544,31908,12: | O Technomancer está em uma sala atrás de uma porta selada localizada ({{mapa|32544,31908,12:2|aqui}}), porém ele só aparece quando você puxa a alavanca localizada na sala. Depois de passar pela porta selada você já encontrará alguns [[Dwarf Henchman]]s, passe por eles e desça as escadas ao final do corredor, você estará em um andar cercado por lava. | ||
Conforme você andar para o norte, '''muitos''' [[Dwarf Henchman]]s e alguns [[Stone Golem]]s irão aparecer, você deverá ir até o centro da sala e puxar a alavanca para que o [[Mad Technomancer]] apareça, é aconselhavel correr constantemente pela sala para não ficar cercado pelos anões ('''Nota:''' Os Henchman têm um respawn rápido pois são constamente sumonados pela sala.), uma sugestão é colocar runas de [[Fire Bomb]] no chão, formando um corredor para evitar ataques e ficar trapado pelos [[Dwarf Henchman]]s. Procure atacar somente o Mad Technomancer, quando ele morrer, você irá conseguir seu loot, a [[Technomancer Beard]]. | Conforme você andar para o norte, '''muitos''' [[Dwarf Henchman]]s e alguns [[Stone Golem]]s irão aparecer, você deverá ir até o centro da sala e puxar a alavanca para que o [[Mad Technomancer]] apareça, é aconselhavel correr constantemente pela sala para não ficar cercado pelos anões ('''Nota:''' Os Henchman têm um respawn rápido pois são constamente sumonados pela sala.), uma sugestão é colocar runas de [[Fire Bomb]] no chão, formando um corredor para evitar ataques e ficar trapado pelos [[Dwarf Henchman]]s. Procure atacar somente o Mad Technomancer, quando ele morrer, você irá conseguir seu loot, a [[Technomancer Beard]]. | ||
<gallery mode="nolines" widths=" | <gallery mode="nolines" widths="240px" heights="240px"> | ||
Arquivo:Secret Service Mad Technomancer 1-1.png | Arquivo:Secret Service Mad Technomancer 1-1.png | ||
Arquivo:Secret Service Mad Technomancer 1-2.png | Arquivo:Secret Service Mad Technomancer 1-2.png | ||
| Linha 780: | Linha 871: | ||
{{transcrições|npc=Chester Kahs|texto= | {{transcrições|npc=Chester Kahs|texto= | ||
''Jogador:'' '''Hi'''<br> | |||
[[Chester Kahs]]: Salutations, stranger.<br> | |||
''Jogador:'' '''Mission'''<br> | ''Jogador:'' '''Mission'''<br> | ||
[[Chester Kahs]]: Have you fulfilled your current mission?<br> | [[Chester Kahs]]: Have you fulfilled your current mission?<br> | ||
Edição atual tal como às 01h05min de 4 de novembro de 2025
|
|
||||||||||||||||||||||||
| Recompensa: Achievement e Mysterious Package que dependendo da sua escolha poder conter: Sneaky Stabber of Eliteness, Squeezing Gear of Girlpower ou Whacking Driller of Fate. |
||||||||||||||||||||||||
| Localização: Vários locais. Você pode começar em Thais, (aqui |
||||||||||||||||||||||||
| Você enfrentará: Bonelords, Demon Skeletons, Dwarf Henchman, Ghouls, Mechanical Fighters, Stone Golems, Wyvern e mais dependendo da sua escolha:
|
||||||||||||||||||||||||
| Mini-Bosses: Nenhum. |
||||||||||||||||||||||||
| Bosses: Black Knight, Mad Technomancer e dependendo da sua escolha:
|
||||||||||||||||||||||||
| Adicionado: Versão 8.1 (11 de dezembro de 2007) |
||||||||||||||||||||||||
|
||||||||||||||||||||||||
|
||||||||||||||||||||||||

Veja também: Quests.
| Aviso: Caso você precise checar se esta quest já está completa, ela fica organizada no artigo de mesmo nome e Factions em seu Quest Log. |
Requerimentos
Missões para TBI (Thais):
Missões para AVIN (Venore):
- Key 5010.
- The White Raven Monastery Quest parcialmente completa (necessário o acesso à Isle of the Kings e conversa com o NPC Costello sobre "Brother Fugio").
Missões para CGB (Carlin):
- Key 5010.
- The White Raven Monastery Quest parcialmente completa (necessário o acesso à Isle of the Kings e conversa com o NPC Costello sobre "Brother Fugio").
- Opcional: As três primeiras missões da The Ice Islands Quest completa (opcional - facilita o acesso ao local onde se encontra a NPC Freezhild, por meio do barco do NPC Buddel).
Método
Com o fortalecimento econômico, político e militar das grandes cidades, houve a necessidade de criar organizações que pudessem defender os interesses particulares dos governos. Estas organizações são núcleos inteligentes que buscam informações de caráter sigiloso de outros governos e organizações. Mas, somente um agente habilidoso e astuto é capaz de obter sucesso na busca de informações em solo hostil. Certamente ele contará com ferramentas especiais para o êxito de suas missões.
| Atenção: O jogador deve escolher apenas UM dos três serviços propostos: AVIN (Venore), CGB (Carlin) ou TBI (Thais) para realizar as missões. Um vez que você inicie as missões de uma das três organizações, não será possível mudar para outra. Todas têm a mesma missão final e as recompensas são similares. |
Secret Agent Tools
Confira na tabela abaixo, as funcionalidades de cada Secret Agent Tool, lembrando que você só receberá uma delas de acordo com a agência que escolher.
| Secret Agent Tool | Ferramentas | ||||||||||
| Nome | |||||||||||
| Sneaky Stabber of Eliteness | |||||||||||
| Squeezing Gear of Girlpower | |||||||||||
| Whacking Driller of Fate | |||||||||||
Missões
|
|
|
AVIN - Venore
Para se juntar ao AVIN (Agency of Venorean Interest Negotiators), vá até o NPC Uncle, em Venore (aqui![]() ), ele está no sul do barco, 2 andares acima. Fale Hi - Join - Yes.
), ele está no sul do barco, 2 andares acima. Fale Hi - Join - Yes.
Falando com Uncle
|
Jogador: Hi
Uncle: Greetings. |

Missão 01: For Your Eyes Only
Fale Hi - Mission para Uncle, ele vai pedir para você entregar uma carta para o contado da agência me Thais, o NPC Gamel.
Falando com Uncle
You see a secret letter.
It weighs 0.50 oz.
Saindo do barco em Thais você encontrará Gamel na primeira casa ao Leste do barco, um andar abaixo. Fale Hi para ele, Gamel irá summonar 02 Bandits, mate eles e fale Hi novamente e Letter e entregue a carta.
Falando com Gamel
|
Jogador: Hi
Gamel: I don't like the way you look. Help me boys! |
Gamel sumona 2 Bandits para lidarem com você.

Entregando a carta
Retorne até Uncle e relate sua missão.
Reportando a missão
Missão 02: A File Between Friends
Desta vez Uncle quer que você roube livro do castelo de Thais (O nome do documento é File AH-X17L89).
Falando com Uncle
|
Jogador: Hi
Uncle: Greetings. |
Agora vá até o castelo de Thais e consiga o arquivo, vá até o castelo de Thais. Na sala do Rei, você encontrará uma escada no canto esquerdo da sala. Suba. Você vai encontrar uma porta selada, entre, abra as gavetas e pegue o File AH-X17L89, depois retorne até Uncle e relate sua missão.

Reportando a missão
Missão 03: What Men are Made Of
Nesta missão ele quer que você entregue um Barrel of Beer (ele pesa 85 oz, então verifique se você tem cap para levar!) para Carlin, na Taverna Secreta no bueiro.
Falando com Uncles
|
Jogador: Hi
Uncle: Greetings. |
You see a barrel of beer.
It weighs 85.00 oz.
Caminho do Barco até o bueiro mais próximo da taverna.


Quando você descer em qualquer bueiro, duas Amazons serão sumonadas do seu lado, mate-as. Fale Hi - Barrel - Yes com Karl, o NPC que está no balcão. Depois de entregar o barril de cerveja, relate sua missão para Uncle.

Falando com Karl
 |
Volte reporte a missão para Uncle.
Reportando a missão
|
Jogador: Hi
Uncle: Greetings. |
Missão 04: Pawn Captures Knight
Fale hi - mission para Uncle, ele vai explicar que um certo cavaleiro se auto declarou lorde do pântano, ele e os regentes de Venore têm mantido uma relativa paz baseado na honra das duas partes, porém o tal cavaleiro tem se mostrado fora de controle recentemente e virou um incômodo para Venore então agora você deve matar esse cavaleiro, o problema é que o tal cavaleiro é ninguém menos que o Black Knight!
Falando com Uncle
|
Jogador: Hi
Uncle: Greetings. |
Para chegar até a Black Knight Villa com mais rapidez devemos ir para Venore e ir para a saída noroeste da cidade (aqui![]() ), em seguida vá para o norte até chegar à casa abandonada. Se desçer a escada (aqui
), em seguida vá para o norte até chegar à casa abandonada. Se desçer a escada (aqui![]() ), você verá um respawn de um Slime a esquerda e para o sul haverá uma porta trancada. Para abrir a porta vamos precisar da Key 5010, a chave pode ser encontrada em uma árvore ao oeste da vila (aqui
), você verá um respawn de um Slime a esquerda e para o sul haverá uma porta trancada. Para abrir a porta vamos precisar da Key 5010, a chave pode ser encontrada em uma árvore ao oeste da vila (aqui![]() ) e (aqui
) e (aqui![]() ).
).


Com a chave em mãos, abra a porta e desça a escada, desça mais 1 andar e vá para a direita e desça novamente. Vá para o sul e suba, em seguida vá para o sul e prepare-se para enfrentar alguns Skeletons, depois entre em um dos buracos. Nesse andar existem quatro Bonelords. Os dois primeiros estão logo à frente da entrada. Os outros dois ficam espalhados pela caverna, mas podem ser lurados e te atacar em conjunto. Depois de derrota-los, desça e você irá encontrar uma porta para level 50+. Vá para o norte e mate o skeleton. Há também um respawn único de wyvern um pouco mais ao norte e dois Bonelords, um de cada lado. Mate todos e atravesse o teleport ao norte para enfrentar o Black Knight.


Portal de Level 50+
Portal para a sala do Black Knight


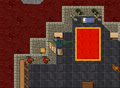
Black Knight 
Essa é a famosa sala do Black Knight. Você entrará pelo extremo norte da sala, o Black Knight fica no centro, assim que entrar o boss já vira na sua direção, portanto é recomendável que o Knight entre primeiro. Dois scorpions e dois Bonelords também dão respawn lá dentro, é recomendado que os shooters foquem e matem os Bonelords para que estes não ataquem o knight que está blocando o boss.

O Boss Black Knight
Recompensas das Árvores


Essa sala é cercada de Fire Fields por todos os lados, a recompensa fica dentro das duas árvores mortas ao sul da sala, mas não há nada nas árvores ao norte. O teleport que traz de volta à sala anterior.
Recompensas
Missão 05: A Cryptic Mission
| Nota: Nesta missão você precisará da The White Raven Monastery Quest parcialmente completa para ter acesso à Isle of the Kings. |
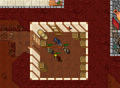
Você deve encontrar um anel, o Family Signet Ring. Ele está nas catacumbas na Isle of the Kings. Desça todas as escadas possíveis, até você chegar no último andar, que é uma caverna com vários Undeads junto com alguns Stalkers e Monks. Siga para Sudoeste. Você irá encontrar uma porta selada (ver a imagem abaixo). Pegue o anel e relate sua missão para Uncle.

Diálogos
Indo para Isle of the Kings com Dalbrect
 |
Voltando para Main com o capitão Jack
 |
Jogador: Hi
Captain Jack: Ahoy, matey. You are lucky to catch me here. I was preparing to set sail. |
Missão 06: A Little Bribe Won't Hurt
Uncle quer que você suborne um bárbaro no raid camp ao Sul de Svargrond, afim de ganhar um aliado contra Carlin. Ela é a NPC Freezhild dentro da Ice Witch Tower, no segundo andar. Fale com ela sobre a weapon crate e volte para reportar sua missão para Uncle em Venore.
Falando com Uncle
|
Jogador: Hi
Uncle: Greetings. |
Para chegar neste local, fale com o NPC Buddel em Svargrond para levar você para o raid camp. Note que ele está bêbado e pode acabar te levando para um lugar diferente do que você pediu, então certifique-se que você está mesmo em raid camp. Você deverá fazer um longo caminho até Freezhild, é aconselhável que traga várias runas GFB para evitar problemas com os bárbaros do local.
Falando com Freezhild
 |

Volte e reporte a missão para Uncle.
Reportando a missão
Missão 07: License to Kill
Uncle quer que você mate o Mad Technomancer em Kazordoon e depois entrege sua barba para ele.
| Nota: Caso você não se sinta confiante para eliminar o Mad Technomancer, você pode comprar sua barba com o Black Bert e pular esta parte da missão. |
Falando com Uncle
|
Jogador: Hi
Uncle: Greetings. |
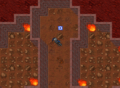
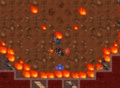
O Technomancer está em uma sala atrás de uma porta selada localizada (aqui![]() ), porém ele só aparece quando você puxa a alavanca localizada na sala. Depois de passar pela porta selada você já encontrará alguns Dwarf Henchmans, passe por eles e desça as escadas ao final do corredor, você estará em um andar cercado por lava.
), porém ele só aparece quando você puxa a alavanca localizada na sala. Depois de passar pela porta selada você já encontrará alguns Dwarf Henchmans, passe por eles e desça as escadas ao final do corredor, você estará em um andar cercado por lava.
Conforme você andar para o norte, muitos Dwarf Henchmans e alguns Stone Golems irão aparecer, você deverá ir até o centro da sala e puxar a alavanca para que o Mad Technomancer apareça, é aconselhavel correr constantemente pela sala para não ficar cercado pelos anões (Nota: Os Henchman têm um respawn rápido pois são constamente sumonados pela sala.), uma sugestão é colocar runas de Fire Bomb no chão, formando um corredor para evitar ataques e ficar trapado pelos Dwarf Henchmans. Procure atacar somente o Mad Technomancer, quando ele morrer, você irá conseguir seu loot, a Technomancer Beard.


O boss Mad Technomancer

Ao entregar a barba para Uncle, ele irá lhe dar um pacote. Clique nele e pegue seu Sneaky Stabber of Eliteness.
Reportando a missão
|
Jogador: Hi
Uncle: Greetings. |
Recompensa

Sneaky Stabber of Eliteness.

You see a mysterious package.
It weighs 10.00 oz.
It bears the seal of the AVIN.
|
|
|
|
CGB - Carlin
Para se juntar ao CGB (Carlin's Girls Brigade), vá até a NPC Emma, em Carlin (aqui![]() ), ela está acima da prisão aonde está a xerife Shauna, leste da cidade. Fale Hi - Join - Yes.
), ela está acima da prisão aonde está a xerife Shauna, leste da cidade. Fale Hi - Join - Yes.
Falando com Emma
 |
Jogador: Hi
Emma: HAIL TO THE QUEEN! |
Se for para personagens masculinos
|
Jogador: Hi
Emma: HAIL TO THE QUEEN! |
Missão 01: Borrowed Knowledge
Fale Hi - Mission para Emma. Ela vai falar sobre a relação estreita que Carlin possui com Thais e que a Academia de Magia de Edron, financiada por Thais, se recusa a compartilhar o conhecimento com a guild de druidas de Carlin e pede que você encontre e roube um Nature Magic Spellbook ![]() na academia de Edron. Vá até a Ivory Library Tower e encontre o livro atrás da porta selada três andares acima do NPC Wyrdin, volte até Emma e relate sua missão.
na academia de Edron. Vá até a Ivory Library Tower e encontre o livro atrás da porta selada três andares acima do NPC Wyrdin, volte até Emma e relate sua missão.
Falando com Emma
|
Jogador: Hi
Emma: HAIL TO THE QUEEN! |
Obtendo o livro.
Nature Magic Spellbook


Reportando a missão
|
| Atenção: Caso você perca o Nature Magic Spellbook, você poderá pegar outro retornando para Emma e falando: hi - mission - lost e assim ela dirá que os contatos dela informaram que o livro retornou para a Biblioteca de Edron. |
Missão 02: Codename:Lumberjack
Fale Hi - Mission para Emma, ela vai contar que um druida visitou o Green Claw Swamp recentemente e que enquanto coletava ervas ele notou uma presença maligna na região, ao procurar pela fonte daquele mal, ele encontrou uma antiga ruína e de repente foi atacado por Bonelords. Após algum tempo o druida chegou a conclusão que os Bonelords estão cultivando árvores da morte que estão carregadas de energia negativa, corrompendo toda área ao seu redor, então Emma quer que você vá até as rúinas no pântano ao noroeste de Venore e investigue o que ou quem está por trás de tudo isso e coloque um fim nessa história, o problema é que você téra que enfrentar ninguém menos que o Black Knight!.
Falando com Emma
|
Jogador: Hi
Emma: HAIL TO THE QUEEN! |
Para chegar até a Black Knight Villa com mais rapidez devemos ir para Venore e ir para a saída noroeste da cidade (aqui![]() ), em seguida vá para o norte até chegar à casa abandonada. Se desçer a escada (aqui
), em seguida vá para o norte até chegar à casa abandonada. Se desçer a escada (aqui![]() ), você verá um respawn de um Slime a esquerda e para o sul haverá uma porta trancada. Para abrir a porta vamos precisar da Key 5010, a chave pode ser encontrada em uma árvore ao oeste da vila (aqui
), você verá um respawn de um Slime a esquerda e para o sul haverá uma porta trancada. Para abrir a porta vamos precisar da Key 5010, a chave pode ser encontrada em uma árvore ao oeste da vila (aqui![]() ) e (aqui
) e (aqui![]() ).
).
Com a chave em mãos, abra a porta e desça a escada, desça mais 1 andar e vá para a direita e desça novamente. Vá para o sul e suba, em seguida vá para o sul e prepare-se para enfrentar alguns Skeletons, depois entre em um dos buracos. Nesse andar existem quatro Bonelords. Os dois primeiros estão logo à frente da entrada. Os outros dois ficam espalhados pela caverna, mas podem ser lurados e te atacar em conjunto. Depois de derrota-los, desça e você irá encontrar uma porta para level 50+. Vá para o norte e mate o skeleton. Há também um respawn único de wyvern um pouco mais ao norte e dois Bonelords, um de cada lado. Mate todos e atravesse o teleport ao norte para enfrentar o Black Knight.
Portal de Level 50+
Portal para a sala do Black Knight
Black Knight
Essa é a famosa sala do Black Knight. Você entrará pelo extremo norte da sala, o Black Knight fica no centro, assim que entrar o boss já vira na sua direção, portanto é recomendável que o Knight entre primeiro. Dois scorpions e dois Bonelords também dão respawn lá dentro, é recomendado que os shooters foquem e matem os Bonelords para que estes não ataquem o knight que está blocando o boss.
O Boss Black Knight
Recompensas das Árvores
Essa sala é cercada de Fire Fields por todos os lados, a recompensa fica dentro das duas árvores mortas ao sul da sala, mas não há nada nas árvores ao norte. O teleport que traz de volta à sala anterior.
Recompensas
Para interromper a criação dessas árvores malignas você deve obter o Rotten Heart of a Tree, ele está dentro da árvore próxima ao teleport atrás de uma porta selada, dê "use" na árvore e olhe em sua backpack para garantir que você recebeu o Rotten Heart of a Tree ![]() . Volte até Emma e relate sua missão.
. Volte até Emma e relate sua missão.

Reportando a missão
|
Missão 03: Rust In Peace
Desta vez Emma quer que você ataque a Ironhouse de Venore. Ela te da uma caixa de jóias com insetos e quer que você use no buraco da chave no porão da Ironhouse (aqui![]() ). Depois de fazê-la, volte até ela e relate sua missão.
). Depois de fazê-la, volte até ela e relate sua missão.
Falando com Emma
|
Jogador: Hi
Emma: HAIL TO THE QUEEN! |

Reportando a missão
|
Missão 04: Plot for A Plan
Emma quer que você vá até Venore. Ela quer os planos de um novo barco. Encontre os no estaleiro ao Noroeste de Venore. Após roubá-los relate sua missão para Emma.
Falando com Emma
|
Jogador: Hi
Emma: HAIL TO THE QUEEN! |
Vá para o estaleiro de Venore (aqui![]() ), ao chegar lá vá para sala com uma porta selada ao norte (aqui
), ao chegar lá vá para sala com uma porta selada ao norte (aqui![]() ), abra o baú para obter o documento Building Plans for a Ship
), abra o baú para obter o documento Building Plans for a Ship ![]() . Volte para Carlin e reporte a missão para Emma.
. Volte para Carlin e reporte a missão para Emma.


Obtendo o Building Plans for a Ship

Reportando a missão
|
Missão 05: No Admittance
Sua próxima missão secreta é encontrar dicas da ruínas de Dark Cathedral. Esteja preparado para encontrar todas as criaturas de Dark Cathedral.
Falando com Emmma
|
Jogador: Hi
Emma: HAIL TO THE QUEEN! |
Vá para Dark Cathedral (aqui![]() ), ao chegar lá, desça e vá último nível inferior. Para obter acesso ao último nível você deve puxar todas as alavancas para ativar o teleport na sala central, ao puxar todas as alavancas você terá cerca de 5 minutos para passar pelo teleport. Na parte noroeste desde andar você encontrará um baú atrás de uma porta selada (aqui
), ao chegar lá, desça e vá último nível inferior. Para obter acesso ao último nível você deve puxar todas as alavancas para ativar o teleport na sala central, ao puxar todas as alavancas você terá cerca de 5 minutos para passar pelo teleport. Na parte noroeste desde andar você encontrará um baú atrás de uma porta selada (aqui![]() ) com os Suspicious Documents
) com os Suspicious Documents ![]() . Volte para Carlin e reporte a missão para Emma.
. Volte para Carlin e reporte a missão para Emma.


Obtendo o Suspicious Documents

Reportando a missão
|
Missão 06: News From the Past
Consiga um livro em Isle of the Kings. Vá até o White Raven Monastery, você não precisa ir até as cavernas profundas, o livro está numa cripta com alguns Ghouls, Skeletons, Stalkers e Demon Skeletons.
Falando com Emmma
|
Jogador: Hi
Emma: HAIL TO THE QUEEN! |
Vá para Isle of the Kings (aqui![]() ) pedindo passagem para o NPC Dalbrect (aqui
) pedindo passagem para o NPC Dalbrect (aqui![]() ), ao chegar lá, desça e vá para o 4º nível inferior aonde você encontrará um baú atrás de uma porta selada (aqui
), ao chegar lá, desça e vá para o 4º nível inferior aonde você encontrará um baú atrás de uma porta selada (aqui![]() ). Abra o baú para obter o livro Book (CGB)
). Abra o baú para obter o livro Book (CGB) ![]() . Volte para Carlin e reporte a missão para Emma.
. Volte para Carlin e reporte a missão para Emma.
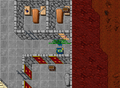
Obtendo o livro.

Reportando a missão
|
Missão 07: License to Kill
Emma quer que você mate o Mad Technomancer em Kazordoon e depois entrege sua barba para ela.
Falando com Emma
|
Jogador: Hi
Emma: HAIL TO THE QUEEN! |
O Technomancer está em uma sala atrás de uma porta selada localizada (aqui![]() ), porém ele só aparece quando você puxa a alavanca localizada na sala. Depois de passar pela porta selada você já encontrará alguns Dwarf Henchmans, passe por eles e desça as escadas ao final do corredor, você estará em um andar cercado por lava.
), porém ele só aparece quando você puxa a alavanca localizada na sala. Depois de passar pela porta selada você já encontrará alguns Dwarf Henchmans, passe por eles e desça as escadas ao final do corredor, você estará em um andar cercado por lava.
Conforme você andar para o norte, muitos Dwarf Henchmans e alguns Stone Golems irão aparecer, você deverá ir até o centro da sala e puxar a alavanca para que o Mad Technomancer apareça, é aconselhavel correr constantemente pela sala para não ficar cercado pelos anões (Nota: Os Henchman têm um respawn rápido pois são constamente sumonados pela sala.), uma sugestão é colocar runas de Fire Bomb no chão, formando um corredor para evitar ataques e ficar trapado pelos Dwarf Henchmans. Procure atacar somente o Mad Technomancer, quando ele morrer, você irá conseguir seu loot, a Technomancer Beard.
O boss Mad Technomancer
Ao entregar a barba para Emma, ela irá lhe dar um pacote. Clique nele e pegue seu Squeezing Gear of Girlpower.
Reportando a missão
|
Jogador: Hi
Emma: HAIL TO THE QUEEN! |
Recompensa

Squeezing Gear of Girlpower.

You see a mysterious package.
It weighs 10.00 oz.
It bears the seal of the CGB.
|
|
|
|
TBI - Thais
Para se juntar ao TBI (Tibian Bureau of Investigation), vá até o NPC Chester Kahs, em Thais (aqui![]() ) e fale Hi - Join - Yes.
) e fale Hi - Join - Yes.
Falando com Chester Kahs
|
Jogador: Hi
Chester Kahs: Salutations, stranger. |
Missão 01: From Thais with Love
Fale Hi - Mission, agora Chester Kahs irá pedir para você conseguir um Fire Bug, e ir para o estaleiro de Venore (aqui![]() ). Quando estiver lá, vá para o canto noroeste. Use o fire bug no chão para a madeira pegar fogo. Retorne para Chester e fale sobre sua missão.
). Quando estiver lá, vá para o canto noroeste. Use o fire bug no chão para a madeira pegar fogo. Retorne para Chester e fale sobre sua missão.
Falando com Chester Kahs
|
Jogador: Hi
Chester Kahs: Salutations, stranger. |

Use o firebug aqui.
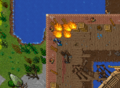


Volte a reporte a missão para Chester Kahs.
Reportando a missão
|
Jogador: Hi
Chester Kahs: Salutations, stranger. |
Missão 02: Operation Green Claw
Fale Hi - Mission, agora Chester Kahs vai dizer que sua próxima missão é uma assunto interno da agência e diz que se trata de um dos seus mais talentosos agentes que desapareceu décadas atrás no Green Claw Swamp. Chester diz que há relatos de coisas estranhas e ruínas misteriosas no pantâno e que você deve ir até lá para tentar encontrar alguma pista sobre este agente. Este agente é ninguém menos que o Black Knight!
Falando com Chester Kahs
|
Jogador: Hi
Chester Kahs: Salutations, stranger. |
Para chegar até a Black Knight Villa com mais rapidez devemos ir para Venore e ir para a saída noroeste da cidade (aqui![]() ), em seguida vá para o norte até chegar à casa abandonada. Se desçer a escada (aqui
), em seguida vá para o norte até chegar à casa abandonada. Se desçer a escada (aqui![]() ), você verá um respawn de um Slime a esquerda e para o sul haverá uma porta trancada. Para abrir a porta vamos precisar da Key 5010, a chave pode ser encontrada em uma árvore ao oeste da vila (aqui
), você verá um respawn de um Slime a esquerda e para o sul haverá uma porta trancada. Para abrir a porta vamos precisar da Key 5010, a chave pode ser encontrada em uma árvore ao oeste da vila (aqui![]() ) e (aqui
) e (aqui![]() ).
).
Com a chave em mãos, abra a porta e desça a escada, desça mais 1 andar e vá para a direita e desça novamente. Vá para o sul e suba, em seguida vá para o sul e prepare-se para enfrentar alguns Skeletons, depois entre em um dos buracos. Nesse andar existem quatro Bonelords. Os dois primeiros estão logo à frente da entrada. Os outros dois ficam espalhados pela caverna, mas podem ser lurados e te atacar em conjunto. Depois de derrota-los, desça e você irá encontrar uma porta para level 50+. Vá para o norte e mate o skeleton. Há também um respawn único de wyvern um pouco mais ao norte e dois Bonelords, um de cada lado. Mate todos e atravesse o teleport ao norte para enfrentar o Black Knight.
Portal de Level 50+
Portal para a sala do Black Knight
Black Knight
Essa é a famosa sala do Black Knight. Você entrará pelo extremo norte da sala, o Black Knight fica no centro, assim que entrar o boss já vira na sua direção, portanto é recomendável que o Knight entre primeiro. Dois scorpions e dois Bonelords também dão respawn lá dentro, é recomendado que os shooters foquem e matem os Bonelords para que estes não ataquem o knight que está blocando o boss.
O Boss Black Knight
Recompensas das Árvores
Essa sala é cercada de Fire Fields por todos os lados, a recompensa fica dentro das duas árvores mortas ao sul da sala, mas não há nada nas árvores ao norte. O teleport que traz de volta à sala anterior.
Recompensas
Além das recompensas, abra a porta selada com o baú. Você receberá um documento, uma carta do Black Knight ![]() . Retorne até o Chester para relatar sua missão.
. Retorne até o Chester para relatar sua missão.

Missão 03: Treachery in Port Hope
Fale Hi - Mission, agora Chester Kahs quer que você investigue os habitantes de Port Hope e procure por algum traidor. Vá para o depot de Port Hope. Nordeste do depot, você encontrará uma pequena construção, (aqui![]() ). Quando você entrar, será atacado por 02 Pirate Buccaneers. Depois de matá-los, pegue o Scroll (TBI)
). Quando você entrar, será atacado por 02 Pirate Buccaneers. Depois de matá-los, pegue o Scroll (TBI) ![]() no baú e volte até o Chester.
no baú e volte até o Chester.
Falando com Chester Kahs
|
Jogador: Hi
Chester Kahs: Salutations, stranger. |


Reportando a missão
|
Jogador: Hi
Chester Kahs: Salutations, stranger. |
Missão 04: Objective Hellgate
Fale Hi - Mission, agora Chester Kahs quer que você investigue alguns documentos no Hellgate. Vá para o Hellgate (você precisa da Chave 3012 para entrar) e encontre um corpo morto, ele está localizado no começo, com vários Ghouls, Skeletons e 2 Demon Skeletons. Tome cuidado por que as vezes o boss Zevelon Duskbringer aparece aqui junto com vampiros próximo da porta do túmulo. No mapa abaixo, você começa no ponto A e o corpo está no ponto B atrás de uma porta selada. Pegue o documento Intelligence Reports ![]() , saia do Hellgate e reporte a missão para Chester Kahs.
, saia do Hellgate e reporte a missão para Chester Kahs.
Falando com Chester Kahs
|
Jogador: Hi
Chester Kahs: Salutations, stranger. |


Reportando a missão
|
Jogador: Hi
Chester Kahs: Salutations, stranger. |
Missão 05: Coldfinger
Fale Hi - Mission, agora Chester Kahs quer que você viaje para o sul dos campos de bárbaros, se você tiver completado as três primeiras missões da The Ice Islands Quest, fale Hi - Passage - Barbarian Camp - No - Yes para Buddel em Svargrond, caso contrário você terá que ir andando até o Barbarian Camps. Ele pode levar você para o lugar errado, pois ele está bêbado. Fale passagem novamente para saber aonde você está. Quando você chegar lá, siga para o topo da torre da Ice Witch e use o Suspicious Signet Ring que Chester Kahs lhe deu na parte noroeste da sala (aqui![]() ). Depois, volte até Chester.
). Depois, volte até Chester.
Falando com Chester Kahs
|
Jogador: Hi
Chester Kahs: Salutations, stranger. |

Use o anel no sqm do canto superior esquerdo.
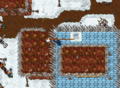
Mensagem após usar o anel.


Volte a reporte a missão para Chester Kahs.
Reportando a missão
|
Jogador: Hi
Chester Kahs: Salutations, stranger. |
Missão 06: The Weakest Spot
Fale Hi - Mission, agora Chester Kahs quer que você use seu kit de disfarce e use um Crowbar para destruir um barril na Taverna dos Bárbaros (em Svargrond) aqui (aqui![]() ). Use o kit de disfarce quando você estiver dentro da sala e use o Crowbar no barril à Nordeste.
). Use o kit de disfarce quando você estiver dentro da sala e use o Crowbar no barril à Nordeste.
Falando com Chester Kahs
|
Jogador: Hi
Chester Kahs: Salutations, stranger. |
| Nota: Seja cuidadoso: Se você usar o disfarce antes de executar sua missão, você pode comprar outro de Chester Kahs por 1000 gp (1k), se for necessário. |


Volte a reporte a missão para Chester Kahs.
Reportando a missão
|
Jogador: Hi
Chester Kahs: Salutations, stranger. |
Missão 07: License to Kill
Fale Hi - Mission, agora Chester Kahs quer que você mate o Mad Technomancer em Kazordoon e depois entregue sua barba para ele.
Falando com Chester Kahs
|
Jogador: Hi
Chester Kahs: Salutations, stranger. |
O Technomancer está em uma sala atrás de uma porta selada localizada (aqui![]() ), porém ele só aparece quando você puxa a alavanca localizada na sala. Depois de passar pela porta selada você já encontrará alguns Dwarf Henchmans, passe por eles e desça as escadas ao final do corredor, você estará em um andar cercado por lava.
), porém ele só aparece quando você puxa a alavanca localizada na sala. Depois de passar pela porta selada você já encontrará alguns Dwarf Henchmans, passe por eles e desça as escadas ao final do corredor, você estará em um andar cercado por lava.
Conforme você andar para o norte, muitos Dwarf Henchmans e alguns Stone Golems irão aparecer, você deverá ir até o centro da sala e puxar a alavanca para que o Mad Technomancer apareça, é aconselhavel correr constantemente pela sala para não ficar cercado pelos anões (Nota: Os Henchman têm um respawn rápido pois são constamente sumonados pela sala.), uma sugestão é colocar runas de Fire Bomb no chão, formando um corredor para evitar ataques e ficar trapado pelos Dwarf Henchmans. Procure atacar somente o Mad Technomancer, quando ele morrer, você irá conseguir seu loot, a Technomancer Beard.
O boss Mad Technomancer
- Ao entregar a barba para Chester, ele irá lhe dar um pacote. Clique nele e pegue seu Whacking Driller of Fate.
Reportando a missão
|
Jogador: Hi
Chester Kahs: Salutations, stranger. |
Recompensa

Whacking Driller of Fate.

You see a mysterious package.
It weighs 10.00 oz.
It bears the seal of the TBI.
|
|
|
|
Extras
Parabéns, você concluiu a quest!
Para se aliar a mais facções confira outros spoilers: