|
|
|
||||||||||||||||||||||||


Wrath of the Emperor Quest: mudanças entre as edições
| [edição aprovada] | [edição aprovada] |
 m |
|||
| (130 revisões intermediárias por 20 usuários não estão sendo mostradas) | |||
| Linha 1: | Linha 1: | ||
<noinclude>{{DASH|img=desambig|Esta é uma página sobre a '''quest''' Wrath of the Emperor. Para a criatura, veja [[Wrath of the Emperor (Criatura)]].}}</noinclude> | |||
{{Infobox_Quest|List={{{1|}}}|GetValue={{{GetValue|}}} | {{Infobox_Quest|List={{{1|}}}|GetValue={{{GetValue|}}} | ||
| premium = sim | | premium = sim | ||
| questloc = Mainland | |||
| name = Wrath of the Emperor Quest | | name = Wrath of the Emperor Quest | ||
| reward = | | reward = [[Arquivo:Outfit Wayfarer Male.gif]] [[Arquivo:Outfit Wayfarer Female.gif]]</br>[[Wayfarer Outfits]], possibilidade de negociar com [[Chartan]], [[Spiritual Charm]], [[Black Jade Cobra]], 100 [[Platinum Coin]]s, 10 [[Crystal Coin]]s, 10 [[Red Dragon Scale]]s, 5 [[Gold Ingot]]s, 10 [[Black Pearl]]s, [[Blue Gem]], [[Dragon Backpack]], [[Jewelled Backpack]], [[Achievement]]s, escolher entre [[Elite Draken Helmet]], [[Merudri Scale Mail]], [[Royal Draken Mail]] ou [[Royal Scale Robe]]. | ||
| location = | | location = [[Banuta]], [[Muggy Plains]], [[Northern Zao]] e [[Razachai]]. | ||
| lvl = 80 | | lvl = 80 | ||
| dangers = [[ | | dangers = [[Brimstone Bug]], [[Demon]], [[Dragon Lord]], [[Draken Abomination]], [[Draken Elite]], [[Draken Spellweaver]], [[Draken Warmaster]], [[Ghastly Dragon]], [[Lancer Beetle]], [[Lizard Chosen]], [[Lizard High Guard]], [[Lizard Legionnaire]], [[Lizard Magistratus ]], [[Lizard Noble]], [[Lizard Zaogun]], [[Mutated Bat]], [[Mutated Tiger]], [[Serpent Spawn]], [[Souleater]], [[Terramite]], [[Undead Dragon]], [[Wailing Widow]]. | ||
| legend = A hora de atacar o Imperador Dragão finalmente chegou! | | mini = [[Fury of the Emperor]], [[Scorn of the Emperor]], [[Spite of the Emperor]] e [[Wrath of the Emperor (Criatura)|Wrath of the Emperor]]. | ||
| bosses = [[The Keeper]], [[Snake God Essence]], [[Snake Thing]], [[Lizard Abomination]] e [[Mutated Zalamon]].</br> | |||
'''Durante invasões em Muggy Plains:'''</br>[[Battlemaster Zunzu]], [[Dreadmaw]], [[Flamecaller Zazrak]], [[Grand Mother Foulscale]] e [[The Blightfather]].</br>'''Durante invasões em Razachai:'''</br>[[Hatebreeder]]. | |||
| legend = A hora de atacar o Imperador Dragão finalmente chegou, a batalha final por Zao começa! | |||
| implemented = 8.6 | | implemented = 8.6 | ||
| expanded1 = 15.00.249ccc | |||
| lvlreq = 120 | | lvlreq = 120 | ||
| duration = Longa | | duration = Longa | ||
| Linha 13: | Linha 19: | ||
| teamnote = 1 [[blocker]] | | teamnote = 1 [[blocker]] | ||
| dif = 3 | | dif = 3 | ||
| imgleg = | | imgleg = Dragon Plates | ||
| quests = | | quests = | ||
| spoiler = | | spoiler = | ||
{{TOC left}} | |||
{{clear}} | |||
* | = Requerimentos = | ||
* [[Children of the Revolution Quest]] (task diária concluída) | * Um amigo para ajudar na primeira missão. | ||
* [[The Ape City Quest]] (para acessar as profundezas de [[Banuta]] | * [[Children of the Revolution Quest]] (task diária concluída). | ||
* [[The Ape City Quest]] até a missão 8 completada (para acessar as profundezas de [[Banuta]]). | |||
* [[Wood]] | * [[The New Frontier Quest]] (até a missão 8 completada). É recomendável que você complete a '''The New Frontier''' para ganhar acesso ao portal de fogo em [[Thais]] (acesso rápido a [[Muggy Plains]]). Ter a '''The New Frontier''' completa se torna obrigatório para a ''Missão 05: New in Town''. | ||
* | * 01 [[Wood]] | ||
* 03 [[Nail]]s | |||
* [[Shovel]] | * [[Shovel]] | ||
* [[Rake]] | * [[Rake]] | ||
* [[Pick]] | * [[Pick]] | ||
* [[Obsidian Knife]] | * [[Obsidian Knife]] | ||
* 15 | * 15.000 [[gp]]s | ||
'''Nota | {{DASH|'''Nota''': A cada ação feita nas missões com sucesso, a mensagem de "'''Your questlog has been updated.'''" aparecerá avisando no seu [[Server Log]] e será atualizado o texto encontrado no [[Quest Log]].}} | ||
== | = Método = | ||
== [[Arquivo:Dragon Plates.gif|40px|link=]] Missão 01: Catering the Lion's Den [[Arquivo:Dragon Plates.gif|40px|link=]] == | |||
{{DASH|'''Notas:''' | |||
* Nessa missão é necessária a ajuda de um amigo (Se ele já fez a quest e não tem mais a [[Marked Crate]], empreste a sua para ele) | |||
* Leve a [[Rake]], a [[Shovel]], a [[Pick]] e a [[Obsidian Knife]], pois você precisará na próxima missão. | |||
* Quando estiver próximo a algum dos guardas, não utilize o Local Chat.}} | |||
Encontre [[Zalamon]] ao leste de [[Zao Steppe]], ({{mapa|33335,31416,7:2|aqui}}) e fale '''Hi - Mission - Yes - Yes'''. Zalamon vai dizer que finalmente chegou a hora de passar através do '''Grande Portão''', mas para isso vamos precisar de uma rota alternativa, pois o Imperador aumentou a defesa do portão depois de nosso ataque durante a última missão da [[Children of the Revolution Quest]]. | |||
'''Falando com Zalamon''' | |||
{{transcrições|npc=Zalamon|texto= | |||
''Jogador:'' '''Hi'''</br> | |||
'''Zalamon:''' Not many travellerzz zzezze dayzz. I hope you bring good newzz.</br> | |||
''Jogador:'' '''Mission'''</br> | |||
'''Zalamon:''' Zze attackzz have weakened our enemy zzignificantly. Yet, your quezzt continuezz. Bezzidezz zzome tazzkzz you could take, zze zzreat of zze emperor izz zztill hanging over our headzz like a rain cloud. ...</br> | |||
'''Zalamon:''' Zzo, are you indeed willing to continue zze fight for our cauzze?</br> | |||
''Jogador:'' '''Yes'''</br> | |||
'''Zalamon:''' You continue to imprezz, zzoftzzkin. ...</br> | |||
'''Zalamon:''' A contact of zze rezzizztanzze izz located furzzer in zze norzz of Zao. ...</br> | |||
'''Zalamon:''' Zze emperor will drag hizz forzzezz to zze great gate now to bolzzter hizz defenzze. Zzinzze we attacked zze gate directly, he will not expect uzz taking a completely different route to reach zze norzzern territoriezz. ...</br> | |||
'''Zalamon:''' I azzume you are already geared up and ready to conquer zze norzz?</br> | |||
''Jogador:'' '''Yes'''</br> | |||
'''Zalamon:''' Your determination izz highly appreciated. To zzneak pazzt zze eyezz of zze enemy, you will have to uzze a diverzzion. Zzere are zzeveral old tunnelzz beneazz zze zzoil of Zzao. ...</br> | |||
'''Zalamon:''' One of zzem izz uzzed azz a maintenanzze connection by enemy lizardzz. To enter it, you will have to uzze a dizzguizze. Zzomezzing like a crate perhapzz. ...</br> | |||
'''Zalamon:''' Mh, if you can find zzome nailzz - 3 should be enough - and 1 piezze of wood, I should be able to create an appropriate cazzing. Return to me if you found zze itemzz and we will talk about zze next zztep.}} | |||
Nossa primeira missão será usar um túnel de manutenção para chegar ao norte de [[Zao]]. Para os guardas não notarem nada, vamos usar um disfarce em [[Marked Crate|forma de caixa]]. Para fazer a caixa, [[Zalamon]] vai pedir 03 [[Nail]]s e 01 [[Wood]] para fazer a caixa. Entregue-os falando '''Hi - Mission - Yes - Crate - Yes''' e Zalamon irá fazer e entregar a caixa para você. | |||
'''Falando com Zalamon''' | |||
{{transcrições|npc=Zalamon|texto= | |||
''Jogador:'' '''Hi'''</br> | |||
'''Zalamon:''' Not many travellerzz zzezze dayzz. I hope you bring good newzz.</br> | |||
''Jogador:'' '''Mission'''</br> | |||
'''Zalamon:''' Ah you have returned. I azzume you already found zzome itemzz to build a proper dizzguizze?</br> | |||
''Jogador:'' '''Yes'''</br> | |||
'''Zalamon:''' Very good, I am confident zzizz will zzuffizze. Now I can build and mark a crate large enough for you to fit in - while zztill being able to breazze of courzze - and I will mark it in our tongue zzo it will look lezz zzuzzpizziouzz. ...</br> | |||
'''Zalamon:''' Wizz zzeir eyezz towardzz zze gate, your chanzzezz to zzlip zzrough have never been better. I will keep zze zzpare materialzz here wizz me, we can alwayzz build a new one if you need to.</br> | |||
''Jogador:'' '''Crate'''</br> | |||
'''Zalamon:''' Ah I zzee. You are ready for your mizzion and waiting for me to create and mark zze crate?</br> | |||
''Jogador:'' '''Yes'''</br> | |||
'''Zalamon:''' Alright. Let uzz create a crate. Hm. Let me zzee. ...</br> | |||
'''Zalamon:''' Good. Zzat will do. ...</br> | |||
'''Zalamon:''' Zze maintenanzze tunnelzz are in zze eazzt of zze plainzz, near ze coazt. Here, I will mark zzem on your map. ...</br> | |||
'''Zalamon:''' Uzze zze dizzguizze wizzely, try to hide in zze dark and avoid being zzeen at all cozzt. ...</br> | |||
'''Zalamon:''' Onzze you have reached zze norzz, you can find zze rezzizztanzze hideout at zze ozzer zzpot I marked on your map. Now hurry.}} | |||
<gallery mode="nolines"> | |||
Arquivo:Wrath of the Emperor Quest 1-1.png|Marked Crate. | |||
</gallery> | |||
[[ | Ele marcou em seu mapa a localização do túnel, que fica no leste de [[Muggy Plains]] ({{mapa|33356,31180,7:2|aqui}}). Você pode chegar ao local através do teleport de [[Zao Steppe]] que leva a [[Muggy Plains]] ({{mapa|33146,31250,7:2|aqui}}) ou através do [[Fire Portal]] do [[Halls of Hope]] em [[Thais]], basta ter a [[The New Frontier Quest]] completa e falar '''Hi - Temple - Father - Yes - Yes''' para a NPC [[Ivalisse]]. Após passar o portal você se encontrará em uma casa em [[Muggy Plains]] ({{Mapa|33338,31169,7:2|aqui}}). | ||
{{DASH|'''Nota:''' Ao falar com Ivalisse, você receberá a mensagem "'''Your questlog has been updated.'''", porém essa mensagem se refere a missão ''The Unwary Mage'' da '''Forgotten Knowledge Quest'''. Não é necessário realizar esta missão para avançar na '''Wrath of the Emperor Quest'''.}} | |||
'''Falando com Ivalisse''' | |||
{{transcrições|npc=Ivalisse|texto= | |||
''Jogador:'' '''Hi'''</br> | |||
'''Ivalisse:''' Hello, worshiper of the Astral Shapers! Welcome to the temple! While you are here to pay tribute, you can also learn something about the ancient art of imbuing.</br> | |||
''Jogador:'' '''Mission'''</br> | |||
'''Ivalisse:''' Besides my various duties in the temple, I also take care of visitors. Well, I would but right now I can't get my mind of how my father's doing. I am sorry.</br> | |||
''Jogador:'' '''Father'''</br> | |||
'''Ivalisse:''' Papa- my father has recently started an adventure on his own. His name is Silus, he is a member of the Edron academy. ...</br> | |||
'''Ivalisse:''' Ever since he has joined what he called a 'special research division', he went on and on about Zao and how venturing there would help him get ahead. ...</br> | |||
'''Ivalisse:''' You must know he lives for science, especially concerning far-away lands and cultures. He talked about the importance of practical field studies but, frankly, he isn't particularly cut out for that. ...</br> | |||
'''Ivalisse:''' I know he has to focus to get his research done right now and I simply cannot leave my duties in the temple. You seem like a person who travels a lot, would you be willing to help me?</br> | |||
''Jogador:'' '''Yes'''</br> | |||
'''Ivalisse:''' Thank you! He told me the other researchers in his team discovered a bridge leading to a cave with a dragon sculpture somewhere in a muggy, grassy area. ...</br> | |||
'''Ivalisse:''' The cave is said to lead to a temple complex underground which is used as a gathering place for a race called 'draken'. He left right away and tried to enter Zao on his own. ...</br> | |||
'''Ivalisse:''' I was even more worried when he explained the route he chose. He wanted to head straight through a giant steppe and through a massive mountainous ridge to reach the grassy plains of lower Zao. ...</br> | |||
'''Ivalisse:''' If you're interested: I know that the Shapers were active in all corners of Tibia. If you happen to find Shaper ruins there, you may even be able to gather some of their lost knowledge. ...</br> | |||
'''Ivalisse:''' I may have been a bit stubborn and angry the day he left, I even refused to say farewell. And now I worry if he is safe. ...</br> | |||
'''Ivalisse:''' I can not do much to help you but I can point you to the fiery orange gate to get you quite close to his last known location in Zao. ...</br> | |||
'''Ivalisse:''' You will be able to enter it as long as you are already familiar with Zao and visited its steppes and jungles at least once. What do you say, will you help me find my father?</br> | |||
''Jogador:'' '''Yes'''</br> | |||
'''Ivalisse:''' You would? That's great! Thank you! If you can find my father, tell him I understand and that I really miss him!}} | |||
<table style="margin-left:auto; margin-right:auto;"> | |||
<tr> | |||
<td><span class="titulo-quest">'''Portal de Thais:'''</span></td> | |||
<td><span class="titulo-quest">'''Portal de Muggy Plains:'''</span></td> | |||
</tr> | |||
<tr> | |||
<td>[[Arquivo:Wrath of the Emperor Quest Mapa 1-3.png|300px|Portal dos Halls of Hope (Thais)]]</td> | |||
<td>[[Arquivo:Wrath of the Emperor Quest Mapa 1-2.png|600px|Portal de Muggy Plains]]</td> | |||
</tr> | |||
</table> | |||
'' | Desça o buraco e vá para o norte da caverna. Em um dado momento, aparecerá uma mensagem laranja para "vestir" seu disfarce de caixa. Você e seu amigo devem dar ''use'' na caixa e se transformarão nela. | ||
<gallery | <gallery mode="nolines"> | ||
Arquivo:Wrath of the Emperor Quest 1-4.png|Portal de Fogo nos Halls of Hope em Thais | |||
Arquivo:Wrath of the Emperor Quest 1-5.png|Local de chegada em Muggy Plains ao passar pelo portal dos Halls of Hope | |||
Arquivo:The New Frontier Quest 9-1.png|Local de chegada em Muggy Plains ao passar pelo portal ao sul de Dragonblaze Peaks | |||
Arquivo:Wrath of the Emperor Quest 1-6.png|Entrada do túnel | |||
Arquivo:Wrath of the Emperor Quest 1-7.png|1º Aviso sobre os guardas | |||
Arquivo:Wrath of the Emperor Quest 1-8.png|2º Aviso, dê ''use'' na caixa. | |||
</gallery> | </gallery> | ||
<span class="titulo-quest">'''The Maintenance Tunnel'''</span> [[Arquivo:Marked Crate.gif|link=]]</br> | |||
{{DASH|img=Information Icon|size=32px|'''Nota:''' Antes de começar o tutorial de como andar pelo túnel, veja abaixo o que fazer caso seja capturado.}} | |||
<span class="titulo-quest">'''Como fugir em caso de captura'''</span></br> | |||
[[ | Se você for capturado, irá parar em uma pequena caverna fechada e perderá sua caixa de disfarce. Lá, o guarda djinn [[Zumtah]] lhe oferece a única maneira de fugir.</br> | ||
Fale com ele até convencê-lo. As palavras chaves são: '''Hi - Exit - No - Yes - Exit - No - Yes - Exit - No - Yes - 278 - Exit - Exit - Exit - Exit - Exit'''.</br> | |||
Ele vai transformar você em um [[Lancer Beetle]]. Então use o buraco na parede ao norte para escapar, ao pisar no SQM marcado com o círculo azul você voltará para a entrada.</br> | |||
{{DASH|'''Atenção: Você deverá fazer todo o caminho novamente, não interessa onde você errou. Além disso, sua caixa será devolvida.'''}} | |||
<gallery mode="nolines"> | |||
Arquivo:Wrath of the Emperor Quest 1-9.png|Encontrando o NPC Zumtah após ser capturado | |||
Arquivo:Wrath of the Emperor Quest 1-10.png|Jogador transformado em Lancer Beetle e o local de saída | |||
<gallery | |||
</gallery> | </gallery> | ||
'''Falando com Zumtah''' | |||
{{transcrições|npc=Zumtah|texto= | |||
''Jogador:'' '''Hi'''</br> | |||
'''Zumtah:''' Another visitor to this constricted, cosy, calm realm, perfect except for an '''exit'''. Muhaha.</br> | |||
''Jogador:'' '''Exit'''</br> | |||
'''Zumtah:''' There is none. Don't even think about getting out. You are trapped. Down here, with me. You will never get out of here. Now that this is clear, are you giving up?</br> | |||
''Jogador:'' '''No'''</br> | |||
'''Zumtah:''' I've already told you that you can't get out. What's the problem? Do you even see an exit?</br> | |||
''Jogador:'' '''Yes'''</br> | |||
'''Zumtah:''' Muhahaha. Where? I can only see a dark cave with nothing than bones and a djinn in it. You mean that small hole there? Muhahaha.</br> | |||
''Jogador:'' '''Exit'''</br> | |||
'''Zumtah:''' A what? I don't even know what you're talking about, human. If you aren't just giving up - will you kindly change the topic please?</br> | |||
''Jogador:'' '''No'''</br> | |||
'''Zumtah:''' You are starting to get on my nerves. Is this the only topic you know?</br> | |||
''Jogador:'' '''Yes'''</br> | |||
'''Zumtah:''' Pesky, persistent human.</br> | |||
''Jogador:'' '''Exit'''</br> | |||
'''Zumtah:''' Haha, no! No. Why don't you just stop asking me that and start enjoying your stay here?</br> | |||
''Jogador:'' '''No'''</br> | |||
'''Zumtah:''' But there is no escape, I said NO. You've already asked several times and my answer will stay the same. What is this? Are you trying to test me?</br> | |||
''Jogador:'' '''Yes'''</br> | |||
'''Zumtah:''' Muhahaha. Then I will give you a test. How many years do you think have I been here? '''89''', '''164''' or '''278'''?</br> | |||
''Jogador:'' '''278'''</br> | |||
'''Zumtah:''' Correct human, and that is not nearly how high you would need to count to tell all the lost souls I've seen dying here. I AM PERPETUAL. Muahahaha.</br> | |||
''Jogador:'' '''Exit'''</br> | |||
'''Zumtah:''' Oh, you mean - if I have ever been out of here in those 278 years? Well, I - I can't remember. No, I can't remember. Sorry.</br> | |||
''Jogador:'' '''Exit'''</br> | |||
'''Zumtah:''' No, I really can't remember. I enjoyed my stay here so much that I forgot how it looks outside of this hole. Outside. The air, the sky, the light. Oh well... well.</br> | |||
''Jogador:'' '''Exit'''</br> | |||
'''Zumtah:''' Oh yes, yes. I... I never really thought about how you creatures feel in here I guess. I... just watched all these beings die here. ...</br> | |||
'''Zumtah:''' I... enjoyed this torture so much that I forgot time and everything around me. ...</br> | |||
'''Zumtah:''' I feel - sorry. Yes, sorry.</br> | |||
''Jogador:'' '''Exit'''</br> | |||
'''Zumtah:''' Oh, excuse me of course, you... wanted to go. Like all... the others. I am sorry, so sorry. You... you can leave. Yes. You can go. You are free. I shall stay here and help every poor soul which ever gets thrown in here from this day onward. ...</br> | |||
'''Zumtah:''' Yes, I will redeem myself. Maybe in another 278 years. ...</br> | |||
'''Zumtah:''' If you want to go, just ask for an '''exit''' and I will transform you into a creature small enough to fit through that hole over there.</br> | |||
''Jogador:'' '''Exit'''</br> | |||
'''Zumtah:''' Alright, as I said you are free now. There will not be an outside for the next three centuries, but you - go. ...</br> | |||
'''Zumtah:''' Oh and I recovered the strange crate you where hiding in, it will wait for you at the exit since you can't carry it as... a beetle, muhaha. Yes, you shall now crawl through the passage as a beetle. There you go.}} | |||
No caminho do longo túnel há guardas que vigiam contra intrusos, se você for pego, terá que recomeçar todo o percurso, até a hora que conseguir finalizar e chegar em uma construção ao norte de Zao. | |||
<span class="titulo-quest">'''Caminho sem ser capturado'''</span></br> | |||
Nesse momento, você deve prestar muita atenção. Durante o caminho, há portas, onde nelas guardas observam a passagem através de frestas. A cada aproximadamente 10 segundos, eles fecham essa fresta e você deve passar rapidamente antes que eles abram a fresta novamente. A dica é andar passo por passo com muita calma. | |||
[[Arquivo:wrathofemperor4.jpg]] | |||
Logo na frente, haverão alguns [[Lizard Tunnel Guard]]s protegendo o túnel e para não ser visto, você deve andar em um caminho específico, fora do olhar deles. Abaixo temos o caminho que está ilustrado com moedas (No meio do caminho haverão mais portas com guardas). | |||
{{DASH|'''Dica''': Em alguns locais será necessário andar na diagonal, por isso fique bastante atento e vá devagar. É aconselhável o uso de moedas ou vials pra marcar o caminho correto, isso irá facilitar caso erre em algo.}} | |||
Comece encostado à direita da parede e siga as moedas, durante o caminho, você vai encontrar [[Lizard Tunnel Guard]]s, caso passe perto deles de maneira incorreta (saindo do caminho ilustrado com moedas), você será "preso" e terá que começar tudo de novo. O mesmo vale para as portas que possuem aberturas que abrem e fecham constantemente. | |||
<gallery mode="nolines" widths="200px" heights="200px" perrow="4"> | |||
Arquivo:Wrath of the Emperor Quest 1-11.png | |||
Arquivo:Wrath of the Emperor Quest 1-12.png | |||
Arquivo:Wrath of the Emperor Quest 1-13.png | |||
Arquivo:Wrath of the Emperor Quest 1-14.png | |||
Arquivo:Wrath of the Emperor Quest 1-15.png | |||
Arquivo:Wrath of the Emperor Quest 1-16.png | |||
Arquivo:Wrath of the Emperor Quest 1-17.png | |||
Arquivo:Wrath of the Emperor Quest 1-18.png | |||
</gallery> | |||
Conforme você avance pelo túnel, irá chegar a uma bifurcação ({{mapa|33384,31067,8:2|aqui}}), um jogador deve seguir as platinums para ir às alavancas. Nesta parte do caminho você ou seu amigo vão precisar ficar na parte de baixo, puxando as alavancas, enquanto o outro irá por cima pelo caminho a esquerda, haverá uma parede bloqueando a passagem para quem escolher ir por baixo. Para o jogador que escolher ir por cima, deve andar encostado na parede, seguindo as moedas até chegar no quadrado demarcado na imagem, tome cuidado para não passar perto das lâmpadas enquanto estiverem acesas. Mande seu colega puxar a alavanca e vá para o sul e para oeste rapidamente. | |||
Em seguida, mande seu colega puxar a segunda alavanca e continue seguindo o caminho de moedas, Você verá uma alavanca no seu andar. Aproxime-se e puxe ela para abrir o muro do andar abaixo e seu colega poderá andar para oeste e encontrar outra alavanca, ao puxá-la, a última lâmpada se apagará e você poderá passar, assim se reencontrando novamente com seu amigo através da escada. Ambos devem continuar indo para oeste até encontrar uma escada, suba por ela para chegar ao andar terréo do norte de Zao. | |||
A primeira missão ainda não acabou! Você precisa encontrar a base rebelde que fica à leste, no meio das montanhas ao norte de [[Zao]] ({{mapa|33173,31075,7:2|aqui}}) . Durante todo o caminho, conhecido como [[Spirittrails]], você encontrará criaturas como [[Lizard High Guard]]s, [[Lizard Legionnaire]]s, [[Lizard Dragon Priest]]s, [[Souleater]]s, [[Mutated Tiger]]s, [[Mutated Rat]]s, etc, por isso tome cuidado. | |||
[[Arquivo:Wrath of the Emperor Quest Mapa 1-1.png|240px|right]] | |||
<gallery | <gallery mode="nolines" widths="145px" heights="106.3px"> | ||
Arquivo:Wrath of the Emperor Quest 1-19.png | |||
Arquivo:Wrath of the Emperor Quest 1-20.png | |||
Arquivo:Wrath of the Emperor Quest 1-21.png | |||
Arquivo:Wrath of the Emperor Quest 1-22.png | |||
Arquivo:Wrath of the Emperor Quest 1-23.png | |||
Arquivo:Wrath of the Emperor Quest 1-24.png | |||
Arquivo:Wrath of the Emperor Quest 1-25.png | |||
Arquivo:Wrath of the Emperor Quest 1-26.png | |||
Arquivo:Wrath of the Emperor Quest 1-27.png | |||
Arquivo:Wrath of the Emperor Quest 1-28.png | |||
</gallery> | </gallery> | ||
Chegando lá, fale '''Hi - Mission - Zalamon''' com o NPC [[Chartan]] completando assim a primeira missão. | |||
'''Falando com o Chartan''' | |||
== | {{transcrições|npc=Chartan|texto= | ||
''Jogador:'' '''Hi'''</br> | |||
'''Chartan:''' Great Znake forgive me to converze wiz ziz unworzy blankzkin.</br> | |||
''Jogador:'' '''Mission'''</br> | |||
'''Chartan:''' Mhm, what are you doing here. Who zent you?</br> | |||
''Jogador:'' '''Zalamon'''</br> | |||
'''Chartan:''' I zee. Zalamon zent word of ze arrival of a zoftzkin quite zome time ago. Zat muzt be you zen. ...</br> | |||
'''Chartan:''' Well, I exzpected zomeone more - imprezzive. However, we will zee how far you can get. You've got newz from ze zouz? ...</br> | |||
'''Chartan:''' Hm, I underztand. ...</br> | |||
'''Chartan:''' Oh you did. ...</br> | |||
'''Chartan:''' I zee. Interezting. ...</br> | |||
'''Chartan:''' You being here meanz we have eztablished connectionz to ze zouz. Finally. And you are going to help uz. Well, zere iz zertainly a lot for you to do. Zo better get ztarted.}} | |||
== [[Arquivo:Dragon Plates.gif|40px|link=]] Missão 02: First Contact [[Arquivo:Dragon Plates.gif|40px|link=]] == | |||
Fale '''Hi - Mission - Yes''' com [[Chartan]] para iniciar a missão. [[Chartan]] irá contar que a base rebelde fica num antigo templo, que foi abandonado há um bom tempo. O teleporte que levava para [[Muggy Plains]] estava funcionando normalmente, mas parou de funcionar quando a corrupção em [[Zao]] atingiu aquela área. | |||
'''Falando com Chartan''' | |||
{{transcrições|npc=Chartan|texto= | |||
''Jogador:'' '''Hi'''</br> | |||
'''Chartan:''' Great Znake forgive me to converze wiz ziz unworzy blankzkin.</br> | |||
''Jogador:'' '''Mission'''</br> | |||
'''Chartan:''' Zo are you ready to get zomezing done?</br> | |||
''Jogador:'' '''Yes'''</br> | |||
'''Chartan:''' Alright. Well, az you might not be aware of it yet - we are on top of an old temple complex. It haz been abandoned and it haz crumbled over time. ...</br> | |||
'''Chartan:''' Ze teleporter over zere uzed to work juzt fine to get uz back to ze zouz. But it haz ztopped operating for quite zome time. ...</br> | |||
'''Chartan:''' My men believe it iz a dizturbanze cauzed by ze corruption zat zpreadz everywhere. Zey are too zcared to go down zere. And zat'z where you come in. ...</br> | |||
'''Chartan:''' Zere were meanz to activate teleporterz zomewhere in ze complex. But zinze you cannot reach all ze roomz, I guezz you will have to improvize. ...</br> | |||
'''Chartan:''' Here iz ze key to ze entranze to ze complex. Figure zomezing out, reztore ze teleporter zo we can get back to ze plainz in ze zouz.}} | |||
Sua segunda missão é dar um jeito de arrumar o teleporte. Desça a escada na direita da base rebelde ({{mapa|33220,31057,9:2|aqui}}). Você irá usar sua [[Shovel]], [[Rake]], [[Pick]] e [[Obsidian Knife]]. Siga as instruções e imagens abaixo para pegar os "ingredientes". | |||
[[Arquivo: | {{DASH|<span class<nowiki>=</nowiki>"titulo-quest">'''Restaurando o Portal'''</span></br> | ||
* '''Passo 1:''' Use um [[Rake]] [[Arquivo:Rake.gif|link=]] ({{mapa|33267,31045,10:2|aqui}}) para obter o [[Lump of Clay]] [[Arquivo:Lump of Clay.gif|link=]] e em seguida use uma [[Shovel]] [[Arquivo:Shovel.gif|link=]] ({{mapa|33251,31065,10:2|aqui}}) para obter a [[Sacred Earth]] [[Arquivo:Sacred Earth.gif|link=]]. | |||
** '''Passo 1.1:''' Agora use o [[Lump of Clay]] [[Arquivo:Lump of Clay.gif|link=]] na [[Sacred Earth]] [[Arquivo:Sacred Earth.gif|link=]] para obter o [[Lump of Sacred Clay]] [[Arquivo:Lump of Sacred Clay.gif|link=]]. | |||
* '''Passo 2:''' Use uma [[Pick]] [[Arquivo:Pick.gif|link=]] na ponta rachada da mesa ({{mapa|33255,31057,10:2|aqui}}) para obter uma [[Unworked Sacred Wood]] [[Arquivo:Unworked Sacred Wood.gif|link=]]. | |||
** '''Passo 2.1:''' Agora use a [[Obsidian Knife]] [[Arquivo:Obsidian Knife.gif|link=]] na [[Unworked Sacred Wood]] [[Arquivo:Unworked Sacred Wood.gif|link=]] para obter o [[Sacred Bowl]] [[Arquivo:Sacred Bowl.gif|link=]]. | |||
* '''Passo 3:''' Use o [[Lump of Sacred Clay]] [[Arquivo:Lump of Sacred Clay.gif|link=]] no [[Sacred Bowl]] [[Arquivo:Sacred Bowl.gif|link=]] para obter o [[Sacred Bowl of Purification]] [[Arquivo:Sacred Bowl of Purification.gif|link=]]. | |||
* '''Passo 4:''' Use o [[Sacred Bowl of Purification]] [[Arquivo:Sacred Bowl of Purification.gif|link=]] em um SQM de [[Muddy Water]] [[Arquivo:Muddy Water 1.gif|link=]] ({{mapa|33270,31037,10:2|aqui}}) para obter o [[Bowl with Sacred Water]] [[Arquivo:Bowl with Sacred Water.gif|link=]]. | |||
* '''Passo 5:''' Use o [[Bowl with Sacred Water]] [[Arquivo:Bowl with Sacred Water.gif|link=]] no [[Coal Basin]] [[Arquivo:Coal Basin.gif|link=]] ({{mapa|33241,31046,10:2|aqui}}) para obter o [[Sacred Coal]] [[Arquivo:Sacred Coal.gif|link=]]. | |||
* '''Passo 6:''' Use o [[Sacred Coal]] [[Arquivo:Sacred Coal.gif|link=]] em um SQM de [[Muddy Water]] [[Arquivo:Muddy Water 1.gif|link=]] ({{mapa|33282,31036,10:2|aqui}}), a água ficará [[Shallow Water Tile|limpa]] [[Arquivo:Shallow Water 1.gif|link=]].}} | |||
<gallery mode="nolines" widths="190px" heights="190px" perrow="5"> | |||
Arquivo:Wrath of the Emperor Quest 2-1.png|Use a [[Shovel]] no SQM marcado na imagem para obter a [[Sacred Earth]].</br>Mensagem: <span style="color: #D14703;">'''You dig out a handful of earth from this sacred place.'''</span> | |||
Arquivo:Wrath of the Emperor Quest 2-2.png|Use o [[Rake]] no SQM marcado na imagem para obter o [[Lump of Clay]].</br>Mensagem: <span style="color: #D14703;">'''You dig out a handful of ordinary clay.'''</span> | |||
Arquivo:Wrath of the Emperor Quest 2-3.png|Use o [[Lump of Clay]] na [[Sacred Earth]] para obter o [[Lump of Sacred Clay]].</br>Mensagem: <span style="color: #D14703;">'''You carefully mix the clay with the sacred earth.'''</span> | |||
Arquivo:Wrath of the Emperor Quest 2-4.png|Use uma [[Pick]] na ponta rachada da mesa para obter uma [[Unworked Sacred Wood]].</br>Mensagem: <span style="color: #D14703;">'''The cracked part of the table lets you cut out a large chunk of wood with your pick.'''</span> | |||
Arquivo:Wrath of the Emperor Quest 2-5.png|Use a [[Obsidian Knife]] na [[Unworked Sacred Wood]] para obter o [[Sacred Bowl]].</br>Mensagem: <span style="color: #D14703;">'''You carve a solid bowl out of the chunk of wood.'''</span> | |||
Arquivo:Wrath of the Emperor Quest 2-6.png|Use o [[Lump of Sacred Clay]] no [[Sacred Bowl]] para obter o [[Sacred Bowl of Purification]].</br>Mensagem: <span style="color: #D14703;">'''You carefully coat the inside of the wooden bowl with the sacred clay.'''</span> | |||
Arquivo:Wrath of the Emperor Quest 2-7.png|Use a [[Sacred Bowl of Purification]] no SQM marcado na imagem para obter o [[Bowl with Sacred Water]].</br>Mensagem: <span style="color: #D14703;">'''Filling the corrupted water into the sacred bowl completely purifies the fluid.'''</span> | |||
Arquivo:Wrath of the Emperor Quest 2-8.png|Use o [[Bowl with Sacred Water]] no [[Coal Basin]] para obter o [[Sacred Coal]]. | |||
Arquivo:Wrath of the Emperor Quest 2-9.png|Use o [[Sacred Coal]] no SQM marcado na imagem para purificar a água (A água ficará azul por alguns segundos).</br>Mensagem: <span style="color: #D14703;">'''As you give the coal into the pool, corrupted fluid begins to dissolve, leaving the purified refreshing water.'''</span> | |||
</gallery> | |||
[[Arquivo: | Após completar todo o processo acima, volte até [[Chartan]] e entregue sua missão falando '''Hi - Mission - Yes'''. A partir de agora você poderá usar o primeiro teleport [[Arquivo:Mystic Flame.gif|link=]] (Chama da esquerda) que leva para [[Muggy Plains]]. | ||
'''Reportando a missão''' | |||
{{transcrições|npc=Chartan|texto= | |||
''Jogador:'' '''Hi'''</br> | |||
''' | '''Chartan:''' Great Znake forgive me to converze wiz ziz unworzy blankzkin.</br> | ||
''Jogador:'' '''Mission'''</br> | |||
'''Chartan:''' Zo? Did you find a way to reztore ze teleporter?</br> | |||
''Jogador:'' '''Yes'''</br> | |||
'''Chartan:''' You did it! Zere waz zome kind of zparkle and I zink it iz working again - oh pleaze feel free to try it, I uhm, I will wait here and be ready juzt in caze zomezing uhm happenz to you. ...</br> | |||
'''Chartan:''' And if you head to Zalamon, be zure to inform him about our zituation. Food rationz are running low and we are ztill not well equipped. We need to eztablish a working zupply line.}} | |||
[[Arquivo: | == [[Arquivo:Dragon Plates.gif|40px|link=]] Missão 03: The Keeper [[Arquivo:Dragon Plates.gif|40px|link=]] == | ||
Completando a segunda missão, volte até [[Zalamon]], ({{Mapa|33354,31411,8:2|aqui}}), no sul de [[Zao]] e fale '''Hi - Mission - Yes''', ele vai falar que os jardins ao norte de [[Zao]] estão contaminados por uma praga. Seu objetivo será matar o que era antes o protetor do jardim, a criatura chamada [[The Keeper]]. | |||
'''Falando com Zalamon''' | |||
''' | {{transcrições|npc=Zalamon|texto= | ||
''Jogador:'' '''Hi'''</br> | |||
'''Zalamon:''' Not many travellerzz zzezze dayzz. I hope you bring good newzz.</br> | |||
''Jogador:'' '''Mission'''</br> | |||
'''Zalamon:''' You ezztablished zze connection to zze hideout, good. But zzizz izz no time to rezzt. Your new tazzk will be quite different. ...</br> | |||
'''Zalamon:''' Zze gardenzz are plagued by a creature. Zze former keeper of zzizz garden became an abomination of madnezz zzat needzz to be zztopped. ...</br> | |||
'''Zalamon:''' He hidezz deep underground and it will be dangerouzz to challenge him in hizz lair but I am willing to rizzk it. ...</br> | |||
'''Zalamon:''' Find him, dezztroy him, bring me hizz - I uhm, mean it izz utterly nezzezzary for you to deliver me a proof of hizz deazz. ...</br> | |||
'''Zalamon:''' Now go - what are you waiting for, zzoftzzkin? Ready to finish what needzz to be finished?</br> | |||
''Jogador:'' '''Yes'''</br> | |||
'''Zalamon:''' Fine. I guezz poizzoning zzome of hizz plantzz will be enough to lure him out of hizz conzzealment. Zzizz plant poizzon here should allow you to do zzome zzignificant damage, take it. ...</br> | |||
'''Zalamon:''' You can find him eazzt of zze corrupted gardenzz. Zzere uzzed to be a zzmall domizzile zzere but it hazz probably been conzzumed by zze corruption zzo beware. And now - go.}} | |||
Aceitando a missão de [[Zalamon]], você receberá um [[Flask of Plant Poison]] [[Arquivo:Flask of Plant Poison.gif|link=]] (Caso perca seu flask, basta voltar ao Zalamon e dizer [[Flask of Plant Poison]] e ele lhe dará outro). | |||
Vá até a base rebelde usando o teleporte em [[Muggy Plains]]. Saindo da base, vá até uma pequena montanha ao sul, enfrentando uma grande variedade de criaturas. | |||
Chegando lá, use a [[Shovel]] para descer no buraco ({{mapa|33222,31100,7:2|aqui}}). Durante todo o caminho, vários [[Brimstone Bug]]s, [[Lancer Beetle]]s e [[Wailing Widow]]s vão ser encontrados em um espaço bastante pequeno, então você deve tomar cuidado para evitar ''waste'' desnecessário. | |||
<gallery mode="nolines" widths="240px" heights="240px"> | |||
Arquivo:Wrath of the Emperor Quest Mapa 3-1.png | |||
Arquivo:Wrath of the Emperor Quest Mapa 3-2.png | |||
Arquivo:Wrath of the Emperor Quest Mapa 3-3.png | |||
</gallery> | |||
<gallery mode="nolines"> | |||
Arquivo:Wrath of the Emperor Quest 3-4.png|Entrada da caverna do The Keeper | |||
Arquivo:Wrath of the Emperor Quest 3-5.png|Área da sala onde você deve usar o ''Flask of Plant Poison'' | |||
</gallery> | |||
[[Arquivo: | <span class="titulo-quest">'''The Keeper'''</span><span style="vertical-align:10px">[[Arquivo:The Keeper.gif|link=]]</span></br> | ||
Use o [[Flask of Plant Poison]] nas [[Giant Dreadcoil]]s [[Arquivo:Giant Dreadcoil.gif|link=]] ao norte da sala para sumonar o [[The Keeper]]. Se você estiver com um time, só há necessidade de uma pessoa usar. Ele tem bastante vida, mas pode ser morto com poucos hits passando pelos poisons especiais da sala. Após ser morto, simplesmente dê ''use'' no corpo da criatura para pegar a prova que [[Zalamon]] precisa, a [[The Tail of the Keeper|Tail of the Keeper]].</br> | |||
<span class="titulo-quest">'''Estratégia:'''</span></br> | |||
[[ | Para você conseguir causar mais dano ao [[The Keeper]] com os fields, você deve passar ele em cima dos fields '''verdes''', quando fizer isso, ele tomará um dano bem alto, o field ficará amarelo e um dos amarelos ficará verde, você deverá ir até esse outro field verde para hitá-lo novamente.</br> | ||
O field amarelo que virará verde sempre será um field do lado oposto do seu, por exemplo, se você passou o [[The Keeper]] no field verde do lado esquerdo, o próximo field verde será do lado direito (e vice-versa). | |||
<gallery mode="nolines"> | |||
Arquivo:wrathofemperor15.jpg|Time lutando contra o The Keeper | |||
</gallery> | |||
Após pegar a cauda retorne até [[Zalamon]] e entregue sua missão.</br> | |||
{{DASH|'''Nota''': Agora você pode comprar runas, poções e comidas com o NPC [[Chartan]] ({{Mapa|33213,31059,9:2|aqui}}) na base rebelde.}} | |||
'''Entregando missão''' | |||
{{transcrições|npc=Zalamon|texto= | |||
''Jogador:'' '''Hi'''</br> | |||
'''Zalamon:''' Not many travellerzz zzezze dayzz. I hope you bring good newzz.</br> | |||
''Jogador:'' '''Mission'''</br> | |||
'''Zalamon:''' Zzo... you finished him. Show me hizz head, will you?</br> | |||
''Jogador:'' '''Yes'''</br> | |||
'''Zalamon:''' Zzizz izz not hizz head but clearly belonged to zze keeper. I - I am imprezzed. You can go now. Leave me alone for a zzecond.}} | |||
== [[Arquivo:Dragon Plates.gif|40px|link=]] Missão 04: Sacrament of the Snake [[Arquivo:Dragon Plates.gif|40px|link=]] == | |||
{{DASH|'''Nota''': É aconselhável ir em time nessa missão e bem preparado pra enfrentar várias [[Medusa]]s, [[Serpent Spawn]]s, [[Hydra]]s, [[Phantasm]]s, [[Souleater]]s, [[Ghastly Dragon]]s entre outras criaturas.}} | |||
Para a quarta missão, fale '''Hi - Mission''' para [[Zalamon]] ({{Mapa|33354,31411,8:2|aqui}}). Ele contará que seu povo colonizou várias partes do mundo, mas a grande quantidade de inimigos encontrados sempre foi um grande problema. Contudo, apenas dois reinos ainda existem, mas perderam o contato um com o outro. A [[Great Snake]] revelou a [[Zalamon]] que, em uma grande floresta muito distante, existe outro povo lizard. Sim, estamos nos referindo à [[Tiquanda]].</br> | |||
Entretanto, esse povo falhou com a [[Great Snake]] e perdeu a sua confiança. Mas eles ainda estão em posse de uma relíquia: um [[Snake Sceptre|cetro]] de imenso poder que pode ser encontrado no antigo templo (abaixo de [[Banuta]]). | |||
'''Falando com Zalamon''' | |||
{{transcrições|npc=Zalamon|texto= | |||
''Jogador:'' '''Hi'''</br> | |||
'''Zalamon:''' Not many travellerzz zzezze dayzz. I hope you bring good newzz.</br> | |||
''Jogador:'' '''Mission'''</br> | |||
'''Zalamon:''' At zze dawn of time, zze children of zze Great Zznake were numerouzz. Zzey daringly colonizzed many partzz of zze world. But all bravery did not help againzzt zze sheer number of enemiezz zzey encountered. ...</br> | |||
'''Zalamon:''' And while zze entitiezz zze unbelieverzz call godzz battled for power out of vanity, zze fazze of zze world changed violently. ...</br> | |||
'''Zalamon:''' Many zzentrezz of our magnifizzent zzivilizzation were dezztroyed and only two realmzz zzat we know of remained intact but lozzt contact to each ozzer. ...</br> | |||
'''Zalamon:''' In vizzionzz, zze Great Zznake revealed to Zalamon zze exzzizztenzze of ozzer lizzard people in a vazzt jungle in a far away land. ...</br> | |||
'''Zalamon:''' Zzough zze lizardzz of zze land failed zze Great Zznake and lozzt itzz favour, zzey are zztill in pozzezzion of ancient reliczz of immenzze power, onzze imbued by zze Great Zznake himzzelf. ...</br> | |||
'''Zalamon:''' I had vizzionzz of an - item. Yezz. It may be uzzeful for uzz - I mean you, ezzpecially you. ...</br> | |||
'''Zalamon:''' We need a zzeptre of power zzat can be found in zze underground of an ancient temple. It hazz been overrun by zzavage apezz and you will have to fight zzem and zze ancient guardianzz of zze temple azz well. Get uzz zzat zzeptre wherever it might be. ...</br> | |||
'''Zalamon:''' It wazz revealed zzat it hazz been zzplit into 3 partzz for reazzonzz zzat are of no importanzze anymore. Zzizz powerful devizze could help uzz in our battle againzzt zze emperor. ...</br> | |||
'''Zalamon:''' A shaft, a cuzzp, and an emerald form a zzeptre of zzuch power zzat zze partzz were hidden and are now guarded by vile creaturezz. ...</br> | |||
'''Zalamon:''' Find it. Retrieve it. And bring it back to me.}} | |||
O | Além de ser bem protegido, esse cetro é dividido em 3 partes: [[Sceptre Part (Emerald)|A Esmeralda]], [[Sceptre Part (Shaft)|O Bastão]] e [[Sceptre Part (Cusp)|O Suporte]]. Então, as 3 partes devem ser unidas em um altar sagrado. | ||
Você precisará de 15.000 [[gp]]s, sendo 5.000 [[gp]]s para cada parte do cetro. Também deverá ter acesso as profundezas de [[Banuta]], fazendo até a última missão da [[The Ape City Quest]]. | |||
{{DASH|Agora você deve ir até [[Port Hope]] e então [[Banuta]]. Você pode ir a pé ou pode pegar o barco do NPC [[Lorek]] que leva você até [[Banuta]] caso você já tenha 20 ou mais task points na [[Paw and Fur - Hunting Elite Quest]]. Ao chegar em Banuta, caso já tenha o atalho liberado, vá até a entrada dele no meio da floresta de [[Tiquanda]] ({{mapa|32853,32669,7:2|aqui}}) e use o teleport que leva você para o primeiro andar de Deeper Banuta.}} | |||
[[ | Quando passar pelo teleporte, você chegará no andar com muitas [[Serpent Spawn]]s, [[Medusa]]s e [[Hydra]]s. A porta para '''Deeper Banuta''' fica ({{mapa|32808,32631,11:2|aqui}}). A partir de agora existem mais quatro andares, sendo três deles com os NPCs que você deve falar, e o quarto com o altar para montar o cetro. Quando encontrar os NPCs [[Ghost Of A Priest]]. | ||
{{DASH|[[Arquivo:Achievement.gif|link=]] Ao falar com o NPC existe a possibilidade do jogador receber o achievement '''"{{Achievement|Ghostwhisperer}}"'''.}} | |||
= | <span class="titulo-quest">'''Primeira Parte: O Bastão'''</span>[[Arquivo:Sceptre Part (Shaft).gif|40px]]</br> | ||
No primeiro andar de Deeper Banuta você deve ir para o norte e para oeste até encontrar o NPC [[Ghost Of A Priest]] ({{mapa|32717,32575,12:2|aqui}}), fale '''Hi - Mission - Mission - Yes''' e pagando 5.000 [[gp]]s, irá obter o [[Sceptre Part (Shaft)|bastão]] do cetro. Em seguida, vá para o próximo andar desçendo as escadas localizadas ao norte ({{mapa|32783,32571,12:2|aqui}}). | |||
<span class="titulo-quest">'''Segunda Parte: A Esmeralda'''</span>[[Arquivo:Sceptre Part (Emerald).gif|40px|link=]]</br> | |||
No segundo andar de Deeper Banuta você deve ir para o norte, dando a volta ou pela esquerda ou pela direita até encontrar o NPC [[Ghost Of A Priest]] ({{mapa|32787,32530,13:2|aqui}}), fale '''Hi - Mission''' e pagando 5.000 [[gp]]s, irá obter a ponta de [[Sceptre Part (Emerald)|A Esmeralda]] do cetro. Vá para o próximo andar desçendo as escadas localizadas ao sul ({{mapa|32784,32609,13:2|aqui}}). | |||
[[Arquivo: | <span class="titulo-quest">'''Terceira Parte: O Suporte'''</span>[[Arquivo:Sceptre Part (Cusp).gif|40px]]</br> | ||
No terceiro andar de Deeper Banuta você deve ir para nordeste e depois sul em linha reta até chegar a uma sala com várias criaturas e encontrar o NPC [[Ghost Of A Priest]] ({{mapa|32808,32643,14:2|aqui}}), fale '''Hi - Mission''' e pagando 5.000 [[gp]]s, irá obter o [[Sceptre Part (Cusp)|O Suporte]] do cetro. Vá para o próximo andar desçendo as escadas localizadas a oeste ({{mapa|32732,32642,14:2|aqui}}), próximo a escada encontra-se o único [[Ghastly Dragon]] de Deeper Banuta. | |||
<gallery mode="nolines" widths="240px" heights="240px" perrow="4"> | |||
Arquivo:Wrath of the Emperor Quest Mapa 4-1.png | |||
Arquivo:Wrath of the Emperor Quest Mapa 4-2.png | |||
Arquivo:Wrath of the Emperor Quest Mapa 4-3.png | |||
Arquivo:Wrath of the Emperor Quest Mapa 4-4.png | |||
Arquivo:Wrath of the Emperor Quest Mapa 4-5.png | |||
Arquivo:Wrath of the Emperor Quest Mapa 4-6.png | |||
Arquivo:Wrath of the Emperor Quest Mapa 4-7.png | |||
Arquivo:Wrath of the Emperor Quest Mapa 4-8.png | |||
</gallery> | |||
[[ | Finalmente vamos montar nosso cetro no altar sagrado, no último andar. A quantidade de criaturas é bem grande e o caminho também. Siga o mapa, pare no local indicado e, com as partes do cetro em sua backpack, puxe a alavanca para ganhar o [[Snake Sceptre]]. | ||
[[Arquivo:Sceptre Part (Emerald).gif|40px]] <span class="titulo-quest">'''+'''</span> [[Arquivo:Sceptre Part (Cusp).gif|40px]] <span class="titulo-quest">'''+'''</span> [[Arquivo:Sceptre Part (Shaft).gif|40px]] <span class="titulo-quest">'''='''</span> [[Arquivo:Snake Sceptre.gif|40px]] | |||
= | <gallery mode="nolines"> | ||
Arquivo:wrathofemperor21.jpg | |||
</gallery> | |||
Agora simplesmente volte até [[Zalamon]] e entregue a relíquia falando '''Hi - Mission - Yes'''. | |||
'''Entregando o item''' | |||
{{transcrições|npc=Zalamon|texto= | |||
''Jogador:'' '''Hi'''</br> | |||
'''Zalamon:''' Not many travellerzz zzezze dayzz. I hope you bring good newzz.</br> | |||
''Jogador:'' '''Mission'''</br> | |||
'''Zalamon:''' You - azzembled zze zzeptre? Hand it out, give it to me, will you?</br> | |||
''Jogador:'' '''Yes'''</br> | |||
'''Zalamon:''' Finally. At lazzt. Zze zzeptre izz - ourzz. Ourzz of courzze. A weapon we should uzze wizzely for our cauzze. I need a zzecond or two. Do you leave me already?}} | |||
[[Arquivo: | == [[Arquivo:Dragon Plates.gif|40px|link=]] Missão 05: New in Town [[Arquivo:Dragon Plates.gif|40px|link=]] == | ||
{{DASH|'''Nota''': Para conseguir pegar essa missão com o NPC, é necessário fazer a task diária [[Children of the Revolution Quest#Tasks|Zzuppliezz]] com [[Zalamon]], caso você tenha ativa a task semanal [[Children of the Revolution Quest#Tasks|Zze Art of War]], será necessário que ela também esteja completa.}} | |||
Nessa missão vamos entrar na grande cidade do Império. Para tal, [[Zalamon]] falsificou alguns documentos com base na sua vitória no ''Mortal Combat''. Além disso, seu objetivo é falar com o contato rebelde dentro da cidade. | |||
'''Falando com Zalamon''' | |||
{{transcrições|npc=Zalamon|texto= | |||
''Jogador:'' '''Hi'''</br> | |||
'''Zalamon:''' Not many travellerzz zzezze dayzz. I hope you bring good newzz.</br> | |||
''Jogador:'' '''Mission'''</br> | |||
'''Zalamon:''' Now we need to get clozzer to zze emperor himzzelf. A hive of beezz would defend zzeir queen wizz zzeir lives in cazze an enemy gained entranzze. Zzizz makezz a formidable defenzze line, nearly inviolable. ...</br> | |||
'''Zalamon:''' But a zztranger directly in zze midzzt of zze hive will be acczzepted - after all it izz not pozzible to overcome zzuch a formidable defenzze which izz nearly inviolable, or izz it? Ha. ...</br> | |||
'''Zalamon:''' Now zzat you overcame zzeir linezz of defenzze at zze great gate, you only need to find a way to enter zzeir home. ...</br> | |||
'''Zalamon:''' Head zztraight to zze entranzze of zze zzity. If you can convinzze zze guardzz to let you enter zze zzity, you should be able to reach our contact zzere wizz eazze. ...</br> | |||
'''Zalamon:''' We have alzzo forged zome paperzz for you and zzent zzem to zze zzity. Your victory in zze arena iz well known in our land. Wizz zze help of zzezze paperzz you will pretend zzat zzome of zze higher officialzz want to talk to you about your battle. ...</br> | |||
'''Zalamon:''' Zzizz way you will be able to enter zze zzity of zze dragon emperor and meet our contact zzere in zze imperial offizze. He will give you zze next inzztructionzz.}} | |||
Siga o mapa abaixo para chegar no NPC que guarda a entrada da cidade. Fique atento com as criaturas no caminho! Fale '''Hi - Mission - Yes''' para o NPC [[Gate Guardian]]. Ele vai teleportar você para dentro da cidade, em seguida siga o caminho (não é difícil errar, já que existem grades fechando o acesso ao resto da cidade). Na parte sul do complexo, você vai encontrar o NPC [[Zlak]], agora você já tem acesso garantido ao teleport que fica logo abaixo dele, com esse teleport você pode voltar a base rebelde, se necessário. Continue na próxima missão. | |||
<gallery mode="nolines" widths="240px" heights="240px"> | |||
Arquivo:Wrath of the Emperor Quest Mapa 5-1.png | |||
Arquivo:Wrath of the Emperor Quest Mapa 5-2.png | |||
</gallery> | |||
<gallery mode="nolines"> | |||
Arquivo:Wrath of the Emperor Quest 5-1.png | |||
Arquivo:Wrath of the Emperor Quest 5-2.png | |||
Arquivo:Wrath of the Emperor Quest 5-3.png | |||
</gallery> | |||
'''Falando com o Gate Guardian''' | |||
== | {{transcrições|npc=Gate Guardian|texto= | ||
''Jogador:'' '''Hi'''</br> | |||
'''Gate Guardian:''' Chhhhzzz. Ugly humanzzz! You better have a good reazzzon to be here!</br> | |||
''Jogador:'' '''Mission'''</br> | |||
'''Gate Guardian:''' You want entranzzze to zzze zzzity?</br> | |||
''Jogador:'' '''Yes'''</br> | |||
'''Gate Guardian:''' Mh, zzzezzze paperzzz zzzeem legit, I have orderzzz to let you pazzz. Zzzo be it.}} | |||
== [[Arquivo:Dragon Plates.gif|40px|link=]] Missão 06: The Official Job [[Arquivo:Dragon Plates.gif|40px|link=]] == | |||
{{DASH|'''Aviso:''' É recomendado trazer um amigo para te ajudar a chegar nos lizards ou você poderá ter um grande gasto. Lembrem-se de que, para contabilizar a morte de cada [[Lizard Magistratus]] e [[Lizard Noble]] das missões seguintes (Missão 06 e 07), é importante seu time estar em Party e com Shared Xp ativa [[Arquivo:Shared Lider Icon.gif|link=]] [[Arquivo:Shared Member Icon.gif|link=]], se não, a morte contabiliza apenas para quem causar mais dano.}} | |||
Essa missão não exige muito tempo. Fale '''Hi - Mission''' para o rebelde [[Zlak]], ele irá comentar que é bom causar um pouco de caos na cidade. Por isso, você deverá matar 4 [[Lizard Magistratus]]. Eles podem ser encontrados nos andares superiores do complexo onde você está ({{mapa|33084,31174,7:2|Utilize esta escada}}). Após matar os 4, fale '''Hi - Mission''' novamente para [[Zlak]] para continuar na missão 07. | |||
'''Falando com Zlak''' | |||
== | {{transcrições|npc=Zlak|texto= | ||
''Jogador:'' '''Mission'''</br> | |||
'''Zlak:''' Ze rumour mill iz quite fazt. Ezpecially when zomeone unuzual az you enterz ze zity. Zoon zey will learn zat you have no reazon to be here and our raze will be buzted. ...</br> | |||
'''Zlak:''' Zo we have to ztrike fazt and quickly. You will have to eliminate zome high ranking key officialz. I zink killing four of zem should be enough. ...</br> | |||
'''Zlak:''' Ziz will dizrupt ze order in ze zity zignificantly zinze zo much dependz on bureaucracy and ze chain of command. Only chaoz and dizorganization will enable me to help you with ze next ztep in ze plan.}} | |||
<gallery mode="nolines"> | |||
Arquivo:wrathofemperor23.jpg | |||
</gallery> | |||
== [[Arquivo:Dragon Plates.gif|40px|link=]] Missão 07: A Noble Cause [[Arquivo:Dragon Plates.gif|40px|link=]] == | |||
Com um pouco de caos dentro da cidade, o povo está com medo. Entretanto, ainda não é hora de entrar no palácio. Existem ainda muitos guardas. Seu objetivo será matar 6 [[Lizard Noble]]s. Com isso, outros nobres se sentirão ameaçados e pedirão guardas para protegê-los. | |||
Isso pode abrir uma brecha no palácio. | |||
'''Falando com Zlak''' | |||
{{transcrições|npc=Zlak|texto= | |||
''Jogador:'' '''Hi'''</br> | |||
'''Zlak:''' Ah, ze human everyone iz talking about. Your victory over ze champion waz quite imprezzive. ...</br> | |||
'''Zlak:''' Alzough, for many ziz only provez what a huge zreat you blank-zkinz ztill poze. What do you want?</br> | |||
''Jogador:'' '''Mission'''</br> | |||
'''Zlak:''' Chaoz and panic are already zpreading. Your barbaric brutality iz frightening effectively. I could acquire a key zat we need to get you into ze palaze itzelf. But zere are ztill too many guardz and elite zquadz even for you to fight. ...</br> | |||
'''Zlak:''' I need you to enter ze zity and zlay at leazt zix noblez. Ze otherz will feel zreatened and call guardz to zemzelvez, and ze dragon kingz will accuze each ozer to be rezponzible for zlaying zeir pet noblez. ...</br> | |||
'''Zlak:''' Zat should enable uz to give you at leazt a chanze to attack ze palaze.}} | |||
Para encontrar os [[Lizard Noble]]s, suba até os últimos andares das casas que estão ao lado da construção do [[Zlak]]. Se você quiser, você pode entrar logo na casa em frente a porta da construção, ({{mapa|33079,31157,7:2|aqui}}). Porém há dois [[Lizard Zaogun]]s protegendo o [[Lizard Noble]]. O respawn do [[Lizard Noble]] é muito rápido, portanto é recomendado ficar esperando sempre no mesmo respawn, ao invés de caminhar pela cidade enfrentando hordas de lizards a fim de matar os 6. | |||
<gallery | <gallery mode="nolines"> | ||
Arquivo:wrathofemperor24.jpg | |||
</gallery> | </gallery> | ||
'''Reportando a missão''' | |||
''' | {{transcrições|npc=Zlak|texto= | ||
''Jogador:'' '''Hi'''</br> | |||
'''Zlak:''' Ah, ze human everyone iz talking about. Your victory over ze champion waz quite imprezzive. ...</br> | |||
'''Zlak:''' Alzough, for many ziz only provez what a huge zreat you blank-zkinz ztill poze. What do you want?</br> | |||
''Jogador:'' '''Mission'''</br> | |||
'''Zlak:''' Word of your deedz iz already zpreading like a wildfire. Zalamon'z plan to unleash zome murderouz beaztz in ze zity workz almozt too well. You are already becoming zome kind of legend with which motherz frighten zeir unruly hatchlingz. ...</br> | |||
'''Zlak:''' Your next mizzion will be a ztrike into ze heart of ze empire.}} | |||
=== Missão | == [[Arquivo:Dragon Plates.gif|40px|link=]] Missão 08: Uninvited Guests [[Arquivo:Dragon Plates.gif|40px|link=]] == | ||
Fale '''Hi - Mission''' novamente com [[Zlak]], ele vai falar que finalmente vamos invadir o palácio! Para isso, nós vamos usar um antigo túnel de fuga cuja entrada fica no andar inferior do ministério. | |||
'''Falando com Zlak''' | |||
{{transcrições|npc=Zlak|texto= | |||
''Jogador:'' '''Hi'''</br> | |||
'''Zlak:''' Ah, ze human everyone iz talking about. Your victory over ze champion waz quite imprezzive. ...</br> | |||
'''Zlak:''' Alzough, for many ziz only provez what a huge zreat you blank-zkinz ztill poze. What do you want?</br> | |||
''Jogador:'' '''Mission'''</br> | |||
'''Zlak:''' Your eagernezz for killing and bloodshed iz frightening, but your next mizzion will zuit your tazte. Wiz ze zity in chaoz and defenzez diverted, ze ztage iz zet for our final ztrike. ...</br> | |||
'''Zlak:''' A large number of rebelz have arrived undercover in ze zity. Zey will attack ze palaze and zome loyal palaze guardz will let zem in. ...</br> | |||
'''Zlak:''' Meanwhile, you will take ze old ezcape tunnel zat leadz from ze abandoned bazement in ze norz of ze miniztry to a lift zat endz zomewhere in ze palaze. ...</br> | |||
'''Zlak:''' When everyzing workz according to ze plan, you will meet Zalamon zomewhere in the underground part of ze palaze.}} | |||
Uma recomendação, você vai precisar de um time forte e bastante suprimentos, prepare-se para enfrentar: | |||
[[ | '''No ministério e túnel de fuga:'''</br> | ||
* [[Lizard High Guard]]s, [[Lizard Legionnaire]]s, [[Lizard Dragon Priest]]s, [[Lizard Zaogun]]s, [[Lancer Beetle]]s, [[Mutated Rat]]s, [[Brimstone Bug]]s, [[Wailing Widow]]s e [[Terramite]]s. | |||
'''No palácio do imperador:'''</br> | |||
* [[Lizard Chosen]]s, [[Draken Spellweaver]]s, [[Draken Elite]]s, [[Draken Abomination]]s, [[Draken Warmaster]]s, [[Draken Spellweaver]]s, [[Undead Dragon]]s, [[Ghastly Dragon]]s, [[Dragon Lord]]s, [[Demon]]s e [[Serpent Spawn]]s. | |||
<span class="titulo-quest">'''The Escape Tunnel e Emperor's Palace'''</span> [[Arquivo:Brimstone Bug.gif|link=]]</br> | |||
Siga o caminho abaixo que leva ao túnel secreto que leva ao palácio do imperador, ao fínal do túnel você verá um piso especial com uma alavanca. Pare sobre o piso, puxe a alavanca e você estará no andar mais alto do palácio. Você e seu time devem descer tudo, até o andar mais profundo. Siga os caminhos para chegar nos círculos verdes, eles indicam onde encontrar as escadas. Percorra o caminho até chegar no último andar, siga até a sala protegida no canto sudeste do andar. Ao chegar, bastar dar use nas paredes para poder passar e entrar na sala protegida. | |||
<gallery mode="nolines" widths="190px" heights="190px" perrow="5"> | |||
Arquivo:Wrath of the Emperor Quest Mapa 8-1.png | |||
Arquivo:Wrath of the Emperor Quest Mapa 8-2.png | |||
Arquivo:Wrath of the Emperor Quest Mapa 8-3.png | |||
Arquivo:Wrath of the Emperor Quest Mapa 8-4.png | |||
Arquivo:Wrath of the Emperor Quest Mapa 8-5.png | |||
Arquivo:Wrath of the Emperor Quest Mapa 8-6.png | |||
Arquivo:Wrath of the Emperor Quest Mapa 8-7.png | |||
Arquivo:Wrath of the Emperor Quest Mapa 8-8.png | |||
Arquivo:Wrath of the Emperor Quest Mapa 8-9.png | |||
Arquivo:Wrath of the Emperor Quest Mapa 8-10.png | |||
Arquivo:Wrath of the Emperor Quest Mapa 8-11.png | |||
Arquivo:Wrath of the Emperor Quest Mapa 8-12.png | |||
Arquivo:Wrath of the Emperor Quest Mapa 8-13.png | |||
Arquivo:Wrath of the Emperor Quest Mapa 8-14.png | |||
Arquivo:Wrath of the Emperor Quest Mapa 8-15.png | |||
Arquivo:Wrath of the Emperor Quest Mapa 8-16.png | |||
Arquivo:Wrath of the Emperor Quest Mapa 8-17.png | |||
</gallery> | |||
<gallery mode="nolines"> | |||
Arquivo:Wrath of the Emperor Quest 8-1.png | |||
Arquivo:Wrath of the Emperor Quest 8-2.png | |||
Arquivo:Wrath of the Emperor Quest 8-3.png | |||
Arquivo:Wrath of the Emperor Quest 8-4.png | |||
</gallery> | |||
{{DASH|'''Atenção: O teleporte no lado esquerdo da sala, com uma nota pendurada na parede, leva novamente a cidade de [[Razachai]], se você pegá-lo, só será possível voltar usando uma [[Scale of Corruption]] e se estiver com a missão 10 aberta, então fique atento para não entrar!'''}} | |||
Já na sala, fale com o NPC [[Zizzle]] dizendo '''Hi - Mission''' para concluir essa missão. Ele vai parabenizá-lo que pedir que assim que estiver preparado, ele irá falar sobre sua próxima missão. | |||
'''Falando com Zizzle''' | |||
== | {{transcrições|npc=Zizzle|texto= | ||
''Jogador:'' '''Hi'''</br> | |||
'''Zizzle:''' Ah our human alliez have finally arrived! I've already feared zat ze emperor'z forzez had caught you. Your rezilienze and prowezz are imprezzive.</br> | |||
''Jogador:'' '''Mission'''</br> | |||
'''Zizzle:''' You made it! Az zoon az you are prepared, I will brief you for your nexzt mizzion.}} | |||
== [[Arquivo:Dragon Plates.gif|40px|link=]] Missão 09: The Sleeping Dragon [[Arquivo:Dragon Plates.gif|40px|link=]] == | |||
Para o Imperador Dragão ter controle total sobre o continente, ele usa um tipo de cristal mágico que amplifica seu poder. É possível reverter o poder, mas provavelmente isso irá alertar o Imperador sobre a sua presença. Mesmo assim, para chegar nesse cristal, é necessário entrar em um tipo de "reino espiritual" que é protegido por um dragão. Para entrar é necessário uma chave. O problema é que: a chave está dentro da cabeça do dragão! | |||
Sua missão será entrar nos sonhos do dragão e libertá-lo. Encerre a conversa e reinicie a conversa com o [[Zizzle]], peça '''Hi - Mission - Yes'''. O NPC lhe dará uma [[Interdimensional Potion|poção especial]] [[Arquivo:Interdimensional Potion.gif|link=]] e um [[Scribbled Sheet of Paper|papel com umas palavras estranhas]] [[Arquivo:Scribbled Sheet of Paper.gif|link=]]. | |||
'''Falando com Zizzle''' | |||
{{transcrições|npc=Zizzle|texto= | |||
''Jogador:'' '''Hi'''</br> | |||
'''Zizzle:''' Ah our human alliez have finally arrived! I've already feared zat ze emperor'z forzez had caught you. Your rezilienze and prowezz are imprezzive.</br> | |||
''Jogador:'' '''Mission'''</br> | |||
'''Zizzle:''' Ze dragon emperor controlz ze whole empire wiz hiz willpower. But even he iz not powerful enough to uze ziz control continuouzly wizout zome form of aid. ...</br> | |||
'''Zizzle:''' From what I learnt from my informantz, ze emperor uzez zome kind of magic cryztalz zat amplify hiz powerz and tranzmit hiz will into ze land. ...</br> | |||
'''Zizzle:''' Wiz ze ancient zeptre zat you acquired for uz earlier, I can charge ozer zeptrez wiz azpectz of power of ze Great Znake. If you manage to touch one of ze tranzmitter cryztalz wiz ze zeptre, itz godly power will realign ze cryztal. ...</br> | |||
'''Zizzle:''' Not only will ze cryztal ztop zending ze orderz of ze emperor into ze mindz of my opprezzed people, it will alzo zend a mezzage of freedom and zelf-rezpect inztead. ...</br> | |||
'''Zizzle:''' Dizabling ze cryztalz will probably alert ze emperor. It will likely be too late for him to intervene in perzon but a creature of hiz power might have ozer wayz to intervene. ...</br> | |||
'''Zizzle:''' But zere iz more. To reach ze emperor, you will need accezz to hiz inner realmz. Ze zecret to enter iz guarded by a dragon. ...</br> | |||
'''Zizzle:''' But ziz iz not ze catch - ze catch iz, zat ze key iz buried in hiz vazt mind. Ze emperor haz bound ze dragon to himzelf, forzing him into an eternal zlumber. ...</br> | |||
'''Zizzle:''' A zignificant part of ze emperor'z power iz uzed to reztrain ze dragon. Ze only way to free him will be to enter hiz dreamz. Are you prepared for ziz?</br> | |||
''Jogador:'' '''Yes'''</br> | |||
'''Zizzle:''' Didn't exzpect anyzing lezz from you. Alright, zankz to your effortz to build an effective reziztanze, our comradez zalvaged ziz potion and ze formula you need to utter to breach hiz zubconzciouznezz. ...</br> | |||
'''Zizzle:''' Drink it and when you are cloze to ze dragon zpeak: Z...z.. well, juzt take ze sheet wiz ze word and read it yourzelf. A lot of rebelz have died to retrieve ziz information, uze it wizely. ...</br> | |||
'''Zizzle:''' Now go and try to find a way to reach ze emperor and to free ze land from it'z opprezzor. Onze you have found a way, return to me and I will explain what to do wiz ze cryztalz. May ze Great Znake guide you!}} | |||
Entre no teleporte do canto direito da sala e vá para o norte do grande salão que você acabou de chegar e encontre o [[A Sleeping Dragon|dragão adormecido]]. | |||
<gallery mode="nolines"> | |||
Arquivo:wrathofemperor26.jpg|A Sleeping Dragon | |||
</gallery> | </gallery> | ||
Beba a poção, fale '''Hi''' e depois a palavra encontrada na descrição do papel: '''SOLOSARASATIQUARIUM'''. | |||
Será feita uma grande descrição RPGística de como são os sonhos de um dragão. | |||
Bem, seu objetivo será pegar alguns itens para liberar o dragão em si. Abaixo as palavras chaves principais para se movimentar dentro dos sonhos do dragão: | |||
'''Look''' - digite para ver o que existe ao seu redor.</br> | |||
'''Go''' - digite para saber quais direções você pode ir, sendo que pode ser: ''north'', ''south'', ''west'' e ''east''.</br> | |||
'''Take''' - pegar algum objeto próximo a você.</br> | |||
'''Use''' - usar algum objeto próximo a você.</br> | |||
Use essa sequência: | |||
<div style="overflow:hidden; box-shadow:0 0 0.3em #999 inset; overflow-y:scroll; height:330px; width:20%; border-color:#FFFFFF"> | |||
<span style="display:inline-block; width:100%; background-color:#DDD; padding-left:4px;"> '''01. West'''</span></br> | |||
<span style="display:inline-block; width:100%; background-color:#FFF; padding-left:4px;"> '''02. Take Attachment'''</span></br> | |||
<span style="display:inline-block; width:100%; background-color:#DDD; padding-left:4px;"> '''03. East'''</span></br> | |||
<span style="display:inline-block; width:100%; background-color:#FFF; padding-left:4px;"> '''04. South'''</span></br> | |||
<span style="display:inline-block; width:100%; background-color:#DDD; padding-left:4px;"> '''05. Take Stand'''</span></br> | |||
<span style="display:inline-block; width:100%; background-color:#FFF; padding-left:4px;"> '''06. East'''</span></br> | |||
<span style="display:inline-block; width:100%; background-color:#DDD; padding-left:4px;"> '''07. Take Model'''</span></br> | |||
<span style="display:inline-block; width:100%; background-color:#FFF; padding-left:4px;"> '''08. Take Emeralds'''</span></br> | |||
<span style="display:inline-block; width:100%; background-color:#DDD; padding-left:4px;"> '''09. West'''</span></br> | |||
<span style="display:inline-block; width:100%; background-color:#FFF; padding-left:4px;"> '''10. North'''</span></br> | |||
<span style="display:inline-block; width:100%; background-color:#DDD; padding-left:4px;"> '''11. East'''</span></br> | |||
<span style="display:inline-block; width:100%; background-color:#FFF; padding-left:4px;"> '''12. Take Rubies'''</span></br> | |||
<span style="display:inline-block; width:100%; background-color:#DDD; padding-left:4px;"> '''13. North'''</span></br> | |||
<span style="display:inline-block; width:100%; background-color:#FFF; padding-left:4px;"> '''14. Use Attachment'''</span></br> | |||
<span style="display:inline-block; width:100%; background-color:#DDD; padding-left:4px;"> '''15. Take Mirror'''</span></br> | |||
<span style="display:inline-block; width:100%; background-color:#FFF; padding-left:4px;"> '''16. North'''</span></br> | |||
<span style="display:inline-block; width:100%; background-color:#DDD; padding-left:4px;"> '''17. Use Model'''</span></br> | |||
<span style="display:inline-block; width:100%; background-color:#FFF; padding-left:4px;"> '''18. South'''</span></br> | |||
<span style="display:inline-block; width:100%; background-color:#DDD; padding-left:4px;"> '''19. South'''</span></br> | |||
<span style="display:inline-block; width:100%; background-color:#FFF; padding-left:4px;"> '''20. West'''</span></br> | |||
<span style="display:inline-block; width:100%; background-color:#DDD; padding-left:4px;"> '''21. West'''</span></br> | |||
<span style="display:inline-block; width:100%; background-color:#FFF; padding-left:4px;"> '''22. North'''</span></br> | |||
<span style="display:inline-block; width:100%; background-color:#DDD; padding-left:4px;"> '''23. West'''</span></br> | |||
<span style="display:inline-block; width:100%; background-color:#FFF; padding-left:4px;"> '''24. Bastesh'''</span></br> | |||
<span style="display:inline-block; width:100%; background-color:#DDD; padding-left:4px;"> '''25. Take Sapphire'''</span></br> | |||
<span style="display:inline-block; width:100%; background-color:#FFF; padding-left:4px;"> '''26. East'''</span></br> | |||
<span style="display:inline-block; width:100%; background-color:#DDD; padding-left:4px;"> '''27. South'''</span></br> | |||
<span style="display:inline-block; width:100%; background-color:#FFF; padding-left:4px;"> '''28. East'''</span></br> | |||
<span style="display:inline-block; width:100%; background-color:#DDD; padding-left:4px;"> '''29. Use Stand'''</span></br> | |||
<span style="display:inline-block; width:100%; background-color:#FFF; padding-left:4px;"> '''30. Use Ruby'''</span></br> | |||
<span style="display:inline-block; width:100%; background-color:#DDD; padding-left:4px;"> '''31. Use Sapphire'''</span></br> | |||
<span style="display:inline-block; width:100%; background-color:#FFF; padding-left:4px;"> '''32. Use Emerald'''</span></br> | |||
<span style="display:inline-block; width:100%; background-color:#DDD; padding-left:4px;"> '''33. Use Mirror'''</span></br> | |||
</div> | |||
Caso você obtenha sucesso, outra descrição RPGística será dada, e a conversa será encerrada para o dragão acordar. Agora você poderá falar diretamente com o dragão. | |||
[[Arquivo: | {{DASH|[[Arquivo:Achievement.gif|link=]] Ao conseguir com sucesso pegar a chave com o dragão, você receberá o achievement '''"{{achievement|Wayfarer}}"'''.}} | ||
Fale '' | Fale '''Hi - Wayfarer - Mission - Yes''' para receber a chave do portão (na verdade é somente uma permissão). Além disso, você ganhará um [[Spiritual Charm]] [[Arquivo:Spiritual Charm.gif|link=]]. | ||
Agora volte até [[Zizzle]] pelo mesmo teleporte no sul e peça '''Mission''', pegue seu [[Replica of the Sceptre]] [[Arquivo:Replica of the Sceptre.gif|link=]]. | |||
'''Falando com Zizzle''' | |||
{{transcrições|npc=Zizzle|texto= | |||
''Jogador:'' '''Hi'''</br> | |||
'''Zizzle:''' Ah our human alliez have finally arrived! I've already feared zat ze emperor'z forzez had caught you. Your rezilienze and prowezz are imprezzive.</br> | |||
''Jogador:'' '''Mission'''</br> | |||
'''Zizzle:''' You freed ze dragon! And you pozzezz ze key to enter ze inner realmz of ze emperor, well done. ...</br> | |||
'''Zizzle:''' Now you are ready to reach ze inner zanctum of ze emperor. Zalamon'z revelationz showed him zat zere are four cryztalz channelling ze will of ze emperor into ze land. ...</br> | |||
'''Zizzle:''' Wiz ze relic you gained from Zalamon we were able to create powerful replicaz of ze zeptre. Take ziz wiz you. ...</br> | |||
'''Zizzle:''' You will have to realign ze cryztalz one after ze ozer. Ztart wiz ze one in ze norz-wezt and work your way clockwize zrough ze room. ...</br> | |||
'''Zizzle:''' Uzing ze zeptre will forze a part of ze emperor'z willpower out of ze cryztal. You will have to kill zoze manifeztationz. ...</br> | |||
'''Zizzle:''' Zen uze your zeptre on ze remainz to deztroy ze emperor'z influenze over ze cryztal. ...</br> | |||
'''Zizzle:''' I recommend not to go alone becauze it will be very dangerouz - but ALL of you will have to uze zeir zeptre replicaz on ze emperor'z remainz to prozeed! ...</br> | |||
'''Zizzle:''' Good luck. You will need it.}} | |||
'''Sonhos do dragão, descrição RPGística''' | |||
A | {{transcrições|npc=A Sleeping Dragon|texto= | ||
''Jogador:'' '''Hi'''</br> | |||
'''A Sleeping Dragon:''' ZzzzZzzZz...chrrr...</br> | |||
''Jogador:'' '''Solosarasatiquarium'''</br> | |||
'''A Sleeping Dragon:''' Dragon dreams are golden. ...</br> | |||
'''A Sleeping Dragon:''' A broad darkness surrounds you as if a heavy curtain is closing before your eyes. After what seems like minutes of floating through emptiness, you get the feeling as if a hole opens in the dark before you. ...</br> | |||
'''A Sleeping Dragon:''' The hole grows larger, you cannot close your eyes. An unimaginable black. Deeper and darker than any nothingness you could possibly imagine drags you into it. ...</br> | |||
'''A Sleeping Dragon:''' You feel as if you cannot breathe anymore. The very second you let loose of your consciousness, you sense all heaviness around you lifted. ...</br> | |||
'''A Sleeping Dragon:''' You dive into an ocean of emerald light. Feeling like born anew the colour around you is almost overwhelming. Countless objects of all shapes and sizes are dashing past you. Racing against each other, millions are clashing in the distance. ...</br> | |||
'''A Sleeping Dragon:''' The loudness of the gargantuan spectacle around you bursts your hearing, yet you absorb all the sounds around you. ...</br> | |||
'''A Sleeping Dragon:''' As several large obstacles move aside directly in front of you, an intense bright centre leaps into your view. Though you cannot perceive how fast you are, your pace seems too slow. ...</br> | |||
'''A Sleeping Dragon:''' Ever decelerating, you ultimately approach a middle in this chaos of tones of green. ...</br> | |||
'''A Sleeping Dragon:''' As you come closer to it, yellowish shades of orange embrace you, softer shapes emerge and you almost forget the mayhem before. In warm comfort you see what lies in the heart of it all. ...</br> | |||
'''A Sleeping Dragon:''' A majestic dragon in his sleep is surrounded by what seems the warmth and energy of a thousand suns. The tranquillity of its sight makes you smile gently. ...</br> | |||
'''A Sleeping Dragon:''' You feel a perfect mixture of joy, compassion and sudden peacefulness. Bright xanthous impressions of topaz, orange and white welcome you at the final halt of your journey. ...</br> | |||
'''A Sleeping Dragon:''' Dragon dreams are golden. ...</br> | |||
'''A Sleeping Dragon:''' You find yourself inside the dragon's dream. You can '''''look''''' around or '''''go''''' into a specific direction. You can also '''''take''''' or '''''use''''' an object. Enter '''''help''''' to display this information at any time. </br>.}} | |||
'''Palavras chaves usadas para pegar a chave''' | |||
== | {{transcrições|npc=A Sleeping Dragon|texto= | ||
''Jogador:'' '''West'''</br> | |||
'''A Sleeping Dragon:''' Advancing to the '''''west''''', you recognise an increase of onyx on the ground. </br> | |||
''Jogador:'' '''Take Attachment'''</br> | |||
'''A Sleeping Dragon:''' You carefully lift the onyx '''''attachment''''' from its socket. It is lighter than you expected. </br> | |||
''Jogador:'' '''East'''</br> | |||
'''A Sleeping Dragon:''' You return to the plateau in the '''''east'''''. </br> | |||
''Jogador:'' '''South'''</br> | |||
'''A Sleeping Dragon:''' You wander to the '''''south''''', passing large obelisks of emerald to your left and sprawling trees of topaz to your right. </br> | |||
''Jogador:'' '''Take Stand'''</br> | |||
'''A Sleeping Dragon:''' As you rip the solid '''''stand''''' out of its socket and take it with you, the large '''''gate''''' opens with a deafening rumble. </br> | |||
''Jogador:'' '''East'''</br> | |||
'''A Sleeping Dragon:''' You gasp at the size of the large open '''''gate''''' as you walk through to head further to the '''''east'''''. </br> | |||
''Jogador:'' '''Take Model'''</br> | |||
'''A Sleeping Dragon:''' You reach for a small solitary arrangement of combined small houses and put it in your pocket. </br> | |||
''Jogador:'' '''Take Emeralds'''</br> | |||
'''A Sleeping Dragon:''' You take an '''''emerald''''' from the pile. </br> | |||
''Jogador:'' '''West'''</br> | |||
'''A Sleeping Dragon:''' You return through the semi-translucent '''''gate''''' to the '''''west'''''. </br> | |||
''Jogador:'' '''North'''</br> | |||
'''A Sleeping Dragon:''' You head back '''''north''''' to the plateau. </br> | |||
''Jogador:'' '''East'''</br> | |||
'''A Sleeping Dragon:''' You travel '''''east''''' across several large emerald bluffs and edges. All sorts of gems are scattered alongside your path. </br> | |||
''Jogador:'' '''Take Rubies'''</br> | |||
'''A Sleeping Dragon:''' You take a rather large '''''ruby''''' out of a pile before you. </br> | |||
''Jogador:'' '''North'''</br> | |||
'''A Sleeping Dragon:''' You head '''''north''''' passing countless stones in the crimson sea of stones beneath your feet. </br> | |||
''Jogador:'' '''Use Attachment'''</br> | |||
'''A Sleeping Dragon:''' Avoiding the bright light, you carefully put the '''''attachment''''' on top of the strange '''''socket'''''. ... </br> | |||
''Jogador:'' '''Take Mirror'''</br> | |||
'''A Sleeping Dragon:''' As your eyes adjust to the sudden reduction of brightness, you see the giant wings of the '''''gate''''' before you move to the side. You can also make out something '''''shiny''''' on the ground. </br> | |||
'''A Sleeping Dragon:''' You pick the '''''mirror''''' from the ground. </br> | |||
''Jogador:'' '''North'''</br> | |||
'''A Sleeping Dragon:''' Your path to the '''''north''''' is open. You pass the gigantic gate wings to your left and right as you advance. After about an hour of travel you hear a slight rustling in the distance. You head further into that direction. ... </br> | |||
''Jogador:'' '''Use Model'''</br> | |||
'''A Sleeping Dragon:''' You lunge out and throw the '''''model''''' far into the water. As nothing happens, you turn your back to the ocean. ... </br> | |||
'''A Sleeping Dragon:''' The very moment you walk down the dune to head back '''''south''''', rays of light burst over your head in a shock wave that makes you tumble down the rest of the hill. ... </br> | |||
''Jogador:'' '''South'''</br> | |||
'''A Sleeping Dragon:''' You travel all the way back down the dune and through the '''''gate''''' to the '''''south'''''. </br> | |||
''Jogador:'' '''South'''</br> | |||
'''A Sleeping Dragon:''' You return to the crimson sea of '''''rubies''''' in the '''''south'''''. </br> | |||
''Jogador:'' '''West'''</br> | |||
'''A Sleeping Dragon:''' You travel back to the plateau in the '''''west'''''. </br> | |||
''Jogador:'' '''West'''</br> | |||
'''A Sleeping Dragon:''' Advancing to the '''''west''''', you recognise an increase of onyx on the ground. </br> | |||
''Jogador:'' '''North'''</br> | |||
'''A Sleeping Dragon:''' You continue travelling the barren sea of gemstones to the '''''north'''''. </br> | |||
''Jogador:'' '''West'''</br> | |||
'''A Sleeping Dragon:''' You leave the massive open '''''gate''''' behind you and go to the '''''west'''''. </br> | |||
''Jogador:'' '''Take Sapphire'''</br> | |||
'''A Sleeping Dragon:''' You carefully remove the '''''sapphire''''' from Bastesh's grasp. </br> | |||
''Jogador:'' '''East'''</br> | |||
'''A Sleeping Dragon:''' You head back to the '''''east''''' and to the plateau. </br> | |||
''Jogador:'' '''South'''</br> | |||
'''A Sleeping Dragon:''' You head back '''''south''''' to the site with the onyx '''''lookout'''''. </br> | |||
''Jogador:'' '''East'''</br> | |||
'''A Sleeping Dragon:''' You return to the plateau in the '''''east'''''. </br> | |||
''Jogador:'' '''Use Stand'''</br> | |||
'''A Sleeping Dragon:''' You put the '''''stand''''' into a small recess you find near the middle of the plateau. </br> | |||
''Jogador:'' '''Use Ruby'''</br> | |||
'''A Sleeping Dragon:''' As the '''''ruby''''' slips into the '''''notch''''', the strong red of the stone intensifies a thousandfold. You fear to hurt your eyes and turn away immediately. The ray seems to be directed to the centre of the plateau with astounding precision. </br> | |||
''Jogador:'' '''Use Sapphire'''</br> | |||
'''A Sleeping Dragon:''' As the '''''sapphire''''' slips into the '''''notch''''', the deep blue of the stone intensifies a thousandfold. You fear to hurt your eyes and turn away immediately. The ray seems to be directed to the centre of the plateau with astounding precision. </br> | |||
''Jogador:'' '''Use Emerald'''</br> | |||
'''A Sleeping Dragon:''' As the '''''emerald''''' slips into the '''''notch''''', the vibrant green of the stone intensifies a thousandfold. You fear to hurt your eyes and turn away immediately. The ray seems to be directed to the centre of the plateau with astounding precision. </br> | |||
''Jogador:'' '''Use Mirror'''</br> | |||
'''A Sleeping Dragon:''' With your eyes covered and avoiding direct sight of the rays, you put the mirror into the stand. ...</br> | |||
'''A Sleeping Dragon:''' Instinctively you run to a larger emerald bluff near the raise to find cover. Mere seconds after you claimed the sturdy shelter, a deep dark humming starts to swirl through the air. ...</br> | |||
'''A Sleeping Dragon:''' Seconds pass as the hum gets louder. The noise is maddening, drowning all other sounds around you. As you cover your ears in pain, the humming explodes into a deafening growl. ...</br> | |||
'''A Sleeping Dragon:''' You raise your head above the edge of the emerald to catch a glimpse of what's happening. ...</br> | |||
'''A Sleeping Dragon:''' The hand seems to have grown into a fist. In the distance you can now see a blurry scheme of a creature too large for your eyes to get a sharper view of its head. ...</br> | |||
'''A Sleeping Dragon:''' Blending the rays, the mirror directs pure white light directly towards the part where you assume the face of the creature. ...</br> | |||
'''A Sleeping Dragon:''' The growl transforms into a scream, everything around you seems to compress. As you press yourself tightly against the bluff, everything falls silent and in a split second, the dark being dissolves into bursts of blackness. You wake.}} | |||
'''Após acordar o dragão''' | |||
'' | |||
'' | {{transcrições|npc=A Sleeping Dragon|texto= | ||
''Jogador:'' '''Hi'''</br> | |||
'''A Sleeping Dragon:''' Greetings, wayfarer.</br> | |||
''Jogador:'' '''Wayfarer'''</br> | |||
'''A Sleeping Dragon:''' I call you the wayfarer. You travelled through my dreams. You ultimately freed my mind. My mind accepted you and so will I.</br> | |||
''Jogador:'' '''Mission'''</br> | |||
'''A Sleeping Dragon:''' Aaaah... free at last. Hmmm. ...</br> | |||
'''A Sleeping Dragon:''' I assume you need to get through the gate to reach the evildoer. I can help you if you trust me, wayfarer. I will share a part of my mind with you which should enable you to step through the gate. ...</br> | |||
'''A Sleeping Dragon:''' This procedure may be exhausting. Are you prepared to receive my key?</br> | |||
''Jogador:'' '''Yes'''</br> | |||
'''A Sleeping Dragon:''' SAETHELON TORILUN GARNUM. ...</br> | |||
'''A Sleeping Dragon:''' SLEEP. ...</br> | |||
'''A Sleeping Dragon:''' GAIN. ...</br> | |||
'''A Sleeping Dragon:''' RISE. ...</br> | |||
'''A Sleeping Dragon:''' The transfer was successful. ...</br> | |||
'''A Sleeping Dragon:''' You are now prepared to enter the realm of the evildoer. I am grateful for your help, wayfarer. Should you seek my council, use this charm I cede to you. For my spirit will guide you wherever you are. May you enjoy a sheltered future, you shall prevail.}} | |||
== [[Arquivo:Dragon Plates.gif|40px|link=]] Missão 10: A Message of Freedom [[Arquivo:Dragon Plates.gif|40px|link=]] == | |||
[[Arquivo:Wrath of the Emperor Quest Mapa 10-1.png|250px|thumb|right|Sala Principal]] | |||
[[ | Agora que temos acesso ao reino do Imperador e a [[Replica of the Sceptre]], é hora de agir! | ||
[[ | |||
[[ | |||
Pegue o mesmo teleport para voltar até o A Sleeping Dragon e vá para o norte. Ande próximo do portão e você será teleportado para uma pequena sala, o primeiro teleport te leva de volta para o NPC [[Zizzle]], o outro no final da sala te leva até a batalha, mas antes, você precisa entender o que fazer. O nosso objetivo será usar a [[Replica of the Sceptre]] no corpo morto das manifestações do Imperador. | |||
Na sala principal há no total 4 teleports, localizados em cada canto da sala, que levam a 4 salas cada uma, e em cada delas está um dos "sentimentos" do Imperador e várias outras criaturas protegendo o local. Você vai precisar de um time forte. Sabendo sobre o que fazer, vamos colocar o time em ação. Ao passar o teleport, você estará na sala principal, comece pelo teleport na parte '''noroeste''' e siga o sentido horário indo para '''nordeste''', depois '''sudeste''' e '''sudoeste'''. Esteja preparado para enfrentar: [[Draken Abomination]]s, [[Draken Warmaster]]s, [[Ghastly Dragon]]s e [[Undead Dragon]]s. | |||
'' | |||
'' | |||
[[ | |||
[[ | |||
[[ | |||
[[ | |||
''' | <span class="titulo-quest">'''The Emperor'''</span> [[Arquivo:Undead Dragon.gif|link=]]</br> | ||
Ao entrar em cada sala, você deve usar o [[Replica of the Sceptre]] [[Arquivo:Replica of the Sceptre.gif|link=]] no [[Large Black Crystal]] [[Arquivo:Large Black Crystal.gif|link=]] no meio da sala para o boss aparecer, caso esteja em grupo ou service só há necessidade de uma pessoa do time usar o cetro. | |||
Depois de matar o boss, não esqueça de usar o [[Replica of the Sceptre]] no corpo para prosseguir, ele tem a mesma aparência de uma [[Wisp]] morta [[Arquivo:Magic Sulphur.gif|link=]]. Você e seu time devem matar os bosses o mais rápido possível, após matar o boss, use o cetro o mais rápido possível em seu corpo antes que desapareça. Ao usar o cetro no corpo de cada boss a seguinte mensagem irá aparecer:</br> | |||
'''Mensagem:'''</br> | |||
[[ | |||
[[ | |||
[[ | |||
' | |||
<span style="color:#D14703; font-family: Arial; font-weight: bold;"> | |||
The sceptre seems to scream as you banish the final presence of the emperor. An ominous presence can be suddenly felt. | |||
</span></br> | |||
{{ | {{DASH|'''Atenção:''' Antes de sair, olhe no seu [[Quest Log]] se foi contado corretamente até chegar em '''4/4 bosses'''.}} | ||
[[ | |||
'' | |||
Ao matar a [[Wrath of the Emperor (Criatura)|Ira do Imperador]], o último "sentimento", você deve passar pelo mesmo teleporte pelo qual você entrou na sala, você será levado a presença da "[[Awareness of the Emperor|Consciência do Imperador]]". Continue na próxima missão. | |||
<gallery mode="nolines"> | |||
Arquivo:WotE Quest Scorn Boss.jpg|[[Scorn of the Emperor|Desprezo do Imperador]]. | |||
[[ | Arquivo:WotE Quest Spite Boss.jpg|[[Spite of the Emperor|Rancor do Imperador]]. | ||
[[ | Arquivo:WotE Quest Fury Boss.jpg|[[Fury of the Emperor|Fúria do Imperador]]. | ||
Arquivo:WotE Quest Wrath Boss.jpg|[[Wrath of the Emperor (Criatura)|Ira do Imperador]]. | |||
[[ | Arquivo:Awareness of the Emperor Wrath of the Emperor.png|400px|Encontrando a "[[Awareness of the Emperor|Consciência do Imperador]]" | ||
[[ | </gallery> | ||
[[ | |||
== [[Arquivo:Dragon Plates.gif|40px|link=]] Missão 11: Payback Time [[Arquivo:Dragon Plates.gif|40px|link=]] == | |||
Você finalmente vai encarar o Imperador Dragão cara-a-cara. Não exatamente cara-a-cara, tá mais pra cara-a-osso, mas tudo bem. | |||
Conversando, ele irá dizer que não está ali para lutar. Gostando ou não, teremos que trabalhar junto com ele para conseguir parar a catástrofe que fora iniciada. | |||
Uma grande revelação acontecerá! Os objetivos de [[Zalamon]] não eram de ajudar o povo lizard, e sim libertar a chamada [[Great Snake]], que tem objetivos de destruir o mundo que conhecemos atualmente. E outra revelação: ao usar a [[Replica of the Sceptre]] nos cristais, nós na verdade mudamos a sua energia para funcionar como fonte de poder e renascimento da tal [[Great Snake]]. | |||
[[Zalamon]] | |||
[[ | |||
[[ | |||
[[ | |||
'' | Vamos ter que confiar no Imperador. Fale '''Hi - Mission - Yes''' para aceitar a missão de impedir o "Deus das Serpentes". | ||
'''Falando com o Imperador''' | |||
'' | |||
== | {{transcrições|npc=Awareness of the Emperor|texto= | ||
''Jogador:'' '''Hi'''</br> | |||
'''Awareness of the Emperor:''' I am not here to fight you, fool. Like it or not, we will have to work together to stop the catastrophe you and that priest have initiated.</br> | |||
''Jogador:'' '''Mission'''</br> | |||
'''Awareness of the Emperor:''' The amplified force of the snake god is tearing the land apart. It is using my crystals in a reverse way to drain the vital force from the land and its inhabitants to fuel its power. ...</br> | |||
'''Awareness of the Emperor:''' I will withstand its influence as good as possible and slow this process. You will have to fight its worldly incarnation though. ...</br> | |||
'''Awareness of the Emperor:''' It is still weak and disoriented. You might stand a chance - this is our only chance. I will send you to the point to where the vital force is channelled. I have no idea where that might be though. ...</br> | |||
'''Awareness of the Emperor:''' You will probably have to fight some sort of vessel the snake god uses. Even if you defeat it, it is likely that it only weakens the snake. ...</br> | |||
'''Awareness of the Emperor:''' You might have to fight several incarnations until the snake god is worn out enough. Then use the power of the snake's own sceptre against it. Use it on its corpse to claim your victory. ...</br> | |||
'''Awareness of the Emperor:''' Be prepared for the fight of your life! Are you ready?</br> | |||
''Jogador:'' '''Yes'''</br> | |||
'''Awareness of the Emperor:''' So be it!}} | |||
<span class="titulo-quest">'''The Snake God'''</span><span style="vertical-align:10px">[[Arquivo:Snake God Essence.gif|link=]]</span></br> | |||
[[Arquivo:Last Room Wote 1.png|300px|thumb|right|Sala da alavanca que leva os jogadores para a luta final.]] | |||
Você será levado para a sala da alavanca que leva para a luta final com dois teleportes: o da esquerda vai para [[Muggy Plains]] (fique tranquilo que você pode voltar por outro teleporte ali no mesmo lugar) e o outro leva ao [[Awareness of the Emperor|Imperador]]. | |||
[[ | |||
[[ | |||
[[ | |||
[[ | |||
Volte até a sala que o Imperador lhe levou e vá até o centro dela. Puxando a alavanca, todo os jogadores no piso preto serão levados até o combate final. Preparado? Puxe a alavanca! No total, 04 "encarnações" do Deus Serpente irão aparecer. | |||
<span class="titulo-quest">'''Estratégia:'''</span></br> | |||
Esse boss, como mencionado anteriormente, tem 04 "encarnações" que ao morrer darão lugar a próxima encarnação. É recomendado que o time tenha um ou mais Knights para blocar e trapar o boss em algum dos cantos da sala enquanto o resto do time ataca de longe. Recomenda-se que mages utilizem [[Sudden Death Rune]]s já que nenhum desses bosses apresenta resistência a [[Death Damage|dano de morte]]. | |||
Finalmente, para acabar de vez com esse falso deus, use sua [[Replica of the Sceptre]] nos restos do [[Mutated Zalamon]] e saia pelo teleporte que leva até o Imperador. | |||
[[ | |||
[[Zalamon]] | |||
<gallery mode="nolines"> | |||
Arquivo:wrathofemperor31.jpg|A primeira é a [[Snake God Essence]]. | |||
Arquivo:wrathofemperor32.jpg|A segunda é a [[Snake Thing]]. | |||
Arquivo:wrathofemperor33.jpg|A terceira é a [[Lizard Abomination]]. | |||
Arquivo:wrathofemperor34.jpg|A quarta é o [[Mutated Zalamon]]. | |||
Arquivo:wrathofemperor35.jpg|Usando o cetro nos restos do [[Mutated Zalamon]]. | |||
</gallery> | |||
{{ | {{DASH|[[Arquivo:Achievement.gif|link=]] Ao usar o cetro no corpo do Mutated Zalamon você receberá o achievement '''"{{achievement|Godslayer}}"'''.}} | ||
'' | |||
=== Missão | == [[Arquivo:Dragon Plates.gif|40px|link=]] Missão 12: Just Rewards [[Arquivo:Dragon Plates.gif|40px|link=]] == | ||
Opa! Hora de recompensas! | |||
O Imperador teria vontade de comer você pelas suas burrices. Mas, ele reconhece seus atos e poupa sua vida. Além disso, irá mostrar sua generosidade com algumas recompensas. Você ganhará um baú cheio de dinheiro, uma casa na cidade, um set da mais fina armadura em [[Zao]] e uma mana que nunca acaba. Para pegar sua recompensa, vá até [[Razachai]] e fale com o NPC [[Izsh]], {{mapa|33080,31214,5:2|aqui}}. | |||
[[ | |||
[[ | |||
[[ | |||
'''Falando com o Imperador''' | |||
{{transcrições|npc= | {{transcrições|npc=Awareness of the Emperor|texto= | ||
''Jogador:'' '''Hi'''</br> | |||
'''Awareness of the Emperor:''' Greetings, mortal. Be aware that you are trying my patience while we are talking.</br> | |||
''Jogador:'' '''Mission'''</br> | |||
'''Awareness of the Emperor:''' So you have mastered the crisis you invoked with your foolishness. I should crush you for your involvement right here and now. ...</br> | |||
'''Awareness of the Emperor:''' But such an act would bring me down to your own barbaric level and only fuel the corruption that destroys the land that I own. Therefore I will not only spare your miserable life but show you the generosity of the dragon emperor. ...</br> | |||
'''Awareness of the Emperor:''' I will reward you beyond your wildest dreams! ...</br> | |||
'''Awareness of the Emperor:''' I grant you three chests - filled to the lid with platinum coins, a house in the city in which you may reside, a set of the finest armor Zao has to offer, and a casket of never-ending mana. ...</br> | |||
'''Awareness of the Emperor:''' Speak with magistrate Izsh in the ministry about your reward. And now leave before I change my mind!}} | |||
Encontre o NPC [[Izsh]] no sul do segundo andar do ministério. | |||
<gallery mode="nolines"> | |||
Arquivo:Izsh Wrath of the Emperor.png | |||
</gallery> | |||
Fale '''Hi - Mission - Yes'''. Infelizmente, vamos receber a triste notícia que, por causa dos documentos falsos para entrar na cidade, guardas mortos, assassinato e destruição de bens em posse do Imperador, vamos perder quase toda nossa recompensa.</br> | |||
A boa notícia é que sobraram algumas recompensas no porão. | |||
'''Falando com Izsh''' | |||
'' | |||
'' | {{transcrições|npc=Izsh|texto= | ||
''Jogador:'' '''Hi'''</br> | |||
'''Izsh:''' Greetingz zcalelezz being.</br> | |||
''Jogador:'' '''Mission'''</br> | |||
'''Izsh:''' Oh yez, let me zee ze documentz. Here we go: zree cheztz filled wiz platinum, one houze, a zet of elite armor, and an unending mana cazket. Iz ziz correct?</br> | |||
''Jogador:'' '''Yes'''</br> | |||
'''Izsh:''' Fine, zo let'z prozeed. You uzed forged documentz to enter our zity, killed zeveral guardz who enjoyed a quite excluzive and expenzive training, deztroyed rare magical devizez in ze pozzezzion of ze emperor. ...</br> | |||
'''Izsh:''' Ze good newz iz, your zree cheztz of platinum should be nearly enough to pay ze finez. Lucky you, ziz could have left you broke. ...</br> | |||
'''Izsh:''' Zere are alzo zertain noble familiez complaining about ze murder of zeveral of zeir beloved onez. ...</br> | |||
'''Izsh:''' I zink I can make a deal wiz ze noblez by zelling zem your property in ze zity. Your prezenze would ruin ze houze prizez zere anyway. ...</br> | |||
'''Izsh:''' Of courze zat will not zuffize to compenzate zeir grief, zo I guezz you'll have to part wiz zat elite armor, too. Zadly, prizez for armor are on an all time low right now. ...</br> | |||
'''Izsh:''' But luckily you ztill have zat mana cazket. Well, you had it. Now we have to zell it. ...</br> | |||
'''Izsh:''' But not all iz lozt my blank-zkinned vizitor. According to my calculationz, zere iz ztill a bit left. ...</br> | |||
'''Izsh:''' I zink we can zave you zome gold and zome treazurez, and you can keep one pieze of your elite armor at leazt. ...</br> | |||
'''Izsh:''' You will find your rewardz in one of ze old zupply zellarz. Beware of ze ratz zough. ...</br> | |||
'''Izsh:''' Ze rednezz of your faze and ze zound you make wiz your teez iz obviouzly a zign of gratitude of your zpeziez! I am flattered, but pleaze leave now az I have to attend to zome important buzinezz.}} | |||
Desça no porão (escada para missão 8) e entre na sala. | |||
= | <span class="titulo-quest">'''Recompensas'''</span></br> | ||
Pegue as duas backpacks ([[Dragon Backpack]] e [[Jewelled Backpack]]) nos baús da esquerda e escolha '''UM''' dentre os quatro itens listados abaixo e não esqueça de clicar no '''guarda-roupas''' para ganhar o [[Wayfarer Outfits|Wayfarer Outfit]]. | |||
<gallery mode="nolines"> | |||
Arquivo:Wrath of the Emperor Recompensa.png | |||
</gallery> | |||
* [[Elite Draken Helmet]] [[Arquivo:Elite Draken Helmet.gif|link=]] | |||
[[ | * [[Merudri Scale Mail]] [[Arquivo:Merudri Scale Mail.gif|link=]] | ||
[[ | * [[Royal Draken Mail]] [[Arquivo:Royal Draken Mail.gif|link=]] | ||
[[ | * [[Royal Scale Robe]] [[Arquivo:Royal Scale Robe.gif|link=]] | ||
[[ | |||
[[ | |||
'' | <span class="titulo-quest">'''Wayfarer Outfits'''</span></br> | ||
Ao matar o [[Snake God Essence]] e reportar sua missão para Izsh, ele permite que você pegue o [[Wayfarer Outfits|Wayfarer Outfit]] na sala de recompensas.</br> | |||
'''Male/Female:'''</br> | |||
[[Arquivo:Outfit Wayfarer Male.gif|link=]] [[Arquivo:Outfit Wayfarer Female.gif|link=]]</br> | |||
[[ | |||
[[ | |||
=== | = Extras = | ||
<span class="titulo-quest">'''Draptor Mount'''</span></br> | |||
Ao entrar no palácio imperial você pode encontrar um [[Draptor]], você pode ter a chance de domá-lo ao usar um [[Harness]] [[Arquivo:Harness.gif|link=]] ou uma [[Music Box]] [[Arquivo:Music Box.gif|link=]] nele.</br> | |||
'''Montaria:'''</br> | |||
[[Arquivo:Draptor (Mount).gif|link=]]</br> | |||
[[ | |||
{{DASH|[[Arquivo:Achievement.gif|link=]] Após domar um Draptor, você receberá o achievement '''"{{Achievement|Scales and Tail}}"'''.}} | |||
<span class="titulo-quest">'''Parabéns, você concluiu a quest!'''</span></br> | |||
'' | |||
Para conseguir os itens necessários para os addons do outfit, confira outros spoilers: | |||
* Addon 1: [[A Father's Burden Quest]]. | |||
* Addon 2: [[An Interest In Botany Quest]]. | |||
Para ter o direito de usar os dois addons: | |||
* [[The Spirit Will Get You Quest]]. | |||
[[ | |||
}} | }} | ||
Edição atual tal como às 21h37min de 9 de junho de 2026
| Esta é uma página sobre a quest Wrath of the Emperor. Para a criatura, veja Wrath of the Emperor (Criatura). |


Veja também: Quests.
Requerimentos
- Um amigo para ajudar na primeira missão.
- Children of the Revolution Quest (task diária concluída).
- The Ape City Quest até a missão 8 completada (para acessar as profundezas de Banuta).
- The New Frontier Quest (até a missão 8 completada). É recomendável que você complete a The New Frontier para ganhar acesso ao portal de fogo em Thais (acesso rápido a Muggy Plains). Ter a The New Frontier completa se torna obrigatório para a Missão 05: New in Town.
- 01 Wood
- 03 Nails
- Shovel
- Rake
- Pick
- Obsidian Knife
- 15.000 gps
| Nota: A cada ação feita nas missões com sucesso, a mensagem de "Your questlog has been updated." aparecerá avisando no seu Server Log e será atualizado o texto encontrado no Quest Log. |
Método
 Missão 01: Catering the Lion's Den
Notas:
|
Encontre Zalamon ao leste de Zao Steppe, (aqui![]() ) e fale Hi - Mission - Yes - Yes. Zalamon vai dizer que finalmente chegou a hora de passar através do Grande Portão, mas para isso vamos precisar de uma rota alternativa, pois o Imperador aumentou a defesa do portão depois de nosso ataque durante a última missão da Children of the Revolution Quest.
) e fale Hi - Mission - Yes - Yes. Zalamon vai dizer que finalmente chegou a hora de passar através do Grande Portão, mas para isso vamos precisar de uma rota alternativa, pois o Imperador aumentou a defesa do portão depois de nosso ataque durante a última missão da Children of the Revolution Quest.
Falando com Zalamon
 |
Jogador: Hi
Zalamon: Not many travellerzz zzezze dayzz. I hope you bring good newzz. |
Nossa primeira missão será usar um túnel de manutenção para chegar ao norte de Zao. Para os guardas não notarem nada, vamos usar um disfarce em forma de caixa. Para fazer a caixa, Zalamon vai pedir 03 Nails e 01 Wood para fazer a caixa. Entregue-os falando Hi - Mission - Yes - Crate - Yes e Zalamon irá fazer e entregar a caixa para você.
Falando com Zalamon
|
Jogador: Hi
Zalamon: Not many travellerzz zzezze dayzz. I hope you bring good newzz. |
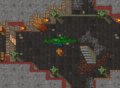
Marked Crate.

Ele marcou em seu mapa a localização do túnel, que fica no leste de Muggy Plains (aqui![]() ). Você pode chegar ao local através do teleport de Zao Steppe que leva a Muggy Plains (aqui
). Você pode chegar ao local através do teleport de Zao Steppe que leva a Muggy Plains (aqui![]() ) ou através do Fire Portal do Halls of Hope em Thais, basta ter a The New Frontier Quest completa e falar Hi - Temple - Father - Yes - Yes para a NPC Ivalisse. Após passar o portal você se encontrará em uma casa em Muggy Plains (aqui
) ou através do Fire Portal do Halls of Hope em Thais, basta ter a The New Frontier Quest completa e falar Hi - Temple - Father - Yes - Yes para a NPC Ivalisse. Após passar o portal você se encontrará em uma casa em Muggy Plains (aqui![]() ).
).
| Nota: Ao falar com Ivalisse, você receberá a mensagem "Your questlog has been updated.", porém essa mensagem se refere a missão The Unwary Mage da Forgotten Knowledge Quest. Não é necessário realizar esta missão para avançar na Wrath of the Emperor Quest. |
Falando com Ivalisse
|
Jogador: Hi
Ivalisse: Hello, worshiper of the Astral Shapers! Welcome to the temple! While you are here to pay tribute, you can also learn something about the ancient art of imbuing. |
| Portal de Thais: | Portal de Muggy Plains: |
 |
 |
Desça o buraco e vá para o norte da caverna. Em um dado momento, aparecerá uma mensagem laranja para "vestir" seu disfarce de caixa. Você e seu amigo devem dar use na caixa e se transformarão nela.

Portal de Fogo nos Halls of Hope em Thais

Local de chegada em Muggy Plains ao passar pelo portal dos Halls of Hope
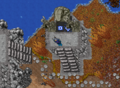
Local de chegada em Muggy Plains ao passar pelo portal ao sul de Dragonblaze Peaks

Entrada do túnel
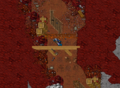
1º Aviso sobre os guardas

2º Aviso, dê use na caixa.


The Maintenance Tunnel ![]()
| Nota: Antes de começar o tutorial de como andar pelo túnel, veja abaixo o que fazer caso seja capturado. |
Como fugir em caso de captura
Se você for capturado, irá parar em uma pequena caverna fechada e perderá sua caixa de disfarce. Lá, o guarda djinn Zumtah lhe oferece a única maneira de fugir.
Fale com ele até convencê-lo. As palavras chaves são: Hi - Exit - No - Yes - Exit - No - Yes - Exit - No - Yes - 278 - Exit - Exit - Exit - Exit - Exit.
Ele vai transformar você em um Lancer Beetle. Então use o buraco na parede ao norte para escapar, ao pisar no SQM marcado com o círculo azul você voltará para a entrada.
| Atenção: Você deverá fazer todo o caminho novamente, não interessa onde você errou. Além disso, sua caixa será devolvida. |

Encontrando o NPC Zumtah após ser capturado

Jogador transformado em Lancer Beetle e o local de saída


Falando com Zumtah
 |
Jogador: Hi
Zumtah: Another visitor to this constricted, cosy, calm realm, perfect except for an exit. Muhaha. |
No caminho do longo túnel há guardas que vigiam contra intrusos, se você for pego, terá que recomeçar todo o percurso, até a hora que conseguir finalizar e chegar em uma construção ao norte de Zao.
Caminho sem ser capturado
Nesse momento, você deve prestar muita atenção. Durante o caminho, há portas, onde nelas guardas observam a passagem através de frestas. A cada aproximadamente 10 segundos, eles fecham essa fresta e você deve passar rapidamente antes que eles abram a fresta novamente. A dica é andar passo por passo com muita calma.

Logo na frente, haverão alguns Lizard Tunnel Guards protegendo o túnel e para não ser visto, você deve andar em um caminho específico, fora do olhar deles. Abaixo temos o caminho que está ilustrado com moedas (No meio do caminho haverão mais portas com guardas).
| Dica: Em alguns locais será necessário andar na diagonal, por isso fique bastante atento e vá devagar. É aconselhável o uso de moedas ou vials pra marcar o caminho correto, isso irá facilitar caso erre em algo. |
Comece encostado à direita da parede e siga as moedas, durante o caminho, você vai encontrar Lizard Tunnel Guards, caso passe perto deles de maneira incorreta (saindo do caminho ilustrado com moedas), você será "preso" e terá que começar tudo de novo. O mesmo vale para as portas que possuem aberturas que abrem e fecham constantemente.


Conforme você avance pelo túnel, irá chegar a uma bifurcação (aqui![]() ), um jogador deve seguir as platinums para ir às alavancas. Nesta parte do caminho você ou seu amigo vão precisar ficar na parte de baixo, puxando as alavancas, enquanto o outro irá por cima pelo caminho a esquerda, haverá uma parede bloqueando a passagem para quem escolher ir por baixo. Para o jogador que escolher ir por cima, deve andar encostado na parede, seguindo as moedas até chegar no quadrado demarcado na imagem, tome cuidado para não passar perto das lâmpadas enquanto estiverem acesas. Mande seu colega puxar a alavanca e vá para o sul e para oeste rapidamente.
), um jogador deve seguir as platinums para ir às alavancas. Nesta parte do caminho você ou seu amigo vão precisar ficar na parte de baixo, puxando as alavancas, enquanto o outro irá por cima pelo caminho a esquerda, haverá uma parede bloqueando a passagem para quem escolher ir por baixo. Para o jogador que escolher ir por cima, deve andar encostado na parede, seguindo as moedas até chegar no quadrado demarcado na imagem, tome cuidado para não passar perto das lâmpadas enquanto estiverem acesas. Mande seu colega puxar a alavanca e vá para o sul e para oeste rapidamente.
Em seguida, mande seu colega puxar a segunda alavanca e continue seguindo o caminho de moedas, Você verá uma alavanca no seu andar. Aproxime-se e puxe ela para abrir o muro do andar abaixo e seu colega poderá andar para oeste e encontrar outra alavanca, ao puxá-la, a última lâmpada se apagará e você poderá passar, assim se reencontrando novamente com seu amigo através da escada. Ambos devem continuar indo para oeste até encontrar uma escada, suba por ela para chegar ao andar terréo do norte de Zao.
A primeira missão ainda não acabou! Você precisa encontrar a base rebelde que fica à leste, no meio das montanhas ao norte de Zao (aqui![]() ) . Durante todo o caminho, conhecido como Spirittrails, você encontrará criaturas como Lizard High Guards, Lizard Legionnaires, Lizard Dragon Priests, Souleaters, Mutated Tigers, Mutated Rats, etc, por isso tome cuidado.
) . Durante todo o caminho, conhecido como Spirittrails, você encontrará criaturas como Lizard High Guards, Lizard Legionnaires, Lizard Dragon Priests, Souleaters, Mutated Tigers, Mutated Rats, etc, por isso tome cuidado.


Chegando lá, fale Hi - Mission - Zalamon com o NPC Chartan completando assim a primeira missão.
Falando com o Chartan
 |
Jogador: Hi
Chartan: Great Znake forgive me to converze wiz ziz unworzy blankzkin. |
Missão 02: First Contact
Fale Hi - Mission - Yes com Chartan para iniciar a missão. Chartan irá contar que a base rebelde fica num antigo templo, que foi abandonado há um bom tempo. O teleporte que levava para Muggy Plains estava funcionando normalmente, mas parou de funcionar quando a corrupção em Zao atingiu aquela área.
Falando com Chartan
|
Jogador: Hi
Chartan: Great Znake forgive me to converze wiz ziz unworzy blankzkin. |
Sua segunda missão é dar um jeito de arrumar o teleporte. Desça a escada na direita da base rebelde (aqui![]() ). Você irá usar sua Shovel, Rake, Pick e Obsidian Knife. Siga as instruções e imagens abaixo para pegar os "ingredientes".
). Você irá usar sua Shovel, Rake, Pick e Obsidian Knife. Siga as instruções e imagens abaixo para pegar os "ingredientes".
Restaurando o Portal
|
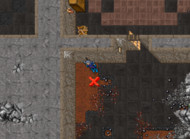
Use a Shovel no SQM marcado na imagem para obter a Sacred Earth.
Mensagem: You dig out a handful of earth from this sacred place.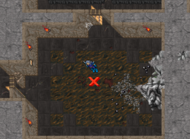
Use o Rake no SQM marcado na imagem para obter o Lump of Clay.
Mensagem: You dig out a handful of ordinary clay.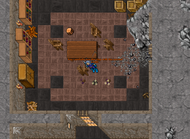
Use o Lump of Clay na Sacred Earth para obter o Lump of Sacred Clay.
Mensagem: You carefully mix the clay with the sacred earth.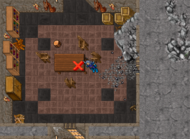
Use uma Pick na ponta rachada da mesa para obter uma Unworked Sacred Wood.
Mensagem: The cracked part of the table lets you cut out a large chunk of wood with your pick.
Use a Obsidian Knife na Unworked Sacred Wood para obter o Sacred Bowl.
Mensagem: You carve a solid bowl out of the chunk of wood.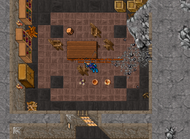
Use o Lump of Sacred Clay no Sacred Bowl para obter o Sacred Bowl of Purification.
Mensagem: You carefully coat the inside of the wooden bowl with the sacred clay.
Use a Sacred Bowl of Purification no SQM marcado na imagem para obter o Bowl with Sacred Water.
Mensagem: Filling the corrupted water into the sacred bowl completely purifies the fluid.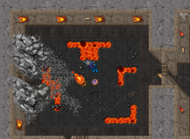
Use o Bowl with Sacred Water no Coal Basin para obter o Sacred Coal.

Use o Sacred Coal no SQM marcado na imagem para purificar a água (A água ficará azul por alguns segundos).
Mensagem: As you give the coal into the pool, corrupted fluid begins to dissolve, leaving the purified refreshing water.


Após completar todo o processo acima, volte até Chartan e entregue sua missão falando Hi - Mission - Yes. A partir de agora você poderá usar o primeiro teleport ![]() (Chama da esquerda) que leva para Muggy Plains.
(Chama da esquerda) que leva para Muggy Plains.
Reportando a missão
|
Jogador: Hi
Chartan: Great Znake forgive me to converze wiz ziz unworzy blankzkin. |
Missão 03: The Keeper
Completando a segunda missão, volte até Zalamon, (aqui![]() ), no sul de Zao e fale Hi - Mission - Yes, ele vai falar que os jardins ao norte de Zao estão contaminados por uma praga. Seu objetivo será matar o que era antes o protetor do jardim, a criatura chamada The Keeper.
), no sul de Zao e fale Hi - Mission - Yes, ele vai falar que os jardins ao norte de Zao estão contaminados por uma praga. Seu objetivo será matar o que era antes o protetor do jardim, a criatura chamada The Keeper.
Falando com Zalamon
|
Jogador: Hi
Zalamon: Not many travellerzz zzezze dayzz. I hope you bring good newzz. |
Aceitando a missão de Zalamon, você receberá um Flask of Plant Poison ![]() (Caso perca seu flask, basta voltar ao Zalamon e dizer Flask of Plant Poison e ele lhe dará outro).
(Caso perca seu flask, basta voltar ao Zalamon e dizer Flask of Plant Poison e ele lhe dará outro).
Vá até a base rebelde usando o teleporte em Muggy Plains. Saindo da base, vá até uma pequena montanha ao sul, enfrentando uma grande variedade de criaturas.
Chegando lá, use a Shovel para descer no buraco (aqui![]() ). Durante todo o caminho, vários Brimstone Bugs, Lancer Beetles e Wailing Widows vão ser encontrados em um espaço bastante pequeno, então você deve tomar cuidado para evitar waste desnecessário.
). Durante todo o caminho, vários Brimstone Bugs, Lancer Beetles e Wailing Widows vão ser encontrados em um espaço bastante pequeno, então você deve tomar cuidado para evitar waste desnecessário.


Entrada da caverna do The Keeper

Área da sala onde você deve usar o Flask of Plant Poison


The Keeper
Use o Flask of Plant Poison nas Giant Dreadcoils  ao norte da sala para sumonar o The Keeper. Se você estiver com um time, só há necessidade de uma pessoa usar. Ele tem bastante vida, mas pode ser morto com poucos hits passando pelos poisons especiais da sala. Após ser morto, simplesmente dê use no corpo da criatura para pegar a prova que Zalamon precisa, a Tail of the Keeper.
Estratégia:
Para você conseguir causar mais dano ao The Keeper com os fields, você deve passar ele em cima dos fields verdes, quando fizer isso, ele tomará um dano bem alto, o field ficará amarelo e um dos amarelos ficará verde, você deverá ir até esse outro field verde para hitá-lo novamente.
O field amarelo que virará verde sempre será um field do lado oposto do seu, por exemplo, se você passou o The Keeper no field verde do lado esquerdo, o próximo field verde será do lado direito (e vice-versa).
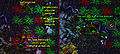
Time lutando contra o The Keeper

Após pegar a cauda retorne até Zalamon e entregue sua missão.
| Nota: Agora você pode comprar runas, poções e comidas com o NPC Chartan (aqui |
Entregando missão
|
Jogador: Hi
Zalamon: Not many travellerzz zzezze dayzz. I hope you bring good newzz. |
Missão 04: Sacrament of the Snake
| Nota: É aconselhável ir em time nessa missão e bem preparado pra enfrentar várias Medusas, Serpent Spawns, Hydras, Phantasms, Souleaters, Ghastly Dragons entre outras criaturas. |
Para a quarta missão, fale Hi - Mission para Zalamon (aqui![]() ). Ele contará que seu povo colonizou várias partes do mundo, mas a grande quantidade de inimigos encontrados sempre foi um grande problema. Contudo, apenas dois reinos ainda existem, mas perderam o contato um com o outro. A Great Snake revelou a Zalamon que, em uma grande floresta muito distante, existe outro povo lizard. Sim, estamos nos referindo à Tiquanda.
). Ele contará que seu povo colonizou várias partes do mundo, mas a grande quantidade de inimigos encontrados sempre foi um grande problema. Contudo, apenas dois reinos ainda existem, mas perderam o contato um com o outro. A Great Snake revelou a Zalamon que, em uma grande floresta muito distante, existe outro povo lizard. Sim, estamos nos referindo à Tiquanda.
Entretanto, esse povo falhou com a Great Snake e perdeu a sua confiança. Mas eles ainda estão em posse de uma relíquia: um cetro de imenso poder que pode ser encontrado no antigo templo (abaixo de Banuta).
Falando com Zalamon
|
Jogador: Hi
Zalamon: Not many travellerzz zzezze dayzz. I hope you bring good newzz. |
Além de ser bem protegido, esse cetro é dividido em 3 partes: A Esmeralda, O Bastão e O Suporte. Então, as 3 partes devem ser unidas em um altar sagrado.
Você precisará de 15.000 gps, sendo 5.000 gps para cada parte do cetro. Também deverá ter acesso as profundezas de Banuta, fazendo até a última missão da The Ape City Quest.
| Agora você deve ir até Port Hope e então Banuta. Você pode ir a pé ou pode pegar o barco do NPC Lorek que leva você até Banuta caso você já tenha 20 ou mais task points na Paw and Fur - Hunting Elite Quest. Ao chegar em Banuta, caso já tenha o atalho liberado, vá até a entrada dele no meio da floresta de Tiquanda (aqui |
Quando passar pelo teleporte, você chegará no andar com muitas Serpent Spawns, Medusas e Hydras. A porta para Deeper Banuta fica (aqui![]() ). A partir de agora existem mais quatro andares, sendo três deles com os NPCs que você deve falar, e o quarto com o altar para montar o cetro. Quando encontrar os NPCs Ghost Of A Priest.
). A partir de agora existem mais quatro andares, sendo três deles com os NPCs que você deve falar, e o quarto com o altar para montar o cetro. Quando encontrar os NPCs Ghost Of A Priest.
Primeira Parte: O Bastão![]()
No primeiro andar de Deeper Banuta você deve ir para o norte e para oeste até encontrar o NPC Ghost Of A Priest (aqui![]() ), fale Hi - Mission - Mission - Yes e pagando 5.000 gps, irá obter o bastão do cetro. Em seguida, vá para o próximo andar desçendo as escadas localizadas ao norte (aqui
), fale Hi - Mission - Mission - Yes e pagando 5.000 gps, irá obter o bastão do cetro. Em seguida, vá para o próximo andar desçendo as escadas localizadas ao norte (aqui![]() ).
).
Segunda Parte: A Esmeralda![]()
No segundo andar de Deeper Banuta você deve ir para o norte, dando a volta ou pela esquerda ou pela direita até encontrar o NPC Ghost Of A Priest (aqui![]() ), fale Hi - Mission e pagando 5.000 gps, irá obter a ponta de A Esmeralda do cetro. Vá para o próximo andar desçendo as escadas localizadas ao sul (aqui
), fale Hi - Mission e pagando 5.000 gps, irá obter a ponta de A Esmeralda do cetro. Vá para o próximo andar desçendo as escadas localizadas ao sul (aqui![]() ).
).
Terceira Parte: O Suporte![]()
No terceiro andar de Deeper Banuta você deve ir para nordeste e depois sul em linha reta até chegar a uma sala com várias criaturas e encontrar o NPC Ghost Of A Priest (aqui![]() ), fale Hi - Mission e pagando 5.000 gps, irá obter o O Suporte do cetro. Vá para o próximo andar desçendo as escadas localizadas a oeste (aqui
), fale Hi - Mission e pagando 5.000 gps, irá obter o O Suporte do cetro. Vá para o próximo andar desçendo as escadas localizadas a oeste (aqui![]() ), próximo a escada encontra-se o único Ghastly Dragon de Deeper Banuta.
), próximo a escada encontra-se o único Ghastly Dragon de Deeper Banuta.


Finalmente vamos montar nosso cetro no altar sagrado, no último andar. A quantidade de criaturas é bem grande e o caminho também. Siga o mapa, pare no local indicado e, com as partes do cetro em sua backpack, puxe a alavanca para ganhar o Snake Sceptre.
![]() +
+ ![]() +
+ ![]() =
= ![]()

Agora simplesmente volte até Zalamon e entregue a relíquia falando Hi - Mission - Yes.
Entregando o item
|
Jogador: Hi
Zalamon: Not many travellerzz zzezze dayzz. I hope you bring good newzz. |
Missão 05: New in Town
| Nota: Para conseguir pegar essa missão com o NPC, é necessário fazer a task diária Zzuppliezz com Zalamon, caso você tenha ativa a task semanal Zze Art of War, será necessário que ela também esteja completa. |
Nessa missão vamos entrar na grande cidade do Império. Para tal, Zalamon falsificou alguns documentos com base na sua vitória no Mortal Combat. Além disso, seu objetivo é falar com o contato rebelde dentro da cidade.
Falando com Zalamon
|
Jogador: Hi
Zalamon: Not many travellerzz zzezze dayzz. I hope you bring good newzz. |
Siga o mapa abaixo para chegar no NPC que guarda a entrada da cidade. Fique atento com as criaturas no caminho! Fale Hi - Mission - Yes para o NPC Gate Guardian. Ele vai teleportar você para dentro da cidade, em seguida siga o caminho (não é difícil errar, já que existem grades fechando o acesso ao resto da cidade). Na parte sul do complexo, você vai encontrar o NPC Zlak, agora você já tem acesso garantido ao teleport que fica logo abaixo dele, com esse teleport você pode voltar a base rebelde, se necessário. Continue na próxima missão.


Falando com o Gate Guardian
 |
Jogador: Hi
Gate Guardian: Chhhhzzz. Ugly humanzzz! You better have a good reazzzon to be here! |
Missão 06: The Official Job
| Aviso: É recomendado trazer um amigo para te ajudar a chegar nos lizards ou você poderá ter um grande gasto. Lembrem-se de que, para contabilizar a morte de cada Lizard Magistratus e Lizard Noble das missões seguintes (Missão 06 e 07), é importante seu time estar em Party e com Shared Xp ativa |
Essa missão não exige muito tempo. Fale Hi - Mission para o rebelde Zlak, ele irá comentar que é bom causar um pouco de caos na cidade. Por isso, você deverá matar 4 Lizard Magistratus. Eles podem ser encontrados nos andares superiores do complexo onde você está (Utilize esta escada![]() ). Após matar os 4, fale Hi - Mission novamente para Zlak para continuar na missão 07.
). Após matar os 4, fale Hi - Mission novamente para Zlak para continuar na missão 07.
Falando com Zlak
 |
Jogador: Mission
Zlak: Ze rumour mill iz quite fazt. Ezpecially when zomeone unuzual az you enterz ze zity. Zoon zey will learn zat you have no reazon to be here and our raze will be buzted. ... |

Missão 07: A Noble Cause
Com um pouco de caos dentro da cidade, o povo está com medo. Entretanto, ainda não é hora de entrar no palácio. Existem ainda muitos guardas. Seu objetivo será matar 6 Lizard Nobles. Com isso, outros nobres se sentirão ameaçados e pedirão guardas para protegê-los. Isso pode abrir uma brecha no palácio.
Falando com Zlak
|
Jogador: Hi
Zlak: Ah, ze human everyone iz talking about. Your victory over ze champion waz quite imprezzive. ... |
Para encontrar os Lizard Nobles, suba até os últimos andares das casas que estão ao lado da construção do Zlak. Se você quiser, você pode entrar logo na casa em frente a porta da construção, (aqui![]() ). Porém há dois Lizard Zaoguns protegendo o Lizard Noble. O respawn do Lizard Noble é muito rápido, portanto é recomendado ficar esperando sempre no mesmo respawn, ao invés de caminhar pela cidade enfrentando hordas de lizards a fim de matar os 6.
). Porém há dois Lizard Zaoguns protegendo o Lizard Noble. O respawn do Lizard Noble é muito rápido, portanto é recomendado ficar esperando sempre no mesmo respawn, ao invés de caminhar pela cidade enfrentando hordas de lizards a fim de matar os 6.

Reportando a missão
|
Jogador: Hi
Zlak: Ah, ze human everyone iz talking about. Your victory over ze champion waz quite imprezzive. ... |
Missão 08: Uninvited Guests
Fale Hi - Mission novamente com Zlak, ele vai falar que finalmente vamos invadir o palácio! Para isso, nós vamos usar um antigo túnel de fuga cuja entrada fica no andar inferior do ministério.
Falando com Zlak
|
Jogador: Hi
Zlak: Ah, ze human everyone iz talking about. Your victory over ze champion waz quite imprezzive. ... |
Uma recomendação, você vai precisar de um time forte e bastante suprimentos, prepare-se para enfrentar:
No ministério e túnel de fuga:
- Lizard High Guards, Lizard Legionnaires, Lizard Dragon Priests, Lizard Zaoguns, Lancer Beetles, Mutated Rats, Brimstone Bugs, Wailing Widows e Terramites.
No palácio do imperador:
- Lizard Chosens, Draken Spellweavers, Draken Elites, Draken Abominations, Draken Warmasters, Draken Spellweavers, Undead Dragons, Ghastly Dragons, Dragon Lords, Demons e Serpent Spawns.
The Escape Tunnel e Emperor's Palace 
Siga o caminho abaixo que leva ao túnel secreto que leva ao palácio do imperador, ao fínal do túnel você verá um piso especial com uma alavanca. Pare sobre o piso, puxe a alavanca e você estará no andar mais alto do palácio. Você e seu time devem descer tudo, até o andar mais profundo. Siga os caminhos para chegar nos círculos verdes, eles indicam onde encontrar as escadas. Percorra o caminho até chegar no último andar, siga até a sala protegida no canto sudeste do andar. Ao chegar, bastar dar use nas paredes para poder passar e entrar na sala protegida.


| Atenção: O teleporte no lado esquerdo da sala, com uma nota pendurada na parede, leva novamente a cidade de Razachai, se você pegá-lo, só será possível voltar usando uma Scale of Corruption e se estiver com a missão 10 aberta, então fique atento para não entrar! |
Já na sala, fale com o NPC Zizzle dizendo Hi - Mission para concluir essa missão. Ele vai parabenizá-lo que pedir que assim que estiver preparado, ele irá falar sobre sua próxima missão.
Falando com Zizzle
 |
Jogador: Hi
Zizzle: Ah our human alliez have finally arrived! I've already feared zat ze emperor'z forzez had caught you. Your rezilienze and prowezz are imprezzive. |
Missão 09: The Sleeping Dragon
Para o Imperador Dragão ter controle total sobre o continente, ele usa um tipo de cristal mágico que amplifica seu poder. É possível reverter o poder, mas provavelmente isso irá alertar o Imperador sobre a sua presença. Mesmo assim, para chegar nesse cristal, é necessário entrar em um tipo de "reino espiritual" que é protegido por um dragão. Para entrar é necessário uma chave. O problema é que: a chave está dentro da cabeça do dragão!
Sua missão será entrar nos sonhos do dragão e libertá-lo. Encerre a conversa e reinicie a conversa com o Zizzle, peça Hi - Mission - Yes. O NPC lhe dará uma poção especial ![]() e um papel com umas palavras estranhas
e um papel com umas palavras estranhas ![]() .
.
Falando com Zizzle
|
Jogador: Hi
Zizzle: Ah our human alliez have finally arrived! I've already feared zat ze emperor'z forzez had caught you. Your rezilienze and prowezz are imprezzive. |
Entre no teleporte do canto direito da sala e vá para o norte do grande salão que você acabou de chegar e encontre o dragão adormecido.
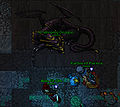
A Sleeping Dragon

Beba a poção, fale Hi e depois a palavra encontrada na descrição do papel: SOLOSARASATIQUARIUM.
Será feita uma grande descrição RPGística de como são os sonhos de um dragão.
Bem, seu objetivo será pegar alguns itens para liberar o dragão em si. Abaixo as palavras chaves principais para se movimentar dentro dos sonhos do dragão:
Look - digite para ver o que existe ao seu redor.
Go - digite para saber quais direções você pode ir, sendo que pode ser: north, south, west e east.
Take - pegar algum objeto próximo a você.
Use - usar algum objeto próximo a você.
Use essa sequência:
Caso você obtenha sucesso, outra descrição RPGística será dada, e a conversa será encerrada para o dragão acordar. Agora você poderá falar diretamente com o dragão.
Fale Hi - Wayfarer - Mission - Yes para receber a chave do portão (na verdade é somente uma permissão). Além disso, você ganhará um Spiritual Charm ![]() .
.
Agora volte até Zizzle pelo mesmo teleporte no sul e peça Mission, pegue seu Replica of the Sceptre ![]() .
.
Falando com Zizzle
|
Jogador: Hi
Zizzle: Ah our human alliez have finally arrived! I've already feared zat ze emperor'z forzez had caught you. Your rezilienze and prowezz are imprezzive. |
Sonhos do dragão, descrição RPGística
 |
Jogador: Hi
A Sleeping Dragon: ZzzzZzzZz...chrrr... . |
Palavras chaves usadas para pegar a chave
|
Jogador: West
A Sleeping Dragon: Advancing to the west, you recognise an increase of onyx on the ground. |
Após acordar o dragão
|
Jogador: Hi
A Sleeping Dragon: Greetings, wayfarer. |
Missão 10: A Message of Freedom

Agora que temos acesso ao reino do Imperador e a Replica of the Sceptre, é hora de agir!
Pegue o mesmo teleport para voltar até o A Sleeping Dragon e vá para o norte. Ande próximo do portão e você será teleportado para uma pequena sala, o primeiro teleport te leva de volta para o NPC Zizzle, o outro no final da sala te leva até a batalha, mas antes, você precisa entender o que fazer. O nosso objetivo será usar a Replica of the Sceptre no corpo morto das manifestações do Imperador.
Na sala principal há no total 4 teleports, localizados em cada canto da sala, que levam a 4 salas cada uma, e em cada delas está um dos "sentimentos" do Imperador e várias outras criaturas protegendo o local. Você vai precisar de um time forte. Sabendo sobre o que fazer, vamos colocar o time em ação. Ao passar o teleport, você estará na sala principal, comece pelo teleport na parte noroeste e siga o sentido horário indo para nordeste, depois sudeste e sudoeste. Esteja preparado para enfrentar: Draken Abominations, Draken Warmasters, Ghastly Dragons e Undead Dragons.
The Emperor 
Ao entrar em cada sala, você deve usar o Replica of the Sceptre ![]() no Large Black Crystal
no Large Black Crystal  no meio da sala para o boss aparecer, caso esteja em grupo ou service só há necessidade de uma pessoa do time usar o cetro.
Depois de matar o boss, não esqueça de usar o Replica of the Sceptre no corpo para prosseguir, ele tem a mesma aparência de uma Wisp morta ![]() . Você e seu time devem matar os bosses o mais rápido possível, após matar o boss, use o cetro o mais rápido possível em seu corpo antes que desapareça. Ao usar o cetro no corpo de cada boss a seguinte mensagem irá aparecer:
. Você e seu time devem matar os bosses o mais rápido possível, após matar o boss, use o cetro o mais rápido possível em seu corpo antes que desapareça. Ao usar o cetro no corpo de cada boss a seguinte mensagem irá aparecer:
Mensagem:
The sceptre seems to scream as you banish the final presence of the emperor. An ominous presence can be suddenly felt.
| Atenção: Antes de sair, olhe no seu Quest Log se foi contado corretamente até chegar em 4/4 bosses. |
Ao matar a Ira do Imperador, o último "sentimento", você deve passar pelo mesmo teleporte pelo qual você entrou na sala, você será levado a presença da "Consciência do Imperador". Continue na próxima missão.
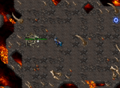
Encontrando a "Consciência do Imperador"


Missão 11: Payback Time
Você finalmente vai encarar o Imperador Dragão cara-a-cara. Não exatamente cara-a-cara, tá mais pra cara-a-osso, mas tudo bem.
Conversando, ele irá dizer que não está ali para lutar. Gostando ou não, teremos que trabalhar junto com ele para conseguir parar a catástrofe que fora iniciada.
Uma grande revelação acontecerá! Os objetivos de Zalamon não eram de ajudar o povo lizard, e sim libertar a chamada Great Snake, que tem objetivos de destruir o mundo que conhecemos atualmente. E outra revelação: ao usar a Replica of the Sceptre nos cristais, nós na verdade mudamos a sua energia para funcionar como fonte de poder e renascimento da tal Great Snake.
Vamos ter que confiar no Imperador. Fale Hi - Mission - Yes para aceitar a missão de impedir o "Deus das Serpentes".
Falando com o Imperador
 |
Jogador: Hi
Awareness of the Emperor: I am not here to fight you, fool. Like it or not, we will have to work together to stop the catastrophe you and that priest have initiated. |
The Snake God

Você será levado para a sala da alavanca que leva para a luta final com dois teleportes: o da esquerda vai para Muggy Plains (fique tranquilo que você pode voltar por outro teleporte ali no mesmo lugar) e o outro leva ao Imperador.
Volte até a sala que o Imperador lhe levou e vá até o centro dela. Puxando a alavanca, todo os jogadores no piso preto serão levados até o combate final. Preparado? Puxe a alavanca! No total, 04 "encarnações" do Deus Serpente irão aparecer.
Estratégia:
Esse boss, como mencionado anteriormente, tem 04 "encarnações" que ao morrer darão lugar a próxima encarnação. É recomendado que o time tenha um ou mais Knights para blocar e trapar o boss em algum dos cantos da sala enquanto o resto do time ataca de longe. Recomenda-se que mages utilizem Sudden Death Runes já que nenhum desses bosses apresenta resistência a dano de morte.
Finalmente, para acabar de vez com esse falso deus, use sua Replica of the Sceptre nos restos do Mutated Zalamon e saia pelo teleporte que leva até o Imperador.

A primeira é a Snake God Essence.

A segunda é a Snake Thing.

A terceira é a Lizard Abomination.

A quarta é o Mutated Zalamon.

Usando o cetro nos restos do Mutated Zalamon.


Missão 12: Just Rewards
Opa! Hora de recompensas!
O Imperador teria vontade de comer você pelas suas burrices. Mas, ele reconhece seus atos e poupa sua vida. Além disso, irá mostrar sua generosidade com algumas recompensas. Você ganhará um baú cheio de dinheiro, uma casa na cidade, um set da mais fina armadura em Zao e uma mana que nunca acaba. Para pegar sua recompensa, vá até Razachai e fale com o NPC Izsh, aqui![]() .
.
Falando com o Imperador
|
Jogador: Hi
Awareness of the Emperor: Greetings, mortal. Be aware that you are trying my patience while we are talking. |
Encontre o NPC Izsh no sul do segundo andar do ministério.

Fale Hi - Mission - Yes. Infelizmente, vamos receber a triste notícia que, por causa dos documentos falsos para entrar na cidade, guardas mortos, assassinato e destruição de bens em posse do Imperador, vamos perder quase toda nossa recompensa.
A boa notícia é que sobraram algumas recompensas no porão.
Falando com Izsh
 |
Jogador: Hi
Izsh: Greetingz zcalelezz being. |
Desça no porão (escada para missão 8) e entre na sala.
Recompensas
Pegue as duas backpacks (Dragon Backpack e Jewelled Backpack) nos baús da esquerda e escolha UM dentre os quatro itens listados abaixo e não esqueça de clicar no guarda-roupas para ganhar o Wayfarer Outfit.

Wayfarer Outfits
Ao matar o Snake God Essence e reportar sua missão para Izsh, ele permite que você pegue o Wayfarer Outfit na sala de recompensas.
Male/Female:


Extras
Draptor Mount
Ao entrar no palácio imperial você pode encontrar um Draptor, você pode ter a chance de domá-lo ao usar um Harness ![]() ou uma Music Box
ou uma Music Box ![]() nele.
nele.
Montaria:

Parabéns, você concluiu a quest!
Para conseguir os itens necessários para os addons do outfit, confira outros spoilers:
- Addon 1: A Father's Burden Quest.
- Addon 2: An Interest In Botany Quest.
Para ter o direito de usar os dois addons: