|
|
|
||||||||||||||||||||||||


Spike Tasks: mudanças entre as edições
| [Aprovação Pendente] | [edição aprovada] |
m |
|||
| (43 revisões intermediárias por 11 usuários não estão sendo mostradas) | |||
| Linha 1: | Linha 1: | ||
{{Infobox_Tasks|List={{{1|}}}|GetValue={{{GetValue|}}} | |||
| name = Spike Tasks | | name = Spike Tasks | ||
| premium = | | premium = Sim | ||
| reward = [[ | | reward = [[Arquivo:Outfit Cave Explorer Male Addon 3.gif]][[Arquivo:Outfit Cave Explorer Female Addon 3.gif]]</br>[[Cave Explorer Outfits]] e addons, [[Achievement]] e [[Experiência]]. | ||
| location = [[The Spike]]. | | location = [[The Spike]]<noinclude> ({{mapa|32243,32598,8:6|aqui}})</noinclude>. | ||
| | | time = A cada 20 horas. | ||
| lvl = 25 | | lvl = 25 | ||
| dangers = | |||
'''[[Upper Spike]] (25-49)''': [[Corym Charlatan]]s, [[Corym Skirmisher]]s, [[Crypt Shambler]]s, [[Demon Skeleton]]s, [[Gargoyle]]s, [[Ghost]]s, [[Mummy]]s e [[Zombie]]s.</br> | |||
| dangers = ''' | '''[[Middle Spike]] (50-79)''': [[Ancient Scarab]]s, [[Bonebeast]]s, [[Clay Guardian]]s, [[Crystalcrusher]]s, [[Earth Elemental]]s, [[Mutated Bat]]s e [[Mutated Rat]]s.</br> | ||
'''[[Lower Spike]] (80+)''': [[Behemoth]]s, [[Dragon Lord]]s, [[Drillworm]]s, [[Enslaved Dwarf]], [[Lost Basher]]s, [[Lost Husher]]s, [[Lost Thrower]]s, [[Massive Earth Elemental]]s, [[Nightmare Scion]]s, [[Vulcongra]]s e [[Wyrm]]s. | |||
| implemented = 10.20 | |||
| | | spoil = | ||
| | __NOTOC__ | ||
{{DASH|'''Atente às restrições de level dos teleports''' | |||
* '''Leveis 25-49:''' podem acessar a parte externa dos primeiros três andares e podem conseguir somente o ''outfit''. | |||
* '''Leveis 50-79:''' podem acessar a parte externa do quarto, quinto e sexto andar e podem conseguir ''outfit'' e o ''primeiro addon''. | |||
* '''Leveis 80+:''' podem acessar a parte externa dos últimos três andares e podem conseguir o ''outfit completo'' com ambos os addons.}} | |||
<gallery> | {{DASH|'''Notas:''' | ||
Arquivo:The spike teleport.jpg| Teleporte de entrada para o Spike. | * Você poderá pegar 4 tasks diariamente e poderá pedi-las todas de uma vez, para economizar tempo. | ||
Arquivo:The spike first floor.jpg| Dentro do Spike | * Ao completar cada task, você receberá pontos de experiência e 1 ponto de fama. | ||
* Você poderá repetir as tasks a cada '''20 horas'''. | |||
* As tasks diferem para cada restrição de level, como serão mostradas a seguir. | |||
* Todos os andares possuem um teleport no oeste (esquerda), o qual o levará para o lado externo do [[The Spike|Spike]]. | |||
* Itens de tasks perdidos poderão ser comprados com [[Gnomux]], no andar -6. | |||
* É necessário ter 100 pontos de fama para comprar o [[Cave Explorer Outfits]].}} | |||
= Método = | |||
Vá ate o NPC [[Xelvar]], em [[Kazordoon]], ({{mapa|32623,31862,11:4|aqui}}). Ao norte dele, você irá encontrar um teleport que te levará para dentro da [[The Spike]]. | |||
<gallery mode="nolines"> | |||
Arquivo:The spike teleport.jpg|Teleporte de entrada para o Spike. | |||
Arquivo:The spike first floor.jpg|Dentro do Spike. | |||
</gallery> | </gallery> | ||
Lá você encontrará o npc [[Gnommander]] | Lá você encontrará o npc [[Gnommander]] e ele lhe dará informações sobre o local e como você pode ajudar. | ||
'''Falando com Gnommander''' | |||
{{transcrições|npc=Gnommander|texto= | {{transcrições|npc=Gnommander|texto= | ||
''Jogador'' | ''Jogador:'' '''Hi'''</br> | ||
[[Gnommander]]: Hi there! Welcome to the spike.<br | [[Gnommander]]: Hi there! Welcome to the spike.</br> | ||
''Jogador'' | ''Jogador:'' '''Spike'''</br> | ||
[[Gnommander]]: I'm the operating commander of the Spike, the latest great accomplishment of the gnomish race. ...<br | [[Gnommander]]: I'm the operating commander of the Spike, the latest great accomplishment of the gnomish race. ...</br> | ||
[[Gnommander]]: The Spike is a crystal structure, created by our greatest crystal experts. It has grown from a crystal the size of my fist to the structure you see here and now. ...<br | [[Gnommander]]: The Spike is a crystal structure, created by our greatest crystal experts. It has grown from a crystal the size of my fist to the structure you see here and now. ...</br> | ||
[[Gnommander]]: Of course this did not happen from one day to the other. It's the fruit of the work of several gnomish generations. Its purpose has changed in the course of time. ...<br | [[Gnommander]]: Of course this did not happen from one day to the other. It's the fruit of the work of several gnomish generations. Its purpose has changed in the course of time. ...</br> | ||
[[Gnommander]]: At first it was conceived as a fast growing resource node. Then it was planned to become the prototype of a new type of high security base. ...<br | [[Gnommander]]: At first it was conceived as a fast growing resource node. Then it was planned to become the prototype of a new type of high security base. ...</br> | ||
[[Gnommander]]: Now it has become a military base and a weapon. With our foes occupied elsewhere, we can prepare our strike into the depths of the earth. ...<br | [[Gnommander]]: Now it has become a military base and a weapon. With our foes occupied elsewhere, we can prepare our strike into the depths of the earth. ...</br> | ||
[[Gnommander]]: This crystal can withstand extreme pressure and temperature, and it's growing deeper and deeper even as we speak. ...<br | [[Gnommander]]: This crystal can withstand extreme pressure and temperature, and it's growing deeper and deeper even as we speak. ...</br> | ||
[[Gnommander]]: The times of the fastest growth have come to an end, however, and we have to slow down in order not to risk the structural integrity of the Spike. But we are on our way and have to do everything possible to defend the Spike.<br | [[Gnommander]]: The times of the fastest growth have come to an end, however, and we have to slow down in order not to risk the structural integrity of the Spike. But we are on our way and have to do everything possible to defend the Spike.</br> | ||
''Jogador'' | ''Jogador:'' '''Commander'''</br> | ||
[[Gnommander]]: I'm responsible for the security and reward heroes to our cause. If you are looking for missions, talk to Gnomilly, Gnombold and Gnomagery.<br | [[Gnommander]]: I'm responsible for the security and reward heroes to our cause. If you are looking for missions, talk to Gnomilly, Gnombold and Gnomagery.</br> | ||
''Jogador'' | ''Jogador:'' '''Reward'''</br> | ||
[[Gnommander]]: I can sell special outfit parts. If your fame is high enough, you might be worthy of such a reward. | [[Gnommander]]: I can sell special outfit parts. If your fame is high enough, you might be worthy of such a reward.}} | ||
}} | |||
Após falar com Gnommander, seu quest log será atualizado. Lá você poderá checar seus pontos de fama. | |||
== Tasks 25-49 == | == Tasks 25-49 == | ||
{{DASH|'''Recomendações:''' | {{DASH|'''Recomendações:''' | ||
*É aconselhável para knights | * É aconselhável para knights que levem alguma arma encantada, uma vez que há um boa quantidade de [[Ghost]]s. | ||
* | * Apenas as [[Mummy|Mummies]] sentem seres invisíveis nestes andares, por isso é recomendado levar um [[Stealth Ring]] ou ter a magia [[Invisible]], para usar em momentos de perigo.}} | ||
Desça um andar e peça por uma '''mission''' a NPC [[Gnomilly]], que falará as tasks disponíveis (Killing Demon Skeletons, Ghost Pacifiers, Angry Spirits e Malevolent Presence). As tasks poderão ser realizadas nos primeiros três andares da [[The Spike]] e, se preferir, você poderá pedi-las todas ao mesmo tempo. | |||
<center><gallery mode="nolines" widths="250px" heights="250px"> | |||
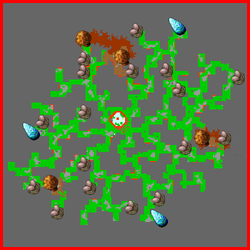
Arquivo:The Spike Task -1.png|Localização dos Ghost Pacifier e Ominous Mound no andar -1 | |||
Arquivo:The Spike Task -2.png|Localização dos Ghost Pacifier e Ominous Mound no andar -2 | |||
Arquivo:The Spike Task -3.png|Localização dos Ghost Pacifier e Ominous Mound no andar -3 | |||
</gallery></center> | |||
=== | {{Menu Quest | ||
| qtdBtn = 4 | |||
| altura = 45 | |||
| boss = não | |||
<!-------------------------------------------------------------------------------------------------------------------------------> | |||
| imgBtn01 = Spirit Shovel | |||
| imgBtnSize01 = 32 | |||
| txtBtn01 = Angry Spirits | |||
| tituloTxtBtn01 = Angry Spirits | |||
| spoilerTxtBtn01 = | |||
<!------------------------------- INÍCIO DO TEXTO DO SPOILER P/ O BOTÂO Nº 01 ---------------------------------------------------> | |||
=== <span class="titulo-quest">Angry Spirits</span> === | |||
Fale '''Hi - Release - Yes''' para [[Gnomilly]]. Ela dirá que você deve liberar a fúria de alguns espíritos que estão nas [[Ominous Mound|covas]]. Você receberá uma [[Spirit Shovel]], para usar nos [[Ominous Mound]]s. Eles são fáceis de encontrar em várias partes dos três primeiros andares. | |||
[[ | Ao cavar as [[Ominous Mound|covas]], elas ficarão [[Ominous Mound (Opened)|abertas]] por alguns minutos e criaturas poderão ser invocadas. Durante esse período você não poderá cavar ali novamente até que a cova volte ao normal. Seu objetivo é invocar um [[Enraged Soul]], portanto, abra quantas [[Ominous Mound|covas]] forem necessárias. | ||
<span class="titulo-quest">'''Recompensa'''</span></br> | |||
Quando o [[Enraged Soul]] aparecer, você completará a sua missão e o [[Spirit Shovel]] sumirá. Volte para [[Gnomilly]] e reporte a missão, dizendo '''Hi - Report - Release'''. Você receberá 1000 de experiência. | |||
'''Falando com Gnomilly''' | |||
{{transcrições|npc= | {{transcrições|npc=gnomilly|texto= | ||
[[Gnomilly]]: | ''Jogador:'' '''Hi'''</br> | ||
[[Gnomilly]]: If you are interested, I can give you some more | [[Gnomilly]]: Hi!</br> | ||
''Jogador'' | ''Jogador:'' '''Release'''</br> | ||
[[Gnomilly]]: Gnometastic! Take this | [[Gnomilly]]: Your task would be to use a spirit shovel to release some spirit's anger from graves that can be found all around here. If you are interested, I can give you some more '''information''' about it. Are you willing to accept this mission?</br> | ||
''Jogador:'' '''Yes'''</br> | |||
[[Gnomilly]]: Gnometastic! Take this spirit shovel and use it on four graves in the cave system. If you lose the shovel you'll have to bring your own. Gnomux sells all the equipment that is required for our missions.}} | |||
<!--------------------------------- FIM DO TEXTO DO SPOILER P/ O BOTÂO Nº 01 ----------------------------------------------------> | |||
| imgBtn02 = Ghost Pacifier | |||
| imgBtnSize02 = 32 | |||
| txtBtn02 = Ghost Pacifiers | |||
| tituloTxtBtn02 = Ghost Pacifiers | |||
| spoilerTxtBtn02 = | |||
<!------------------------------- INÍCIO DO TEXTO DO SPOILER P/ O BOTÂO Nº 02 ---------------------------------------------------> | |||
=== <span class="titulo-quest">Ghost Pacifiers</span> === | |||
Fale '''Hi - Pacifiers - Yes''' para [[Gnomilly]]. Ela dirá que você deve encontrar e recarregar 7 [[Ghost Pacifier]]s utilizando um [[Tuning Fork]]. Ghost Pacifiers são fáceis de encontrar nos três primeiros andares, geralmente no final de cada túnel. Cuidado, pois os [[Ghost Pacifier]]s são guardados por várias criaturas. | |||
Ao usar o [[Tuning Fork]] em um [[Ghost Pacifier]], ele ficará [[Charged Ghost Pacifier|carregado]] por alguns minutos. Durante esse tempo, você não poderá utilizar o item até que ele volte ao normal. | |||
= | <span class="titulo-quest">'''Recompensa'''</span></br> | ||
O [[Tuning Fork]] desaparecerá assim que for usado no último [[Ghost Pacifier]]. Volte para [[Gnomilly]] e reporte a missão, dizendo '''Hi - Report - Pacifiers'''. Você receberá 1000 de experiência. | |||
'''Falando com Gnomilly''' | |||
{{transcrições|npc=Gnomilly|texto= | |||
''Jogador:'' '''Hi'''</br> | |||
[[Gnomilly]]: Hi!</br> | |||
''Jogador:'' '''Pacifiers'''</br> | |||
[[Gnomilly]]: We need you to recharge our ghost pacifiers. They are placed at several strategic points in the caves around us and should be easy to find. Your mission would be to charge seven of them. ...</br> | |||
[[Gnomilly]]: If you are interested, I can give you some more '''information''' about it. Are you willing to accept this mission?</br> | |||
''Jogador:'' '''Yes'''</br> | |||
[[Gnomilly]]: Gnometastic! Take this resonance charger and use it on seven of the pacifiers in the cave. If you lose the charger, you'll have to bring your own. Gnomux sells all the equipment that is required for our missions.}} | |||
<!--------------------------------- FIM DO TEXTO DO SPOILER P/ O BOTÂO Nº 02 ----------------------------------------------------> | |||
| imgBtn03 = Demon Skeleton | |||
| imgBtnSize03 = 50 | |||
| txtBtn03 = Killing</br>Demon Skeletons | |||
| tituloTxtBtn03 = Killing Demon Skeletons | |||
| spoilerTxtBtn03 = | |||
<!------------------------------- INÍCIO DO TEXTO DO SPOILER P/ O BOTÂO Nº 03 ---------------------------------------------------> | |||
=== <span class="titulo-quest">Killing Demon Skeletons</span> === | |||
Fale '''Hi - Kill - Yes''' para [[Gnomilly]]. Ela dirá que o número de [[Demon Skeleton]]s aumentou consideravelmente nas cavernas e que você precisa reduzir esse número. Você deve matar 7 [[Demon Skeleton]]s. A maneira mais simples de fazer esta tarefa é matar os [[Demon Skeleton]]s que você encontrará nas outras missões. | |||
<span class="titulo-quest">'''Recompensa'''</span></br> | |||
Após matar a quantidade certa de criaturas, volte para [[Gnomilly]] e reporte a missão, dizendo '''Hi - Report - Kill'''. Você receberá 1000 de experiência. | |||
'''Falando com Gnomilly''' | |||
{{transcrições|npc= | {{transcrições|npc=gnomilly|texto= | ||
[[Gnomilly]]: | ''Jogador:'' '''Hi'''</br> | ||
''Jogador'' | [[Gnomilly]]: Hi!</br> | ||
[[Gnomilly]]: Gnometastic! | ''Jogador:'' '''Kill'''</br> | ||
[[Gnomilly]]: We need someone to reduce the steadily growing number of demon skeletons in the caves. If you are interested, I can give you some more '''information''' about it. Are you willing to accept this mission?</br> | |||
''Jogador:'' '''Yes'''</br> | |||
[[Gnomilly]]: Gnometastic! Just go out and kill them. You should find more of them than you like.}} | |||
<!--------------------------------- FIM DO TEXTO DO SPOILER P/ O BOTÂO Nº 03 ----------------------------------------------------> | |||
| imgBtn04 = Ghost Detector | |||
| imgBtnSize04 = 32 | |||
| txtBtn04 = Malevolent</br>Presence | |||
| tituloTxtBtn04 = Malevolent Presence | |||
| spoilerTxtBtn04 = | |||
<!------------------------------- INÍCIO DO TEXTO DO SPOILER P/ O BOTÂO Nº 04 ---------------------------------------------------> | |||
=== <span class="titulo-quest">Malevolent Presence</span> === | |||
Fale '''Hi - Track - Yes''' para [[Gnomilly]]. Ela dirá que tem uma importante task: rastrear o local exato que emana uma presença espiritual gigantesca e maligna em um dos 3 andares. [[Gnomilly]] te dará um [[Ghost Detector]], o qual te guiará até o ponto exato. | |||
'''Falando com Gnomilly''' | |||
{{transcrições|npc=Gnomilly|texto= | {{transcrições|npc=Gnomilly|texto= | ||
''Jogador'': | ''Jogador:'' '''Hi'''</br> | ||
[[Gnomilly]]: You'd be given the highly important task to track down an enormously malevolent spiritual presence in the cave system. Use your tracking device to find out how close you are to the presence. ...<br | [[Gnomilly]]: Hi!</br> | ||
[[Gnomilly]]: Use that information to find the residual energy and use the tracker there. If you are interested, I can give you some more | ''Jogador:'' '''Track'''</br> | ||
''Jogador'' | [[Gnomilly]]: You'd be given the highly important task to track down an enormously malevolent spiritual presence in the cave system. Use your tracking device to find out how close you are to the presence. ...</br> | ||
[[Gnomilly]]: Use that information to find the residual energy and use the tracker there. If you are interested, I can give you some more '''information''' about it. Are you willing to accept this mission?</br> | |||
''Jogador:'' '''Yes'''</br> | |||
[[Gnomilly]]: Gnometastic! Use this tracking device in the caves and locate the residual spirit energy. If you lose the tracking device, you'll have to bring your own. Gnomux sells all the equipment that is required for our missions.}} | [[Gnomilly]]: Gnometastic! Use this tracking device in the caves and locate the residual spirit energy. If you lose the tracking device, you'll have to bring your own. Gnomux sells all the equipment that is required for our missions.}} | ||
Com o | Com o [[Ghost Detector]] em mãos, dê "Use" nele em cada andar, e mensagens aparecerão indicando se há ou não presença maligna naquele andar. Caso haja, as mensagens também indicarão a direção a ser tomada. | ||
<table style="text-align:center; width: | |||
<caption>Direções</caption> | <table style="text-align:center; width:300px; height:300px; float:right; border-spacing:0px;"> | ||
<caption>'''Direções'''</caption> | |||
<tr> | <tr> | ||
<td style="background-color:#CEDFF2;">North-West<br | <td style="border-radius:25px 0px 0px 0px; height:100px; width:100px; background-color:#CEDFF2;">North-West</br><small>(Noroeste)</small></td> | ||
<td style="background-color:#E8F2F8;">North<br | <td style="height:100px; width:100px; background-color:#E8F2F8;">North</br><small>(Norte)</small></td> | ||
<td style="background-color:#CEDFF2;">North-East<br | <td style="border-radius:0px 25px 0px 0px; height:100px; width:100px; background-color:#CEDFF2;">North-East</br><small>(Nordeste)</small></td> | ||
</tr><tr> | </tr><tr> | ||
<td style="background-color:#E8F2F8;">West<br | <td style="height:100px; width:100px; background-color:#E8F2F8;">West</br><small>(Oeste)</small></td> | ||
<td style="background-color:#6699FF;"> | <td style="height:100px; width:100px; background-color:#6699FF;">Você</td> | ||
<td style="background-color:#E8F2F8;">East<br | <td style="height:100px; width:100px; background-color:#E8F2F8;">East</br><small>(Leste)</small></td> | ||
</tr><tr> | </tr><tr> | ||
<td style="background-color:#CEDFF2;">South-West<br | <td style="border-radius:0px 0px 0px 25px; height:100px; width:100px; background-color:#CEDFF2;">South-West</br><small>(Sudoeste)</small></td> | ||
<td style="background-color:#E8F2F8;">South<br | <td style="height:100px; width:100px; background-color:#E8F2F8;">South</br><small>(Sul)</small></td> | ||
<td style="background-color:#CEDFF2;">South-East<br | <td style="border-radius:0px 0px 25px 0px; height:100px; width:100px; background-color:#CEDFF2;">South-East</br><small>(Sudeste)</small></td> | ||
</tr> | </tr> | ||
</table> | </table> | ||
Mensagens: | '''Mensagens:''' | ||
*All values normal.Scale in nominal spectrum range.<br | * All values normal. Scale in nominal spectrum range.</br><small>''Tradução: Níveis normais. Escala na faixa de espectro simbólica.'' (Não há presença maligna detectável) </small> | ||
*The detector points to the <direção>.<br | * The detector points to the <direção>.</br><small>''Tradução: O detector aponta para o <direção>.''</small> | ||
*The detector is off the scale! A presence must be close!<br | * The detector is off the scale! A presence must be close!</br><small>''Tradução: O detector está descontrolado! A presença deve estar perto!''</small> | ||
*You found a malignant presence, the glowing detector signals that it does not need any futher data.<br | * You found a malignant presence, the glowing detector signals that it does not need any futher data.</br><small>''Tradução: Você encontrou a presença maligna. O detector brilhante sinaliza que não são necessárias mais informações.''</small> | ||
Ao conseguir a mensagem que indica o local correto, o | <span class="titulo-quest">'''Recompensa'''</span></br> | ||
Ao conseguir a mensagem que indica o local correto, o [[Ghost Detector]] sumirá. Volte para [[Gnomilly]] e reporte a missão, dizendo '''Hi - Report - Track'''. Você receberá 1000 de experiência. | |||
{{clear}} | |||
<!--------------------------------- FIM DO TEXTO DO SPOILER P/ O BOTÂO Nº 04 ----------------------------------------------------> | |||
}} | |||
== | == Tasks 50-79 == | ||
Procure o NPC [[Gnombold]], ele estará na [[The Spike]], descendo 4 andares, peça por uma '''mission''' e então ele irá falar as tasks disponíveis. Você pode solicitar as quatro tasks aos mesmo tempo. | |||
'''Falando com Gnombold''' | |||
{{transcrições|npc= | {{transcrições|npc=Gnombold|texto= | ||
[[ | ''Jogador:'' '''Hi'''</br> | ||
[[Gnombold]]: Hi!</br> | |||
[[ | ''Jogador:'' '''Mission'''</br> | ||
[[Gnombold]]: I can offer you several missions: to gather geomantic charges, to fertilise the mushroom caves, to destroy monster nests and to kill some crystalcrushers.}} | |||
== | <center><gallery mode="nolines" widths="250px" heights="250px"> | ||
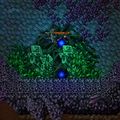
Arquivo:The Spike Task -4.png|Localização dos Monster Nests, Gardener Mushrooms e Magnetic Monoliths no andar -4 | |||
Arquivo:The Spike Task -5.png|Localização dos Monster Nests, Gardener Mushrooms e Magnetic Monoliths no andar -5 | |||
</gallery></center> | |||
{{Menu Quest | |||
| qtdBtn = 4 | |||
| altura = 45 | |||
| boss = não | |||
'' | <!-------------------------------------------------------------------------------------------------------------------------------> | ||
[[ | | imgBtn01 = Monster Nest | ||
| imgBtnSize01 = 32 | |||
| txtBtn01 = Destroying Nests | |||
| tituloTxtBtn01 = Destroying Nests | |||
| spoilerTxtBtn01 = | |||
<!------------------------------- INÍCIO DO TEXTO DO SPOILER P/ O BOTÂO Nº 01 ---------------------------------------------------> | |||
=== <span class="titulo-quest">Destroying Nests</span> === | |||
Fale '''Hi - Nests - Yes''' para [[Gnombold]] então ele irá lhe pedir para que vá nas cavernas centrais do spike e destrua 5 [[Monster Nest]]s para ele, mas pra isso você precisa se disfarçar. Vá ao sul do NPC e passe em alguns [[Green Crystal Stalagmite]] você irá se transformar em um [[Mutated Bat]], '''atenção''', você só conseguirá destruir os [[Monster Nest]]s se estiver disfarçado. Ao destruir o ninho ele irá se transformar em um [[Destroyed Monster Nest]] por um tempo, e poderá nascer alguma criatura que exista nesse andar. | |||
= | <gallery mode="nolines"> | ||
Arquivo:Spike task nest transformation.jpg|Conseguindo o disfarce | |||
Arquivo:Spike task destroying nests.jpg|Destruindo um nest | |||
</gallery> | |||
'''Falando com Gnombold''' | |||
{{transcrições|npc=Gnombold|texto= | {{transcrições|npc=Gnombold|texto= | ||
''Jogador'': ''' | ''Jogador:'' '''Hi'''</br> | ||
[[Gnombold]]: Our mission for you is to step into the gnomish transformer and then destroy eight monster nests in the caves. If you are interested, I can give you some more information about it. Are you willing to accept this mission?<br | [[Gnombold]]: Hi!</br> | ||
''Jogador'' | ''Jogador:'' '''Nests'''</br> | ||
[[Gnombold]]: Our mission for you is to step into the gnomish transformer and then destroy eight monster nests in the caves. If you are interested, I can give you some more information about it. Are you willing to accept this mission?</br> | |||
''Jogador:'' '''Yes'''</br> | |||
[[Gnombold]]: Gnometastic! Don't forget to step into the transformer before you go out and destroy five monster nests. If your transformation runs out, return to the transformer to get another illusion.}} | [[Gnombold]]: Gnometastic! Don't forget to step into the transformer before you go out and destroy five monster nests. If your transformation runs out, return to the transformer to get another illusion.}} | ||
Após destruir, basta voltar para [[Gnombold]] reportar a missão, dizendo " | <span class="titulo-quest">'''Recompensa'''</span></br> | ||
Após destruir 5 ninhos, basta voltar para [[Gnombold]] reportar a missão, dizendo '''Hi - Report - Nests'''. Você receberá 2000? pontos de experiência. | |||
<!--------------------------------- FIM DO TEXTO DO SPOILER P/ O BOTÂO Nº 01 ----------------------------------------------------> | |||
| imgBtn02 = Gardener Mushroom | |||
| imgBtnSize02 = 50 | |||
| txtBtn02 = Fertilising</br>Mushrooms | |||
| tituloTxtBtn02 = Fertilising Mushrooms | |||
| spoilerTxtBtn02 = | |||
<!------------------------------- INÍCIO DO TEXTO DO SPOILER P/ O BOTÂO Nº 02 ---------------------------------------------------> | |||
=== <span class="titulo-quest">Fertilising Mushrooms</span> === | |||
Fale '''Hi - Fertilise - Yes''' para [[Gnombold]] então ele irá lhe pedir para procurar 4 jardins de cogumelos diferentes nas cavernas centrais do spike, chegando nos locais utilize o [[Flask Mushroom Fertilizer]] que você recebeu nos [[Gardener Mushroom]]. | |||
= | <gallery mode="nolines"> | ||
Arquivo:Spike task fertilise.jpg|Fertilizando o mushroom | |||
</gallery> | |||
'''Falando com Gnombold''' | |||
{{transcrições|npc=Gnombold|texto= | {{transcrições|npc=Gnombold|texto= | ||
''Jogador'': ''' | ''Jogador:'' '''Hi'''</br> | ||
[[Gnombold]]: Your mission would be to seek out gardener mushrooms in the caves and use some fertiliser on them. If you are interested, I can give you some more information about it. Are you willing to accept this mission?<br | [[Gnombold]]: Hi!</br> | ||
''Jogador'' | ''Jogador:'' '''Fertilise'''</br> | ||
[[Gnombold]]: Your mission would be to seek out gardener mushrooms in the caves and use some fertiliser on them. If you are interested, I can give you some more information about it. Are you willing to accept this mission?</br> | |||
''Jogador:'' '''Yes'''</br> | |||
[[Gnombold]]: Gnometastic! And here is your fertiliser - use it on four gardener mushroom in the caves. If you lose the fertiliser you'll have to bring your own. Gnomux sells all the equipment that is required for our missions.}} | [[Gnombold]]: Gnometastic! And here is your fertiliser - use it on four gardener mushroom in the caves. If you lose the fertiliser you'll have to bring your own. Gnomux sells all the equipment that is required for our missions.}} | ||
Após fertilizar todos os [[Gardener Mushroom]], basta voltar para [[Gnombold]] reportar a missão, dizendo | <span class="titulo-quest">'''Recompensa'''</span></br> | ||
Após fertilizar todos os [[Gardener Mushroom]], basta voltar para [[Gnombold]] reportar a missão, dizendo '''Hi - Report - Fertilise'''. Você receberá 2000? pontos de experiência. | |||
=== Geomantic Charges === | <!--------------------------------- FIM DO TEXTO DO SPOILER P/ O BOTÂO Nº 02 ----------------------------------------------------> | ||
| imgBtn03 = Magnetic Monolith | |||
| imgBtnSize03 = 50 | |||
| txtBtn03 = Geomantic</br>Charges | |||
| tituloTxtBtn03 = Geomantic Charges | |||
| spoilerTxtBtn03 = | |||
<!------------------------------- INÍCIO DO TEXTO DO SPOILER P/ O BOTÂO Nº 03 ---------------------------------------------------> | |||
=== <span class="titulo-quest">Geomantic Charges</span> === | |||
Fale '''Hi - Charges - Yes''' para [[Gnombold]] então ele irá lhe dar uma [[Lodestone]] [[Arquivo:Lodestone.gif|link=]] e você terá que recarregar ela utilizando-a três vezes nos [[Magnetic Monolith]]s que estão espalhados pelos andares centrais do Spike. | |||
'''Falando com Gnombold''' | |||
{{transcrições|npc=Gnombold|texto= | {{transcrições|npc=Gnombold|texto= | ||
''Jogador'': ''' | ''Jogador:'' '''Hi'''</br> | ||
[[Gnombold]]: Our mission for you is to use a magnet on three different monoliths in the cave system here. After the magnet evaporates on the last charge, enter the magnetic extractor here to deliver your charge. ...<br | [[Gnombold]]: Hi!</br> | ||
[[Gnombold]]: If you are interested, I can give you some more information about it. Are you willing to accept this mission?<br | ''Jogador:'' '''Charges'''</br> | ||
''Jogador'' | [[Gnombold]]: Our mission for you is to use a magnet on three different monoliths in the cave system here. After the magnet evaporates on the last charge, enter the magnetic extractor here to deliver your charge. ...</br> | ||
[[Gnombold]]: Gnometastic! Charge this magnet at three monoliths in the cave system. With three charges, the magnet will disintegrate and charge you with its gathered energies. Step on the magnetic extractor here to deliver the charge to us, then report to me. ... | [[Gnombold]]: If you are interested, I can give you some more information about it. Are you willing to accept this mission?</br> | ||
''Jogador:'' '''Yes'''</br> | |||
[[Gnombold]]: Gnometastic! Charge this magnet at three monoliths in the cave system. With three charges, the magnet will disintegrate and charge you with its gathered energies. Step on the magnetic extractor here to deliver the charge to us, then report to me. ...</br> | |||
[[Gnombold]]: If you lose the magnet you'll have to bring your own. Gnomux sells all the equipment that is required for our missions.}} | [[Gnombold]]: If you lose the magnet you'll have to bring your own. Gnomux sells all the equipment that is required for our missions.}} | ||
Após recarregar a [[Lodestone]] o suficiente ela irá sumir e a energia ficará presa em seu corpo, feito isso basta voltar para [[Gnombold]] reportar a missão, dizendo " | Ao usar a [[Lodestone]] em dos monólitos, ela irá virar uma [[Partially Charged Lodestone]] [[Arquivo:Partially Charged Lodestone.gif|link=]], ao usá-la novamente em outro monólito, ela irá virar uma [[Highly Charged Lodestone]] [[Arquivo:Highly Charged Lodestone.gif|link=]]. A cada uso, você será teleportado pra algum outro lugar da cave, então fique atento pois a sala que você aparecer estará cheia de criaturas. | ||
Ao usar a [[Lodestone]] pela terceira vez, o item irá desaparecer e você receberá a mensagem: '''You have charged you body with geomantic energy and can report about it.''' Os monólitos levarão cerca de um a dois minutos para recarregarem antes que possam ser usados novamente. | |||
<span class="titulo-quest">'''Recompensa'''</span></br> | |||
Após recarregar a [[Lodestone]] o suficiente ela irá sumir e a energia ficará presa em seu corpo, feito isso basta voltar para [[Gnombold]] reportar a missão, dizendo '''Hi - Report - Charges'''. Você receberá 2000? pontos de experiência. | |||
<gallery mode="nolines"> | |||
Arquivo:Spike task charges.jpg|Usando pela ultima vez | |||
</gallery> | |||
<!--------------------------------- FIM DO TEXTO DO SPOILER P/ O BOTÂO Nº 03 ----------------------------------------------------> | |||
| imgBtn04 = Crystalcrusher | |||
| imgBtnSize04 = 50 | |||
| txtBtn04 = Killing</br>Crystalcrushers | |||
| tituloTxtBtn04 = Killing Crystalcrushers | |||
| spoilerTxtBtn04 = | |||
<!------------------------------- INÍCIO DO TEXTO DO SPOILER P/ O BOTÂO Nº 04 ---------------------------------------------------> | |||
=== <span class="titulo-quest">Killing Crystalcrushers</span> === | |||
Fale '''Hi - Kill - Yes''' para [[Gnombold]] então ele irá lhe pedir ir nas cavernas centrais da [[The Spike]] e matar 7 [[Crystalcrusher]] para ele. Você facilmente completará esta tarefa enquanto realiza as outras. | |||
'''Falando com Gnombold''' | |||
{{transcrições|npc=Gnombold|texto= | {{transcrições|npc=Gnombold|texto= | ||
''Jogador'': ''' | ''Jogador:'' '''Hi'''</br> | ||
[[Gnombold]]: This mission will require you to kill some | [[Gnombold]]: Hi!</br> | ||
''Jogador'' | ''Jogador:'' '''Kill'''</br> | ||
[[Gnombold]]: Gnometastic! You should have no trouble to find enough | [[Gnombold]]: This mission will require you to kill some crystalcrushers for us. If you are interested, I can give you some more information about it. Are you willing to accept this mission?</br> | ||
''Jogador:'' '''Yes'''</br> | |||
[[Gnombold]]: Gnometastic! You should have no trouble to find enough crystalcrushers. Killing seven of them should be enough.}} | |||
<span class="titulo-quest">'''Recompensa'''</span></br> | |||
Após matar a quantidade certa de inimigos, volte para [[Gnombold]] e reporte a missão, dizendo '''Hi - Report - Kill'''. Você receberá 2000? pontos de experiência. | |||
<!--------------------------------- FIM DO TEXTO DO SPOILER P/ O BOTÂO Nº 04 ----------------------------------------------------> | |||
}} | |||
== Tasks 80+ == | == Tasks 80+ == | ||
Procure o NPC [[Gnomargery]], ela estará na [[The Spike]], no sexto andar, peça por uma '''mission''', então ela irá citar as tasks. | |||
'''Falando com Gnomargery''' | |||
{{transcrições|npc=Gnomargery|texto= | {{transcrições|npc=Gnomargery|texto= | ||
''Jogador'' | ''Jogador:'' '''Hi'''</br> | ||
[[Gnomargery]]: Hi!<br | [[Gnomargery]]: Hi!</br> | ||
''Jogador'' | ''Jogador:'' '''Mission'''</br> | ||
[[Gnomargery]]: I can offer you several missions: to deliver parcels to our boys and girls in the battlefield, to get reports from our undercover gnomes, to do some temperature measuring and to kill some drillworms. | [[Gnomargery]]: I can offer you several missions: to deliver parcels to our boys and girls in the battlefield, to get reports from our undercover gnomes, to do some temperature measuring and to kill some drillworms.}} | ||
=== | Abaixo temos uma galeria com a localização dos objetos descritos a seguir. O [[Thermometer]] mostra a localização dos ''Lava Spots'' para a task ''Temperature Gauging'', os Gnomes a localização dos [[Gnome Trooper]]s para a task ''Parcel Delivery'', e as criaturas variadas mostra a localização dos diferentes NPCs disfarçados para a task ''Undercover Contacts''. | ||
<center><gallery mode="nolines" widths="250px" heights="250px"> | |||
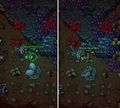
Arquivo:The Spike Task -6.png|Localização dos ''Lava Spots'', [[Gnome Trooper]]s e NPCs disfarçados no andar -6 | |||
Arquivo:The Spike Task -7.png|Localização dos ''Lava Spots'', [[Gnome Trooper]]s e NPCs disfarçados no andar -7 | |||
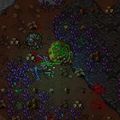
Arquivo:The Spike Task -8.png|Localização dos ''Lava Spots'', [[Gnome Trooper]]s e NPCs disfarçados no andar -8 | |||
</gallery></center> | |||
{{Menu Quest | |||
| qtdBtn = 4 | |||
| altura = 45 | |||
| boss = não | |||
<!-------------------------------------------------------------------------------------------------------------------------------> | |||
| imgBtn01 = Drillworm | |||
| imgBtnSize01 = 50 | |||
| txtBtn01 = Drillworm Killing | |||
| tituloTxtBtn01 = Drillworm Killing | |||
| spoilerTxtBtn01 = | |||
<!------------------------------- INÍCIO DO TEXTO DO SPOILER P/ O BOTÂO Nº 01 ---------------------------------------------------> | |||
=== <span class="titulo-quest">Drillworm Killing</span> === | |||
Fale '''Hi - Kill - Yes''' para [[Gnomargery]] ela irá lhe pedir para matar 7 [[Drillworm]]s. Você pode encontrá-los em todos os 3 últimos andares do [[The Spike]]. | |||
'''Falando com Gnomargery''' | |||
{{transcrições|npc=Gnomargery|texto= | {{transcrições|npc=Gnomargery|texto= | ||
''Jogador'': ''' | ''Jogador:'' '''Hi'''</br> | ||
[[Gnomargery]]: We need someone to bring four parcels to some of our far away outposts in the caverns. If you are interested, I can give you some more information about it. Are you willing to accept this mission?<br | [[Gnomargery]]: Hi!</br> | ||
''Jogador'' | ''Jogador:'' '''Kill'''</br> | ||
[[Gnomargery]]: Gnometastic! Here are the parcels. Regrettably, the labels got lost during transport; but I guess those lonely gnomes won't mind as long as they get ANY parcel at all. ...<br | [[Gnomargery]]: This mission will require you to kill some drillworms for us. If you are interested, I can give you some more information about it. Are you willing to accept this mission?</br> | ||
''Jogador:'' '''Yes'''</br> | |||
[[Gnomargery]]: Gnometastic! You should have no trouble finding enough drillworms.}} | |||
<span class="titulo-quest">'''Recompensa'''</span></br> | |||
Após derrotar a quantidade certa de inimigos retorne para [[Gnomargery]] e reporte sua missão , dizendo '''Hi - Report - Kill'''. Você receberá 3500 pontos de experiência. | |||
<!--------------------------------- FIM DO TEXTO DO SPOILER P/ O BOTÂO Nº 01 ----------------------------------------------------> | |||
| imgBtn02 = Gnomish Supplies | |||
| imgBtnSize02 = 32 | |||
| txtBtn02 = Parcel Delivery | |||
| tituloTxtBtn02 = Parcel Delivery | |||
| spoilerTxtBtn02 = | |||
<!------------------------------- INÍCIO DO TEXTO DO SPOILER P/ O BOTÂO Nº 02 ---------------------------------------------------> | |||
=== <span class="titulo-quest">Parcel Delivery</span> === | |||
Fale '''Hi - Deliver - Yes''' para [[Gnomargery]] ela irá lhe entregar 4 [[Gnomish Supplies]], e irá pedir para entrega-los para alguns [[Gnome Trooper]]s que estão espalhados pelos 3 últimos andares do [[The Spike]]. | |||
'''Falando com Gnomargery''' | |||
{{transcrições|npc=Gnomargery|texto= | |||
''Jogador:'' '''Hi'''</br> | |||
[[Gnomargery]]: Hi!</br> | |||
''Jogador:'' '''Deliver'''</br> | |||
[[Gnomargery]]: We need someone to bring four parcels to some of our far away outposts in the caverns. If you are interested, I can give you some more information about it. Are you willing to accept this mission?</br> | |||
''Jogador:'' '''Yes'''</br> | |||
[[Gnomargery]]: Gnometastic! Here are the parcels. Regrettably, the labels got lost during transport; but I guess those lonely gnomes won't mind as long as they get ANY parcel at all. ...</br> | |||
[[Gnomargery]]: If you lose the parcels, you'll have to get new ones. Gnomux sells all the equipment that is required for our missions.}} | [[Gnomargery]]: If you lose the parcels, you'll have to get new ones. Gnomux sells all the equipment that is required for our missions.}} | ||
<gallery mode="nolines"> | |||
<gallery> | |||
Arquivo:Spike tasks - delivery 1.jpg | Arquivo:Spike tasks - delivery 1.jpg | ||
Arquivo:Spike tasks - delivery 2.jpg | Arquivo:Spike tasks - delivery 2.jpg | ||
</gallery> | </gallery> | ||
Ao encontrar os [[Gnome Trooper]]s basta falar '''something''' para que eles peguem um [[Gnomish Supplies]]. | |||
{{transcrições|npc=Gnome Trooper|texto= | {{transcrições|npc=Gnome Trooper|texto= | ||
''Jogador'' | ''Jogador:'' '''Hi'''</br> | ||
[[Gnome Trooper]]: Do you have something to deliver?<br | [[Gnome Trooper]]: Do you have something to deliver?</br> | ||
''Jogador'' | ''Jogador:'' '''something'''}} | ||
=== | <span class="titulo-quest">'''Recompensa'''</span></br> | ||
Após entregar os 4 pacotes retorne para [[Gnomargery]] e reporte sua missão , dizendo '''Hi - Report - Delivery'''. Você receberá 3500 pontos de experiência. | |||
<!--------------------------------- FIM DO TEXTO DO SPOILER P/ O BOTÂO Nº 02 ----------------------------------------------------> | |||
| imgBtn03 = Thermometer | |||
| imgBtnSize03 = 32 | |||
| txtBtn03 = Temperature</br>Gauging | |||
| tituloTxtBtn03 = Temperature Gauging | |||
| spoilerTxtBtn03 = | |||
<!------------------------------- INÍCIO DO TEXTO DO SPOILER P/ O BOTÂO Nº 03 ---------------------------------------------------> | |||
=== <span class="titulo-quest">Temperature Gauging</span> === | |||
Fale '''Hi - Temperature - Yes''' para [[Gnomargery]] ela irá lhe dar um [[Thermometer]]. Nos 3 últimos andares do [[The Spike]] existem diversos lugares com lava, você deve se dirigir a esses locais com seu item e usá-lo até encontrar qual deles é o mais quente, os lugares que não forem o que você procura irão exibir a mensagem ''This is not the hot spot!''. | |||
<gallery mode="nolines"> | |||
Arquivo:Spike tasks - temperature.jpg|Após aparecer essa mensagem, basta reportar sua task para a NPC. | |||
</gallery> | |||
'''Falando com Gnomargery''' | |||
{{transcrições|npc=Gnomargery|texto= | {{transcrições|npc=Gnomargery|texto= | ||
''Jogador'': ''' | ''Jogador:'' '''Hi'''</br> | ||
[[Gnomargery]]: Your task would be to use a gnomish temperature measurement device - short GTMD - to locate the hottest spot at the lava pools in the caves. If you are interested, I can give you some more information about it. Are you willing to accept this mission?<br | [[Gnomargery]]: Hi!</br> | ||
''Jogador'' | ''Jogador:'' '''Temperature'''</br> | ||
[[Gnomargery]]: Gnometastic! Find the hottest spot of the lava pools in the caves. If you lose the GTMD before you find the hot spot, you'll have to get yourself a new one. Gnomux sells all the equipment that is required for our missions. | [[Gnomargery]]: Your task would be to use a gnomish temperature measurement device - short GTMD - to locate the hottest spot at the lava pools in the caves. If you are interested, I can give you some more information about it. Are you willing to accept this mission?</br> | ||
''Jogador:'' '''Yes'''</br> | |||
[[Gnomargery]]: Gnometastic! Find the hottest spot of the lava pools in the caves. If you lose the GTMD before you find the hot spot, you'll have to get yourself a new one. Gnomux sells all the equipment that is required for our missions.}} | |||
[[ | <span class="titulo-quest">'''Recompensa'''</span></br> | ||
Após encontrar o ''lava spot'' mais quente retorne para [[Gnomargery]] e reporte sua missão , dizendo '''Hi - Report - Temperature'''. Você receberá 3500 pontos de experiência. | |||
<!--------------------------------- FIM DO TEXTO DO SPOILER P/ O BOTÂO Nº 03 ----------------------------------------------------> | |||
| imgBtn04 = Lost Thrower | |||
| imgBtnSize04 = 50 | |||
| txtBtn04 = Undercover</br>Contacts | |||
| tituloTxtBtn04 = Undercover Contacts | |||
| spoilerTxtBtn04 = | |||
<!------------------------------- INÍCIO DO TEXTO DO SPOILER P/ O BOTÂO Nº 04 ---------------------------------------------------> | |||
=== <span class="titulo-quest">Undercover Contacts</span> === | |||
Fale '''Hi - Undercover - Yes''' para [[Gnomargery]] ela irá lhe pedir para encontrar alguns NPC's espiões que estão espalhados pelos 3 últimos andares do [[The Spike]], basta falar '''Hi''' para eles para receber um report da situação, fale com eles até que seu questlog seja atualizado informando que já é o suficiente. | |||
'''Falando com Gnomargery''' | |||
{{transcrições|npc=Gnomargery|texto= | {{transcrições|npc=Gnomargery|texto= | ||
''Jogador'': ''' | ''Jogador:'' '''Hi'''</br> | ||
[[Gnomargery]]: | [[Gnomargery]]: Hi!</br> | ||
''Jogador'' | ''Jogador:'' '''Undercover'''</br> | ||
[[Gnomargery]]: | [[Gnomargery]]: Someone is needed to get three reports from our undercover agents posing as monsters in the caves around us. If you are interested, I can give you some more information about it. Are you willing to accept this mission?</br> | ||
''Jogador:'' '''Yes'''</br> | |||
[[Gnomargery]]: Gnometastic! Get three reports from our agents. You can find them anywhere in the caves around us. Just keep looking for monsters that behave strangely and give you a wink.}} | |||
<gallery mode="nolines"> | |||
Arquivo:Spike tasks - undercover.jpg|Um exemplo de NPC espião disfarçado. | |||
</gallery> | |||
= | <span class="titulo-quest">'''Recompensa'''</span></br> | ||
Após seu quest log ser atualizado, retorne para [[Gnomargery]] e reporte sua missão , dizendo '''Hi - Report - Undercover'''. Você receberá 3500 pontos de experiência. | |||
<!--------------------------------- FIM DO TEXTO DO SPOILER P/ O BOTÂO Nº 04 ----------------------------------------------------> | |||
}} | |||
Para conseguir basta ter | = Extras = | ||
<span class="titulo-quest">'''Cave Explorer Outfits'''</span></br> | |||
Para conseguir basta ter 100 pontos de fama e comprar com o NPC [[Gnommander]] conforme transcrições da [[Cave Explorer Outfits Quest]]. | |||
* Outfit - Level: 25 ou superior - Preço: 1000 gold coins | * Outfit - Level: 25 ou superior - Preço: 1000 gold coins | ||
* Primeiro Addon - Level: 50 ou superior - Preço: 2000 gold coins | * Primeiro Addon - Level: 50 ou superior - Preço: 2000 gold coins | ||
* Segundo Addon - Level: 80 ou superior - Preço: 3000 gold coins | * Segundo Addon - Level: 80 ou superior - Preço: 3000 gold coins | ||
[[Arquivo:Achievement.gif]] Ao completar os dois addons você receberá o achievement {{Achievement|Cave Completionist}}. | {{DASH|[[Arquivo:Achievement.gif|link=]] Ao completar os dois addons você receberá o achievement '''"{{Achievement|Cave Completionist}}"'''.}} | ||
}} | }} | ||


Edição atual tal como às 11h23min de 19 de setembro de 2024
|
|
|||||||||||
Recompensa:  Cave Explorer Outfits e addons, Achievement e Experiência. |
|||||||||||
| Localização: The Spike (aqui |
|||||||||||
| Você enfrentará: Upper Spike (25-49): Corym Charlatans, Corym Skirmishers, Crypt Shamblers, Demon Skeletons, Gargoyles, Ghosts, Mummys e Zombies. Middle Spike (50-79): Ancient Scarabs, Bonebeasts, Clay Guardians, Crystalcrushers, Earth Elementals, Mutated Bats e Mutated Rats. |
|||||||||||
| Mini-Bosses: Nenhum |
|||||||||||
| Bosses: Nenhum |
|||||||||||
| Level: | Premium: | Frequência: | |||||||||
| 25 | A cada 20 horas. | ||||||||||
Veja também: Tarefas Diárias
Atente às restrições de level dos teleports
|
Notas:
|
Método
Vá ate o NPC Xelvar, em Kazordoon, (aqui![]() ). Ao norte dele, você irá encontrar um teleport que te levará para dentro da The Spike.
). Ao norte dele, você irá encontrar um teleport que te levará para dentro da The Spike.
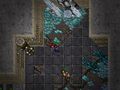
Teleporte de entrada para o Spike.
Dentro do Spike.


Lá você encontrará o npc Gnommander e ele lhe dará informações sobre o local e como você pode ajudar.
Falando com Gnommander
|
Jogador: Hi
Gnommander: Hi there! Welcome to the spike. |
Após falar com Gnommander, seu quest log será atualizado. Lá você poderá checar seus pontos de fama.
Tasks 25-49
Recomendações:
|
Desça um andar e peça por uma mission a NPC Gnomilly, que falará as tasks disponíveis (Killing Demon Skeletons, Ghost Pacifiers, Angry Spirits e Malevolent Presence). As tasks poderão ser realizadas nos primeiros três andares da The Spike e, se preferir, você poderá pedi-las todas ao mesmo tempo.

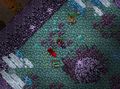
Localização dos Ghost Pacifier e Ominous Mound no andar -1
Localização dos Ghost Pacifier e Ominous Mound no andar -2

Localização dos Ghost Pacifier e Ominous Mound no andar -3


|
|
|
|

Angry Spirits
Fale Hi - Release - Yes para Gnomilly. Ela dirá que você deve liberar a fúria de alguns espíritos que estão nas covas. Você receberá uma Spirit Shovel, para usar nos Ominous Mounds. Eles são fáceis de encontrar em várias partes dos três primeiros andares.
Ao cavar as covas, elas ficarão abertas por alguns minutos e criaturas poderão ser invocadas. Durante esse período você não poderá cavar ali novamente até que a cova volte ao normal. Seu objetivo é invocar um Enraged Soul, portanto, abra quantas covas forem necessárias.
Recompensa
Quando o Enraged Soul aparecer, você completará a sua missão e o Spirit Shovel sumirá. Volte para Gnomilly e reporte a missão, dizendo Hi - Report - Release. Você receberá 1000 de experiência.
Falando com Gnomilly
|
Jogador: Hi
Gnomilly: Hi! |
Ghost Pacifiers
Fale Hi - Pacifiers - Yes para Gnomilly. Ela dirá que você deve encontrar e recarregar 7 Ghost Pacifiers utilizando um Tuning Fork. Ghost Pacifiers são fáceis de encontrar nos três primeiros andares, geralmente no final de cada túnel. Cuidado, pois os Ghost Pacifiers são guardados por várias criaturas.
Ao usar o Tuning Fork em um Ghost Pacifier, ele ficará carregado por alguns minutos. Durante esse tempo, você não poderá utilizar o item até que ele volte ao normal.
Recompensa
O Tuning Fork desaparecerá assim que for usado no último Ghost Pacifier. Volte para Gnomilly e reporte a missão, dizendo Hi - Report - Pacifiers. Você receberá 1000 de experiência.
Falando com Gnomilly
|
Jogador: Hi
Gnomilly: Hi! |
Killing Demon Skeletons
Fale Hi - Kill - Yes para Gnomilly. Ela dirá que o número de Demon Skeletons aumentou consideravelmente nas cavernas e que você precisa reduzir esse número. Você deve matar 7 Demon Skeletons. A maneira mais simples de fazer esta tarefa é matar os Demon Skeletons que você encontrará nas outras missões.
Recompensa
Após matar a quantidade certa de criaturas, volte para Gnomilly e reporte a missão, dizendo Hi - Report - Kill. Você receberá 1000 de experiência.
Falando com Gnomilly
|
Jogador: Hi
Gnomilly: Hi! |
Malevolent Presence
Fale Hi - Track - Yes para Gnomilly. Ela dirá que tem uma importante task: rastrear o local exato que emana uma presença espiritual gigantesca e maligna em um dos 3 andares. Gnomilly te dará um Ghost Detector, o qual te guiará até o ponto exato.
Falando com Gnomilly
|
Jogador: Hi
Gnomilly: Hi! |
Com o Ghost Detector em mãos, dê "Use" nele em cada andar, e mensagens aparecerão indicando se há ou não presença maligna naquele andar. Caso haja, as mensagens também indicarão a direção a ser tomada.
| North-West (Noroeste) |
North (Norte) |
North-East (Nordeste) |
| West (Oeste) |
Você | East (Leste) |
| South-West (Sudoeste) |
South (Sul) |
South-East (Sudeste) |
Mensagens:
- All values normal. Scale in nominal spectrum range.
Tradução: Níveis normais. Escala na faixa de espectro simbólica. (Não há presença maligna detectável) - The detector points to the <direção>.
Tradução: O detector aponta para o <direção>. - The detector is off the scale! A presence must be close!
Tradução: O detector está descontrolado! A presença deve estar perto! - You found a malignant presence, the glowing detector signals that it does not need any futher data.
Tradução: Você encontrou a presença maligna. O detector brilhante sinaliza que não são necessárias mais informações.
Recompensa
Ao conseguir a mensagem que indica o local correto, o Ghost Detector sumirá. Volte para Gnomilly e reporte a missão, dizendo Hi - Report - Track. Você receberá 1000 de experiência.
Tasks 50-79
Procure o NPC Gnombold, ele estará na The Spike, descendo 4 andares, peça por uma mission e então ele irá falar as tasks disponíveis. Você pode solicitar as quatro tasks aos mesmo tempo.
Falando com Gnombold
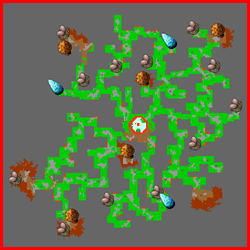
Localização dos Monster Nests, Gardener Mushrooms e Magnetic Monoliths no andar -4
Localização dos Monster Nests, Gardener Mushrooms e Magnetic Monoliths no andar -5


|
|
|
|


Destroying Nests
Fale Hi - Nests - Yes para Gnombold então ele irá lhe pedir para que vá nas cavernas centrais do spike e destrua 5 Monster Nests para ele, mas pra isso você precisa se disfarçar. Vá ao sul do NPC e passe em alguns Green Crystal Stalagmite você irá se transformar em um Mutated Bat, atenção, você só conseguirá destruir os Monster Nests se estiver disfarçado. Ao destruir o ninho ele irá se transformar em um Destroyed Monster Nest por um tempo, e poderá nascer alguma criatura que exista nesse andar.
Conseguindo o disfarce
Destruindo um nest


Falando com Gnombold
|
Jogador: Hi
Gnombold: Hi! |
Recompensa
Após destruir 5 ninhos, basta voltar para Gnombold reportar a missão, dizendo Hi - Report - Nests. Você receberá 2000? pontos de experiência.
Fertilising Mushrooms
Fale Hi - Fertilise - Yes para Gnombold então ele irá lhe pedir para procurar 4 jardins de cogumelos diferentes nas cavernas centrais do spike, chegando nos locais utilize o Flask Mushroom Fertilizer que você recebeu nos Gardener Mushroom.
Fertilizando o mushroom

Falando com Gnombold
|
Jogador: Hi
Gnombold: Hi! |
Recompensa
Após fertilizar todos os Gardener Mushroom, basta voltar para Gnombold reportar a missão, dizendo Hi - Report - Fertilise. Você receberá 2000? pontos de experiência.
Geomantic Charges
Fale Hi - Charges - Yes para Gnombold então ele irá lhe dar uma Lodestone ![]() e você terá que recarregar ela utilizando-a três vezes nos Magnetic Monoliths que estão espalhados pelos andares centrais do Spike.
e você terá que recarregar ela utilizando-a três vezes nos Magnetic Monoliths que estão espalhados pelos andares centrais do Spike.
Falando com Gnombold
|
Jogador: Hi
Gnombold: Hi! |
Ao usar a Lodestone em dos monólitos, ela irá virar uma Partially Charged Lodestone ![]() , ao usá-la novamente em outro monólito, ela irá virar uma Highly Charged Lodestone
, ao usá-la novamente em outro monólito, ela irá virar uma Highly Charged Lodestone ![]() . A cada uso, você será teleportado pra algum outro lugar da cave, então fique atento pois a sala que você aparecer estará cheia de criaturas.
. A cada uso, você será teleportado pra algum outro lugar da cave, então fique atento pois a sala que você aparecer estará cheia de criaturas.
Ao usar a Lodestone pela terceira vez, o item irá desaparecer e você receberá a mensagem: You have charged you body with geomantic energy and can report about it. Os monólitos levarão cerca de um a dois minutos para recarregarem antes que possam ser usados novamente.
Recompensa
Após recarregar a Lodestone o suficiente ela irá sumir e a energia ficará presa em seu corpo, feito isso basta voltar para Gnombold reportar a missão, dizendo Hi - Report - Charges. Você receberá 2000? pontos de experiência.
Usando pela ultima vez

Killing Crystalcrushers
Fale Hi - Kill - Yes para Gnombold então ele irá lhe pedir ir nas cavernas centrais da The Spike e matar 7 Crystalcrusher para ele. Você facilmente completará esta tarefa enquanto realiza as outras.
Falando com Gnombold
|
Jogador: Hi
Gnombold: Hi! |
Recompensa
Após matar a quantidade certa de inimigos, volte para Gnombold e reporte a missão, dizendo Hi - Report - Kill. Você receberá 2000? pontos de experiência.
Tasks 80+
Procure o NPC Gnomargery, ela estará na The Spike, no sexto andar, peça por uma mission, então ela irá citar as tasks.
Falando com Gnomargery
|
Jogador: Hi
Gnomargery: Hi! |
Abaixo temos uma galeria com a localização dos objetos descritos a seguir. O Thermometer mostra a localização dos Lava Spots para a task Temperature Gauging, os Gnomes a localização dos Gnome Troopers para a task Parcel Delivery, e as criaturas variadas mostra a localização dos diferentes NPCs disfarçados para a task Undercover Contacts.

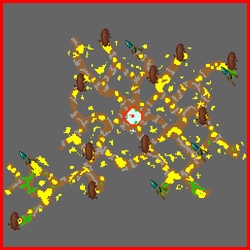
Localização dos Lava Spots, Gnome Troopers e NPCs disfarçados no andar -6
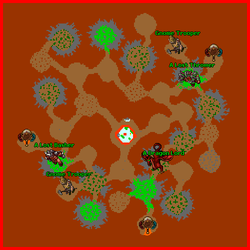
Localização dos Lava Spots, Gnome Troopers e NPCs disfarçados no andar -7
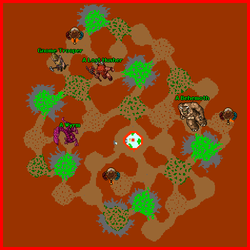
Localização dos Lava Spots, Gnome Troopers e NPCs disfarçados no andar -8


|
|
|
|


Drillworm Killing
Fale Hi - Kill - Yes para Gnomargery ela irá lhe pedir para matar 7 Drillworms. Você pode encontrá-los em todos os 3 últimos andares do The Spike.
Falando com Gnomargery
|
Jogador: Hi
Gnomargery: Hi! |
Recompensa
Após derrotar a quantidade certa de inimigos retorne para Gnomargery e reporte sua missão , dizendo Hi - Report - Kill. Você receberá 3500 pontos de experiência.
Parcel Delivery
Fale Hi - Deliver - Yes para Gnomargery ela irá lhe entregar 4 Gnomish Supplies, e irá pedir para entrega-los para alguns Gnome Troopers que estão espalhados pelos 3 últimos andares do The Spike.
Falando com Gnomargery
|
Jogador: Hi
Gnomargery: Hi! |


Ao encontrar os Gnome Troopers basta falar something para que eles peguem um Gnomish Supplies.
|
Jogador: Hi
Gnome Trooper: Do you have something to deliver? |
Recompensa
Após entregar os 4 pacotes retorne para Gnomargery e reporte sua missão , dizendo Hi - Report - Delivery. Você receberá 3500 pontos de experiência.
Temperature Gauging
Fale Hi - Temperature - Yes para Gnomargery ela irá lhe dar um Thermometer. Nos 3 últimos andares do The Spike existem diversos lugares com lava, você deve se dirigir a esses locais com seu item e usá-lo até encontrar qual deles é o mais quente, os lugares que não forem o que você procura irão exibir a mensagem This is not the hot spot!.
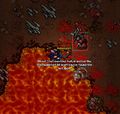
Após aparecer essa mensagem, basta reportar sua task para a NPC.

Falando com Gnomargery
|
Jogador: Hi
Gnomargery: Hi! |
Recompensa
Após encontrar o lava spot mais quente retorne para Gnomargery e reporte sua missão , dizendo Hi - Report - Temperature. Você receberá 3500 pontos de experiência.
Undercover Contacts
Fale Hi - Undercover - Yes para Gnomargery ela irá lhe pedir para encontrar alguns NPC's espiões que estão espalhados pelos 3 últimos andares do The Spike, basta falar Hi para eles para receber um report da situação, fale com eles até que seu questlog seja atualizado informando que já é o suficiente.
Falando com Gnomargery
|
Jogador: Hi
Gnomargery: Hi! |
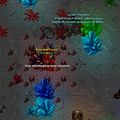
Um exemplo de NPC espião disfarçado.

Recompensa
Após seu quest log ser atualizado, retorne para Gnomargery e reporte sua missão , dizendo Hi - Report - Undercover. Você receberá 3500 pontos de experiência.
Extras
Cave Explorer Outfits
Para conseguir basta ter 100 pontos de fama e comprar com o NPC Gnommander conforme transcrições da Cave Explorer Outfits Quest.
- Outfit - Level: 25 ou superior - Preço: 1000 gold coins
- Primeiro Addon - Level: 50 ou superior - Preço: 2000 gold coins
- Segundo Addon - Level: 80 ou superior - Preço: 3000 gold coins