|
|
|
||||||||||||||||||||||||


The Explorer Society Quest: mudanças entre as edições
| [edição aprovada] | [edição aprovada] |
m |
|||
| (82 revisões intermediárias por 22 usuários não estão sendo mostradas) | |||
| Linha 1: | Linha 1: | ||
{{Infobox_Quest|List={{{1|}}}|GetValue={{{GetValue|}}} | {{Infobox_Quest|List={{{1|}}}|GetValue={{{GetValue|}}} | ||
| premium | | premium = sim | ||
| name | | name = The Explorer Society Quest | ||
| reward | | reward = [[Achievements]], [[Ice Pick]], [[Spectral Stone]], 06 [[Orichalcum Pearl]]s, 01 [[Talon]], 01 [[Crown Backpack]], 50 [[platinum coin]]s, 100 [[gp]]s, 02 [[Black Pearl]]s, [[Crystal Necklace]], [[Dwarven Ring]], [[Skull of Ratha]], 01 [[White Pearl]] e [[Wolf Tooth Chain]]. Usar os teletransportes entre [[Port Hope]] e [[Northport]], e entre [[Liberty Bay]] e [[Svargrond]]. Acesso a [[Calassa]] e [[Frozen Trench]]. Você pode comprar [[Atlas]], [[Crown Backpack]]s e [[Orichalcum Pearl]]s. | ||
| location | | location = Vários locais.<noinclude> Início nos representantes da Explorer Society [[Mortimer]] em [[Northport]], ({{mapa|32500,31623,7:2|aqui}}), ou [[Angus]] em [[Port Hope]], ({{mapa|32671,32733,7:2|aqui}}).</noinclude> Missões em [[Kazordoon]], [[Darashia]], [[Ab'Dendriel]], [[Edron]], [[Svargrond]] e [[Liberty Bay]] dentre outros. | ||
| lvl | | lvl = 0 | ||
| lvlreq | | lvlreq = 100 | ||
| duration | | duration = Longa | ||
| team | | team = 1 jogador | ||
| teamnote | | teamnote = | ||
| dif | | dif = 2 | ||
| imgleg | | imgleg = Atlas | ||
| quests | | quests = | ||
| dangers | | dangers = [[Amazon]]s, [[Banshee]]s, [[Bonelord]]s, [[Cyclops]], [[Dark Magician]]s, [[Demon Skeleton]]s, [[Dwarf]]s, [[Dwarf Guard]]s, [[Dwarf Soldier]]s, [[Elephant]]s, [[Elf]]s, [[Elf Scout]]s, [[Frost Dragon]]s, [[Frost Dragon Hatchling]]s, [[Frost Troll]]s, [[Ghost]]s, [[Ghoul]]s, [[Giant Spider]], [[Hunter]]s, possivelmente 01 [[Hydra]] lurada, [[Kongra]]s, [[Mammoth]]s, [[Minotaur]]s, [[Minotaur Archer]]s, [[Minotaur Guard]]s, [[Minotaur Mage]]s, [[Monk]]s, [[Mummy|Mummies]], [[Lizard Sentinel|Lizards Sentinel]], [[Lizard Snakecharmer|Lizards Snakecharmer]], [[Lizard Templar|Lizards Templar]], [[Merlkin]]s, [[Orc]]s, [[Orc Spearman]], [[Orc Berserker]], [[Orc Shaman]], [[Orc Leader]], [[Orc Rider]], [[Orc Warlord]], [[Quara Constrictor]], [[Quara Mantassin]], [[Quara Pincher]], [[Quara Predator]], [[Quara Hydromancer]], [[Priestess]]es, [[Sibang]]s, [[Smuggler]]s, [[Tarantula]]s, [[Terror Bird]]s, [[Valkyrie]]s, [[Wild Warrior]]s, [[Witch]]es. | ||
| legend | | mini = Nenhum. | ||
| spoiler | | bosses = Nenhum. | ||
| implemented = 7.6 | |||
| legend = A Explorer Society é uma ordem de nobres que exploram todos os lugares do continente Tibiano. Se você quiser provar que é capaz de entrar nessa sociedade, você precisa passar por vários testes. Boa sorte... | |||
| spoiler = | |||
__NOTOC__ | |||
= Requerimentos = | |||
* [[Shovel]] ou [[Light Shovel]] ou uma [[Secret Agent Tool]]. | |||
* [[Rope]] ou [[Elvenhair Rope]] ou magia [[Magic Rope]]. | |||
* Magia [[Levitate]]. | |||
* [[Key 3802]] Obtida na [[Emperor's Cookies Quest]]. | |||
* [[Key 3012]]. | |||
* Amigos para ajudar em missões mais complicadas. | |||
* Missão ''Formorgar Mines 3'' da [[The Ice Islands Quest]] completa. | |||
* [[Stealth Ring]] ou magia [[Invisible]] (Opcional). | |||
* Missão ''The Way to Yalahar'' da [[In Service of Yalahar Quest]] (Opcional). | |||
* [[The Queen of the Banshees Quest]]. | |||
* Missão "Kiss From The Queen Of The Banshees" da [[Kissing a Pig Quest]]. | |||
Essa é uma [[quest]] longa e difícil. Algumas partes podem ser feitas em qualquer level, mas algumas missões requerem que você passe por lugares difíceis, como [[Dwacatra]], [[Ulderek's Rock]], profundezas de [[Banuta]], [[Calassa]] e etc. | = Método = | ||
Essa é uma [[quest]] longa e difícil. Algumas partes podem ser feitas em qualquer level, mas algumas missões requerem que você passe por lugares difíceis, como [[Dwacatra]], [[Ulderek's Rock]], profundezas de [[Banuta]], [[Calassa]] e etc. Comece realizando a missão ''Joining the Explorers''. | |||
== | {{Menu Quest | ||
| qtdBtn = 2 | |||
| altura = 45 | |||
| boss = não | |||
<!-------------------------------------------------------------------------------------------------------------------------------> | |||
| imgBtn01 = Dwarven Pickaxe | |||
| imgBtnSize01 = 35 | |||
| txtBtn01 = Joining the Explorers - Modo Expresso | |||
| tituloTxtBtn01 = Joining the Explorers - Modo Expresso | |||
| spoilerTxtBtn01 = | |||
<!------------------------------- INÍCIO DO TEXTO DO SPOILER P/ O BOTÂO Nº 01 ---------------------------------------------------> | |||
== [[Arquivo:Atlas.gif|30px|link=]] Joining the Explorers - Modo Expresso [[Arquivo:Atlas.gif|30px|link=]] == | |||
Para começar essa [[quest]], visite a [[Tibian Explorer Society]] em [[Port Hope]] ({{mapa|32671,32732,7:2|aqui}}) ou [[Northport]] ({{mapa|32500,31623,7:2|aqui}}), fale '''Hi - Join - Yes - Yes'''. | |||
'''Falando com Angus em Port Hope''' | |||
'''Nota:''' A cada ação feita | {{transcrições|npc=Angus|texto= | ||
''Jogador:'' '''Hi'''</br> | |||
[[Angus]]: Greetings, what can I do for you?</br> | |||
''Jogador:'' '''Join'''</br> | |||
[[Angus]]: Do you want to join the explorer society?</br> | |||
''Jogador:'' '''Yes'''</br> | |||
[[Angus]]: Fine, though it takes more then a mere lip service to join our ranks. To prove your dedication to the cause you will have to acquire an item for us ...</br> | |||
[[Angus]]: The mission should be simple to fulfil. For our excavations we have ordered a sturdy pickaxe in Kazordoon. You would have to seek out this trader Uzgod and get the pickaxe for us ...</br> | |||
[[Angus]]: Simple enough? Are you interested in this task?</br> | |||
''Jogador:'' '''Yes'''</br> | |||
[[Angus]]: We will see if you can handle this simple task. Get the pickaxe from Uzgod in Kazordoon and bring it to one of our bases. Report there about the pickaxe.}} | |||
{{DASH|'''Nota:''' A cada ação feita com sucesso nas missões, a mensagem "'''Your questlog has been updated.'''" aparecerá no seu [[Server Log]] e o texto encontrado no [[Quest Log]] será atualizado.}} | |||
Após falar '''Join''' para o NPC da Explorer Society, sua primeira missão será conseguir um [[Dwarven Pickaxe]]. Se quiser economizar tempo, é possível encontrar o [[Dwarven Pickaxe]] em respawns diários na [[Pick 'N Shovel Mine]] a oeste de [[Kazordoon]] ou comprar um diretamente no mercado. Quando conseguir o item, basta entrega-lo ao NPC [[Angus]] em [[Port Hope]] ou [[Mortimer]] em [[Northport]] e você já terá completado a missão ''Joining the Explorers'', podendo iniciar as outras missões da quest. | |||
'''Entregando o Dwarven Pickaxe'''</br> | |||
{{transcrições|npc=Angus|texto= | |||
''Jogador:'' '''Hi'''</br> | |||
[[Angus]]: Greetings, what can I do for you?</br> | |||
''Jogador:'' '''Pickaxe'''</br> | |||
[[Angus]]: Did you get the requested pickaxe from Uzgod in Kazordoon?</br> | |||
''Jogador:'' '''Yes'''</br> | |||
[[Angus]]: Excellent, you brought just the tool we need! Of course it was only a simple task. However ...</br> | |||
[[Angus]]: I officially welcome you to the explorer society. From now on you can ask for missions to improve your rank.}} | |||
'''Você é agora um membro oficial da Tibian Explorer Society. Agora você pode iniciar as próximas missões da quest, basta falar mission para o NPC com o qual você iniciou a quest.''' | |||
{{Voltar|link=Joining_the_Explorers_-_Modo_Expresso}} | |||
<!--------------------------------- FIM DO TEXTO DO SPOILER P/ O BOTÂO Nº 01 ----------------------------------------------------> | |||
| imgBtn02 = Uzgod | |||
| imgBtnSize02 = 35 | |||
| txtBtn02 = Joining the Explorers - Modo RPG | |||
| tituloTxtBtn02 = Joining the Explorers - Modo RPG | |||
| spoilerTxtBtn02 = | |||
<!------------------------------- INÍCIO DO TEXTO DO SPOILER P/ O BOTÂO Nº 02 ---------------------------------------------------> | |||
== [[Arquivo:Atlas.gif|30px|link=]] Joining the Explorers - Modo RPG [[Arquivo:Atlas.gif|30px|link=]] == | |||
Para começar essa [[quest]], visite a [[Tibian Explorer Society]] em [[Port Hope]] ({{mapa|32671,32732,7:2|aqui}}) ou [[Northport]] ({{mapa|32500,31623,7:2|aqui}}), fale '''Hi - Join - Yes - Yes'''. | |||
'''Falando com Angus em Port Hope''' | |||
{{transcrições|npc=Angus|texto= | |||
''Jogador:'' '''Hi'''</br> | |||
[[Angus]]: Greetings, what can I do for you?</br> | |||
''Jogador:'' '''Join'''</br> | |||
[[Angus]]: Do you want to join the explorer society?</br> | |||
''Jogador:'' '''Yes'''</br> | |||
[[Angus]]: Fine, though it takes more then a mere lip service to join our ranks. To prove your dedication to the cause you will have to acquire an item for us ...</br> | |||
[[Angus]]: The mission should be simple to fulfil. For our excavations we have ordered a sturdy pickaxe in Kazordoon. You would have to seek out this trader Uzgod and get the pickaxe for us ...</br> | |||
[[Angus]]: Simple enough? Are you interested in this task?</br> | |||
''Jogador:'' '''Yes'''</br> | |||
[[Angus]]: We will see if you can handle this simple task. Get the pickaxe from Uzgod in Kazordoon and bring it to one of our bases. Report there about the pickaxe.}} | |||
{{DASH|'''Nota:''' A cada ação feita com sucesso nas missões, a mensagem "'''Your questlog has been updated.'''" aparecerá no seu [[Server Log]] e o texto encontrado no [[Quest Log]] será atualizado.}} | |||
Após | Após falar '''Join''' para o NPC da Explorer Society, sua primeira missão será conseguir um [[Dwarven Pickaxe]]. Vá para [[Kazordoon]] e fale com [[Uzgod]], o [[NPCs Comerciante de Armas|comerciante de armas]] (embaixo do [[Depot]]). | ||
Peça a ele uma [[Dwarven Pickaxe]]. Ele vai dizer que já tem muitas encomendas, mas se você recuperar seu [[Family Brooch (Dwarven Family)|Family Brooch]], ele te dará a [[Dwarven Pickaxe]]. | Peça a ele uma [[Dwarven Pickaxe]]. Ele vai dizer que já tem muitas encomendas, mas se você recuperar seu [[Family Brooch (Dwarven Family)|Family Brooch]], ele te dará a [[Dwarven Pickaxe]]. | ||
| Linha 44: | Linha 113: | ||
Para entrar em [[Dwacatra]], você precisa pegar uma [[chave]]. Mas para isso, você precisa de mais duas chaves que estão perto da sala do trono. | Para entrar em [[Dwacatra]], você precisa pegar uma [[chave]]. Mas para isso, você precisa de mais duas chaves que estão perto da sala do trono. | ||
<gallery> | <gallery mode="nolines"> | ||
Arquivo:explorer1.gif|A primeira ([[Key 3800]]) está no final do corredor secreto | Arquivo:explorer1.gif|A primeira ([[Key 3800]]) está no final do corredor secreto | ||
</gallery> | </gallery> | ||
A segunda ([[Key 3801]]) está em um quarto trancado, abra a porta com a [[Key 3800]] e pegue a chave na caixa (o local está indicado na imagem acima). | A segunda ([[Key 3801]]) está em um quarto trancado, abra a porta com a [[Key 3800]] e pegue a chave na caixa (o local está indicado na imagem acima). A última ([[Key 3802]]) está em um quarto três andares abaixo da sala do trono, próximo ao depósito de armas. Você precisa da [[Key 3801]] para abrir essa porta. Desça três andares e vá para Noroeste. Você verá uma cama com um baú próximo. Use a [[Key 3801]] para abrir a porta caso esteja trancada. | ||
<gallery mode="nolines"> | |||
Arquivo:explorer2.gif|Localização da ([[Key 3802]]) | |||
</gallery> | |||
A entrada da [[Dwacatra|Prisão]] fica perto da entrada de [[Kazordoon]]. | Quando tiver a [[Key 3802]], você pode entrar em [[Dwacatra]]. A entrada da [[Dwacatra|Prisão]] fica perto da entrada de [[Kazordoon]]. | ||
<gallery> | <gallery mode="nolines"> | ||
Arquivo:explorer3.gif|Entrada para a Prisão | Arquivo:explorer3.gif|Entrada para a Prisão | ||
</gallery> | </gallery> | ||
| Linha 64: | Linha 131: | ||
Em [[Dwacatra]], desça o buraco ('''IMPORTANTE''': Você precisa de [[shovel]]) próximo ao poço e abra a caixa atrás da porta. Você vai ter que enfrentar um grande número de [[Orc]]s, [[Orc Spearman]], [[Minotaur]]os, [[Minotaur Archer]]s, [[Dwarf|Dwarves]], [[Dwarf Soldier]]s, [[Dwarf Guard]]s, alguns [[Cyclops|Cyclopes]], e talvez um [[Minotaur Mage]] ou [[Orc Berserker]]. Vá devagar para não ser cercado. | Em [[Dwacatra]], desça o buraco ('''IMPORTANTE''': Você precisa de [[shovel]]) próximo ao poço e abra a caixa atrás da porta. Você vai ter que enfrentar um grande número de [[Orc]]s, [[Orc Spearman]], [[Minotaur]]os, [[Minotaur Archer]]s, [[Dwarf|Dwarves]], [[Dwarf Soldier]]s, [[Dwarf Guard]]s, alguns [[Cyclops|Cyclopes]], e talvez um [[Minotaur Mage]] ou [[Orc Berserker]]. Vá devagar para não ser cercado. | ||
<gallery> | <gallery mode="nolines"> | ||
Arquivo:explorer4.gif|Vá até o círculo e desça o buraco | Arquivo:explorer4.gif|Vá até o círculo e desça o buraco | ||
</gallery> | </gallery> | ||
CUIDADO! Após descer nesse buraco você ficará em um pequeno espaço que contem | CUIDADO! Após descer nesse buraco você ficará em um pequeno espaço que contem 3 [[Dwarf Soldier]]s e 1 [[Dwarf Guard]]s. | ||
<gallery> | <gallery mode="nolines"> | ||
Arquivo: | Arquivo:Guardex.png|Baú onde se encontra o brooch | ||
</gallery> | </gallery> | ||
Quando terminar, volte até [[Uzgod]], e diga que encontrou seu '''brooch'''. Ele vai te entregar a [[Dwarven Pickaxe]]. Volte para a [[Tibian Explorer Society|Explorer Society]] e entregue a [[Dwarven Pickaxe]] (pode ser em [[Northport]] ou [[Port Hope]]). | Quando terminar, volte até [[Uzgod]], e diga que encontrou seu '''brooch'''. Ele vai te entregar a [[Dwarven Pickaxe]]. Volte para a [[Tibian Explorer Society|Explorer Society]] e entregue a [[Dwarven Pickaxe]] (pode ser em [[Northport]] ou [[Port Hope]]). | ||
'''Você é agora um membro oficial da Tibian Explorer Society. Agora você pode iniciar as próximas missões da quest, basta falar mission para o NPC com o qual você iniciou a quest.''' | |||
''' | '''Falando com Uzgod em Kazordoon''' | ||
{{transcrições|npc=Uzgod|texto= | |||
''Jogador:'' '''Hi'''</br> | |||
{{transcrições|npc= | [[Uzgod]]: Hiho ''jogador''! Wanna weapon, eh?</br> | ||
''Jogador'' | ''Jogador:'' '''Pickaxe'''</br> | ||
[[ | [[Uzgod]]: True dwarven pickaxes having to be maded by true weaponsmith! You wanting to get pickaxe for explorer society?</br> | ||
''Jogador'' | ''Jogador:'' '''Yes'''</br> | ||
[[ | [[Uzgod]]: Me order book quite full is. But telling you what: You getting me something me lost and Uzgod seeing that your pickaxe comes first. Jawoll! You interested?</br> | ||
''Jogador'' | ''Jogador:'' '''Yes'''</br> | ||
[[ | [[Uzgod]]: Good good. You listening: Me was stolen valuable heirloom. Brooch from my family. Good thing is criminal was caught. Bad thing is, criminal now in dwarven prison of dwacatra is and must have taken brooch with him ...</br> | ||
[[ | [[Uzgod]]: To get into dwacatra you having to get several keys. Each key opening way to other key until you get key to dwarven prison ...</br> | ||
[[ | [[Uzgod]]: Last key should be in the generals quarter near armory. Only General might have key to enter there too. But me not knowing how to enter Generals private room at barracks. You looking on your own ...</br> | ||
[[Uzgod]]: When got key, then you going down to dwarven prison and getting me that brooch. Tell me that you got brooch when having it.}} | |||
[[ | |||
'''Após pegar o brooch''' | '''Após pegar o brooch''' | ||
{{transcrições|npc=Uzgod|texto= | {{transcrições|npc=Uzgod|texto= | ||
''Jogador'' | ''Jogador:'' '''Hi'''</br> | ||
[[Uzgod]]: Hiho ''jogador''! Wanna weapon, eh?<br | [[Uzgod]]: Hiho ''jogador''! Wanna weapon, eh?</br> | ||
''Jogador'' | ''Jogador:'' '''Brooch'''</br> | ||
[[Uzgod]]: You got me brooch?<br | [[Uzgod]]: You got me brooch?</br> | ||
''Jogador'' | ''Jogador:'' '''Yes'''</br> | ||
[[Uzgod]]: Thanking you for brooch. Me guessing you now want your pickaxe?<br | [[Uzgod]]: Thanking you for brooch. Me guessing you now want your pickaxe?</br> | ||
''Jogador'' | ''Jogador:'' '''Yes'''</br> | ||
[[Uzgod]]: Here you have it.<br | [[Uzgod]]: Here you have it.</br> | ||
''Jogador'' | ''Jogador:'' '''Bye'''</br> | ||
[[Uzgod]]: Guut bye. Coming back soon. | [[Uzgod]]: Guut bye. Coming back soon.}} | ||
'''Falando com Angus em Port Hope''' | |||
{{transcrições|npc=Angus|texto= | {{transcrições|npc=Angus|texto= | ||
''Jogador'' | ''Jogador:'' '''Hi'''</br> | ||
[[Angus]]: Greetings, what can I do for you?<br | [[Angus]]: Greetings, what can I do for you?</br> | ||
''Jogador'' | ''Jogador:'' '''Pickaxe'''</br> | ||
[[Angus]]: Did you get the requested pickaxe from Uzgod in Kazordoon?<br | [[Angus]]: Did you get the requested pickaxe from Uzgod in Kazordoon?</br> | ||
''Jogador'' | ''Jogador:'' '''Yes'''</br> | ||
[[Angus]]: Excellent, you brought just the tool we need! Of course it was only a simple task. However ...<br | [[Angus]]: Excellent, you brought just the tool we need! Of course it was only a simple task. However ...</br> | ||
[[Angus]]: I officially welcome you to the explorer society. From now on you can ask for missions to improve your rank.}} | [[Angus]]: I officially welcome you to the explorer society. From now on you can ask for missions to improve your rank.}} | ||
{{Voltar|link=Joining_the_Explorers_-_Modo_RPG}} | |||
<!--------------------------------- FIM DO TEXTO DO SPOILER P/ O BOTÂO Nº 02 ----------------------------------------------------> | |||
}} | |||
= [[Arquivo:Atlas.gif|30px|link=]] Missões [[Arquivo:Atlas.gif|30px|link=]] = | |||
A partir de agora você deverá realizar missões para a [[The Explorer Society]], as missões são dividas em ranks. Conforme você completar as missões de cada rank, você será promovido e novas missões serão liberadas. Os ranks são: | |||
{{DASH|'''Obs:''' | |||
* '''Dentro de cada um dos três primeiros ranks, as missões podem ser iniciadas e entregues de uma vez só, portanto é recomendado que você pegue todas as missões do seu rank com o NPC com o qual você iniciou a quest. No rank IV você terá que fazer as missões em uma ordem específica.''' | |||
** '''Exemplo:''' No Rank I: Novice, você pode pedir as missões: ''The Butterfly Hunt'' e ''The Plant Collection''. Enquanto caça as borboletas, você também pode coletar as amostras das plantas e entregar as duas missões ao mesmo tempo. | |||
* '''Para a missão The Ice Delivery, recomenda-se que você a inicie com o NPC Mortimer em Northport para garantir que o Icicle não derreta. Para ganhar velocidade e tempo, é recomendado que você utilize um set de velocidade compatível com o level do seu personagem.'''}} | |||
=== | == [[Arquivo:Atlas.gif|30px|link=]] Rank I: The Ice Delivery [[Arquivo:Atlas.gif|30px|link=]] == | ||
Essa missão requer que você use uma [[Ice Pick]] especial, e colete um pouco de gelo da ilha de [[Folda]]. O gelo está na forma de [[Icicle]]. O Icicle derrete rapidamente (em 10 minutos), então você deve se apressar quando pegá-lo. É recomendado que você pegue esta missão da [[Tibian Explorer Society|Explorer Society]] em [[Northport]], já que é mais próximo das [[Ice Islands]]. | Essa missão requer que você use uma [[Ice Pick]] especial, e colete um pouco de gelo da ilha de [[Folda]]. O gelo está na forma de [[Icicle]]. O Icicle derrete rapidamente (em 10 minutos), então você deve se apressar quando pegá-lo. É recomendado que você pegue esta missão da [[Tibian Explorer Society|Explorer Society]] em [[Northport]], já que é mais próximo das [[Ice Islands]]. | ||
Pegue a [[Ice Pick]] pedindo '''mission''', vá para [[Folda]], e entre na caverna principal | Pegue a [[Ice Pick]] pedindo '''mission''', vá para [[Folda]], e entre na caverna principal ({{mapa|31998,31570,7:2|aqui}}). | ||
'''Pedindo a missão''' | |||
'''Falando com Angus em Port Hope''' | |||
{{transcrições|npc=Angus|texto= | |||
''Jogador:'' '''Hi'''</br> | |||
[[Angus]]: Greetings, what can I do for you?</br> | |||
''Jogador:'' '''Ice Delivery'''</br> | |||
[[Angus]]: Our finest minds came up with the theory that deep beneath the ice island of Folda ice can be found that is ancient. To prove this theory we wouldneed a sample of the aforesaid ice ...</br> | |||
[[Angus]]: Of course the ice melts away quickly so you would need to hurry to bring it here ...</br> | |||
[[Angus]]: Would you like to accept this mission?</br> | |||
''Jogador:'' '''Yes'''</br> | |||
[[Angus]]: So listen please: Take this ice pick and use it on a block of ice in the caves beneath Folda. Get some ice and bring it here as fast as you can ...</br> | |||
[[Angus]]: Should the ice melt away, report on your ice delivery mission anyway. I will then tell you if the time is right to start another mission.}} | |||
Os mapas que seguem mostram o caminho mais curto para o gelo. Você enfrentará [[Frost Troll]]s, [[Rotworm]]s, [[Minotaur]]s, [[Minotaur Archer]]s, e talvez alguns [[Slime]]s. Mate tudo no seu caminho, e se você for rápido eles não renascerão e não irão atrasá-lo na volta. | Os mapas que seguem mostram o caminho mais curto para o gelo. Você enfrentará [[Frost Troll]]s, [[Rotworm]]s, [[Minotaur]]s, [[Minotaur Archer]]s, e talvez alguns [[Slime]]s. Mate tudo no seu caminho, e se você for rápido eles não renascerão e não irão atrasá-lo na volta. | ||
<gallery> | <gallery mode="nolines"> | ||
Arquivo:explorer5.png|Logo que entrar na caverna desça a escada | Arquivo:explorer5.png|Logo que entrar na caverna desça a escada | ||
Arquivo:explorer6.png|Vá até o fim da linha e use a pick no gelo | Arquivo:explorer6.png|Vá até o fim da linha e use a pick no gelo | ||
| Linha 148: | Linha 224: | ||
Leve o [[Icicle]] de volta para a [[Tibian Explorer Society|Explorer Society]], e diga '''ice delivery'''. Se o [[Icicle]] derreter, fale com o NPC e ele te dará outra chance. | Leve o [[Icicle]] de volta para a [[Tibian Explorer Society|Explorer Society]], e diga '''ice delivery'''. Se o [[Icicle]] derreter, fale com o NPC e ele te dará outra chance. | ||
'''Entregando o Icicle''' | |||
''' | |||
{{transcrições|npc=Angus|texto= | {{transcrições|npc=Angus|texto= | ||
''Jogador'' | ''Jogador:'' '''Hi'''</br> | ||
[[Angus]]: Greetings, what can I do for you?<br | [[Angus]]: Greetings, what can I do for you?</br> | ||
''Jogador'' | ''Jogador:'' '''Ice Delivery'''</br> | ||
[[Angus]]: Did you get the ice we are looking for?<br | [[Angus]]: Did you get the ice we are looking for?</br> | ||
''Jogador'' | ''Jogador:'' '''Yes'''</br> | ||
[[Angus]]: Just in time. Sadly not much ice is left over but it will do. Thank you again.}} | [[Angus]]: Just in time. Sadly not much ice is left over but it will do. Thank you again.}} | ||
{{DASH|[[Arquivo:Achievement.gif|link=]] Ao completar a missão de quarta-feira do [[Rashid]] e entregar o [[Icicle]] para Angus ou Mortimer, você irá receber o achievement '''"{{Achievement|Just in Time}}"'''.}} | |||
== [[Arquivo:Atlas.gif|30px|link=]] Rank I: The Butterfly Hunt [[Arquivo:Atlas.gif|30px|link=]] == | |||
Para esta missão, a Explorer Society procura por espécimes frescas de certas borboletas. Para cada borboleta]] você receberá um [[Butterfly Conservation Kit]] para coletar um corpo morto recentemente das diferentes borboletas. Para começar esta missão fale '''Hi - Mission - Butterfly Hunt - Yes''' com [[Angus]] em [[Port Hope]] ou [[Mortimer]] em [[Northport]] conforme o NPC que você falou para iniciar a quest. | |||
'''Falando com Angus em Port Hope''' | |||
[[ | {{transcrições|npc=Angus|texto= | ||
''Jogador:'' '''Hi'''</br> | |||
[[Angus]]: Greetings, what can I do for you?</br> | |||
''Jogador:'' '''Mission'''</br> | |||
[[Angus]]: The missions available for your rank are the butterfly hunt, plant collection and ice delivery.</br> | |||
''Jogador:'' '''Butterfly Hunt'''</br> | |||
[[Angus]]: The mission asks you to collect some species of butterflies, are you interested?</br> | |||
''Jogador:'' '''Yes'''</br> | |||
[[Angus]]: This preparation kit will allow you to collect a purple butterfly you have killed ...</br> | |||
[[Angus]]: Just use it on the fresh corpse of a purple butterfly, return the prepared butterfly to me and give me a report of your butterfly hunt.}} | |||
{{DASH|'''Dicas:''' | |||
* Todas as borboletas podem ser encontradas em [[Yalahar]], dentro da cidade mesmo, porém você precisa iniciar a missão ''The Way to Yalahar'' da [[In Service of Yalahar Quest]]. | |||
* Você pode fazer as missões '''Butterfly Hunt''' e '''Plant Collection''' ao mesmo tempo, simplesmente peça por cada uma dessas missões. É recomendado que você encontre as [[Butterfly (Violeta)|borboletas roxas]] primeiro, e mantenha seus olhos abertos para as outras enquanto coleta as plantas. Se você ver uma [[Butterfly (Azul)]] ou [[Butterfly (Vermelho)]] antes de precisar delas, mate-as mesmo assim e pegue o corpo. Se você encontrar as outras borboletas rápido o suficiente, poderá usar o corpo, mesmo que não seja assim tão recente (claro que não pode ter apodrecido totalmente).}} | |||
[[ | No mapa abaixo, se você preferir matar as borboletas em [[Port Hope]], veja a localização (apenas uma suposição já que elas obviamente mudam de lugar) das borboletas: | ||
<gallery mode="packed" heights="300px"> | |||
Arquivo:explorer7.gif|Siga a legenda abaixo | |||
</gallery> | |||
[[Arquivo: | [[Arquivo:Butterfly_(Violeta).gif|link=]] [[Butterfly (Violeta)|Borboleta Roxa]]: <span style="color:red;">'''Número 1'''</span> | ||
</br> [[Arquivo:Butterfly_(Azul).gif|link=]] [[Butterfly (Azul)|Borboleta Azul]]: <span style="color:red;">'''Número 2'''</span> | |||
</br> [[Arquivo:Butterfly_(Vermelho).gif|link=]] [[Butterfly (Vermelho)|Borboleta Vermelha]]: <span style="color:red;">'''Número 3'''</span> | |||
<span class="titulo-quest">Borboleta Roxa</span> [[Arquivo:Butterfly (Violeta).gif|link=]]</br> | |||
Primeiro, você precisará achar uma [[Butterfly (Violeta)|borboleta roxa]]. Essas são as mais comuns, e podem ser vistas em toda a área de pântano ao Norte de [[Port Hope]], a área gramada ao Sul de [[Port Hope]], como em muitos outros lugares em todo o Tibia. Abaixo imagem no [[Cormaya#Cormaya_Garden|Cormaya Garden]]. | |||
<gallery> | <gallery mode="nolines"> | ||
Arquivo: | Arquivo:explorerbbroxa.gif | ||
</gallery> | </gallery> | ||
[[ | Após coletar o corpo da borboleta roxa, retorne até [[Angus]] ou [[Mortimer]] e fale '''Hi - Butterfly Hunt - Yes''' para entregar o corpo da borboleta e em seguida fale '''Butterfly Hunt''' novamente para receber um novo [[Butterfly Conservation Kit]], o NPC irá dizer que agora você precisa coletar o corpo de uma borboleta azul. | ||
'''Entregando o corpo da borboleta roxa''' | |||
{{transcrições|npc=Angus|texto= | {{transcrições|npc=Angus|texto= | ||
''Jogador'' | ''Jogador:'' '''Hi'''</br> | ||
[[Angus]]: Greetings, what can I do for you?<br | [[Angus]]: Greetings, what can I do for you?</br> | ||
''Jogador'' | ''Jogador:'' '''Butterfly Hunt'''</br> | ||
[[Angus]]: | [[Angus]]: Did you acquire the purple butterfly we are looking for?</br> | ||
''Jogador'' | ''Jogador:'' '''Yes'''</br> | ||
[[Angus]]: | [[Angus]]: A little bit battered but it will do. Thank you! If you think you are ready, ask for another butterfly hunt.</br> | ||
''Jogador'' | ''Jogador:'' '''Butterfly Hunt'''</br> | ||
[[Angus]]: This preparation kit will allow you to collect a | [[Angus]]: This preparation kit will allow you to collect a blue butterfly you have killed ...</br> | ||
[[Angus]]: Just use it on the fresh corpse of a | [[Angus]]: Just use it on the fresh corpse of a blue butterfly, return the prepared butterfly to me and give me a report of your butterfly hunt.}} | ||
<span class="titulo-quest">Borboleta Azul</span> [[Arquivo:Butterfly (Azul).gif|link=]]</br> | |||
Segundo, você precisará achar uma [[Butterfly (Azul)|borboleta azul]]. Essas são mais difíceis de localizar, mas são encontradas perto de [[Port Hope]], geralmente com [[Butterfly (Violeta)|borboletas roxas]]. Elas são vistas ao longo das costas Norte e Sul de [[Port Hope]], nos arredores de [[Tiquanda]], na mata ao Norte de [[Port Hope]], e ao longo do rio dentro da floresta de [[Tiquanda]]. Há também uma [[Butterfly (Azul)|borboleta azul]] na pequena montanha perto do barco em [[Cormaya]], em [[Meriana]] e no [[Well of Life]] na [[Pits of Inferno]]. Abaixo imagem no [[Cormaya#Cormaya_Garden|Jardim de Cormaya]]. | |||
<gallery mode="nolines"> | |||
Arquivo:explorerbbazul.gif | |||
</gallery> | |||
Após coletar o corpo da borboleta azul, retorne até [[Angus]] ou [[Mortimer]] e fale '''Hi - Butterfly Hunt - Yes''' para entregar o corpo da borboleta e em seguida fale '''Butterfly Hunt''' novamente para receber um novo [[Butterfly Conservation Kit]], o NPC irá dizer que agora você precisa coletar o corpo de uma borboleta vermelha. | |||
''' | '''Entregando o corpo da borboleta azul''' | ||
{{transcrições|npc=Angus|texto= | {{transcrições|npc=Angus|texto= | ||
''Jogador'' | ''Jogador:'' '''Hi'''</br> | ||
[[Angus]]: Greetings, what can I do for you?<br | [[Angus]]: Greetings, what can I do for you?</br> | ||
''Jogador'' | ''Jogador:'' '''Butterfly Hunt'''</br> | ||
[[Angus]]: Did you acquire the blue butterfly we are looking for?<br | [[Angus]]: Did you acquire the blue butterfly we are looking for?</br> | ||
''Jogador'' | ''Jogador:'' '''Yes'''</br> | ||
[[Angus]]: Again I think it will do. Thank you! If you think you are ready, ask for another butterfly hunt.<br | [[Angus]]: Again I think it will do. Thank you! If you think you are ready, ask for another butterfly hunt.</br> | ||
''Jogador'' | ''Jogador:'' '''Butterfly Hunt'''</br> | ||
[[Angus]]: This preparation kit will allow you to collect a red butterfly you have killed ...<br | [[Angus]]: This preparation kit will allow you to collect a red butterfly you have killed ...</br> | ||
[[Angus]]: Just use it on the fresh corpse of a red butterfly, return the prepared butterfly to me and give me a report of your butterfly hunt.}} | [[Angus]]: Just use it on the fresh corpse of a red butterfly, return the prepared butterfly to me and give me a report of your butterfly hunt.}} | ||
''' | <span class="titulo-quest">Borboleta Vermelha</span> [[Arquivo:Butterfly (Vermelho).gif|link=]]</br> | ||
Terceiro, você precisará achar uma [[Butterfly (Vermelho)|borboleta vermelha]]. A maioria das pessoas têm problemas com essa parte. Não parece ter um lugar "normal" para essas borboletas aparecerem, mas elas podem ser vistas nas bordas das florestas ao Norte e Sul de [[Port Hope]] e neste respaw a sudeste da cidade ({{mapa|128.10,128.87,7|aqui}}) em [[Trapwood]] perto da cidade, Sudoeste de [[Banuta]], e ao longo do rio em [[Tiquanda]], em toda [[Vandura]] (em [[Liberty Bay]] e ao sul de [[Liberty Bay]]) em [[Vandura]] e no [[Well of Life]] na [[Pits of Inferno]]. Também, algumas podem ser encontradas na entrada de [[Chor]] e em [[Yalahar]]. Na imagem abaixo, uma borboleta vermelha ao Sul de [[Tiquanda]]. | |||
<gallery mode="nolines"> | |||
Arquivo:explorerbbverm.png | |||
</gallery> | |||
Após coletar o corpo da borboleta vermelha, retorne até [[Angus]] ou [[Mortimer]] e fale '''Hi - Butterfly Hunt - Yes''' para entregar o corpo da borboleta, assim terminando a missão. | |||
'''Entregando o corpo da borboleta vermelha''' | |||
{{transcrições|npc=Angus|texto= | {{transcrições|npc=Angus|texto= | ||
''Jogador'' | ''Jogador:'' '''Hi'''</br> | ||
[[Angus]]: Greetings, what can I do for you?<br | [[Angus]]: Greetings, what can I do for you?</br> | ||
''Jogador'' | ''Jogador:'' '''Butterfly Hunt'''</br> | ||
[[Angus]]: Did you acquire the red butterfly we are looking for?<br | [[Angus]]: Did you acquire the red butterfly we are looking for?</br> | ||
''Jogador'' | ''Jogador:'' '''Yes'''</br> | ||
[[Angus]]: That is an extraordinary species you have brought. Thank you! That was the last butterfly we needed.}} | [[Angus]]: That is an extraordinary species you have brought. Thank you! That was the last butterfly we needed.}} | ||
=== | == [[Arquivo:Atlas.gif|30px|link=]] Rank I: The Plant Collection [[Arquivo:Atlas.gif|30px|link=]] == | ||
Para esta missão você precisa coletar amostras de três tipos diferentes de plantas selvagens numa ordem específica. Para cada planta será lhe dado um [[Botanist's Container]], para utilizar na coleta da amostra da planta. | Para esta missão você precisa coletar amostras de três tipos diferentes de plantas selvagens numa ordem específica. Para cada planta será lhe dado um [[Botanist's Container]], para utilizar na coleta da amostra da planta. Para começar esta missão fale '''Hi - Mission - Plant Collection - Yes''' com [[Angus]] em [[Port Hope]] ou [[Mortimer]] em [[Northport]] conforme o NPC que você falou para iniciar a quest. | ||
'''Falando com Angus em Port Hope''' | |||
{{transcrições|npc=Angus|texto= | |||
''Jogador:'' '''Hi'''</br> | |||
[[Angus]]: Greetings, what can I do for you?</br> | |||
''Jogador:'' '''Mission'''</br> | |||
[[Angus]]: The missions available for your rank are the butterfly hunt, plant collection and ice delivery.</br> | |||
''Jogador:'' '''Plant Collection'''</br> | |||
[[Angus]]: In this mission we require you to get us some plant samples from Tiquandan plants. Would you like to fulfil this mission?</br> | |||
''Jogador:'' '''Yes'''</br> | |||
[[Angus]]: Fine! Here take this botanist's container. Use it on a jungle bells plant to collect a sample for us. Report about your plant collection when you have been successful.}} | |||
<span class="titulo-quest">Jungle Bells Plant</span> [[Arquivo:Jungle Bells Plant.gif|link=]]</br> | |||
<gallery> | Primeiro, você precisa encontrar uma amostra de uma '''[[Jungle Bells Plant]]'''. Estas podem ser encontradas no solo ao longo do lado Sul de [[Port Hope]] muito próximo da cidade, e dentro de [[Tiquanda]] na Selva Norte de [[Port Hope]]. Alguns foram vistos ({{mapa|32577,32815,7:2|aqui}}), ({{mapa|32770,32739,7:2|aqui}}) e ({{mapa|32548,32836,7:2|aqui}}). '''Jungle bells''' também estão localizadas no [[Well of Life]] na [[Pits of Inferno]]. | ||
<gallery mode="nolines"> | |||
Arquivo:explorer8.png|Você pode encontrar aqui, no Sul da cidade | Arquivo:explorer8.png|Você pode encontrar aqui, no Sul da cidade | ||
Arquivo:explorer9.png|Ou aqui, próximo da '''Witches Cauldron''' | Arquivo:explorer9.png|Ou aqui, próximo da '''Witches Cauldron''' | ||
</gallery> | </gallery> | ||
'''Entregando a amostra de Jungle Bells''' | |||
{{transcrições|npc=Angus|texto= | |||
''Jogador:'' '''Hi'''</br> | |||
[[Angus]]: Greetings, what can I do for you?</br> | |||
''Jogador:'' '''Plant Collection'''</br> | |||
[[Angus]]: Did you acquire the sample of the jungle bells plant we are looking for?</br> | |||
''Jogador:'' '''Yes'''</br> | |||
[[Angus]]: I see. It seems you've got some quite useful sample by sheer luck. Thank you! Just tell me when you are ready to continue with the plant collection.</br> | |||
''Jogador:'' '''Plant Collection'''</br> | |||
[[Angus]]: Use this botanist's container on a witches cauldron to collect a sample for us. Bring it here and report about your plant collection.}} | |||
<gallery> | <span class="titulo-quest">Witches Cauldron Plant</span> [[Arquivo:Witches Cauldron Plant.gif|link=]]</br> | ||
Em segundo lugar, é preciso encontrar uma amostra de uma '''[[Witches Cauldron Plant]]'''. Estas encontram-se um pouco mais profundamente na selva de [[Tiquanda]]. O jeito mais fácil de se localizar é ao longo do rio. Vá para Leste de [[Port Hope]] no lado Norte do rio e siga o rio em direção ao Norte. Elas podem ser encontradas à Norte de um acampamento com [[Skeleton]]s (aproximadamente ({{mapa|32807,32672,7:2|aqui}}). Outro local, à Nordeste da [[Tibian Explorer Society|Explorer Society]] em [[Port Hope]] ({{mapa|32748,32608,7:2|aqui}}). Também são encontradas no [[Well of Life]] na [[Pits of Inferno]]. O local mais próximo da base da Explorer Society é este: ({{mapa|32763,32707,7:2|aqui}}). | |||
<gallery mode="nolines"> | |||
Arquivo:explorer10.png|Essa fica próxima da '''Jungle Bells''' | Arquivo:explorer10.png|Essa fica próxima da '''Jungle Bells''' | ||
</gallery> | </gallery> | ||
Finalmente, é preciso encontrar uma amostra de '''[[Giant Jungle Rose]]'''. Uma pode ser encontrada perto do rio no caminho das ''witches cauldron'' descrito acima | '''Entregando a amostra de Witches Cauldron''' | ||
{{transcrições|npc=Angus|texto= | |||
''Jogador:'' '''Hi'''</br> | |||
[[Angus]]: Greetings, what can I do for you?</br> | |||
''Jogador:'' '''Plant Collection'''</br> | |||
[[Angus]]: Did you acquire the sample of the witches cauldron we are looking for?</br> | |||
''Jogador:'' '''Yes'''</br> | |||
[[Angus]]: Ah, finally. I started to wonder what took you so long. But thank you! Another fine sample, indeed. Just tell me when you are ready to continue with the plant collection.</br> | |||
''Jogador:'' '''Plant Collection'''</br> | |||
[[Angus]]: Use this botanist's container on a giant jungle rose to obtain a sample for us. Bring it here and report about your plant collection.}} | |||
<span class="titulo-quest">Giant Jungle Rose</span> [[Arquivo:Giant Jungle Rose.gif|link=]]</br> | |||
Finalmente, é preciso encontrar uma amostra de '''[[Giant Jungle Rose]]'''. Uma pode ser encontrada perto do rio no caminho das ''witches cauldron'' descrito acima ({{mapa|32771,32743,7:2|aqui}}). Giant jungle rose também são encontradas no [[Well of Life]] na [[Pits of Inferno]]. | |||
<gallery> | <gallery mode="nolines"> | ||
Arquivo:explorer11.png|Sul das outras duas | Arquivo:explorer11.png|Sul das outras duas | ||
</gallery> | </gallery> | ||
'''Entregando a amostra de Jungle Rose''' | |||
''' | |||
{{transcrições|npc=Angus|texto= | {{transcrições|npc=Angus|texto= | ||
''Jogador'' | ''Jogador:'' '''Hi'''</br> | ||
[[Angus]]: Greetings, what can I do for you?<br | [[Angus]]: Greetings, what can I do for you?</br> | ||
''Jogador'' | ''Jogador:'' '''Plant Collection'''</br> | ||
[[Angus]]: Did you acquire the sample of the giant jungle rose we are looking for?<br | [[Angus]]: Did you acquire the sample of the giant jungle rose we are looking for?</br> | ||
''Jogador'' | ''Jogador:'' '''Yes'''</br> | ||
[[Angus]]: What a lovely sample! With that you have finished your plant collection missions. | [[Angus]]: What a lovely sample! With that you have finished your plant collection missions.}} | ||
}} | |||
== Rank: | == [[Arquivo:Atlas.gif|30px|link=]] Rank II: The Lizard Urn [[Arquivo:Atlas.gif|30px|link=]] == | ||
A [[Tibian Explorer Society|Explorer]] está pedindo para você obter um [[Funeral Urn]] sagrado da vila de lagartos em [[Chor]], para suas pesquisas. Para começar esta missão fale '''Hi - Mission - Lizard Urn - Yes''' com [[Angus]] em [[Port Hope]] ou [[Mortimer]] em [[Northport]] conforme o NPC que você falou para iniciar a quest. Pelo grande número de lizards, é aconselhável usar [[GFB]] e [[Stealth Ring]] (ou Magia [[Invisible]]). | |||
'''Falando com Angus em Port Hope''' | |||
= | {{transcrições|npc=Angus|texto= | ||
''Jogador:'' '''Hi'''</br> | |||
[[Angus]]: Greetings, what can I do for you?</br> | |||
''Jogador:'' '''Mission'''</br> | |||
[[Angus]]: The missions available for your rank are lizard urn, bonelord secrets and orc powder.</br> | |||
''Jogador:'' '''Lizard Urn'''</br> | |||
[[Angus]]: The explorer society would like to acquire an ancient urn which is some sort of relic to the lizard people of Tiquanda. Would you like to accept this mission?</br> | |||
''Jogador:'' '''Yes'''</br> | |||
[[Angus]]: You have indeed the spirit of an adventurer! In the south-east of Tiquanda is a small settlement of the lizard people ...</br> | |||
[[Angus]]: Beneath the newly constructed temple there, the lizards hide the said urn. Our attempts to acquire this item were without success ...</br> | |||
[[Angus]]: Perhaps you are more successful.}} | |||
Vá para [[Chor]] | Vá para [[Chor]], você encontrará todos tipos de lizards de classe baixa: [[Lizard Sentinel|Lizards Sentinel]], [[Lizard Snakecharmer|Lizards Snakecharmer]] e [[Lizard Sentinel|Lizards Templar]]. Os lagartos não são difíceis, mas a quantidade presente no local é grande, então é bom levar alguns [[Stealth Ring]]s e [[GFB]]s com você... Mate primeiro os [[Lizard Snakecharmer|Lizards Snakecharmer]], porque eles podem ser uma verdadeira dor-de-cabeça com as suas [[cobra]]s sumonadas. | ||
O melhor caminho para chegar em [[Chor]] é ir pelas montanhas em [[Ankrahmun]]. Quando você estiver na floresta, vá {{mapa|32955,32785,7: | O melhor caminho para chegar em [[Chor]] é ir pelas montanhas em [[Ankrahmun]]. Quando você estiver na floresta, vá ({{mapa|32955,32785,7:2|aqui}}), e então atravesse a passagem pela montanha ({{mapa|33004,32750,7:2|aqui}}). Os mapas abaixo mostram o caminho desde [[Ankrahmun]] até a [[Funeral Urn]], outra boa opção é se você tiver o rank de ''Ranger'' na [[Paw and Fur - Hunting Elite Quest]], assim você poderá pegar o atalho pelo barco do NPC [[Lorek]], e pelo custo de 50 gp, ele o levará para [[Chor]]. O [[Funeral Urn]] fica localizado em um templo, bem no centro da vila ({{mapa|32957,32850,7:2|aqui}}). Desça a escada e mate alguns [[Lizard Snakecharmer]]s. | ||
<gallery> | <gallery mode="nolines"> | ||
Arquivo:explorerurn1.png|Vá para Oeste de [[Ankrahmun]] e suba | Arquivo:explorerurn1.png|Vá para Oeste de [[Ankrahmun]] e suba | ||
Arquivo:explorerurn2.png|Mate algumas [[Hyaena]]s no caminho e suba | Arquivo:explorerurn2.png|Mate algumas [[Hyaena]]s no caminho e suba | ||
| Linha 334: | Linha 437: | ||
</gallery> | </gallery> | ||
<gallery mode="nolines"> | |||
<gallery> | |||
Arquivo:explorer12.png|Passe pela porta e pegue a urna | Arquivo:explorer12.png|Passe pela porta e pegue a urna | ||
</gallery> | </gallery> | ||
Quando pegar a [[Funeral Urn]], volte até a [[Tibian Explorer Society|Explorer Society]] e reporte sua missão falando '''Hi - Lizard Urn - Yes'''. | |||
'''Reportando a missão''' | |||
[[ | |||
[[ | |||
'' | |||
'' | |||
{{transcrições|npc=Angus|texto= | {{transcrições|npc=Angus|texto= | ||
''Jogador'' | ''Jogador:'' '''Hi'''</br> | ||
[[Angus]]: Greetings, what can I do for you?<br | [[Angus]]: Greetings, what can I do for you?</br> | ||
''Jogador'' | ''Jogador:'' '''Lizard Urn'''</br> | ||
[[Angus]]: Did you manage to get the ancient urn?<br | [[Angus]]: Did you manage to get the ancient urn?</br> | ||
''Jogador'' | ''Jogador:'' '''Yes'''</br> | ||
[[Angus]]: Yes, that is the prized relic we have been looking for so long. You did a great job, thank you.}} | [[Angus]]: Yes, that is the prized relic we have been looking for so long. You did a great job, thank you.}} | ||
=== | == [[Arquivo:Atlas.gif|30px|link=]] Rank II: The Bonelord Secret [[Arquivo:Atlas.gif|30px|link=]] == | ||
A [[Explorer Society]] acredita que a pirâmide à nordeste de [[Darashia]] foi construída por [[Bonelord]]s. | A [[Explorer Society]] acredita que a pirâmide à nordeste de [[Darashia]] foi construída por [[Bonelord]]s. | ||
Sua missão é ir até a [[ | Sua missão é ir até a [[Daramian Minotaur Pyramid]] e pegar um [[Wrinkled Parchment]]. Lá você enfrentará todos os tipos de minotauros, então é bom ter um pouco de cuidado se você é level baixo. | ||
Siga os mapas até o local: | Siga os mapas até o local: | ||
<gallery> | <gallery mode="nolines"> | ||
Arquivo:explorerbeh1.png|Vá para Noroeste de [[Darashia]] | Arquivo:explorerbeh1.png|Vá para Noroeste de [[Darashia]] | ||
Arquivo:explorerbeh2.png | Arquivo:explorerbeh2.png | ||
| Linha 380: | Linha 468: | ||
</gallery> | </gallery> | ||
Volte para a [[Tibian Explorer Society|Explorer Society]] e fale para ele que você conseguiu o "[[ | Volte para a [[Tibian Explorer Society|Explorer Society]] e fale para ele que você conseguiu o "Bonelord Secrets ([[Wrinkled Parchment]])". | ||
'''Falando com Angus em Port Hope''' | |||
{{transcrições|npc=Angus|texto= | {{transcrições|npc=Angus|texto= | ||
''Jogador'' | ''Jogador:'' '''Hi'''</br> | ||
[[Angus]]: Greetings, what can I do for you?<br | [[Angus]]: Greetings, what can I do for you?</br> | ||
''Jogador'' | ''Jogador:'' '''Mission'''</br> | ||
[[Angus]]: The missions available for your rank are lizard urn, bonelord secrets and orc powder.<br | [[Angus]]: The missions available for your rank are lizard urn, bonelord secrets and orc powder.</br> | ||
''Jogador'' | ''Jogador:'' '''Bonelord Secrets'''</br> | ||
[[Angus]]: We want to learn more about the ancient race of bonelords. We believe the black pyramid north east of Darashia was originally built by them ...<br | [[Angus]]: We want to learn more about the ancient race of bonelords. We believe the black pyramid north east of Darashia was originally built by them ...</br> | ||
[[Angus]]: We ask you to explore the ruins of the black pyramid and look for any signs that prove our theory. You might probably find some document with the numeric bonelord language ...<br | [[Angus]]: We ask you to explore the ruins of the black pyramid and look for any signs that prove our theory. You might probably find some document with the numeric bonelord language ...</br> | ||
[[Angus]]: That would be sufficient proof. Would you like to accept this mission?<br | [[Angus]]: That would be sufficient proof. Would you like to accept this mission?</br> | ||
''Jogador'' | ''Jogador:'' '''Yes'''</br> | ||
[[Angus]]: Excellent! So travel to the city of Darashia and then head north-east for the pyramid ...<br | [[Angus]]: Excellent! So travel to the city of Darashia and then head north-east for the pyramid ...</br> | ||
[[Angus]]: If any documents are left, you probably find them in the catacombs beneath. Good luck!}} | [[Angus]]: If any documents are left, you probably find them in the catacombs beneath. Good luck!}} | ||
''' | '''Reportando a missão''' | ||
{{transcrições|npc=Angus|texto= | {{transcrições|npc=Angus|texto= | ||
''Jogador'' | ''Jogador:'' '''Hi'''</br> | ||
[[Angus]]: Greetings, what can I do for you?<br | [[Angus]]: Greetings, what can I do for you?</br> | ||
''Jogador'' | ''Jogador:'' '''Bonelord Secrets'''</br> | ||
[[Angus]]: Have you found any proof that the pyramid was built by bonelords?<br | [[Angus]]: Have you found any proof that the pyramid was built by bonelords?</br> | ||
''Jogador'' | ''Jogador:'' '''Yes'''</br> | ||
[[Angus]]: You did it! Excellent! The scientific world will be shaken by this discovery!}} | [[Angus]]: You did it! Excellent! The scientific world will be shaken by this discovery!}} | ||
=== | == [[Arquivo:Atlas.gif|30px|link=]] Rank II: The Orc Powder [[Arquivo:Atlas.gif|30px|link=]] == | ||
{{DASH|'''Obs:''' Se você quiser, pode comprar o item [[Strange Powder|Strange Powder]] [[Arquivo:Strange Powder.gif|link=]] no [[NPC]] [[Black Bert]] por 5,000 [[gp]]s.}} | |||
A [[Tibian Explorer Society|Explorer Society]] quer que você vá e pegue um pó usado pelos | A [[Tibian Explorer Society|Explorer Society]] quer que você vá e pegue um pó usado pelos orcs para fazer os [[Orc Berserker]]s e [[Orc Rider]]s ficarem "loucos". | ||
Okay, vá para [[ | Okay, vá para [[Ulderek's Rock]], no caminho você irá lutar contra vários tipos de orcs. Quando estiver na fortaleza, vá até o círculo vermelho no mapa abaixo: | ||
Quando estiver | |||
[[Arquivo:explorer13.png]] | [[Arquivo:explorer13.png]] | ||
Subindo a rampa você encontrará diversos | Subindo a rampa você encontrará diversos orcs, na maior parte [[Orc Leader]]s e [[Orc Warlord]]s. Após subir 5 andares você encontrará a porta. Abra o baú e você encontrará o [[Strange Powder|Orc Powder]]. | ||
Volte até a [[Tibian Explorer Society|Explorer]] para completar a missão. | Volte até a [[Tibian Explorer Society|Explorer]] para completar a missão. | ||
| Linha 421: | Linha 511: | ||
Rank: Journeyman completo! | Rank: Journeyman completo! | ||
'''Falando com Angus em Port Hope''' | |||
'''Angus em Port Hope''' | |||
{{transcrições|npc=Angus|texto= | {{transcrições|npc=Angus|texto= | ||
''Jogador'' | ''Jogador:'' '''Hi'''</br> | ||
[[Angus]]: Greetings, what can I do for you?<br | [[Angus]]: Greetings, what can I do for you?</br> | ||
''Jogador'' | ''Jogador:'' '''Mission'''</br> | ||
[[Angus]]: The missions available for your rank are lizard urn, bonelord secrets and orc powder.<br | [[Angus]]: The missions available for your rank are lizard urn, bonelord secrets and orc powder.</br> | ||
''Jogador'' | ''Jogador:'' '''Orc Powder'''</br> | ||
[[Angus]]: It is commonly known that orcs of Uldereks Rock use some sort of powder to increase the fierceness of their war wolves and berserkers ...<br | [[Angus]]: It is commonly known that orcs of Uldereks Rock use some sort of powder to increase the fierceness of their war wolves and berserkers ...</br> | ||
[[Angus]]: What we do not know are the ingredients of this powder and its effect on humans ...<br | [[Angus]]: What we do not know are the ingredients of this powder and its effect on humans ...</br> | ||
[[Angus]]: So we would like you to get a sample of the aforesaid powder. Do you want to accept this mission?<br | [[Angus]]: So we would like you to get a sample of the aforesaid powder. Do you want to accept this mission?</br> | ||
''Jogador'' | ''Jogador:'' '''Yes'''</br> | ||
[[Angus]]: You are a brave soul. As far as we can tell, the orcs maintain some sort of training facility in some hill in the north-east of their city ...<br | [[Angus]]: You are a brave soul. As far as we can tell, the orcs maintain some sort of training facility in some hill in the north-east of their city ...</br> | ||
[[Angus]]: There you should find lots of their war wolves and hopefully also some of the orcish powder. Good luck!}} | [[Angus]]: There you should find lots of their war wolves and hopefully also some of the orcish powder. Good luck!}} | ||
''' | '''Reportando a missão''' | ||
{{transcrições|npc=Angus|texto= | {{transcrições|npc=Angus|texto= | ||
''Jogador'' | ''Jogador:'' '''Hi'''</br> | ||
[[Angus]]: Greetings, what can I do for you?<br | [[Angus]]: Greetings, what can I do for you?</br> | ||
''Jogador'' | ''Jogador:'' '''Orc Powder'''</br> | ||
[[Angus]]: Did you acquire some of the orcish powder?<br | [[Angus]]: Did you acquire some of the orcish powder?</br> | ||
''Jogador'' | ''Jogador:'' '''Yes'''</br> | ||
[[Angus]]: You really got it? Amazing! Thank you for your efforts.}} | [[Angus]]: You really got it? Amazing! Thank you for your efforts.}} | ||
== Rank: | == [[Arquivo:Atlas.gif|30px|link=]] Rank III: The Elven Poetry [[Arquivo:Atlas.gif|30px|link=]] == | ||
Fale '''Hi - Mission - Elven Poetry - Yes''' para [[Angus]] ou [[Mortimer]], agora a [[Tibian Explorer Society|Explorer Society]] quer estudar os poetas élficos. Sua missão será pegar um [[Songs of the Forest|livro]] no [[Hellgate]]. | |||
'''Falando com Angus em Port Hope''' | |||
== | {{transcrições|npc=Angus|texto= | ||
''Jogador:'' '''Hi'''</br> | |||
[[Angus]]: Greetings, what can I do for you?</br> | |||
''Jogador:'' '''Mission'''</br> | |||
[[Angus]]: The missions available for your rank are elven poetry, memory stone and rune writings.</br> | |||
''Jogador:'' '''Elven Poetry'''</br> | |||
[[Angus]]: Some high ranking members would like to study elven poetry. They want the rare book 'Songs of the Forest' ...</br> | |||
[[Angus]]: For sure someone in Ab'Dendriel will own a copy. So you would just have to ask around there. Are you willing to accept this mission?</br> | |||
''Jogador:'' '''Yes'''</br> | |||
[[Angus]]: Excellent. This mission is easy but nonetheless vital. Travel to Ab'Dendriel and get the book.}} | |||
Você irá precisar da [[Key 3012|chave 3012]]. Ao conseguir, vá pelo [[Hellgate]] seguindo o caminho nos mapas abaixo para chegar na área dos elfos. Quando descer, siga o mapa abaixo, passe pela porta e pegue seu livro [[Songs of the Forest]]. Você enfrentará alguns [[Elf]]s e [[Elf Scout]]s. Assim que você tiver o livro, retorne para a [[Tibian Explorer Society|Explorer Society]]. | |||
{{DASH|'''Obs:''' Caso não saiba sair de Hellgate veja [[Rota:Hellgate]].}} | |||
{{DASH|'''Obs 2:''' Caso tenha pego o Elven Poetry Book no Baú, e perdeu, você pode comprar outro com o NPC [[Elvith]] por 500gps durante a quest, falando "Elven Poetry".}} | |||
<gallery> | <gallery mode="nolines" widths="200px" heights="200px"> | ||
Arquivo:ESQ_Elven_poetry_1.png|Dentro do | Arquivo:ESQ_Elven_poetry_1.png|Dentro do Hellgate, vá para Oeste | ||
Arquivo:ESQ_Elven_poetry_2.png|Vá para Leste | Arquivo:ESQ_Elven_poetry_2.png|Vá para Leste | ||
Arquivo:ESQ_Elven_poetry_3.png|Siga a seta e desça | Arquivo:ESQ_Elven_poetry_3.png|Siga a seta e desça | ||
Arquivo:ESQ_Elven_poetry_4.png|Localização do livro '''Songs of the Forest'''. | |||
</gallery> | </gallery> | ||
'''Reportando a missão''' | |||
{{transcrições|npc=Angus|texto= | {{transcrições|npc=Angus|texto= | ||
''Jogador'' | ''Jogador:'' '''Hi'''</br> | ||
[[Angus]]: Greetings, what can I do for you?< | [[Angus]]: Greetings, what can I do for you?</br> | ||
''Jogador:'' '''Elven Book'''</br> | |||
[[Angus]]: Did you acquire a copy of 'Songs of the Forest' for us?</br> | |||
''Jogador:'' '''Yes'''</br> | |||
[[Angus]]: Let me have a look! Yes, that's what we wanted. A copy of 'Songs of the Forest'. I won't ask any questions about those bloodstains.}} | |||
''Jogador | |||
'' | |||
[[Angus]]: Did you acquire a copy of 'Songs of the Forest' for us?<br | |||
''Jogador'' | |||
[[Angus]]: Let me have a look! Yes, that's what we wanted. A copy of 'Songs of the Forest'. I won't ask any questions about those bloodstains. | |||
}} | |||
== [[Arquivo:Atlas.gif|30px|link=]] Rank III: The Memory Stone [[Arquivo:Atlas.gif|30px|link=]] == | |||
A [[Tibian Explorer Society|Explorer]] quer algumas pedras mágicas usadas por povos antigos como uma maneira de escrita. | A [[Tibian Explorer Society|Explorer]] quer algumas pedras mágicas usadas por povos antigos como uma maneira de escrita. | ||
O local fica no Norte de [[Edron]], próximo do caminho para os [[demon]]s. | O local fica no Norte de [[Edron]], próximo do caminho para os [[demon]]s. | ||
Vá para [[Edron]] | {{DASH|'''Nota:''' Não adianta comprar a memory stone com o black bert, Angus não aceita dizendo: "This memory stone looks damaged. Probably you bought it from some suspicious individual. Travel to Edron and get one on your own.".}} | ||
Vá para a [[Edron Northern Ruins]] e entre ({{mapa|33163,31636,7:2|aqui}}). | |||
Enfrentando [[Demon Skeleton]]s, [[Wild Warrior]]s, [[Priestess]] e [[Bonelord]]s, siga o mapa abaixo: | Enfrentando [[Demon Skeleton]]s, [[Wild Warrior]]s, [[Priestess]] e [[Bonelord]]s, siga o mapa abaixo: | ||
<gallery mode="nolines" widths="196px" heights="196px"> | |||
Arquivo:Norte de Edron 1-1.png | |||
Arquivo:Hero Cave 1-1.png | |||
Arquivo:Hero Cave 1-2.png | |||
Arquivo:Hero Cave 1-3.png | |||
Arquivo:Hero Cave 1-4-1.png | |||
</gallery> | |||
Siga a linha | Siga a linha pontilhada até encontrar as duas escadas, uma subindo e outra descendo, mas vá para '''BAIXO''' e a [[Memory Stone]] vai estar simplesmente à sua direita. | ||
[[ | Após pegá-la, simplesmente volte até a [[Tibian Explorer Society|Explorer Society]]. | ||
'''Falando com Angus em Port Hope''' | |||
{{transcrições|npc=Angus|texto= | {{transcrições|npc=Angus|texto= | ||
''Jogador'' | ''Jogador:'' '''Hi'''</br> | ||
[[Angus]]: Greetings, what can I do for you?<br | [[Angus]]: Greetings, what can I do for you?</br> | ||
''Jogador'' | ''Jogador:'' '''Mission'''</br> | ||
[[Angus]]: The missions available for your rank are elven poetry, memory stone and rune writings.<br | [[Angus]]: The missions available for your rank are elven poetry, memory stone and rune writings.</br> | ||
''Jogador'' | ''Jogador:'' '''Memory Stone'''</br> | ||
[[Angus]]: We acquired some knowledge about special magic stones. Some lost | [[Angus]]: We acquired some knowledge about special magic stones. Some lost civilizations used it to store knowledge and lore, just like we use books ...</br> | ||
[[Angus]]: The wisdom in such stones must be immense, but so are the dangers faced by every person who tries to obtain one...<br | [[Angus]]: The wisdom in such stones must be immense, but so are the dangers faced by every person who tries to obtain one...</br> | ||
[[Angus]]: As far as we know the ruins found in the north-west of Edron were once inhabited by beings who used such stones. Do you have the heart to go there and to get us such a stone?<br | [[Angus]]: As far as we know the ruins found in the north-west of Edron were once inhabited by beings who used such stones. Do you have the heart to go there and to get us such a stone?</br> | ||
''Jogador'' | ''Jogador:'' '''Yes'''</br> | ||
[[Angus]]: In the ruins of north-western Edron you should be able to find a memory stone. Good luck. | [[Angus]]: In the ruins of north-western Edron you should be able to find a memory stone. Good luck.}} | ||
}} | |||
'''Entregando a pedra''' | '''Entregando a pedra''' | ||
{{transcrições|npc=Angus|texto= | {{transcrições|npc=Angus|texto= | ||
''Jogador'' | ''Jogador:'' '''Hi'''</br> | ||
[[Angus]]: Greetings, what can I do for you?<br | [[Angus]]: Greetings, what can I do for you?</br> | ||
''Jogador'' | ''Jogador:'' '''Memory Stone'''</br> | ||
[[Angus]]: Were you able to acquire a memory stone for our society?<br | [[Angus]]: Were you able to acquire a memory stone for our society?</br> | ||
''Jogador'' | ''Jogador:'' '''Yes'''</br> | ||
[[Angus]]: A flawless memory stone! Incredible! It will take years even to figure out how it works but what an opportunity for science, thank you! | [[Angus]]: A flawless memory stone! Incredible! It will take years even to figure out how it works but what an opportunity for science, thank you!}} | ||
}} | |||
=== | == [[Arquivo:Atlas.gif|30px|link=]] Rank III: The Rune Writings [[Arquivo:Atlas.gif|30px|link=]] == | ||
A [[Tibian Explorer Society|Explorer Society]] quer estudar antigas runas usadas pela sociedade dos lagartos e quer sua ajuda, para começar esta missão fale '''Hi - Mission - Rune Writings - Yes''' com [[Angus]] em [[Port Hope]] ou [[Mortimer]] em [[Northport]] conforme o NPC que você falou para iniciar a quest. | |||
'''Falando com Angus em Port Hope''' | |||
{{transcrições|npc=Angus|texto= | |||
''Jogador:'' '''Hi'''</br> | |||
[[Angus]]: Greetings, what can I do for you?</br> | |||
''Jogador:'' '''Mission'''</br> | |||
[[Angus]]: The missions available for your rank are elven poetry, memory stone and rune writings.</br> | |||
''Jogador:'' '''Rune Writings'''</br> | |||
[[Angus]]: We would like to study some ancient runes that were used by the lizard race. We suspect some relation of the lizards to the founders of [[Ankrahmun]] ...</br> | |||
[[Angus]]: Somewhere under the ape infested city of [[Banuta]], one can find dungeons that were once inhabited by lizards... </br> | |||
[[Angus]]: Look there for an atypical structure that would rather fit to Ankrahmun and its Ankrahmun Tombs. Copy the runes you will find on this structure...</br> | |||
[[Angus]]: Are you up to that challenge?</br> | |||
''Jogador:'' '''Yes'''</br> | |||
[[Angus]]: Excellent! Here, take this tracing paper and use it on the object you will find there to create a copy of the ancient runes.}} | |||
[[ | Vá para [[Banuta]] e desça ({{mapa|32827,32575,7:2|aqui}}). Você encontrará primatas durante todo o caminho. Vá da seta azul para a amarela. Siga a linha e use o pedaço de papel na '''[[Obelisk|atypical structure]]''' no Norte da sala. | ||
{{DASH|'''Nota:''' Ao usar o papel na estrutura aparecerá a mensagem "'''Your questlog has been updated.'''" no [[Server Log]].}} | |||
<gallery mode="nolines"> | |||
Arquivo:ESQ Rune writings 1.png | |||
Arquivo:ESQ Rune writings 2.png | |||
</gallery> | |||
[[ | Volte até a [[Tibian Explorer Society|Explorer Society]] e entregue a sua missão. | ||
'''Reportando a missão''' | |||
{{transcrições|npc=Angus|texto= | {{transcrições|npc=Angus|texto= | ||
''Jogador'' | ''Jogador:'' '''Hi'''</br> | ||
[[Angus]]: Greetings, what can I do for you?< | [[Angus]]: Greetings, what can I do for you?</br> | ||
''Jogador:'' '''Rune Writings'''</br> | |||
[[Angus]]: Did you create a copy of the ancient runes as requested?</br> | |||
''Jogador:'' '''Yes'''</br> | |||
''Jogador | |||
'' | |||
[[Angus]]: Did you create a copy of the ancient runes as requested?<br | |||
''Jogador'' | |||
[[Angus]]: It's a bit wrinkled but it will do. Thanks again.}} | [[Angus]]: It's a bit wrinkled but it will do. Thanks again.}} | ||
== Rank: | == [[Arquivo:Atlas.gif|30px|link=]] Rank IV: The Ectoplasm [[Arquivo:Atlas.gif|30px|link=]] == | ||
A [[Tibian Explorer Society|Explorer Society]] está trabalhando na criação de portais astrais. | A [[Tibian Explorer Society|Explorer Society]] está trabalhando na criação de portais astrais. | ||
Sua missão é simples. Você ganhará um [[Ectoplasm Container]], e deverá usar em um [[ghost]] recentemente morto. | Sua missão é simples. Você ganhará um [[Ectoplasm Container]], e deverá usar em um [[ghost]] recentemente morto. | ||
| Linha 583: | Linha 664: | ||
Mate um [[ghost]] e então use o [[Ectoplasm Container]]. Retorne até a [[Tibian Explorer Society|Explorer Society]] após concluir sua missão. | Mate um [[ghost]] e então use o [[Ectoplasm Container]]. Retorne até a [[Tibian Explorer Society|Explorer Society]] após concluir sua missão. | ||
'''Falando com Angus em Port Hope''' | |||
'''Angus em Port Hope''' | |||
{{transcrições|npc=Angus|texto= | {{transcrições|npc=Angus|texto= | ||
''Jogador'' | ''Jogador:'' '''Hi'''</br> | ||
[[Angus]]: Greetings, what can I do for you?<br | [[Angus]]: Greetings, what can I do for you?</br> | ||
''Jogador'' | ''Jogador:'' '''Mission'''</br> | ||
[[Angus]]: The explorer society needs a great deal of help in the research of astral travel. Are you willing to help?<br | [[Angus]]: The explorer society needs a great deal of help in the research of astral travel. Are you willing to help?</br> | ||
''Jogador'' | ''Jogador:'' '''Yes'''</br> | ||
[[Angus]]: Fine. The society is looking for new means to travel. Some of our most brilliant minds have some theories about astral travel that they want to research further ...<br | [[Angus]]: Fine. The society is looking for new means to travel. Some of our most brilliant minds have some theories about astral travel that they want to research further ...</br> | ||
[[Angus]]: Therefore we need you to collect some ectoplasm from the corpse of a ghost. We will supply you with a collector that you can use on the body of a slain ghost ...<br | [[Angus]]: Therefore we need you to collect some ectoplasm from the corpse of a ghost. We will supply you with a collector that you can use on the body of a slain ghost ...</br> | ||
[[Angus]]: Do you think you are ready for that mission?<br | [[Angus]]: Do you think you are ready for that mission?</br> | ||
''Jogador'' | ''Jogador:'' '''Yes'''</br> | ||
[[Angus]]: Good! Take this container and use it on a ghost that was recently slain. Return with the collected ectoplasm and hand me that container ...<br | [[Angus]]: Good! Take this container and use it on a ghost that was recently slain. Return with the collected ectoplasm and hand me that container ...</br> | ||
[[Angus]]: Don't lose the container. They are expensive!}} | [[Angus]]: Don't lose the container. They are expensive!}} | ||
'''Quando pegar o ectoplasma''' | '''Quando pegar o ectoplasma''' | ||
{{transcrições|npc=Angus|texto= | {{transcrições|npc=Angus|texto= | ||
''Jogador'' | ''Jogador:'' '''Hi'''</br> | ||
[[Angus]]: Greetings, what can I do for you?<br | [[Angus]]: Greetings, what can I do for you?</br> | ||
''Jogador'' | ''Jogador:'' '''Mission'''</br> | ||
[[Angus]]: Do you have some collected ectoplasm with you?<br | [[Angus]]: Do you have some collected ectoplasm with you?</br> | ||
''Jogador'' | ''Jogador:'' '''Yes'''</br> | ||
[[Angus]]: Phew, I had no idea that ectoplasm would smell that ... oh, it's you, well, sorry. Thank you for the ectoplasm.}} | [[Angus]]: Phew, I had no idea that ectoplasm would smell that ... oh, it's you, well, sorry. Thank you for the ectoplasm.}} | ||
=== | == [[Arquivo:Atlas.gif|30px|link=]] Rank IV: The Spectral Dress [[Arquivo:Atlas.gif|30px|link=]] == | ||
Os estudos da [[Tibian Explorer Society|Explorer Society]] com portais astrais estão tendo progresso. Agora eles precisam de algum objeto astral. Um [[Spectral Dress]] será de grande utilidade, e você deverá pedir um para a [[The Queen Of The Banshees]], que mora em [[Ghostlands]]. | Os estudos da [[Tibian Explorer Society|Explorer Society]] com portais astrais estão tendo progresso. Agora eles precisam de algum objeto astral. Um [[Spectral Dress]] será de grande utilidade, e você deverá pedir um para a [[The Queen Of The Banshees]], que mora em [[Ghostlands]]. | ||
'''Falando com Angus em Port Hope''' | |||
{{transcrições|npc=Angus|texto= | |||
''Jogador:'' '''Hi'''</br> | |||
[[Angus]]: Greetings, what can I do for you?</br> | |||
''Jogador:'' '''Mission'''</br> | |||
[[Angus]]: The research on ectoplasm makes good progress. Now we need some spectral article. Our scientists think a spectral dress would be a perfect object for their studies ...</br> | |||
[[Angus]]: The bad news is that the only source to got such a dress is the queen of the banshees. Do you dare to seek her out?</br> | |||
''Jogador:'' '''Yes'''</br> | |||
[[Angus]]: That is quite courageous. We know, it's much we are asking for. The queen of the banshees lives in the so called Ghostlands, south west of Carlin. It is rumoured that her lair is located in the deepest dungeons beneath that cursed place ...</br> | |||
[[Angus]]: Any violence will probably be futile, you will have to negotiate with her. Try to get a spectral dress from her. Good luck.}} | |||
Primeiro vá a [[Ghostlands]] e entre no buraco mostrado ({{mapa|32223,31860,7:2|aqui}}), vá para o sul e entre em outro buraco, lá encontrará [[Skeleton]]s, [[Ghoul]]s e algumas [[Poison Spider]]s. Prossiga para sudeste e desça o buraco, continue indo para a direita e você encontrará duas [[Magic Wall]]s. Para removê-las você precisa usar duas alavancas, uma alavanca está ao leste e outra está a oeste, caso esteja fazendo a quest em grupo, é recomendável que um jogador vá para cada alavanca e assim poupar tempo. | |||
[[ | {{DASH|'''Dicas:''' | ||
* É importante ser rápido para puxar as alavancas pois as magic walls se fecham rapidamente. | |||
* Quando as alavancas forem puxadas e as [[Magic Wall]]s sumirem, é importante que nenhum membro da equipe tente passar pelo corredor afim de chegar ao buraco pois ao passar por dois SQMs específicos do corredor, as barreiras serão reativadas.}} | |||
<gallery mode="nolines" widths="200px" heights="200px"> | |||
Arquivo:Banshee Quest White Raven 1-1.png | |||
Arquivo:Banshee Quest White Raven 1-2.png | |||
Arquivo:Banshee Quest White Raven 1-3.png | |||
</gallery> | |||
[[ | {{DASH|img=Magic Wall2|'''Nota:''' Caso as alavancas estejam viradas para a direita e as [[Magic Wall]]s também estejam ativas, significa que outros jogadores já passaram pela área para fazer a quest, neste caso apenas acione as alavancas novamente de modo que fiquem viradas para a direita, removendo as [[Magic Wall]]s.}} | ||
<div style="width:98%; margin-top:10px; margin-left:auto; margin-right:auto; vertical-align:top; padding:8px; border-radius: 10px; border: 1px dashed #CEDFF2; background-color:#E8F2F8;"> | |||
<table> | |||
<tr> | |||
<td style="padding:8px; width:50%; text-align:justify; vertical-align:top; border-right: 1px solid #CEDFF2;"> | |||
<span class="titulo-quest">Alavanca da Esquerda</span>[[Arquivo:Bonelord.gif|50px|link=]]</br> | |||
[[ | Para ativar a alavanca da esquerda você tem que passar por muitos [[Scorpion]]s, 3 [[Demon Skeleton]]s e alguns [[Ghoul]]s e na sala da alavanca há 2 [[Bonelord]]s, 1 [[Demon Skeleton]], 2-3 [[Stalker]]s e [[Ghoul]]s. Agora suba as escadas e desça novamente na escada no centro da sala e encontre a alavanca no canto superior direito da sala. | ||
<gallery mode="nolines" widths="105px" heights="105px"> | |||
Arquivo:Banshee Quest White Raven 1-4-1.png | |||
Arquivo:Banshee Quest White Raven 1-4-2.png | |||
Arquivo:Banshee Quest White Raven 1-4-3.png | |||
Arquivo:Banshee Quest White Raven 1-4-4.png | |||
</gallery> | |||
</td> | |||
<td style="padding:8px; width:50%; text-align:justify; vertical-align:top;"> | |||
<span class="titulo-quest">Alavanca da Direita</span>[[Arquivo:Giant Spider.gif|48px|link=]]</br> | |||
Para ativar a alavanca da direita você tem que passar por muitas [[Poison Spider]]s, passe por elas e desça as escadas a direita ('''Não é possível retornar!'''). Na sala há uma [[Giant Spider]], você pode enfrentá-la ou correr para a alavanca e em seguida descer as escadas a direita novamente, você estará em um túnel de retorno para sala das [[Poison Spider]]s. | |||
<gallery mode="nolines" widths="105px" heights="105px"> | |||
Arquivo:Banshee Quest White Raven 1-5-1.png | |||
Arquivo:Banshee Quest White Raven 1-5-2.png | |||
Arquivo:Banshee Quest White Raven 1-5-3.png | |||
</gallery> | |||
</td> | |||
</tr> | |||
</table> | |||
</div> | |||
Depois das [[Magic Wall]]s, desça o buraco (o teleport é para voltar caso as [[Magic Wall]]s tenham se fechado). Vá para o norte dessa sala. Você encontrará [[Mummy|Mummies]], [[Ghost]]s, [[Demon Skeleton]]s e [[Stalker]]s. O livro que você pode pegar no corpo faz parte da [[The White Raven Monastery Quest]]. Após matar as criaturas, suba no [[Poison Gas]] ao leste do corpo para surgir uma alavanca, use a alavanca e desça a escada que irá aparecer. | |||
<gallery mode="nolines" widths="200px" heights="200px"> | |||
Arquivo:Banshee Quest White Raven 1-6.png | |||
Arquivo:Banshee Quest White Raven 1-7-2.png | |||
</gallery> | |||
Agora você estará em uma sala com um teleport ao sul, ao passar por ele você entrará em um corredor fino e longo com um teleport ao norte ('''O teleport te levará para fora das Magic Walls.'''), vá para o sul, há '''um teleport invisível''' que fica fazendo você voltar para o início. Use a pick ({{mapa|32266,31892,12:2|aqui}}), desça e vá para o sul, use uma rope e continue indo para o sul. No final do corredor, vá para esquerda, suba a rampa e desça novamente, você estará em uma sala redonda. Nesta sala você encontrará 3 [[Ghost]]s, 3 [[Stalker]]s e 4 [[Demon Skeleton]]s, desça as escadas. | |||
[[ | Vá pelas escadas. Desça pelas escadas à nordeste daqui. Você passará por: [[Ghost]]s, [[Stalker]]s, [[Demon Skeleton]]s e muitos [[Scorpion]]s. Desça as escadas à sudoeste daqui. No caminho você encontrará muitas [[Banshee]]s. O [[Spectral Dress]] é localizado ({{mapa|32259,31949,14:2|aqui}}) atrás de uma porta selada, mas para pegá-lo, você precisa falar com a [[The Queen Of The Banshees]] antes. Vá para as escadas ao norte e suba (aqui há mais [[Banshee]]s), desça as escadas e siga o caminho para as escadas ao sul e suba, aqui você encontrará [[Ghost]]s e [[Demon Skeleton]], vá para o norte desta sala, suba as escadas e vá para leste e em seguida para o norte e desça, aqui você encontrará [[Banshee]]s, [[Ghost]]s, [[Mummy|Mummies]] e [[Stalker]]s e a NPC [[The Queen Of The Banshees]]. | ||
<gallery mode="nolines" widths="196px" heights="196px" perrow="5"> | |||
Arquivo:Banshee Quest Hidden Seal 1-1.png | |||
Arquivo:Banshee Quest Hidden Seal 1-4.png | |||
Arquivo:Banshee Quest Logic Seal 1-3.png | |||
Arquivo:BQ1.png | |||
Arquivo:Banshee Quest Sacrifice Seal 1-5.png | |||
Arquivo:Banshee Quest Plague Seal 1-2.png | |||
Arquivo:Banshee Quest Plague Seal 1-3.png | |||
Arquivo:Banshee Quest Sacrifice Seal 1-6.png | |||
Arquivo:Banshee Quest Queen Seal 1-0.png | |||
Arquivo:Banshee Quest Queen Seal 1-2.png | |||
</gallery> | |||
[[ | Fale '''Hi - Spectral Dress''' com a [[The Queen Of The Banshees]], ela vai dizer que você pode pegar o vestido, volte pelo mesmo caminho (veja as imagens). Depois de pegar o [[Spectral Dress]], volte para a [[Tibian Explorer Society|Explorer Society]]. | ||
'''Falando com a The Queen of the Banshees''' | |||
[[ | {{transcrições|npc=The Queen Of The Banshees|texto= | ||
''Jogador:'' '''Hi'''</br> | |||
[[The Queen Of The Banshees]]: Be greeted, dear visitor. Come and stay ... a while.</br> | |||
''Jogador:'' '''Spectral Dress'''</br> | |||
[[The Queen Of The Banshees]]: Your wish for a spectral dress is silly. Although I will grant you the permission to take one. My maidens left one in a box in a room, directly south of here.}} | |||
'''Entregando a missão''' | |||
{{transcrições|npc=Angus|texto= | {{transcrições|npc=Angus|texto= | ||
''Jogador'' | ''Jogador:'' '''hi ''' </br> | ||
[[Angus]]: Greetings, what can I do for you?<br | [[Angus]]: Greetings, what can I do for you? </br> | ||
''Jogador'' | ''Jogador:'' '''mission ''' </br> | ||
[[Angus]]: | [[Angus]]: Have you acquired the spectral dress we need? </br> | ||
[[Angus]]: | ''Jogador:'' '''yes ''' </br> | ||
[[Angus]]: | [[Angus]]: Just in time! With this spectral article we can start the final phase of our research. </br> | ||
''Jogador:'' '''bye ''' </br> | |||
[[Angus]]: Good bye.}} | |||
{{DASH|[[Arquivo:achievement.gif|link=]] Ao entregar o vestido à uma das bases da explorer você receberá o achievement '''"{{Achievement|Explorer}}"'''.}} | |||
{{ | |||
[[ | |||
{{ | |||
=== | == [[Arquivo:Atlas.gif|30px|link=]] Rank IV: The Spectral Stone [[Arquivo:Atlas.gif|30px|link=]] == | ||
Okay, pegue a missão em [[Port Hope]] ou [[Northport]]. | Okay, pegue a missão em [[Port Hope]] ou [[Northport]]. | ||
| Linha 709: | Linha 809: | ||
[[Arquivo:explorerportals.png]] | [[Arquivo:explorerportals.png]] | ||
''' | '''Falando com Angus em Port Hope''' | ||
{{transcrições|npc=Angus|texto= | {{transcrições|npc=Angus|texto= | ||
''Jogador'' | ''Jogador:'' '''Hi'''</br> | ||
[[Angus]]: Greetings, what can I do for you?<br | [[Angus]]: Greetings, what can I do for you?</br> | ||
''Jogador'' | ''Jogador:'' '''Mission'''</br> | ||
[[Angus]]: With the objects you've provided our researchers will make steady progress. Still we are missing some test results from fellow explorers ...<br | [[Angus]]: With the objects you've provided our researchers will make steady progress. Still we are missing some test results from fellow explorers ...</br> | ||
[[Angus]]: Please travel to our base in [[Northport]] and ask them to mail us their latest research reports. Then return here and ask about new missions.}} | [[Angus]]: Please travel to our base in [[Northport]] and ask them to mail us their latest research reports. Then return here and ask about new missions.}} | ||
''' Mortimer em Northport''' | '''Falando com Mortimer em Northport''' | ||
{{transcrições|npc=Mortimer|texto= | {{transcrições|npc=Mortimer|texto= | ||
''Jogador'' | ''Jogador:'' '''Hi'''</br> | ||
[[Mortimer]]: Greetings, what can I do for you?<br | [[Mortimer]]: Greetings, what can I do for you?</br> | ||
''Jogador'' | ''Jogador:'' '''Mission'''</br> | ||
[[Mortimer]]: Oh, yes! Tell our fellow explorer that the papers are in the mail already.}} | [[Mortimer]]: Oh, yes! Tell our fellow explorer that the papers are in the mail already.}} | ||
''' Angus em Port Hope''' | '''Falando com Angus em Port Hope''' | ||
{{transcrições|npc=Angus|texto= | {{transcrições|npc=Angus|texto= | ||
''Jogador'' | ''Jogador:'' '''Hi'''</br> | ||
[[Angus]]: Greetings, what can I do for you?<br | [[Angus]]: Greetings, what can I do for you?</br> | ||
''Jogador'' | ''Jogador:'' '''Mission'''</br> | ||
[[Angus]]: The reports from Northport have already arrived here and our progress is astonishing. We think it is possible to create an astral bridge between our bases. Are you interested to assist us with this?<br | [[Angus]]: The reports from Northport have already arrived here and our progress is astonishing. We think it is possible to create an astral bridge between our bases. Are you interested to assist us with this?</br> | ||
''Jogador'' | ''Jogador:'' '''Yes'''</br> | ||
[[Angus]]: Good, just take this spectral essence and use it on the strange carving in this building as well as on the corresponding tile in our base at [[Northport]] ...<br | [[Angus]]: Good, just take this spectral essence and use it on the strange carving in this building as well as on the corresponding tile in our base at [[Northport]] ...</br> | ||
[[Angus]]: As soon as you have charged the portal tiles that way, report about the spectral portals.}} | [[Angus]]: As soon as you have charged the portal tiles that way, report about the spectral portals.}} | ||
=== | == [[Arquivo:Atlas.gif|30px|link=]] Rank IV: The Astral Portals [[Arquivo:Atlas.gif|30px|link=]] == | ||
Desça e fale com o [[Angus]] ou [[Mortimer]] (dependendo da base escolhida) e fale '''mission'''. Ele irá dizer que ambos os pisos estão carregados e harmonizados. | |||
'''Falando com Angus em Port Hope''' | |||
== | {{transcrições|npc=Angus|texto= | ||
''Jogador:'' '''Hi'''</br> | |||
[[Angus]]: Greetings, what can I do for you?</br> | |||
''Jogador:'' '''Mission'''</br> | |||
[[Angus]]: Both carvings are now charged and harmonised. In theory you should be able to travel in zero time from one base to the other ...</br> | |||
[[Angus]]: However, you will need to have an orichalcum pearl in your possession to use it as power source. It will be destroyed during the process. I will give you 6 of such pearls and you can buy new ones in our bases ...</br> | |||
[[Angus]]: In addition, you need to be a premium explorer to use the astral travel. ...</br> | |||
[[Angus]]: And remember: it's a small teleport for you, but a big teleport for all Tibians! Here is a small present for your efforts!</br> | |||
''Jogador:'' '''Bye'''</br> | |||
[[Angus]]: Good bye.}} | |||
<span class="titulo-quest">Recompensa</span></br> | |||
Após completar todas missões dos Ranks I a IV você irá receber as seguintes recompensas: | |||
* 06 [[Orichalcum Pearl]]s [[Arquivo:Orichalcum Pearl.gif|link=]] | |||
* 01 [[Crown Backpack]] [[Arquivo:Crown Backpack.gif|link=]] | |||
* 50 [[Platinum coin]]s [[Arquivo:Platinum Coin.gif|link=]] | |||
* Direito de usar os teletransportes entre [[Port Hope]] e [[Northport]]. | |||
* Pode comprar os seguintes itens com os NPCs [[Angus]] ou [[Mortimer]]: | |||
** [[Atlas]] [[Arquivo:Atlas.gif|link=]] | |||
** [[Crown Backpack]]s [[Arquivo:Crown Backpack.gif|link=]] | |||
** [[Orichalcum Pearl]]s [[Arquivo:Orichalcum Pearl.gif|link=]] por 80 [[gp]]s cada. | |||
Após completar todas as missões, incluindo as missões secundárias abaixo, você terá os seguintes benefícios: | |||
* Direito de usar os teletransportes entre [[Liberty Bay]] e [[Svargrond]]. | |||
* Acesso a [[Calassa]] e [[Frozen Trench]]. | |||
'''Nota:''' | {{DASH|'''Nota:''' Para que essa quest fique como completada no [[Quest Log]], você deverá fazer as missões secundárias.}} | ||
== Missões Secundárias == | |||
=== The Undersea Kingdom === | |||
Vá até [[Liberty Bay]] e fale com [[Berenice]]. Ela vai contar que um navio da [[Tibian Explorer Society|Explorer]] estava investigando o lar das quaras, mas afundou, e o motivo não é conhecido. Sua missão será recuperar um livro no fundo do mar, com anotações sobre essa estranha raça. | |||
=== | |||
Vá até [[Liberty Bay]] e fale com [[Berenice]]. Ela vai contar que um navio da [[Tibian Explorer Society|Explorer]] estava investigando o lar das | |||
Você irá precisar de [[pick]] e 5,000 [[gp]]s para alugar um [[Helmet of the Deep]]. | Você irá precisar de [[pick]] e 5,000 [[gp]]s para alugar um [[Helmet of the Deep]]. | ||
Além disso, você precisa ter o rank de '''Relic Hunter''' para conseguir a missão com a [[Berenice]]. | Além disso, você precisa ter o rank de '''Relic Hunter''' para conseguir a missão com a [[Berenice]]. | ||
Quando pegar a missão, vá até o [[Captain Max|Capitão Max]] no cais, e peça para ir até [[Calassa]] por 200 [[gp]]s. Chegando lá, você poderá alugar um [[Helmet of the Deep]] por 5,000 [[gp]]s, caso você ainda não tenha um. ''' | Quando pegar a missão, vá até o [[Captain Max|Capitão Max]] no cais, e peça para ir até [[Calassa]] por 200 [[gp]]s. Chegando lá, você poderá alugar um [[Helmet of the Deep]] por 5,000 [[gp]]s, caso você ainda não tenha um.</br> | ||
{{DASH|'''Nota''': O capacete de mergulho pesa 210 oz., então não esqueça de ter [[capacidade]].}} | |||
Okay, coloque o capacete na cabeça e pule na água. Fique preparado para enfrentar | Okay, coloque o capacete na cabeça e pule na água. Fique preparado para enfrentar vários tipos de quaras e [[Massive Water Elemental]]s. Lembre-se que embaixo d'água, você anda muito devagar. | ||
Vá para o Sul, depois Leste. Você verá um navio destruído. Use a [[pick]] na [[Intact Ventilation Grille|escotilha de madeira]], e então uma escada irá aparecer. | Vá para o Sul, depois Leste. Você verá um navio destruído. Use a [[pick]] na [[Intact Ventilation Grille|escotilha de madeira]], e então uma escada irá aparecer. | ||
<gallery> | <gallery mode="nolines"> | ||
Arquivo:explorerunder1.png|Vá até o navio destruído, enfrentando Todo tipo de Quaras e [[Massive Water Elemental]] | Arquivo:explorerunder1.png|Vá até o navio destruído, enfrentando Todo tipo de Quaras e [[Massive Water Elemental]] | ||
Arquivo:TheExplorerSocietyCalassa1.png|Use a Pick no local indicado e desça, enfrentando 2 [[Quara Constrictor]]s e 3 [[Quara Hydromancer]]s. | Arquivo:TheExplorerSocietyCalassa1.png|Use a Pick no local indicado e desça, enfrentando 2 [[Quara Constrictor]]s e 3 [[Quara Hydromancer]]s. | ||
| Linha 846: | Linha 897: | ||
Retorne até [[Berenice]] e entregue o [[Damaged Logbook]]. | Retorne até [[Berenice]] e entregue o [[Damaged Logbook]]. | ||
'''Berenice em Liberty Bay''' | '''Berenice em Liberty Bay''' | ||
{{transcrições|npc=Berenice|texto= | {{transcrições|npc=Berenice|texto= | ||
''Jogador'' | ''Jogador:'' '''Hi'''</br> | ||
[[Berenice]]: Greetings, what can I do for you?<br | [[Berenice]]: Greetings, what can I do for you?</br> | ||
''Jogador'' | ''Jogador:'' '''Mission'''</br> | ||
[[Berenice]]: The most important mission we currently have is an expedition to Calassa.<br | [[Berenice]]: The most important mission we currently have is an expedition to Calassa.</br> | ||
''Jogador'' | ''Jogador:'' '''Calassa'''</br> | ||
[[Berenice]]: Ah! So you have heard about our special mission to investigate the | [[Berenice]]: Ah! So you have heard about our special mission to investigate the Quara race in their natural surrounding! Would you like to know more about it?</br> | ||
''Jogador'' | ''Jogador:'' '''Yes'''</br> | ||
[[Berenice]]: Since you have already proved to be a valuable member of our society, I will happily entrust you with this mission, but there are a few things which you need to know, so listen carefully. ...<br | [[Berenice]]: Since you have already proved to be a valuable member of our society, I will happily entrust you with this mission, but there are a few things which you need to know, so listen carefully. ...</br> | ||
[[Berenice]]: | [[Berenice]]: Calassa is an underwater settlement, so you are in severe danger of drowning unless you are well-prepared. ...</br> | ||
[[Berenice]]: We have developed a new device called ' | [[Berenice]]: We have developed a new device called 'Helmet of the Deep' which will enable you to breathe even in the depths of the ocean. ...</br> | ||
[[Berenice]]: I will instruct | [[Berenice]]: I will instruct Captain Max to bring you to Calassa and to lend one of these helmets to you. These helmets are very valuable, so there is a deposit of 5000 gold pieces on it. ...</br> | ||
[[Berenice]]: While in Calassa, do not take the helmet off under any circumstances. If you have any questions, don't hesitate to ask | [[Berenice]]: While in Calassa, do not take the helmet off under any circumstances. If you have any questions, don't hesitate to ask Captain Max. ...</br> | ||
[[Berenice]]: Your mission there, apart from observing the Quara, is to retrieve a special logbook from one of the shipwrecks buried there. ...<br | [[Berenice]]: Your mission there, apart from observing the Quara, is to retrieve a special logbook from one of the shipwrecks buried there. ...</br> | ||
[[Berenice]]: One of our last expeditions there failed horribly and the ship sank, but we still do not know the exact reason. ...<br | [[Berenice]]: One of our last expeditions there failed horribly and the ship sank, but we still do not know the exact reason. ...</br> | ||
[[Berenice]]: If you could retrieve the logbook, we'd finally know what happened. Have you understood your task and are willing to take this risk?<br | [[Berenice]]: If you could retrieve the logbook, we'd finally know what happened. Have you understood your task and are willing to take this risk?</br> | ||
''Jogador'' | ''Jogador:'' '''Yes'''</br> | ||
[[Berenice]]: Excellent! I will immediately inform | [[Berenice]]: Excellent! I will immediately inform Captain Max to bring you to Calassa whenever you are ready. Don't forget to make thorough preparations!}} | ||
}} | |||
'''Após pegar o livro''' | '''Após pegar o livro''' | ||
{{transcrições|npc=Berenice|texto= | {{transcrições|npc=Berenice|texto= | ||
''Jogador'' | ''Jogador:'' '''Hi'''</br> | ||
[[Berenice]]: Greetings, what can I do for you?<br | [[Berenice]]: Greetings, what can I do for you?</br> | ||
''Jogador'' | ''Jogador:'' '''Calassa'''</br> | ||
[[Berenice]]: OH! So you have safely returned from [[Calassa]]! Congratulations, were you able to retrieve the logbook?<br | [[Berenice]]: OH! So you have safely returned from [[Calassa]]! Congratulations, were you able to retrieve the logbook?</br> | ||
''Jogador'' | ''Jogador:'' '''Yes'''</br> | ||
[[Berenice]]: Yes! That's the logbook! However... it seems that the water has already destroyed many of the pages. This is not your fault though, you did your best. Thank you! | [[Berenice]]: Yes! That's the logbook! However... it seems that the water has already destroyed many of the pages. This is not your fault though, you did your best. Thank you!}} | ||
}} | |||
Para ganhar o direito de fazer essa missão, complete a missão acima ( | === The Frozen Trench === | ||
Para ganhar o direito de fazer essa missão, complete a missão acima (The Undersea Kingdom). Além disso, complete até pelo menos a missão "Formorgar Mines 3" da [[The Ice Islands Quest]]. | |||
Você precisará da magia [[levitate]] ou [[parcel]]s, e um [[Helmet of the Deep]]. | Você precisará da magia [[levitate]] ou [[parcel]]s, e um [[Helmet of the Deep]]. | ||
| Linha 893: | Linha 943: | ||
Após descer no penhasco, vá para o oeste até encontrar uma caverna ao norte. Continue indo para o norte até encontrar um '''frozen human''' e pare na frente dele, ele é guardado por um [[Quara Predator]]. Uma mensagem irá aparecer dizendo que você encontrou um ser humano congelado e que você deve relatar isso ao [[Lurik]]. | Após descer no penhasco, vá para o oeste até encontrar uma caverna ao norte. Continue indo para o norte até encontrar um '''frozen human''' e pare na frente dele, ele é guardado por um [[Quara Predator]]. Uma mensagem irá aparecer dizendo que você encontrou um ser humano congelado e que você deve relatar isso ao [[Lurik]]. | ||
<gallery mode="nolines"> | |||
Arquivo:Way to fronzen human.jpg | |||
Arquivo:Frozen human.jpg | |||
</gallery> | |||
[[Arquivo: | {{DASH|[[Arquivo:achievement.gif|link=]] Ao relatar à [[Lurik]], você receberá o achievement '''"{{Achievement|Sea Scout}}"'''.}} | ||
'''Lurik em Svargrond''' | |||
{{transcrições|npc=Lurik|texto= | {{transcrições|npc=Lurik|texto= | ||
''Jogador'' | ''Jogador:'' '''Hi'''</br> | ||
[[Lurik]]: Welcome, ''jogador''!<br | [[Lurik]]: Welcome, ''jogador''!</br> | ||
''Jogador'' | ''Jogador:'' '''Mission'''</br> | ||
[[Lurik]]: Ah, you've just come in time. An experienced explorer is just what we need here! ...<br | [[Lurik]]: Ah, you've just come in time. An experienced explorer is just what we need here! ...</br> | ||
[[Lurik]]: And as I heard from [[Berenice]], you have also experience in undersea exploration. ...<br | [[Lurik]]: And as I heard from [[Berenice]], you have also experience in undersea exploration. ...</br> | ||
[[Lurik]]: Would you be willing to go on a special mission in an underwater ice cave? It's pretty risky, I know. ...<br | [[Lurik]]: Would you be willing to go on a special mission in an underwater ice cave? It's pretty risky, I know. ...</br> | ||
[[Lurik]]: However, I think you have just what it takes! Do you agree?<br | [[Lurik]]: However, I think you have just what it takes! Do you agree?</br> | ||
''Jogador'' | ''Jogador:'' '''Yes'''</br> | ||
[[Lurik]]: Wonderful. I knew that I could count on you. Get old [[Buddel]] to bring you to [[Tyrsung]] and secretly sneak to the southern coast. ...<br | [[Lurik]]: Wonderful. I knew that I could count on you. Get old [[Buddel]] to bring you to [[Tyrsung]] and secretly sneak to the southern coast. ...</br> | ||
[[Lurik]]: The ship of the Venorean hunters should anchor there. They have no idea that they stopped right over the [[Frozen Trench]]. ...<br | [[Lurik]]: The ship of the Venorean hunters should anchor there. They have no idea that they stopped right over the [[Frozen Trench]]. ...</br> | ||
[[Lurik]]: This ice cave is said to bear many secrets. We sent one of our best explorers to investigate what's going on down there. ...<br | [[Lurik]]: This ice cave is said to bear many secrets. We sent one of our best explorers to investigate what's going on down there. ...</br> | ||
[[Lurik]]: However, he has not returned yet and we fear the worst. Please investigate the underwater cave and find out what has happened to him!}} | [[Lurik]]: However, he has not returned yet and we fear the worst. Please investigate the underwater cave and find out what has happened to him!}} | ||
'''Após concluir a missão''' | '''Após concluir a missão''' | ||
{{transcrições|npc=Lurik|texto= | {{transcrições|npc=Lurik|texto= | ||
''Jogador'' | ''Jogador:'' '''Hi'''</br> | ||
[[Lurik]]: Welcome, ''jogador''!<br | [[Lurik]]: Welcome, ''jogador''!</br> | ||
''Jogador'' | ''Jogador:'' '''Mission'''</br> | ||
[[Lurik]]: These are horrible news. I wonder if there was a malfunction of the diving helmet ...<br | [[Lurik]]: These are horrible news. I wonder if there was a malfunction of the diving helmet ...</br> | ||
[[Lurik]]: In any case, a horrible death for that poor explorer. ...<br | [[Lurik]]: In any case, a horrible death for that poor explorer. ...</br> | ||
[[Lurik]]: We will try to retrieve the frozen corpse to give him a proper burial. ...<br | [[Lurik]]: We will try to retrieve the frozen corpse to give him a proper burial. ...</br> | ||
[[Lurik]]: Thank you very much for your help! You have completed two very difficult undersea missions for us and deserve a reward. ...<br | [[Lurik]]: Thank you very much for your help! You have completed two very difficult undersea missions for us and deserve a reward. ...</br> | ||
[[Lurik]]: As token of our appreciation and with respect to your achievement, you are hereby granted the sea scout badge. ...<br | [[Lurik]]: As token of our appreciation and with respect to your achievement, you are hereby granted the sea scout badge. ...</br> | ||
[[Lurik]]: I will put the according stamp in your explorer log. Thank you again!}} | [[Lurik]]: I will put the according stamp in your explorer log. Thank you again!}} | ||
=== A | === The Island of Dragons === | ||
A [[Tibian Explorer Society|Explorer Society]] quer descobrir como surgiram os [[Frost Dragon]]s em [[Okolnir]]. Encontre alguma prova que antes existiu [[Dragon Lord]]s na ilha. | |||
Após pedir a missão para [[Lurik]] em [[Svargrond]], vá para [[Okolnir]]. | |||
Siga o mapa abaixo: | |||
<gallery mode="nolines"> | |||
Arquivo:explorerdragons1.png|Quando chegar em [[Okolnir]] no barco, vá para o Sul e suba | |||
Arquivo:explorerdragons2.png|Enfrentando [[Frost Dragon]]s e [[Frost Dragon Hatchling]]s, vá até a escada à Leste e desça | |||
Arquivo:explorerdragons3.png|Você encontrará mais [[Frost Dragon]]s, vá para o Sul e desça no [[Pitfall|buraco]] camuflado. | |||
Arquivo:explorerdragons4.png|No buraco haverá mais [[Frost Dragon]]s, vá para o Sul e use a sua [[Pick]] no buraco escondido | |||
Arquivo:explorerdragons5.png|Vá até o final da sala, você verá um [[Frozen Dragon|dragão lord congelado]], clique nele e pegue a [[Scale from a Frozen Dragon]] | |||
</gallery> | |||
Retorne até [[Lurik]] e entregue a [[Scale from a Frozen Dragon]], ele lhe dará 50 [[Platinum Coin]]s como recompensa. | |||
'''Lurik em Svargrond''' | |||
{{transcrições|npc=Lurik|texto= | |||
''Jogador:'' '''Hi'''</br> | |||
[[Lurik]]: Welcome, ''jogador''!</br> | |||
''Jogador:'' '''Mission'''</br> | |||
[[Lurik]]: Ah, you've just come in time. An experienced explorer is just what we need here! Would you like to go on a mission for us?</br> | |||
''Jogador:'' '''Yes'''</br> | |||
[[Lurik]]: Now we're talking! Maybe you've already heard of the island [[Okolnir]] south of [[Hrodmir]]. ...</br> | |||
[[Lurik]]: [[Okolnir]] is the home of a new and fierce dragon race, the so-called frost dragons. However, we have no idea where they originate from. ...</br> | |||
[[Lurik]]: Rumours say that dragon lords, that roamed on this isle, were somehow turned into frost dragons when the great frost covered [[Okolnir]]. ...</br> | |||
[[Lurik]]: Travel to [[Okolnir]] and try to find a proof for the existence of dragon lords there in the old times. I think old [[Buddel]] might be able to bring you there.}} | |||
'''Após pegar a scale''' | |||
{{transcrições|npc=Lurik|texto= | |||
''Jogador:'' '''Hi'''</br> | |||
[[Lurik]]: Welcome, ''jogador''!</br> | |||
''Jogador:'' '''Mission'''</br> | |||
[[Lurik]]: A frozen dragon lord? This is just the information we needed! And you even brought a scale from it! Take these 5000 gold pieces as a reward. ...</br> | |||
[[Lurik]]: As you did such a great job, I might have another mission for you later.}} | |||
=== The Ice Music === | |||
Em [[Hrodmir]], existe uma cachoeira com várias stalagmites, e quando o vento bate nelas, produz um som. Sua '''mission''' é usar um [[Resonance Crystal]] para "gravar" esse som. | |||
Vá para as Barbarian Islands, e matando [[Mammoth]]s no caminho, siga esse mapa abaixo: | |||
<gallery mode="nolines"> | |||
Arquivo:explorericemusic1.png|Vá para sudoeste de Svargrond e suba a escada. | |||
Arquivo:explorericemusic2.png|Siga para oeste, desça a escada | |||
Arquivo:explorericemusic3.png|Vá um pouco para o Norte, e use o [[Resonance Crystal]] no [[Stalagmite (Object)|Stalagmite]] | |||
Arquivo:explorericemusic4.png|Após usar o [[Resonance Crystal]], você receberá a mensagem: '''"You recorded the ice music."''' | |||
</gallery> | |||
Simplesmente retorne até [[Lurik]] e entregue a sua missão. | |||
{{DASH|Como recompensa pelo seu excelente trabalho, você poderá usar os teletransportes astrais entre [[Svargrond]] e [[Liberty Bay]] com uma [[Orichalcum Pearl|orichalcum pearl]].}} | |||
'''Falando com Lurik em Svargrond''' | |||
'' | {{transcrições|npc=Lurik|texto= | ||
''Jogador:'' '''Hi'''</br> | |||
[[Lurik]]: Welcome, ''jogador''!</br> | |||
''Jogador:'' '''Mission'''</br> | |||
[[Lurik]]: Ah, yes, the mission. Let me tell you about something called ice music. ...</br> | |||
[[Lurik]]: There is a cave on [[Hrodmir]], north of the southernmost barbarian camp [[Krimhorn]]. ...</br> | |||
[[Lurik]]: In this cave, there are a waterfall and a lot of stalagmites. ...</br> | |||
[[Lurik]]: When the wind blows into this cave and hits the stalagmites, it is supposed to create a sound similar to a soft song. ...</br> | |||
[[Lurik]]: Please take this resonance crystal and use it on the stalagmites in the cave to record the sound of the wind.}} | |||
'''Após usar o cristal''' | |||
{{transcrições|npc=Lurik|texto= | |||
''Jogador:'' '''Hi'''</br> | |||
[[Lurik]]: Welcome, ''Jogador''!</br> | |||
''Jogador:'' '''Mission'''</br> | |||
[[Lurik]]: Ah! You did it! I can't wait to hear the sound... but I will do that in a silent moment. ...</br> | |||
[[Lurik]]: You helped as much in our research here. As a reward, you may use our astral portal in the upper room from now on. ...</br> | |||
[[Lurik]]: For just one orichalcum pearl, you can travel between Liberty Bay and Svargrond. Thank you again!}} | |||
== [[Arquivo:Atlas.gif|30px|link=]] Missões Adicionais [[Arquivo:Atlas.gif|30px|link=]] == | |||
Essas missões são independentes e não é preciso ter nenhum Rank na '''The Explorer Society Quest''' para fazê-las. A única ligação entre elas é que nas 3 missões, você pode vender a recompensa para os NPC's responsáveis por cada base da Explorer Society.</br> | |||
{{DASH|'''Nota:''' Estas missões podem ser feitas por jogadores free account.}} | |||
=== <span class="titulo-quest">Explorer Brooch</span> === | |||
Vá ao Jolly Axeman Tavern em [[Kazordoon]], no banheiro ao norte você verá 4 grades de esgoto, ({{mapa|32637,31873,9:2|aqui}}), desça, mate o [[Rat]] e pegue o [[Explorer Brooch]] no corpo. A única utilidade do brooch é poder retorná-lo nos postos da [[Explorer Society]] em [[Northport]] ou [[Port Hope]] por uma recompensa de 50 [[gp]]s. | |||
[[Arquivo:ExplorerBroochQuest.gif|link=]] | |||
'''Entregando o Explorer Brooch''' | |||
{{transcrições|npc=Mortimer|texto= | {{transcrições|npc=Mortimer|texto= | ||
''Jogador'' | ''Jogador:'' '''Brooch'''</br> | ||
[[Mortimer]]: | [[Mortimer]]: Our members travel to far away places and cross dangerous areas, many fall prey to enemies or the land ...</br> | ||
Sometimes the personal explorer brooches can be recovered. That way we learn about the fate of our members ...</br> | |||
We offer a reward for each brooch returned to us. Have you found an explorer brooch?</br> | |||
''Jogador:'' '''Yes'''</br> | |||
''Jogador'' | [[Mortimer]]: It's always a sad day when we learn about the death of a member. But at least we learnt about his fate. Thank you, here is your reward.}} | ||
[[Mortimer]]: | |||
=== <span class="titulo-quest">Giant Smithhammer</span> === | |||
Vá para [[Plains of Havoc]], desça as escadas do prédio {{mapa|32780,32234,7:2|aqui}}. Assim que você descer, você enfrentará vários [[Cyclops]], [[Minotaur]]s, [[Minotaur Guard]]s, [[Minotaur Mage]]s e até alguns [[Orc]]s. Neste local existem várias recompensas, incluindo a [[Giant Smithhammer]], que estão em baús, barris e comodas. | |||
[[Arquivo:Smithhammerquest.png|300px]] | |||
<span class="titulo-quest">'''Recompensas'''</span> | |||
* 01 [[Talon]] [[Arquivo:Talon.gif|link=]], 01 [[Giant Smithhammer]] [[Arquivo:Giant Smithhammer.gif|link=]] e 100 [[gp]]s [[Arquivo:Gold Coin.gif|link=]] podem ser encontrados em três baús {{mapa|32776,32253,8:2|aqui}}. | |||
* O livro [[Cyclops Complaint (Book)]] [[Arquivo:Black Book.gif|link=]] pode ser encontrado em uma [[Chest of Drawers]] [[Arquivo:Chest of Drawers.gif|link=]] {{mapa|32770,32245,8:2|aqui}}. | |||
* O livro [[Diary of Hengis Wulfson (Book)]] [[Arquivo:Black Book.gif|link=]] pode ser encontrado em um [[Barrel]] [[Arquivo:Barrel.gif|link=]] {{mapa|32786,32254,8:2|aqui}}. | |||
Não jogue o [[Giant Smithhammer]] fora, você pode retorná-lo nos postos da [[Explorer Society]] em [[Northport]] ou [[Port Hope]] por uma recompensa de 250 [[gp]]s. | |||
'''Entregando o Giant Smithhammer''' | |||
{{transcrições|npc=Mortimer|texto= | {{transcrições|npc=Mortimer|texto= | ||
''Jogador'' | ''Jogador:'' '''Hi'''</br> | ||
[[Mortimer]]: Greetings, what can I do for you?<br | [[Mortimer]]: Greetings, what can I do for you?</br> | ||
''Jogador'' | ''Jogador:'' '''Giant Smith Hammer'''</br> | ||
[[Mortimer]]: The explorer society is looking for a genuine giant smith hammer for our collection. It is rumoured the cyclopses of the [[Plains of Havoc]] might be using one. Did you by chance obtain such a hammer?<br | [[Mortimer]]: The explorer society is looking for a genuine giant smith hammer for our collection. It is rumoured the cyclopses of the [[Plains of Havoc]] might be using one. Did you by chance obtain such a hammer?</br> | ||
''Jogador'' | ''Jogador:'' '''Yes'''</br> | ||
[[Mortimer]]: Marvellous! You brought a giant smith hammer for the explorer society!}} | [[Mortimer]]: Marvellous! You brought a giant smith hammer for the explorer society!}} | ||
=== <span class="titulo-quest">Skull of Ratha</span> === | |||
{{DASH|'''Notas:''' | |||
* Há duas quests separadas no [[Amazon Camp]] de Venore. As duas foram unidas neste tópico. | |||
* Já que witches podem usar [[Fire Field]]s, é uma boa ideia trazer algumas runas de [[Destroy Field]] para caso seu caminho seja bloqueado.}} | |||
Nenhuma dessas quests é muito complicada. Talvez o único problema seja derrotar as criaturas que guardam as recompensas. | |||
[[Arquivo:Amazon Encampment Map.jpg]] | |||
Viaje através da saída noroeste de Venore, ({{mapa|32867,32032,6:2|aqui}}) vá para o Amazon Camp ao norte de [[Venore]], ({{mapa|32847,31926,7:2|aqui}}). O "Witch Hill" (onde está uma das quests) é localizado próximo ao centro do acampamento, ({{mapa|32846,31919,7:2|aqui}}). No círculo branco abaixo: | |||
<gallery mode="nolines" widths="246px" heights="246px"> | |||
Arquivo:rathaskull.png | |||
Arquivo:imgamazoncamp.png | |||
</gallery> | |||
Após derrotar 2 [[Witch]]es, 1 [[Valkyrie]] e 1 [[Lion]], abra as 2 caixas para obter 2 bags: uma com a [[Skull of Ratha]] e 1 [[White Pearl]] e outra com um [[Dwarven Ring]] e um [[Wolf Tooth Chain]].</br> | |||
Não jogue a [[Skull of Ratha]] fora, você pode retorná-la nos postos da [[Explorer Society]] em [[Northport]] ou [[Port Hope]] por uma recompensa de 250 [[gp]], outra recompensa está localizada no subterrâneo ao leste do "Witch Hill", ({{mapa|32870,31927,7:2|aqui}}), desça 1 nível dentro da "Witch House". No canto nordeste, está a recompensa, protegida por uma [[Witch]] e 3-5 [[Valkyrie]]s. | |||
Após derrotá-las, abra o baú para encontrar uma bag com 100 [[gp]], 2 [[Black Pearl]]s e um [[Crystal Necklace]]. | |||
'''Entregando a Skull of Ratha''' | |||
{{transcrições|npc=Mortimer|texto= | |||
''Jogador:'' '''Hi'''</br> | |||
[[Mortimer]]: Greetings, what can I do for you?</br> | |||
''Jogador:'' '''Skull Of Ratha'''</br> | |||
[[Mortimer]]: Ratha was a great explorer and even greater ladies' man. Sadly he never returned from a visit to the amazons. Probably he is dead ...</br> | |||
[[Mortimer]]: The society offers a substantial reward for the retrieval of Ratha or his remains. Do you have any news about Ratha?</br> | |||
''Jogador:'' '''Yes'''</br> | |||
[[Mortimer]]: Poor Ratha. Thank you for returning this skull to the society. We will see to a honourable burial of Ratha.}} | |||
}} | }} | ||

Edição atual tal como às 16h39min de 27 de maio de 2026
|
|
||||||||||||||||||||||||
| Recompensa: Achievements, Ice Pick, Spectral Stone, 06 Orichalcum Pearls, 01 Talon, 01 Crown Backpack, 50 platinum coins, 100 gps, 02 Black Pearls, Crystal Necklace, Dwarven Ring, Skull of Ratha, 01 White Pearl e Wolf Tooth Chain. Usar os teletransportes entre Port Hope e Northport, e entre Liberty Bay e Svargrond. Acesso a Calassa e Frozen Trench. Você pode comprar Atlas, Crown Backpacks e Orichalcum Pearls. |
||||||||||||||||||||||||
| Localização: Vários locais. Início nos representantes da Explorer Society Mortimer em Northport, (aqui |
||||||||||||||||||||||||
| Você enfrentará: Amazons, Banshees, Bonelords, Cyclops, Dark Magicians, Demon Skeletons, Dwarfs, Dwarf Guards, Dwarf Soldiers, Elephants, Elfs, Elf Scouts, Frost Dragons, Frost Dragon Hatchlings, Frost Trolls, Ghosts, Ghouls, Giant Spider, Hunters, possivelmente 01 Hydra lurada, Kongras, Mammoths, Minotaurs, Minotaur Archers, Minotaur Guards, Minotaur Mages, Monks, Mummies, Lizards Sentinel, Lizards Snakecharmer, Lizards Templar, Merlkins, Orcs, Orc Spearman, Orc Berserker, Orc Shaman, Orc Leader, Orc Rider, Orc Warlord, Quara Constrictor, Quara Mantassin, Quara Pincher, Quara Predator, Quara Hydromancer, Priestesses, Sibangs, Smugglers, Tarantulas, Terror Birds, Valkyries, Wild Warriors, Witches. |
||||||||||||||||||||||||
| Mini-Bosses: Nenhum. |
||||||||||||||||||||||||
| Bosses: Nenhum. |
||||||||||||||||||||||||
| Adicionado: Versão 7.6 (12 de dezembro de 2005) |
||||||||||||||||||||||||
|
||||||||||||||||||||||||
|
||||||||||||||||||||||||
Veja também: Quests.
Requerimentos
- Shovel ou Light Shovel ou uma Secret Agent Tool.
- Rope ou Elvenhair Rope ou magia Magic Rope.
- Magia Levitate.
- Key 3802 Obtida na Emperor's Cookies Quest.
- Key 3012.
- Amigos para ajudar em missões mais complicadas.
- Missão Formorgar Mines 3 da The Ice Islands Quest completa.
- Stealth Ring ou magia Invisible (Opcional).
- Missão The Way to Yalahar da In Service of Yalahar Quest (Opcional).
- The Queen of the Banshees Quest.
- Missão "Kiss From The Queen Of The Banshees" da Kissing a Pig Quest.
Método
Essa é uma quest longa e difícil. Algumas partes podem ser feitas em qualquer level, mas algumas missões requerem que você passe por lugares difíceis, como Dwacatra, Ulderek's Rock, profundezas de Banuta, Calassa e etc. Comece realizando a missão Joining the Explorers.
|
|
 Joining the Explorers - Modo Expresso
Para começar essa quest, visite a Tibian Explorer Society em Port Hope (aqui![]() ) ou Northport (aqui
) ou Northport (aqui![]() ), fale Hi - Join - Yes - Yes.
), fale Hi - Join - Yes - Yes.
Falando com Angus em Port Hope
 |
Jogador: Hi
Angus: Greetings, what can I do for you? |
| Nota: A cada ação feita com sucesso nas missões, a mensagem "Your questlog has been updated." aparecerá no seu Server Log e o texto encontrado no Quest Log será atualizado. |
Após falar Join para o NPC da Explorer Society, sua primeira missão será conseguir um Dwarven Pickaxe. Se quiser economizar tempo, é possível encontrar o Dwarven Pickaxe em respawns diários na Pick 'N Shovel Mine a oeste de Kazordoon ou comprar um diretamente no mercado. Quando conseguir o item, basta entrega-lo ao NPC Angus em Port Hope ou Mortimer em Northport e você já terá completado a missão Joining the Explorers, podendo iniciar as outras missões da quest.
Entregando o Dwarven Pickaxe
|
Jogador: Hi
Angus: Greetings, what can I do for you? |
Você é agora um membro oficial da Tibian Explorer Society. Agora você pode iniciar as próximas missões da quest, basta falar mission para o NPC com o qual você iniciou a quest.
|
|
|
|
Joining the Explorers - Modo RPG
Para começar essa quest, visite a Tibian Explorer Society em Port Hope (aqui![]() ) ou Northport (aqui
) ou Northport (aqui![]() ), fale Hi - Join - Yes - Yes.
), fale Hi - Join - Yes - Yes.
Falando com Angus em Port Hope
|
Jogador: Hi
Angus: Greetings, what can I do for you? |
| Nota: A cada ação feita com sucesso nas missões, a mensagem "Your questlog has been updated." aparecerá no seu Server Log e o texto encontrado no Quest Log será atualizado. |
Após falar Join para o NPC da Explorer Society, sua primeira missão será conseguir um Dwarven Pickaxe. Vá para Kazordoon e fale com Uzgod, o comerciante de armas (embaixo do Depot).
Peça a ele uma Dwarven Pickaxe. Ele vai dizer que já tem muitas encomendas, mas se você recuperar seu Family Brooch, ele te dará a Dwarven Pickaxe. O Family Brooch está em Dwacatra, a prisão de Kazordoon.
Para entrar em Dwacatra, você precisa pegar uma chave. Mas para isso, você precisa de mais duas chaves que estão perto da sala do trono.

A primeira (Key 3800) está no final do corredor secreto

A segunda (Key 3801) está em um quarto trancado, abra a porta com a Key 3800 e pegue a chave na caixa (o local está indicado na imagem acima). A última (Key 3802) está em um quarto três andares abaixo da sala do trono, próximo ao depósito de armas. Você precisa da Key 3801 para abrir essa porta. Desça três andares e vá para Noroeste. Você verá uma cama com um baú próximo. Use a Key 3801 para abrir a porta caso esteja trancada.
Localização da (Key 3802)

Quando tiver a Key 3802, você pode entrar em Dwacatra. A entrada da Prisão fica perto da entrada de Kazordoon.

Entrada para a Prisão

Em Dwacatra, desça o buraco (IMPORTANTE: Você precisa de shovel) próximo ao poço e abra a caixa atrás da porta. Você vai ter que enfrentar um grande número de Orcs, Orc Spearman, Minotauros, Minotaur Archers, Dwarves, Dwarf Soldiers, Dwarf Guards, alguns Cyclopes, e talvez um Minotaur Mage ou Orc Berserker. Vá devagar para não ser cercado.

Vá até o círculo e desça o buraco

CUIDADO! Após descer nesse buraco você ficará em um pequeno espaço que contem 3 Dwarf Soldiers e 1 Dwarf Guards.
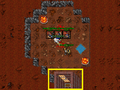
Baú onde se encontra o brooch

Quando terminar, volte até Uzgod, e diga que encontrou seu brooch. Ele vai te entregar a Dwarven Pickaxe. Volte para a Explorer Society e entregue a Dwarven Pickaxe (pode ser em Northport ou Port Hope).
Você é agora um membro oficial da Tibian Explorer Society. Agora você pode iniciar as próximas missões da quest, basta falar mission para o NPC com o qual você iniciou a quest.
Falando com Uzgod em Kazordoon
 |
Jogador: Hi
Uzgod: Hiho jogador! Wanna weapon, eh? |
Após pegar o brooch
|
Falando com Angus em Port Hope
|
Jogador: Hi
Angus: Greetings, what can I do for you? |
|
|
|
|
Missões
A partir de agora você deverá realizar missões para a The Explorer Society, as missões são dividas em ranks. Conforme você completar as missões de cada rank, você será promovido e novas missões serão liberadas. Os ranks são:
Obs:
|
Rank I: The Ice Delivery
Essa missão requer que você use uma Ice Pick especial, e colete um pouco de gelo da ilha de Folda. O gelo está na forma de Icicle. O Icicle derrete rapidamente (em 10 minutos), então você deve se apressar quando pegá-lo. É recomendado que você pegue esta missão da Explorer Society em Northport, já que é mais próximo das Ice Islands.
Pegue a Ice Pick pedindo mission, vá para Folda, e entre na caverna principal (aqui![]() ).
).
Pedindo a missão
Falando com Angus em Port Hope
|
Jogador: Hi
Angus: Greetings, what can I do for you? |
Os mapas que seguem mostram o caminho mais curto para o gelo. Você enfrentará Frost Trolls, Rotworms, Minotaurs, Minotaur Archers, e talvez alguns Slimes. Mate tudo no seu caminho, e se você for rápido eles não renascerão e não irão atrasá-lo na volta.

Logo que entrar na caverna desça a escada

Vá até o fim da linha e use a pick no gelo


Leve o Icicle de volta para a Explorer Society, e diga ice delivery. Se o Icicle derreter, fale com o NPC e ele te dará outra chance.
Entregando o Icicle
|
Rank I: The Butterfly Hunt
Para esta missão, a Explorer Society procura por espécimes frescas de certas borboletas. Para cada borboleta]] você receberá um Butterfly Conservation Kit para coletar um corpo morto recentemente das diferentes borboletas. Para começar esta missão fale Hi - Mission - Butterfly Hunt - Yes com Angus em Port Hope ou Mortimer em Northport conforme o NPC que você falou para iniciar a quest.
Falando com Angus em Port Hope
|
Jogador: Hi
Angus: Greetings, what can I do for you? |
Dicas:
|
No mapa abaixo, se você preferir matar as borboletas em Port Hope, veja a localização (apenas uma suposição já que elas obviamente mudam de lugar) das borboletas:

Siga a legenda abaixo

 Borboleta Roxa: Número 1
 Borboleta Azul: Número 2
 Borboleta Vermelha: Número 3
Borboleta Roxa
Primeiro, você precisará achar uma borboleta roxa. Essas são as mais comuns, e podem ser vistas em toda a área de pântano ao Norte de Port Hope, a área gramada ao Sul de Port Hope, como em muitos outros lugares em todo o Tibia. Abaixo imagem no Cormaya Garden.

Após coletar o corpo da borboleta roxa, retorne até Angus ou Mortimer e fale Hi - Butterfly Hunt - Yes para entregar o corpo da borboleta e em seguida fale Butterfly Hunt novamente para receber um novo Butterfly Conservation Kit, o NPC irá dizer que agora você precisa coletar o corpo de uma borboleta azul.
Entregando o corpo da borboleta roxa
|
Jogador: Hi
Angus: Greetings, what can I do for you? |
Borboleta Azul
Segundo, você precisará achar uma borboleta azul. Essas são mais difíceis de localizar, mas são encontradas perto de Port Hope, geralmente com borboletas roxas. Elas são vistas ao longo das costas Norte e Sul de Port Hope, nos arredores de Tiquanda, na mata ao Norte de Port Hope, e ao longo do rio dentro da floresta de Tiquanda. Há também uma borboleta azul na pequena montanha perto do barco em Cormaya, em Meriana e no Well of Life na Pits of Inferno. Abaixo imagem no Jardim de Cormaya.

Após coletar o corpo da borboleta azul, retorne até Angus ou Mortimer e fale Hi - Butterfly Hunt - Yes para entregar o corpo da borboleta e em seguida fale Butterfly Hunt novamente para receber um novo Butterfly Conservation Kit, o NPC irá dizer que agora você precisa coletar o corpo de uma borboleta vermelha.
Entregando o corpo da borboleta azul
|
Jogador: Hi
Angus: Greetings, what can I do for you? |
Borboleta Vermelha
Terceiro, você precisará achar uma borboleta vermelha. A maioria das pessoas têm problemas com essa parte. Não parece ter um lugar "normal" para essas borboletas aparecerem, mas elas podem ser vistas nas bordas das florestas ao Norte e Sul de Port Hope e neste respaw a sudeste da cidade (aqui![]() ) em Trapwood perto da cidade, Sudoeste de Banuta, e ao longo do rio em Tiquanda, em toda Vandura (em Liberty Bay e ao sul de Liberty Bay) em Vandura e no Well of Life na Pits of Inferno. Também, algumas podem ser encontradas na entrada de Chor e em Yalahar. Na imagem abaixo, uma borboleta vermelha ao Sul de Tiquanda.
) em Trapwood perto da cidade, Sudoeste de Banuta, e ao longo do rio em Tiquanda, em toda Vandura (em Liberty Bay e ao sul de Liberty Bay) em Vandura e no Well of Life na Pits of Inferno. Também, algumas podem ser encontradas na entrada de Chor e em Yalahar. Na imagem abaixo, uma borboleta vermelha ao Sul de Tiquanda.

Após coletar o corpo da borboleta vermelha, retorne até Angus ou Mortimer e fale Hi - Butterfly Hunt - Yes para entregar o corpo da borboleta, assim terminando a missão.
Entregando o corpo da borboleta vermelha
|
Rank I: The Plant Collection
Para esta missão você precisa coletar amostras de três tipos diferentes de plantas selvagens numa ordem específica. Para cada planta será lhe dado um Botanist's Container, para utilizar na coleta da amostra da planta. Para começar esta missão fale Hi - Mission - Plant Collection - Yes com Angus em Port Hope ou Mortimer em Northport conforme o NPC que você falou para iniciar a quest.
Falando com Angus em Port Hope
|
Jogador: Hi
Angus: Greetings, what can I do for you? |
Jungle Bells Plant ![]()
Primeiro, você precisa encontrar uma amostra de uma Jungle Bells Plant. Estas podem ser encontradas no solo ao longo do lado Sul de Port Hope muito próximo da cidade, e dentro de Tiquanda na Selva Norte de Port Hope. Alguns foram vistos (aqui![]() ), (aqui
), (aqui![]() ) e (aqui
) e (aqui![]() ). Jungle bells também estão localizadas no Well of Life na Pits of Inferno.
). Jungle bells também estão localizadas no Well of Life na Pits of Inferno.

Você pode encontrar aqui, no Sul da cidade

Ou aqui, próximo da Witches Cauldron


Entregando a amostra de Jungle Bells
|
Jogador: Hi
Angus: Greetings, what can I do for you? |
Witches Cauldron Plant 
Em segundo lugar, é preciso encontrar uma amostra de uma Witches Cauldron Plant. Estas encontram-se um pouco mais profundamente na selva de Tiquanda. O jeito mais fácil de se localizar é ao longo do rio. Vá para Leste de Port Hope no lado Norte do rio e siga o rio em direção ao Norte. Elas podem ser encontradas à Norte de um acampamento com Skeletons (aproximadamente (aqui![]() ). Outro local, à Nordeste da Explorer Society em Port Hope (aqui
). Outro local, à Nordeste da Explorer Society em Port Hope (aqui![]() ). Também são encontradas no Well of Life na Pits of Inferno. O local mais próximo da base da Explorer Society é este: (aqui
). Também são encontradas no Well of Life na Pits of Inferno. O local mais próximo da base da Explorer Society é este: (aqui![]() ).
).

Essa fica próxima da Jungle Bells

Entregando a amostra de Witches Cauldron
|
Jogador: Hi
Angus: Greetings, what can I do for you? |
Giant Jungle Rose 
Finalmente, é preciso encontrar uma amostra de Giant Jungle Rose. Uma pode ser encontrada perto do rio no caminho das witches cauldron descrito acima (aqui![]() ). Giant jungle rose também são encontradas no Well of Life na Pits of Inferno.
). Giant jungle rose também são encontradas no Well of Life na Pits of Inferno.

Sul das outras duas

Entregando a amostra de Jungle Rose
|
Rank II: The Lizard Urn
A Explorer está pedindo para você obter um Funeral Urn sagrado da vila de lagartos em Chor, para suas pesquisas. Para começar esta missão fale Hi - Mission - Lizard Urn - Yes com Angus em Port Hope ou Mortimer em Northport conforme o NPC que você falou para iniciar a quest. Pelo grande número de lizards, é aconselhável usar GFB e Stealth Ring (ou Magia Invisible).
Falando com Angus em Port Hope
|
Jogador: Hi
Angus: Greetings, what can I do for you? |
Vá para Chor, você encontrará todos tipos de lizards de classe baixa: Lizards Sentinel, Lizards Snakecharmer e Lizards Templar. Os lagartos não são difíceis, mas a quantidade presente no local é grande, então é bom levar alguns Stealth Rings e GFBs com você... Mate primeiro os Lizards Snakecharmer, porque eles podem ser uma verdadeira dor-de-cabeça com as suas cobras sumonadas.
O melhor caminho para chegar em Chor é ir pelas montanhas em Ankrahmun. Quando você estiver na floresta, vá (aqui![]() ), e então atravesse a passagem pela montanha (aqui
), e então atravesse a passagem pela montanha (aqui![]() ). Os mapas abaixo mostram o caminho desde Ankrahmun até a Funeral Urn, outra boa opção é se você tiver o rank de Ranger na Paw and Fur - Hunting Elite Quest, assim você poderá pegar o atalho pelo barco do NPC Lorek, e pelo custo de 50 gp, ele o levará para Chor. O Funeral Urn fica localizado em um templo, bem no centro da vila (aqui
). Os mapas abaixo mostram o caminho desde Ankrahmun até a Funeral Urn, outra boa opção é se você tiver o rank de Ranger na Paw and Fur - Hunting Elite Quest, assim você poderá pegar o atalho pelo barco do NPC Lorek, e pelo custo de 50 gp, ele o levará para Chor. O Funeral Urn fica localizado em um templo, bem no centro da vila (aqui![]() ). Desça a escada e mate alguns Lizard Snakecharmers.
). Desça a escada e mate alguns Lizard Snakecharmers.

Vá para Oeste de Ankrahmun e suba

Mate algumas Hyaenas no caminho e suba

Siga o caminho

Siga o caminho

Siga o caminho

Vá pela linha vermelha e vá pela passagem na montanha

Descendo a escada, siga a linha preta e desça a escada


Passe pela porta e pegue a urna

Quando pegar a Funeral Urn, volte até a Explorer Society e reporte sua missão falando Hi - Lizard Urn - Yes.
Reportando a missão
|
Rank II: The Bonelord Secret
A Explorer Society acredita que a pirâmide à nordeste de Darashia foi construída por Bonelords.
Sua missão é ir até a Daramian Minotaur Pyramid e pegar um Wrinkled Parchment. Lá você enfrentará todos os tipos de minotauros, então é bom ter um pouco de cuidado se você é level baixo. Siga os mapas até o local:


Volte para a Explorer Society e fale para ele que você conseguiu o "Bonelord Secrets (Wrinkled Parchment)".
Falando com Angus em Port Hope
|
Jogador: Hi
Angus: Greetings, what can I do for you? |
Reportando a missão
|
Rank II: The Orc Powder
| Obs: Se você quiser, pode comprar o item Strange Powder |
A Explorer Society quer que você vá e pegue um pó usado pelos orcs para fazer os Orc Berserkers e Orc Riders ficarem "loucos".
Okay, vá para Ulderek's Rock, no caminho você irá lutar contra vários tipos de orcs. Quando estiver na fortaleza, vá até o círculo vermelho no mapa abaixo:

Subindo a rampa você encontrará diversos orcs, na maior parte Orc Leaders e Orc Warlords. Após subir 5 andares você encontrará a porta. Abra o baú e você encontrará o Orc Powder.
Volte até a Explorer para completar a missão.
Rank: Journeyman completo!
Falando com Angus em Port Hope
|
Jogador: Hi
Angus: Greetings, what can I do for you? |
Reportando a missão
|
Rank III: The Elven Poetry
Fale Hi - Mission - Elven Poetry - Yes para Angus ou Mortimer, agora a Explorer Society quer estudar os poetas élficos. Sua missão será pegar um livro no Hellgate.
Falando com Angus em Port Hope
|
Jogador: Hi
Angus: Greetings, what can I do for you? |
Você irá precisar da chave 3012. Ao conseguir, vá pelo Hellgate seguindo o caminho nos mapas abaixo para chegar na área dos elfos. Quando descer, siga o mapa abaixo, passe pela porta e pegue seu livro Songs of the Forest. Você enfrentará alguns Elfs e Elf Scouts. Assim que você tiver o livro, retorne para a Explorer Society.
| Obs: Caso não saiba sair de Hellgate veja Rota:Hellgate. |
| Obs 2: Caso tenha pego o Elven Poetry Book no Baú, e perdeu, você pode comprar outro com o NPC Elvith por 500gps durante a quest, falando "Elven Poetry". |
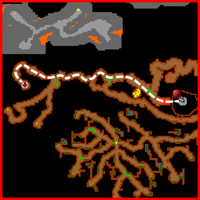
Dentro do Hellgate, vá para Oeste
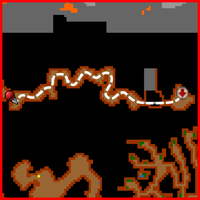
Vá para Leste
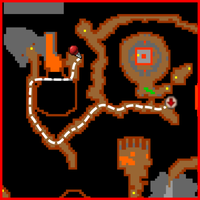
Siga a seta e desça
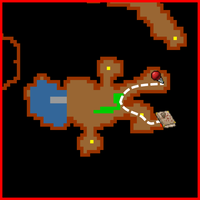
Localização do livro Songs of the Forest.


Reportando a missão
|
Rank III: The Memory Stone
A Explorer quer algumas pedras mágicas usadas por povos antigos como uma maneira de escrita. O local fica no Norte de Edron, próximo do caminho para os demons.
| Nota: Não adianta comprar a memory stone com o black bert, Angus não aceita dizendo: "This memory stone looks damaged. Probably you bought it from some suspicious individual. Travel to Edron and get one on your own.". |
Vá para a Edron Northern Ruins e entre (aqui![]() ).
Enfrentando Demon Skeletons, Wild Warriors, Priestess e Bonelords, siga o mapa abaixo:
).
Enfrentando Demon Skeletons, Wild Warriors, Priestess e Bonelords, siga o mapa abaixo:


Siga a linha pontilhada até encontrar as duas escadas, uma subindo e outra descendo, mas vá para BAIXO e a Memory Stone vai estar simplesmente à sua direita.
Após pegá-la, simplesmente volte até a Explorer Society.
Falando com Angus em Port Hope
|
Jogador: Hi
Angus: Greetings, what can I do for you? |
Entregando a pedra
|
Rank III: The Rune Writings
A Explorer Society quer estudar antigas runas usadas pela sociedade dos lagartos e quer sua ajuda, para começar esta missão fale Hi - Mission - Rune Writings - Yes com Angus em Port Hope ou Mortimer em Northport conforme o NPC que você falou para iniciar a quest.
Falando com Angus em Port Hope
|
Jogador: Hi
Angus: Greetings, what can I do for you? |
Vá para Banuta e desça (aqui![]() ). Você encontrará primatas durante todo o caminho. Vá da seta azul para a amarela. Siga a linha e use o pedaço de papel na atypical structure no Norte da sala.
). Você encontrará primatas durante todo o caminho. Vá da seta azul para a amarela. Siga a linha e use o pedaço de papel na atypical structure no Norte da sala.
| Nota: Ao usar o papel na estrutura aparecerá a mensagem "Your questlog has been updated." no Server Log. |


Volte até a Explorer Society e entregue a sua missão.
Reportando a missão
|
Rank IV: The Ectoplasm
A Explorer Society está trabalhando na criação de portais astrais. Sua missão é simples. Você ganhará um Ectoplasm Container, e deverá usar em um ghost recentemente morto.
Mate um ghost e então use o Ectoplasm Container. Retorne até a Explorer Society após concluir sua missão.
Falando com Angus em Port Hope
|
Jogador: Hi
Angus: Greetings, what can I do for you? |
Quando pegar o ectoplasma
|
Rank IV: The Spectral Dress
Os estudos da Explorer Society com portais astrais estão tendo progresso. Agora eles precisam de algum objeto astral. Um Spectral Dress será de grande utilidade, e você deverá pedir um para a The Queen Of The Banshees, que mora em Ghostlands.
Falando com Angus em Port Hope
|
Jogador: Hi
Angus: Greetings, what can I do for you? |
Primeiro vá a Ghostlands e entre no buraco mostrado (aqui![]() ), vá para o sul e entre em outro buraco, lá encontrará Skeletons, Ghouls e algumas Poison Spiders. Prossiga para sudeste e desça o buraco, continue indo para a direita e você encontrará duas Magic Walls. Para removê-las você precisa usar duas alavancas, uma alavanca está ao leste e outra está a oeste, caso esteja fazendo a quest em grupo, é recomendável que um jogador vá para cada alavanca e assim poupar tempo.
), vá para o sul e entre em outro buraco, lá encontrará Skeletons, Ghouls e algumas Poison Spiders. Prossiga para sudeste e desça o buraco, continue indo para a direita e você encontrará duas Magic Walls. Para removê-las você precisa usar duas alavancas, uma alavanca está ao leste e outra está a oeste, caso esteja fazendo a quest em grupo, é recomendável que um jogador vá para cada alavanca e assim poupar tempo.
Dicas:
|


 |
Nota: Caso as alavancas estejam viradas para a direita e as Magic Walls também estejam ativas, significa que outros jogadores já passaram pela área para fazer a quest, neste caso apenas acione as alavancas novamente de modo que fiquem viradas para a direita, removendo as Magic Walls. |
|
Alavanca da Esquerda Para ativar a alavanca da esquerda você tem que passar por muitos Scorpions, 3 Demon Skeletons e alguns Ghouls e na sala da alavanca há 2 Bonelords, 1 Demon Skeleton, 2-3 Stalkers e Ghouls. Agora suba as escadas e desça novamente na escada no centro da sala e encontre a alavanca no canto superior direito da sala. |
Alavanca da Direita Para ativar a alavanca da direita você tem que passar por muitas Poison Spiders, passe por elas e desça as escadas a direita (Não é possível retornar!). Na sala há uma Giant Spider, você pode enfrentá-la ou correr para a alavanca e em seguida descer as escadas a direita novamente, você estará em um túnel de retorno para sala das Poison Spiders. |


Depois das Magic Walls, desça o buraco (o teleport é para voltar caso as Magic Walls tenham se fechado). Vá para o norte dessa sala. Você encontrará Mummies, Ghosts, Demon Skeletons e Stalkers. O livro que você pode pegar no corpo faz parte da The White Raven Monastery Quest. Após matar as criaturas, suba no Poison Gas ao leste do corpo para surgir uma alavanca, use a alavanca e desça a escada que irá aparecer.


Agora você estará em uma sala com um teleport ao sul, ao passar por ele você entrará em um corredor fino e longo com um teleport ao norte (O teleport te levará para fora das Magic Walls.), vá para o sul, há um teleport invisível que fica fazendo você voltar para o início. Use a pick (aqui![]() ), desça e vá para o sul, use uma rope e continue indo para o sul. No final do corredor, vá para esquerda, suba a rampa e desça novamente, você estará em uma sala redonda. Nesta sala você encontrará 3 Ghosts, 3 Stalkers e 4 Demon Skeletons, desça as escadas.
), desça e vá para o sul, use uma rope e continue indo para o sul. No final do corredor, vá para esquerda, suba a rampa e desça novamente, você estará em uma sala redonda. Nesta sala você encontrará 3 Ghosts, 3 Stalkers e 4 Demon Skeletons, desça as escadas.
Vá pelas escadas. Desça pelas escadas à nordeste daqui. Você passará por: Ghosts, Stalkers, Demon Skeletons e muitos Scorpions. Desça as escadas à sudoeste daqui. No caminho você encontrará muitas Banshees. O Spectral Dress é localizado (aqui![]() ) atrás de uma porta selada, mas para pegá-lo, você precisa falar com a The Queen Of The Banshees antes. Vá para as escadas ao norte e suba (aqui há mais Banshees), desça as escadas e siga o caminho para as escadas ao sul e suba, aqui você encontrará Ghosts e Demon Skeleton, vá para o norte desta sala, suba as escadas e vá para leste e em seguida para o norte e desça, aqui você encontrará Banshees, Ghosts, Mummies e Stalkers e a NPC The Queen Of The Banshees.
) atrás de uma porta selada, mas para pegá-lo, você precisa falar com a The Queen Of The Banshees antes. Vá para as escadas ao norte e suba (aqui há mais Banshees), desça as escadas e siga o caminho para as escadas ao sul e suba, aqui você encontrará Ghosts e Demon Skeleton, vá para o norte desta sala, suba as escadas e vá para leste e em seguida para o norte e desça, aqui você encontrará Banshees, Ghosts, Mummies e Stalkers e a NPC The Queen Of The Banshees.


Fale Hi - Spectral Dress com a The Queen Of The Banshees, ela vai dizer que você pode pegar o vestido, volte pelo mesmo caminho (veja as imagens). Depois de pegar o Spectral Dress, volte para a Explorer Society.
Falando com a The Queen of the Banshees
 |
Jogador: Hi
The Queen Of The Banshees: Be greeted, dear visitor. Come and stay ... a while. |
Entregando a missão
|
Rank IV: The Spectral Stone
Okay, pegue a missão em Port Hope ou Northport.
O NPC (Angus ou Mortimer) vai pedir para você viajar até a outra base (Northport ou Port Hope) e pegar as últimas notas de pesquisa falando mission. Quando fizer, volte até a base onde você pediu a missão.
Os passos finais para ativar o portal astral estão no final. Voltando para a base, peça novamente uma mission. O NPC da base escolhida lhe entregará uma Spectral Stone.
Sua missão será usar essa pedra no andar superior da base onde você está, e usar também na outra base.
A imagem abaixo mostra o jogador usando a pedra em Northport e depois em Port Hope.

Falando com Angus em Port Hope
|
Jogador: Hi
Angus: Greetings, what can I do for you? |
Falando com Mortimer em Northport
 |
Falando com Angus em Port Hope
|
Jogador: Hi
Angus: Greetings, what can I do for you? |
Rank IV: The Astral Portals
Desça e fale com o Angus ou Mortimer (dependendo da base escolhida) e fale mission. Ele irá dizer que ambos os pisos estão carregados e harmonizados.
Falando com Angus em Port Hope
|
Jogador: Hi
Angus: Greetings, what can I do for you? |
Recompensa
Após completar todas missões dos Ranks I a IV você irá receber as seguintes recompensas:
- 06 Orichalcum Pearls

- 01 Crown Backpack

- 50 Platinum coins

- Direito de usar os teletransportes entre Port Hope e Northport.
- Pode comprar os seguintes itens com os NPCs Angus ou Mortimer:
- Atlas

- Crown Backpacks
- Orichalcum Pearls por 80 gps cada.
- Atlas
Após completar todas as missões, incluindo as missões secundárias abaixo, você terá os seguintes benefícios:
- Direito de usar os teletransportes entre Liberty Bay e Svargrond.
- Acesso a Calassa e Frozen Trench.
| Nota: Para que essa quest fique como completada no Quest Log, você deverá fazer as missões secundárias. |
Missões Secundárias
The Undersea Kingdom
Vá até Liberty Bay e fale com Berenice. Ela vai contar que um navio da Explorer estava investigando o lar das quaras, mas afundou, e o motivo não é conhecido. Sua missão será recuperar um livro no fundo do mar, com anotações sobre essa estranha raça.
Você irá precisar de pick e 5,000 gps para alugar um Helmet of the Deep. Além disso, você precisa ter o rank de Relic Hunter para conseguir a missão com a Berenice.
Quando pegar a missão, vá até o Capitão Max no cais, e peça para ir até Calassa por 200 gps. Chegando lá, você poderá alugar um Helmet of the Deep por 5,000 gps, caso você ainda não tenha um.
| Nota: O capacete de mergulho pesa 210 oz., então não esqueça de ter capacidade. |
Okay, coloque o capacete na cabeça e pule na água. Fique preparado para enfrentar vários tipos de quaras e Massive Water Elementals. Lembre-se que embaixo d'água, você anda muito devagar.
Vá para o Sul, depois Leste. Você verá um navio destruído. Use a pick na escotilha de madeira, e então uma escada irá aparecer.

Vá até o navio destruído, enfrentando Todo tipo de Quaras e Massive Water Elemental
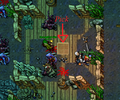
Use a Pick no local indicado e desça, enfrentando 2 Quara Constrictors e 3 Quara Hydromancers.

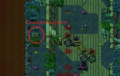
Vá para o norte, passe pela porta e pegue o Damaged Logbook


Retorne até Berenice e entregue o Damaged Logbook.
Berenice em Liberty Bay
|
Jogador: Hi
Berenice: Greetings, what can I do for you? |
Após pegar o livro
|
Jogador: Hi
Berenice: Greetings, what can I do for you? |
The Frozen Trench
Para ganhar o direito de fazer essa missão, complete a missão acima (The Undersea Kingdom). Além disso, complete até pelo menos a missão "Formorgar Mines 3" da The Ice Islands Quest. Você precisará da magia levitate ou parcels, e um Helmet of the Deep.
Vá até Lurik em Svargrond, e peça uma mission. Ele lhe mandará investigar o que aconteceu com um explorador que se perdeu em uma missão para explorar a Frozen Trench.
Certo, fale com Buddel para levá-lo até Tyrsung. Uma vez em Tyrsung, siga para o Sul até um acampamento com smugglers. No ponto mais ao Sul da ilha, haverá um navio encalhado. Dirija-se para cima do navio, coloque seu Helmet of the Deep, e pule na água usando a prancha na parte Sul do navio.

Você enfrentará Quara Constrictors e Quara Mantassins. Dirija-se para o sul até que você encontre um penhasco para usar levitate.
Após descer no penhasco, vá para o oeste até encontrar uma caverna ao norte. Continue indo para o norte até encontrar um frozen human e pare na frente dele, ele é guardado por um Quara Predator. Uma mensagem irá aparecer dizendo que você encontrou um ser humano congelado e que você deve relatar isso ao Lurik.


Lurik em Svargrond
|
Jogador: Hi
Lurik: Welcome, jogador! |
Após concluir a missão
|
Jogador: Hi
Lurik: Welcome, jogador! |
The Island of Dragons
A Explorer Society quer descobrir como surgiram os Frost Dragons em Okolnir. Encontre alguma prova que antes existiu Dragon Lords na ilha.
Após pedir a missão para Lurik em Svargrond, vá para Okolnir. Siga o mapa abaixo:

Quando chegar em Okolnir no barco, vá para o Sul e suba

Enfrentando Frost Dragons e Frost Dragon Hatchlings, vá até a escada à Leste e desça
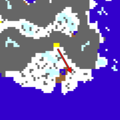
Você encontrará mais Frost Dragons, vá para o Sul e desça no buraco camuflado.

No buraco haverá mais Frost Dragons, vá para o Sul e use a sua Pick no buraco escondido

Vá até o final da sala, você verá um dragão lord congelado, clique nele e pegue a Scale from a Frozen Dragon


Retorne até Lurik e entregue a Scale from a Frozen Dragon, ele lhe dará 50 Platinum Coins como recompensa.
Lurik em Svargrond
|
Jogador: Hi
Lurik: Welcome, jogador! |
Após pegar a scale
The Ice Music
Em Hrodmir, existe uma cachoeira com várias stalagmites, e quando o vento bate nelas, produz um som. Sua mission é usar um Resonance Crystal para "gravar" esse som.
Vá para as Barbarian Islands, e matando Mammoths no caminho, siga esse mapa abaixo:

Vá para sudoeste de Svargrond e suba a escada.
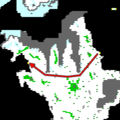
Siga para oeste, desça a escada

Vá um pouco para o Norte, e use o Resonance Crystal no Stalagmite
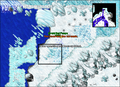
Após usar o Resonance Crystal, você receberá a mensagem: "You recorded the ice music."


Simplesmente retorne até Lurik e entregue a sua missão.
| Como recompensa pelo seu excelente trabalho, você poderá usar os teletransportes astrais entre Svargrond e Liberty Bay com uma orichalcum pearl. |
Falando com Lurik em Svargrond
|
Jogador: Hi
Lurik: Welcome, jogador! |
Após usar o cristal
|
Jogador: Hi
Lurik: Welcome, Jogador! |
Missões Adicionais
Essas missões são independentes e não é preciso ter nenhum Rank na The Explorer Society Quest para fazê-las. A única ligação entre elas é que nas 3 missões, você pode vender a recompensa para os NPC's responsáveis por cada base da Explorer Society.
| Nota: Estas missões podem ser feitas por jogadores free account. |
Explorer Brooch
Vá ao Jolly Axeman Tavern em Kazordoon, no banheiro ao norte você verá 4 grades de esgoto, (aqui![]() ), desça, mate o Rat e pegue o Explorer Brooch no corpo. A única utilidade do brooch é poder retorná-lo nos postos da Explorer Society em Northport ou Port Hope por uma recompensa de 50 gps.
), desça, mate o Rat e pegue o Explorer Brooch no corpo. A única utilidade do brooch é poder retorná-lo nos postos da Explorer Society em Northport ou Port Hope por uma recompensa de 50 gps.

Entregando o Explorer Brooch
|
Jogador: Brooch
Mortimer: Our members travel to far away places and cross dangerous areas, many fall prey to enemies or the land ... |
Giant Smithhammer
Vá para Plains of Havoc, desça as escadas do prédio aqui![]() . Assim que você descer, você enfrentará vários Cyclops, Minotaurs, Minotaur Guards, Minotaur Mages e até alguns Orcs. Neste local existem várias recompensas, incluindo a Giant Smithhammer, que estão em baús, barris e comodas.
. Assim que você descer, você enfrentará vários Cyclops, Minotaurs, Minotaur Guards, Minotaur Mages e até alguns Orcs. Neste local existem várias recompensas, incluindo a Giant Smithhammer, que estão em baús, barris e comodas.

Recompensas
- 01 Talon
 , 01 Giant Smithhammer
  e 100 gps
  podem ser encontrados em três baús aqui
 .
. - O livro Cyclops Complaint (Book)
 pode ser encontrado em uma Chest of Drawers
  aqui.
aqui. - O livro Diary of Hengis Wulfson (Book) pode ser encontrado em um Barrel
 aqui.
aqui.
Não jogue o Giant Smithhammer fora, você pode retorná-lo nos postos da Explorer Society em Northport ou Port Hope por uma recompensa de 250 gps.
Entregando o Giant Smithhammer
|
Jogador: Hi
Mortimer: Greetings, what can I do for you? |
Skull of Ratha
Notas:
|
Nenhuma dessas quests é muito complicada. Talvez o único problema seja derrotar as criaturas que guardam as recompensas.

Viaje através da saída noroeste de Venore, (aqui![]() ) vá para o Amazon Camp ao norte de Venore, (aqui
) vá para o Amazon Camp ao norte de Venore, (aqui![]() ). O "Witch Hill" (onde está uma das quests) é localizado próximo ao centro do acampamento, (aqui
). O "Witch Hill" (onde está uma das quests) é localizado próximo ao centro do acampamento, (aqui![]() ). No círculo branco abaixo:
). No círculo branco abaixo:


Após derrotar 2 Witches, 1 Valkyrie e 1 Lion, abra as 2 caixas para obter 2 bags: uma com a Skull of Ratha e 1 White Pearl e outra com um Dwarven Ring e um Wolf Tooth Chain.
Não jogue a Skull of Ratha fora, você pode retorná-la nos postos da Explorer Society em Northport ou Port Hope por uma recompensa de 250 gp, outra recompensa está localizada no subterrâneo ao leste do "Witch Hill", (aqui![]() ), desça 1 nível dentro da "Witch House". No canto nordeste, está a recompensa, protegida por uma Witch e 3-5 Valkyries.
), desça 1 nível dentro da "Witch House". No canto nordeste, está a recompensa, protegida por uma Witch e 3-5 Valkyries.
Após derrotá-las, abra o baú para encontrar uma bag com 100 gp, 2 Black Pearls e um Crystal Necklace.
Entregando a Skull of Ratha
|
Jogador: Hi
Mortimer: Greetings, what can I do for you? |