|
|
|
||||||||||||||||||||||||


Grimvale Quest: mudanças entre as edições
| [edição aprovada] | [edição aprovada] |
| Linha 1 202: | Linha 1 202: | ||
Sobre '''Sacrifice''', Domizian nos diz que é preciso sacrificar alguém que tenha sido tocado pela maldição ''Were'' mas que nunca tenha machucado outro ser vivo. Se você falar com a NPC [[Niral]] a respeito desse sacrifício, ela dirá que está disposto a dar sua vida pelo povo da ilha mas que gostaria que você encontrasse outra maneira de cumprir esta parte do ritual. | Sobre '''Sacrifice''', Domizian nos diz que é preciso sacrificar alguém que tenha sido tocado pela maldição ''Were'' mas que nunca tenha machucado outro ser vivo. Se você falar com a NPC [[Niral]] a respeito desse sacrifício, ela dirá que está disposto a dar sua vida pelo povo da ilha mas que gostaria que você encontrasse outra maneira de cumprir esta parte do ritual. | ||
Para isso você deve queimar uma [[Dewberry Palm Leaf|folha]] [[Arquivo:Dewberry Palm Leaf.gif|link=]] das [[Bluish Dewberry Palm|palmeiras azuis]] [[Arquivo:Bluish Dewberry Palm.gif|link=]] da ilha em uma [[Torch|tocha]] [[Arquivo:Torch.gif|link=]] (usar a folha da palmeira na tocha) próximo ao shrine dedicado a deusa da lua. Tendo feito isso, faça e toque os intrumentos sagrados ('''Conch Shell Horn e Scarab Ocarina''') próximo ao shrine também. | Para isso você deve queimar uma [[Dewberry Palm Leaf|folha]] [[Arquivo:Dewberry Palm Leaf.gif|link=]] das [[Bluish Dewberry Palm|palmeiras azuis]] [[Arquivo:Bluish Dewberry Palm.gif|link=]], para conseguir a [[Dewberry Palm Leaf|folha]] use o canivete ou uma [[Kitchen Knife]] nas palmeiras azuis, da ilha em uma [[Torch|tocha]] [[Arquivo:Torch.gif|link=]] (usar a folha da palmeira na tocha) próximo ao shrine dedicado a deusa da lua. Tendo feito isso, faça e toque os intrumentos sagrados ('''Conch Shell Horn e Scarab Ocarina''') próximo ao shrine também. | ||
Tendo realizado o ritual por completo, volte a falar com Niral (não precisa fazer novamente o quebra-cabeça das fases da lua) e reporte a missão falando '''Hi - Mission'''. Ela ficará agradecida e pedirá que volte no dia seguinte '''(20 horas reais)''' para conferir seu estado novamente. | Tendo realizado o ritual por completo, volte a falar com Niral (não precisa fazer novamente o quebra-cabeça das fases da lua) e reporte a missão falando '''Hi - Mission'''. Ela ficará agradecida e pedirá que volte no dia seguinte '''(20 horas reais)''' para conferir seu estado novamente. | ||


Edição das 13h32min de 10 de julho de 2023

|
|
||||||||||||||||||||||||
| Recompensa: Possibilidade de enfrentar bosses diários e Feroxa, acesso à novas áreas, acesso aos atalhos entre Edron e Cormaya e entre o Lion Sanctum e Hyaena Lairs, acesso ao depot de Oskayaat, Foxtail Amulet, Cask (With Goblin Zombie), Lit Torch, Lion Ring, Lion Mosaic, Achievements, habilidade de negociar com Domizian e NPCs de Oskayaat e a montaria Foxmouse. |
||||||||||||||||||||||||
| Localização: Ankrahmun, Banuta, Cormaya, Darashia, Edron, Grimvale, Krailos, Lion's Rock, Lion Sanctum, Murky Caverns, Oskayaat, Oskayaat Undercity, Vengoth e Venore. |
||||||||||||||||||||||||
| Você enfrentará: Ancient Scarabs, Bats, Bonebeasts, Carniphilas, Clomps, Cobras, Cunning Werepanthers, Demon Skeletons, Elder Bonelords, Energy Elementals, Feral Werecrocodiles, Foxs, Gargoyles, Haunted Treelings, Kongras, Merlkins, Mummies, Noble Lions, Ogre Brutes, Ogre Savages, Ogre Shamans, Poison Spiders, Roaring Lions, Scorpions, Sibangs, Slimes, Spiders, Stonerefiners, Tarantulas, Tigers, Vampire, Werebadgers, Werebears, Wereboars, Werecrocodiles, Werehyaenas, Werehyaena Shamans, Werelions, Werelionesses, White Lions, Werepanthers, Weretigers, Werewolves e White Weretigers. |
||||||||||||||||||||||||
| Mini-Bosses: Nenhum. |
||||||||||||||||||||||||
| Bosses: Black Vixen, Bloodback, Darkfang, Feroxa, Katex Blood Tongue, Shadowpelt, Sharpclaw, Srezz Yellow Eyes, Utua Stone Sting e Yirkas Blue Scales. Durante a Mini World Change Full Moon:
|
||||||||||||||||||||||||
| Adicionado: Versão 10.80 (21 de julho de 2015) |
||||||||||||||||||||||||
| Expansões: 11.50 (05 de dezembro de 2017) | 12.40 (13 de julho de 2020) | futuro (futuro) |
||||||||||||||||||||||||
|
||||||||||||||||||||||||
|
||||||||||||||||||||||||

Veja também: Quests.
Requerimentos
- Dinheiro para viagens.
- Suprimentos.
- Shovel.
Missão: The Curse of the Full Moon
Missão: The Curse Spreads
- Ter a Missão 04: The Dark Lands da Blood Brothers Quest iniciada para ter acesso a Vengoth.
- Ter a task Moonshadow da missão The Curse of the Full Moon completa.
| Nota: Para fazer a task Moonshadow da missão The Curse of the Full Moon você não precisa fazer nenhuma das outras tasks e nem esperar o dia de lua cheia, basta ir até Grimvale em qualquer dia e fazer somente esta task e você já poderá entrar no portal do The Last Sanctum a leste de Cormaya. |
Missão: An Ancient Feud
- Suprimentos.
- Ter a missão The Curse Spreads completa.
- Ter a Lion's Rock Quest completa.
- 01 Hard-Boiled Hydra Egg.
- 01 Haunch of Boar.
- 05 Lion's Mane.
- 01 Net.
- 05 Salt.
- 01 Lion's Mane Flower.
- 01 Kitchen Knife ou outra ferramenta de corte.
Missão: Paradise Lost
- Suprimentos.
- Ter as missões The Curse Of The Full Moon, The Curse Spreads e An Ancient Feud completas.
- 01 Torch.
- 01 Kitchen Knife ou outra ferramenta de corte.
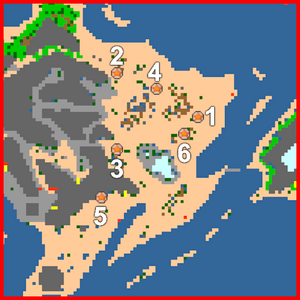
| Legenda dos Mapas | |
| - Ponto de partida. | |
| - Locais para subir ou descer. | |
| - Passagens. | |
| - Usar Levitate. | |
| - Portais. | |
| - Objetivos. | |
Método
 The Curse of the Full Moon
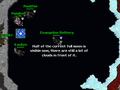
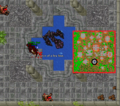
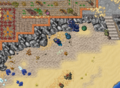
Uma vez por mês, durante a lua cheia, entre os dias 12 e 14 de cada mês, aqueles que sofrem com a maldição assumirão a forma de perigosas criaturas licantrópicas, inclusive na superfície de Grimvale. Para ajudar os habitantes da ilha é necessário realizar algumas tasks que permitirão que você tenha a chance de enfrentar a boss Feroxa. Para realizar as tasks Nightshades e Silver Traps, é necessário que a mini world change Full Moon esteja ativa, porém para ter a chance de enfrentar a boss Feroxa é preciso realizar as outras duas tasks: Were-Creatures e Moonshadow (pelo menos uma vez). Para acessar a ilha, dirija-se ao nordeste de Edron (aqui![]() ) e encontre o NPC Cornell e fale Hi - Passage - Yes para pegar a balsa.
) e encontre o NPC Cornell e fale Hi - Passage - Yes para pegar a balsa.
| Nota: Toda vez que você matar Feroxa será necessário fazer novamente as tasks "Were-Creatures" e "Moonshadow". Peça novamente a missão para o NPC Maeryn da mesma maneira que na task Nightshades. Verifique que seu quest log ficará novamente em andamento sem o "Completed" após pedir as missões. |
| Veja Também: Mini World Changes#Full Moon |
Clique na task para ter mais informações abaixo.
|
|
|
|
Nightshades
| Nota: As Purple Nightshade Blossoms |
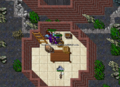
Chegando a Grimvale, procure a NPC Maeryn (aqui![]() ), diga Hi - Mission - Yes. Ela contará sobre a maldição das criaturas licantrópicas (Were-Creatures). E, pedirá ajuda para obter, pelo menos, 03 Purple Nightshade Blossoms, flores capazes de curar os infectados pela doença.
), diga Hi - Mission - Yes. Ela contará sobre a maldição das criaturas licantrópicas (Were-Creatures). E, pedirá ajuda para obter, pelo menos, 03 Purple Nightshade Blossoms, flores capazes de curar os infectados pela doença.
Falando com Maeryn
 |
Jogador: Hi
Maeryn: Greetings, visitor. I wonder what may lead you to this dangerous place. |
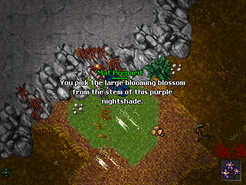
Para coletar uma Purple Nightshade Blossoms ![]() basta usar uma Blooming Purple Nightshade
basta usar uma Blooming Purple Nightshade ![]() . Após coletar a flor, é necessário aguardar 30 minutos para poder coletar novamente no mesmo local.
As Blooming Purple Nightshades florescem no subsolo da ilha. Desça o buraco que existe na parte nordeste da ilha (aqui
. Após coletar a flor, é necessário aguardar 30 minutos para poder coletar novamente no mesmo local.
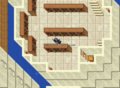
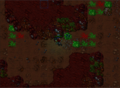
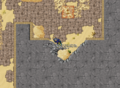
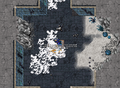
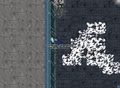
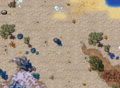
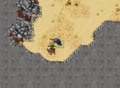
As Blooming Purple Nightshades florescem no subsolo da ilha. Desça o buraco que existe na parte nordeste da ilha (aqui![]() ). A localização delas pode ser vista no mapa abaixo:
). A localização delas pode ser vista no mapa abaixo:
Atenção:
|

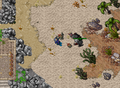
Localização das Blooming Purple Nightshade
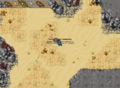
Coletando as Purple Nightshade Blossoms


Quando obtiver as três flores, retorne à NPC Maeryn e entregue-as a ela. Depois disso, você ainda poderá continuar entregando flores a ela, dizendo as mesmas palavras.
Entregando as flores
|
Jogador: Hi
Maeryn: Greetings, visitor. I wonder what may lead you to this dangerous place. |
|
|
|
|
Silver Traps
| Nota: Os Vial of Liquid Silvers |
As criaturas licantrópicas são enfraquecidas pelo efeito da prata e isso pode ser utilizado a seu favor. No andar -3 da ilha, veios de prata liquida escorrem por alguns pontos das paredes. Fale Hi - Trap - Yes com Maeryn para pegar a missão.
Pedindo a missão
|
Jogador: Hi
Maeryn: Greetings, visitor. I wonder what may lead you to this dangerous place. |
Para coletar a prata, basta usar uma Pick ou um Secret Agent Tool em um desses veios. Ao fazer isso, você poderá obter um Vial of Liquid Silver ![]() .
.
Nota: Nem sempre é possível obter a prata na primeira tentativa. É necessário um intervalo de cerca de 2 minutos entre uma tentativa e outra. Caso falhe a mensagem será:
|

Após obter a prata, se não tiver Closed Traps com você, compre-as da Gladys e de posse da prata e das armadilhas vá até a NPC Maeryn e reporte sua missão para obter uma Closed Silvered Trap.
|
|
|
|
Were-Creatures
| Nota: Não é necessário que a mini world change Full Moon esteja ativa para cumprir esta missão. |
Para ajudar os habitantes de Grimvale, você precisa matar 50 criaturas licantrópicas. Não é necessário solicitar esta missão a nenhum NPC. Assim que derrotar uma das criaturas, o quest log carregará e você também poderá acompanhar seu progresso através dele.
Moonshadow
| Nota: Não é necessário que a mini world change Full Moon esteja ativa para cumprir esta etapa. |
Durante a Mini World Change Full Moon, no dia 13 de cada mês, a lua cheia atingirá seu ápice, trazendo Feroxa de volta. Neste dia, antes do ápice da lua, o portal deverá ser preparado para que se torne possível enfrentar a criatura ancestral. Desça até o último andar subterrâneo de Grimvale. Dirija-se para a sala onde encontrará o puzzle das alavancas (aqui![]() ). Ao usar as alavancas, é possível rearranjar as posições dos pisos brancos. Dessa forma, use as alavancas até deixar os pisos brancos num formato de V, após o piso estar organizado, use novamente qualquer uma das alavancas. Aparecerá um brilho branco sobre alguns pisos do quadrado e será emitido um som de "*click*". Assim, quando a lua atingir seu ápice, o portal poderá ser utilizado.
). Ao usar as alavancas, é possível rearranjar as posições dos pisos brancos. Dessa forma, use as alavancas até deixar os pisos brancos num formato de V, após o piso estar organizado, use novamente qualquer uma das alavancas. Aparecerá um brilho branco sobre alguns pisos do quadrado e será emitido um som de "*click*". Assim, quando a lua atingir seu ápice, o portal poderá ser utilizado.


Feroxa
Requerimentos:
- Várias Closed Silvered Traps, caso contrário Feroxa não poderá ser derrotada.
Método
No dia 13 de cada mês, entre 3 e 12 horas após o server save, a aparição de Feroxa em Grimvale será anunciada pela mensagem:
- "Grimvale drowns in werecreatures as the full moon reaches its apex and ancient evil returns".
Quando a mensagem aparecer, os jogadores terão cerca de 30 minutos para acessar o portal situado no último andar subterrâneo de Grimvale (aqui![]() ). Ao passar pelo portal, você terá que esperar em uma pequena sala. Enquanto o time não for teleportado para o local onde o boss será enfrentado, o portal poderá ser utilizado livremente. Após o início da luta, ninguém mais poderá utilizar o portal para ir à sala de espera. Uma vez teleportado, a missão The Curse of the Full Moon já constará como completa em seu questlog mas ao enfrentar Feroxa você terá a chance de conseguir alguns itens raros como:
). Ao passar pelo portal, você terá que esperar em uma pequena sala. Enquanto o time não for teleportado para o local onde o boss será enfrentado, o portal poderá ser utilizado livremente. Após o início da luta, ninguém mais poderá utilizar o portal para ir à sala de espera. Uma vez teleportado, a missão The Curse of the Full Moon já constará como completa em seu questlog mas ao enfrentar Feroxa você terá a chance de conseguir alguns itens raros como:
Etapas da espera:
|
Portal ativo.
Sala de espera.
Segunda mensagem.
Terceira mensagem.
Jogadores são teleportados.


Siga para a esquerda e desça as escadas para encontrar Feroxa em sua forma humana. Ao entrar em seu covil, o Boss estará em sua forma humana. Conforme o time lute contra Feroxa, ela mudará de forma três vezes. Suas quatro formas são:
- Feroxa em sua forma humana imortal.
 Feroxa em sua forma licantrópica imortal.
 Feroxa em sua forma licantrópica mortal.
- Feroxa em sua forma humana mortal.
Estratégia:
Em sua primeira fase ela estará em sua forma humana e correrá pela sala, atacando à distância. O time deverá atacá-la incessantemente para que ela avance para a sua segunda forma, caso o time demore para matá-la, Feroxa sumirá e irá aparecer novamente no centro da sala. Quando dano suficiente for causado, ela se transformará em uma mulher-loba, assumindo assim a sua segunda fase. Nesta fase, os jogadores não poderão causar dano através de ataques tradicionais e ela irá sumonar Werewolfs. Os Werewolfs sumonados por Feroxa sempre terão o mesmo alvo que ela. Caso o time consiga derrotar Feroxa nesta fase, cada jogador que participar ativamente do combate receberá o primeiro loot individual.
Posicione Closed Silvered Traps no chão, abra-as (dando use), e lure a boss para cima das armadilhas. Cada armadilha causará um dano de 1000 hitpoints em Feroxa. Fazendo-a passar por 20 armadilhas, ela se tornará vulnerável aos ataques dos jogadores e deve ser atacada até a sua morte.
Ao ser derrotada em sua terceira fase, Feroxa retornará a sua forma humana ou na forma de um Gloom Wolf e lutará até a sua morte definitiva. Os jogadores envolvidos no combate receberão o segundo loot individual após derrotá-la. Para sair da sala do boss, suba a escada encontrada no lado direito da sala e caminhe para o norte para encontrar o portal de saída (aqui![]() ).
).
1º Estágio: Feroxa em sua forma humana imortal.
2º Estágio: Feroxa em sua forma licantrópica imortal.
3º Estágio: Feroxa em sua forma licantrópica mortal.
4º Estágio: Feroxa em sua forma humana mortal.

Portal de saída


|
|
|
|
 The Curse Spreads
Vá para Grimvale e procure pela NPC Maeryn (aqui![]() ). Fale Hi - The Curse Spreads - Yes, ela irá te informar que a maldição Were está se espalhando cada vez mais, chegando em Edron e Cormaya. Ela irá pedir sua ajuda para tentar conter tudo isso, pois ela não pode abandonar o vilarejo agora. Ao aceitar, você deverá então ir até o NPC Daniel Steelsoul no castelo de Edron (aqui
). Fale Hi - The Curse Spreads - Yes, ela irá te informar que a maldição Were está se espalhando cada vez mais, chegando em Edron e Cormaya. Ela irá pedir sua ajuda para tentar conter tudo isso, pois ela não pode abandonar o vilarejo agora. Ao aceitar, você deverá então ir até o NPC Daniel Steelsoul no castelo de Edron (aqui![]() ), para ter mais informações.
), para ter mais informações.
Falando com Maeryn
|
Jogador: Hi
Maeryn: Greetings, visitor. I wonder what may lead you to this dangerous place. |
No castelo de Edron, procure por Daniel Steelsoul e fale Hi - The Curse Spreads - Yes. Ele irá falar sobre a grande preocupação com cada lua cheia, pois é quando várias criaturas Were são vistas nos arredores da cidade. Ele irá pedir que ajude-o a procurar uma cura para a maldição pois as Purple Nightshade Blossoms são uma cura temporária e que para alguns já não tem efeito e que você deverá então procurar ajuda na Noodles Academy.
Falando com Daniel Steelsoul
 |
Jogador: Hi
Daniel Steelsoul: Greetings and Banor be with you, Jogador! |
Noodles Academy of Modern Magic ![]()
Vá até a Noodles Academy of Modern Magic, (aqui![]() ), na segunda torre suba até o último andar para encontrar o NPC Milos e fale Hi - The Curse Spreads - Ley.
), na segunda torre suba até o último andar para encontrar o NPC Milos e fale Hi - The Curse Spreads - Ley.
Ele acha estranho o fato de que os moradores da cidade não estarem se curando com as Purple Nightshades, e diz ter uma teoria sobre o caso: ele fala sobre as "linhas de ley" (linhas arcanas) e uma dessas linhas passa por Edron, e pode ser a razão de os moradores não se curarem com as Purple Nightshades. Ele fala que você deve encontrar uma maneira de potencializar o poder de cura dessas plantas e que se você procurar por suas anotações antigas na academia, elas talvez o ajudem a achar uma cura.
Falando com Milos
 |
Jogador: Hi
Milos: Oh hello. I hardly noticed you. I'm afraid I am a bit distracted at the moment. |
Vá para a biblioteca na torre central da academia e lá procure por 03 notas (02 no terceiro andar e 01 no quarto andar). Após encontrar as 03 notas, vá até o NPC Puffels (aqui![]() ) que fica no subterrâneo da torre do sul e clique no baú para receber a 4º nota.
) que fica no subterrâneo da torre do sul e clique no baú para receber a 4º nota.
Nota 1 - Piece of Parchment
 .
.
Nota 2 - Piece of Parchment
 .
.
Nota 3 - Piece of Parchment
 .
.
Nota 4 - Hastily Scribbled Note
 .
.


Com as 04 notas em mãos, volte para até o NPC Milos e fale Hi - The Curse Spreads - Ingredients - Crimson. Ao ver que encontrou as notas, ele ficará surpreso e dirá que se encontrar os ingredientes certos poderá curar todas as pessoas que estão dentro das Ley Lines e assim erradicar a maldição.
Milos irá lhe entregar um dos ingredientes que é uma Crimson Nightshade Blossoms ![]() e uma tábula antiga, o Stone Tablet with Ley Lines
e uma tábula antiga, o Stone Tablet with Ley Lines ![]() . Ele acredita que serão úteis no progresso de sua missão.
. Ele acredita que serão úteis no progresso de sua missão.
Reportando a missão
|
Jogador: Hi
Milos: Oh hello. I hardly noticed you. I'm afraid I am a bit distracted at the moment. |
Notas: Lendo as anotações conseguimos descobrir os ingredientes necessários para fazer a poção:
|
Hidden Threats 
Prata, Ouro e a Shadow Bite Plant! Para coletar ouro e prata você deverá ir para o local da Hidden Threats Quest em Venore. Chegando lá, fale Hi - Help - Yes com o NPC Corym Ratter e atravesse a porta logo a direita.
| Nota: Você só conseguirá coletar a prata e o ouro enquanto estiver nessa missão. |
Falando com o Corym Ratter
 |
Jogador: Hi
Corym Ratter: Welcome stranger! You might be surprised that I don't attack you immediately. The point is, that I think you could be useful to me. What you see in front of you is a great mine of the corym!... |
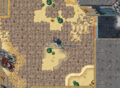
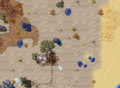
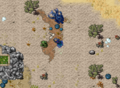
Siga para o norte e fale Hi - Decreasing Resources - Defy com o NPC Corym Servant. Neste mesmo andar, à sudeste (aqui![]() ), poderemos encontrar pepitas de ouro
), poderemos encontrar pepitas de ouro ![]() , que podem ser coletados em forma de Gold Nuggets com uma pick. Em seguida, atravesse a porta a direita do NPC Servant. Desça na área onde tem os Stonerefiner e vá para o sul (aqui
, que podem ser coletados em forma de Gold Nuggets com uma pick. Em seguida, atravesse a porta a direita do NPC Servant. Desça na área onde tem os Stonerefiner e vá para o sul (aqui![]() ) para encontrar as pepitas de prata
) para encontrar as pepitas de prata ![]() e utilize novamente a Pick para coletar Silver Nuggets.
e utilize novamente a Pick para coletar Silver Nuggets.
Falando com o Corym Servant
 |
Jogador: Hi
Corym Servant: We work as hard we can, my master! Wait, I haven't seen you here before. You were sent by the Corym Ratter, I see. He misses the courage to visit us and find the reason for decreasing resources? He's the coward I have expected. |
Personagem coletando prata.
Personagem coletando ouro.
Local do arbusto para coleta das Shadow Bite Berries


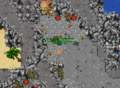
Vá para Edron para coletar Shadow Bite Berries ![]() . A localização mais fácil de acessar fica na caverna de Earth Elemental (aqui
. A localização mais fácil de acessar fica na caverna de Earth Elemental (aqui![]() ). Tudo o que você precisa fazer é ir até a caverna, descer ao andar onde pode-se encontrar Bog Raiders e seguir até o local indicado (aqui
). Tudo o que você precisa fazer é ir até a caverna, descer ao andar onde pode-se encontrar Bog Raiders e seguir até o local indicado (aqui![]() ), chegando lá, basta clicar na Shadow Bite Plant
), chegando lá, basta clicar na Shadow Bite Plant ![]() para coletá-la. Com todos os ingredientes em mãos, volte para a Noodles Academy.
para coletá-la. Com todos os ingredientes em mãos, volte para a Noodles Academy.
| Lendo a 4º anotação conseguimos descobrir como fazer a poção:
Use os seguintes reagentes -" [Debaixo do último artigo, você observa dois símbolos apressadamente desenhados: uma lua crescente e um círculo com um ponto no centro. "Em pó!" está rabiscado debaixo dos símbolos. Além desses dois símbolos, você pode ler a palavra "Shadow Bite".] |
Agora você deverá triturar os pedaços de ouro e prata no Wooden Grinder, que fica dois andares abaixo do NPC Milos, transformando-os em Gold Dust![]() e Silver Dust
e Silver Dust![]() .
.
Transformando os itens

Feito isso, reporte sua missão a Milos, falando Hi - Curse. Milos irá dizer que você precisa ir ao laboratório do NPC Sinclair (aqui![]() ), para fazer uma poção.
), para fazer uma poção.
Reportando a missão
|
Jogador: Hi
Milos: Milos: Oh hello. I hardly noticed you. I'm afraid I am a bit distracted at the moment. |
Para isso, você deverá utilizar os ingredientes em um Alchemical Apparatus ![]() na seguinte ordem:
na seguinte ordem:

Pronto! Está feita a Nightshade Distillate![]() . Retorne ao NPC Daniel Steelsoul para falar que conseguiu criar a poção da cura (Hi - Potion) . Ele diz que você fez um ótimo trabalho e que tem esperança de que a poção possa curar as pessoas infectadas na cidade, mas a maldição chegou a Cormaya também e ele pede, então, que vá lá e fale com Yoem.
. Retorne ao NPC Daniel Steelsoul para falar que conseguiu criar a poção da cura (Hi - Potion) . Ele diz que você fez um ótimo trabalho e que tem esperança de que a poção possa curar as pessoas infectadas na cidade, mas a maldição chegou a Cormaya também e ele pede, então, que vá lá e fale com Yoem.
Reportando a missão
|
Jogador: Hi
Daniel Steelsoul: Greetings and Banor be with you, Jogador! |
The Last Sanctum 
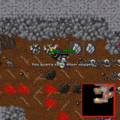
Vá até o NPC Yoem (aqui![]() ) e diga Hi - Curse. Ele contará que a maldição da lua cheia chegou a Cormaya também... Mais e mais pessoas estão sendo afetadas e é estranho o fato de que algumas dessas pessoas não foram mordidas por bestas. Até então, achavam que esta era a única maneira de infecção, porém agora era óbvio que havia outra maneira e ele acha que é a água subterrânea. Alguém precisa investigar as cavernas ao leste da ilha.
) e diga Hi - Curse. Ele contará que a maldição da lua cheia chegou a Cormaya também... Mais e mais pessoas estão sendo afetadas e é estranho o fato de que algumas dessas pessoas não foram mordidas por bestas. Até então, achavam que esta era a única maneira de infecção, porém agora era óbvio que havia outra maneira e ele acha que é a água subterrânea. Alguém precisa investigar as cavernas ao leste da ilha.
Falando com Yoem
 |
Jogador: Hi
Yoem: Hello Jogador! Do you need some equipment for your house? |
| Nota: Para entrar no Portal |
Vá até o leste da ilha (aqui![]() ), desça o buraco e siga o caminho único. Tenha em mente que já há várias criaturas were a sua espera... No final do caminho, entre em um Mystic Flame
), desça o buraco e siga o caminho único. Tenha em mente que já há várias criaturas were a sua espera... No final do caminho, entre em um Mystic Flame![]() rodeado por espelhos.
rodeado por espelhos.
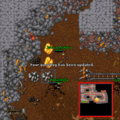
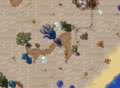
Ao conseguir passar pela Mystic Flame, você deverá seguir para o sudoeste da caverna até achar um local para descer (aqui![]() ). Confira as imagens abaixo com a rota. Nessa parte da caverna siga o caminho até encontrar a água contaminada (seu quest log será atualizado). Você também encontrará 03 Dark Stone Totems, cada um representando uma localização das Linhas de Ley.
). Confira as imagens abaixo com a rota. Nessa parte da caverna siga o caminho até encontrar a água contaminada (seu quest log será atualizado). Você também encontrará 03 Dark Stone Totems, cada um representando uma localização das Linhas de Ley.
Caminho.
Estátuas.


Retorne para o NPC Yoem e reporte sua missão. Agora ele pedirá ajuda novamente da Noodles Academy of Modern Magic.
Reportando a missão
|
Jogador: Hi
Yoem: Hello Jogador! Do you need some equipment for your house? |
Retorne ao NPC Milos e conte as novidades falando Hi - Curse. Ele dirá que existem totens parecidos com os vistos na caverna em Cormaya. Eles estão propagando o mal, sendo responsáveis por contaminar as águas do local.
Ele entregará a você um Golden Symbol of Suon ![]() para purificar esse mal. Como observamos na caverna em Cormaya, você encontrou 03 Dark Stone Totems , é partir deles que as Linhas de Ley se iniciam. Ao longo destas linhas existem algumas pedras
para purificar esse mal. Como observamos na caverna em Cormaya, você encontrou 03 Dark Stone Totems , é partir deles que as Linhas de Ley se iniciam. Ao longo destas linhas existem algumas pedras ![]() e ao clicar na Stone Tablet with Ley Lines
e ao clicar na Stone Tablet with Ley Lines ![]() perto dessas pedras, ela irá informar se tem algo próximo ou não. Seguindo as orientações, chegaremos a localização das 03 Dark Stone Piles maiores em Banuta, Krailos e Vengoth.
perto dessas pedras, ela irá informar se tem algo próximo ou não. Seguindo as orientações, chegaremos a localização das 03 Dark Stone Piles maiores em Banuta, Krailos e Vengoth.
Para purificá-las basta usar o Golden Symbol of Suon próxima a eles. Quando você usá-lo, uma cruz sagrada  irá aparecer em você.
| Nota: Você pode purificar as estátuas em qualquer ordem. |
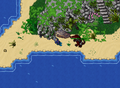
Localização do Dark Stone Pile em Banuta.

Localização do Dark Stone Pile em Krailos.
Localização da Dark Stone Pile em Vengoth.


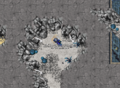
Ao purificar os três pontos, retorne para a caverna em Cormaya e vá para o local da água contaminada, você irá notar que ela está limpa agora (seu quest log será atualizado).
Água Contaminada.
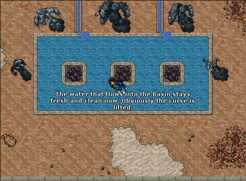
Água Limpa.

Retorne novamente ao NPC Yoem e reporte sua missão falando Hi - Curse. Ele agradecerá e pedirá que conte ao NPC Daniel Steelsoul também sobre o seu feito.
Reportando a missão
|
Retorne até ao NPC Daniel Steelsoul e fale Hi - Curse. Ele agradecerá, mas tem um último pedido para acabar de vez com a maldição do local. Pede que você investigue as cavernas das criaturas "were" em Edron e Cormaya e localize o líder alfa de cada tipo Were. Você deve derrotá-los e assim enfraquecê-los o suficiente para que mantenham distância por um bom tempo.
Reportando a missão
|
Jogador: Hi
Daniel Steelsoul: Greetings and Banor be with you, Jogador! |
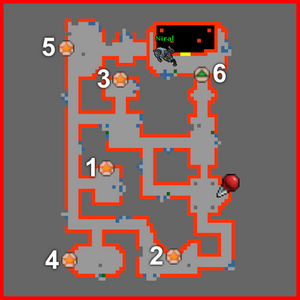
The Were-Alfas
São 5 bosses no total, 3 estão localizados na Lycanthrope Grounds (Edron) e os outros 2 estão localizados na Lycanthrope Grounds (Cormaya). Esses bosses são uma forma mais forte de sua espécie, mas não oferecem muito perigo ao jogadores bem preparados.
 |
Nota: Existem dois portais que conectam as cavernas de Edron (aqui |
|
|
|
|
|


Recompensa
Retorne ao Daniel Steelsoul e conte que derrotou os 05 líderes alfa! Fale Hi - Curse. Ele ficará agradecido e lhe recompensará com um ![]() Foxtail Amulet. Ele também vai dizer que enquanto a maldição não irá desaparecer completamente, ela será mais fácil de combater, ele também irá contar que criaturas "metade homem e metade leão" foram avistadas no deserto de Darama.
Foxtail Amulet. Ele também vai dizer que enquanto a maldição não irá desaparecer completamente, ela será mais fácil de combater, ele também irá contar que criaturas "metade homem e metade leão" foram avistadas no deserto de Darama.
Reportando a missão
|
Jogador: Hi
Daniel Steelsoul: Greetings and Banor be with you, Jogador! |
 An Ancient Feud
Vá para Edron e encontre o NPC Daniel Steelsoul no castelo (aqui![]() ). Diga Hi - Lion - Yes. Ele dirá que ouviu rumores da maldição que se espalhou para o Deserto de Darama onde pessoas estariam se transformando em criaturas metade homem e metade leão, e então diz para você viajar para Darashia e se encontrar com seu amigo e informante, Domizian.
). Diga Hi - Lion - Yes. Ele dirá que ouviu rumores da maldição que se espalhou para o Deserto de Darama onde pessoas estariam se transformando em criaturas metade homem e metade leão, e então diz para você viajar para Darashia e se encontrar com seu amigo e informante, Domizian.
Falando com Daniel Steelsoul
|
Jogador: Hi
Daniel Steelsoul: Greetings and Banor be with you, Jogador! |
Vá para Darashia, entre no primeiro conjunto de casas à esquerda do barco (aqui![]() ), e suba um andar para encontrar Domizian. Fale Hi - Lion. Ele te contará um pouco da história da perigosa maldição local, bem como da existência dos Werehyaenas, ele também dirá que acredita que as Werehyaenas tenham um pacto com os mortos-vivos de Drefia e que você deveria investigar e encontrar provas disso.
), e suba um andar para encontrar Domizian. Fale Hi - Lion. Ele te contará um pouco da história da perigosa maldição local, bem como da existência dos Werehyaenas, ele também dirá que acredita que as Werehyaenas tenham um pacto com os mortos-vivos de Drefia e que você deveria investigar e encontrar provas disso.

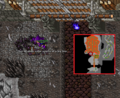
Falando com Domizian
 |
Jogador: Hi
Domizian: Greetings, traveller! |
Sua missão agora é ir até a caverna das Werehyaenas, ao norte de Darashia (aqui![]() ).
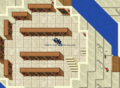
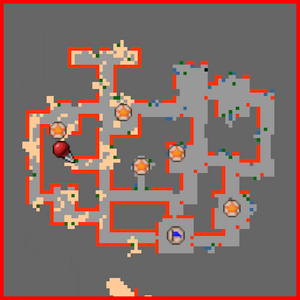
Você terá de ir até 03 pontos específicos que demonstram a ligação entre os Werehyaenas e os necromantes de Drefia. Além de obter confirmação verbal com o NPC A Skull. Para encontrá-los, basta seguir os mapas abaixo. Você enfrentará Werehyaenas e Werehyaena Shamans. As setas vermelhas indicam onde você precisará subir ou descer, as estrela são os locais que você deve ir.
).
Você terá de ir até 03 pontos específicos que demonstram a ligação entre os Werehyaenas e os necromantes de Drefia. Além de obter confirmação verbal com o NPC A Skull. Para encontrá-los, basta seguir os mapas abaixo. Você enfrentará Werehyaenas e Werehyaena Shamans. As setas vermelhas indicam onde você precisará subir ou descer, as estrela são os locais que você deve ir.
| Nota: Você só consegue falar com o NPC A Skull durante a noite (xx:45 até xx:15 no mundo real). |


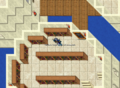
Neste andar você terá de visitar dois locais, estão marcados com estrelas (aqui![]() ) e (aqui
) e (aqui![]() ), basta passar pelas sala e você receberá mensagens brancas. Para visitar o terceiro local, suba a leste do lago. Vá para nordeste, você passará por um lich. Seu objetivo é passar pela sala com a estrela (aqui
), basta passar pelas sala e você receberá mensagens brancas. Para visitar o terceiro local, suba a leste do lago. Vá para nordeste, você passará por um lich. Seu objetivo é passar pela sala com a estrela (aqui![]() ). Você receberá uma mensagem em branco. Volte para o andar inferior e vá para o sul e fale Hi - Undead com o NPC A Skull (aqui
). Você receberá uma mensagem em branco. Volte para o andar inferior e vá para o sul e fale Hi - Undead com o NPC A Skull (aqui![]() ).
).


Falando com a Skull
 |
Após falar com o NPC A Skull durante a noite, seu quest log será atualizado e você deverá voltar à cidade e falar com Domizian. Diga Hi - Lion. Domizian dirá que você tem de encontrar uma maneira de impedir que eles continuem a trabalhar juntos. Sua missão agora é retornar à caverna dos Werehyaenas e encontrar o líder dos homens-hienas, Rhargu.
Reportando a missão
|
Rhargu's Demand 
| Nota: A missão Rhargu's Demand aparece como uma missão separada no quest log, porém não é possível concluir a missão An Ancient Feud sem completar esta missão antes. |
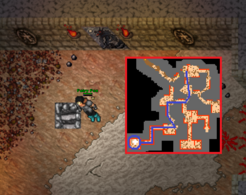
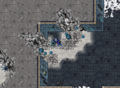
Volte para a caverna dos Werehyaenas e encontre o NPC Rhargu, ele estará no fundo da caverna (aqui![]() ). Siga as setas vermelhas até encontrá-lo. Diga Hi - Undead.
). Siga as setas vermelhas até encontrá-lo. Diga Hi - Undead.


Falando com Rhargu
|
Jogador: Hi
Rhargu: Grr. Intruder! |
Ele dirá que este assunto não é da sua conta, mas que está disposto a encerrar os laços com os mortos-vivos se você trouxer toda a comida que ele gosta.
Você receberá um Empty Cask e você precisará coletar os seguintes itens:
| Nota: Com exceção do Empty Cask, você pode coletar e preparar todos os itens antes de iniciar esta missão. Caso você perca a sua Empty Cask, poderá solicitar um novo, falando Hi - Lost Cask para o NPC Rhargu. |
- 01 Hydra Egg

- 01 Haunch of Boar

- 05 Lion's Mane

- 01 Net

- 05 Salt

Preparando o Hydra Egg:
- Você precisará de um Hydra Egg cozido:
- Basta usar um Hydra Egg em um Oven
 ou uma Campfire (Pot)
  .
.
- Basta usar um Hydra Egg
| Dica: Um campfire pode ser encontrado na mesma caverna da quest, no andar -4 (aqui |
Capturando os ratos:
| Dica: Se você for ou tiver um amigo mage, poderá sumonar os Cave Rats para essa missão. |
- Você precisará encher o Empty Cask
 com ratos.
- Capture 5 Cave Rats. Basta usar um Net (Ferramenta) neles.
- Use o Salt nos Cave Rat (Item)
 para criar Salted Cave Rats
  .
. - Agora basta usar os Salted Cave Rats no Empty Cask para encher o seu barril, que se tornará um Cask (With Cave Rats)
 .
.
- Capture 5 Cave Rats. Basta usar um Net (Ferramenta)
Recompensa
Após coletar todos os itens e preparar a comida solicitada, volte ao Rhargu e diga: Hi - Undead - Yes. Ele pegará toda a comida e te dará:

Agora você deverá voltar a falar com Domizian.
| Nota: Caso você perca a sua Lit Torch (Quest), poderá solicitar uma nova falando lost torch com o NPC Rhargu. Isso pode ser feito também por quem já finalizou todas as missões para criar uma nova Lit Torch |
Reportando a missão
|
Jogador: Hi
Rhargu: Grr. Intruder! |
Lion's Rock 
Assim que voltar a encontrar Domizian, diga Hi - Destroy. Ele dirá que o único fogo que conseguirá destruir os totens dos mortos-vivos é o fogo sagrado, bem como o que fazer para obtê-lo. Ele irá dizer que você deve ir até Lion's Rock e descer até a área onde habitam os Noble Lions que guardam uma entrada secreta que só pode ser acessada se você souber a senha.
Reportando a missão
|
Jogador: Hi
Domizian: Greetings, traveller! |
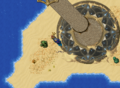
The Lion Sanctum 
Para santificar o fogo, siga para Lion's Rock. Subindo dois andares (aqui![]() ) você encontrará várias Lion's Mane Flower
) você encontrará várias Lion's Mane Flower![]() no chão. Clique em uma delas para coletá-la. Use seu canivete, ou uma Ritual Scissors, em uma Lion's Mane Flower, assim você irá obter uma Chopped Lion Mane Petals
no chão. Clique em uma delas para coletá-la. Use seu canivete, ou uma Ritual Scissors, em uma Lion's Mane Flower, assim você irá obter uma Chopped Lion Mane Petals ![]() .
.
Mensagem ao coletar uma Lion's Mane Flower

Cortando as pétalas
Vendo as pétalas cortadas


Agora deverá seguir para um altar específico. Siga o caminho das imagens abaixo:


Continue seguindo as imagens. Você encontrará uma porta selada (aqui![]() ). Nesta sala você encontrará alguns White Lions, desça as escadas ao norte e esteja preparado para enfrentar Werelions e Werelionesses e siga até a estrela.
). Nesta sala você encontrará alguns White Lions, desça as escadas ao norte e esteja preparado para enfrentar Werelions e Werelionesses e siga até a estrela.


Agora você estará em uma sala com um livro em cima de um altar (aqui![]() ). Fique em frente ao altar (atrás do livro e não sob o mosaico) e use a Chopped Lion Mane Petals
). Fique em frente ao altar (atrás do livro e não sob o mosaico) e use a Chopped Lion Mane Petals ![]() em sua Lit Torch (Quest)
em sua Lit Torch (Quest)![]() . Em posse do fogo santificado, vá novamente até a caverna das Werehyaenas. Você deverá incendiar o monumento feito de pedras e crânios. Siga o caminho das imagens abaixo e use sua Lit Torch
. Em posse do fogo santificado, vá novamente até a caverna das Werehyaenas. Você deverá incendiar o monumento feito de pedras e crânios. Siga o caminho das imagens abaixo e use sua Lit Torch![]() santificada no monumento feito de pedras e crânios, representado na imagem pela estrela (aqui
santificada no monumento feito de pedras e crânios, representado na imagem pela estrela (aqui![]() ):
):


Volte ao Domizian e reporte o feito. Diga Hi - Destroyed. Ele ficará contente com o progresso e dirá que a enorme quantidade de Werehyaenas e Werehyaena Shamans ainda é uma grande ameaça à população de Darashia, portanto pede que você ajude a diminuir a população. Basta voltar até a caverna dos Werehyaenas e eliminar 300 Werehyaenas ou Werehyaena Shamans.
Reportando a missão
|
Jogador: Hi
Domizian: Greetings, traveller! |
Após matar as 300 criaturas, volte ao Domizian e reporte sua missão. Diga Hi - Kill. Você receberá um Lion Ring ![]() , o que te permitirá acessar uma nova área da caverna dos Werelions, ele pede para que você vá até este local e relate a situação ao rei dos werelions, Heliodor.
, o que te permitirá acessar uma nova área da caverna dos Werelions, ele pede para que você vá até este local e relate a situação ao rei dos werelions, Heliodor.
Reportando a missão
|
Jogador: Hi
Domizian: Greetings, traveller! |
Com seu Lion Ring em mãos, siga conforme as imagens abaixo até chegar na estátua com formato de leão, representada pela estrela no mapa (aqui![]() ):
):

Equipe seu Lion Ring e dê "use" na estátua de leão  . Você será levado ao andar inferior.
| Nota: É necessário que você esteja com o seu Lion Ring equipado no momento em que usar a estátua (isso é necessário somente enquanto estiver fazendo a quest. Depois de completa, não será mais necessário equipá-lo para poder usar a estátua, se quiser retornar aqui). |
Vá para o sudeste e dê use na estátua , representado pela estrela no mapa (aqui![]() ). Você receberá uma mensagem dizendo que deve provar que é digno de ter uma audiência com Heliodor.
). Você receberá uma mensagem dizendo que deve provar que é digno de ter uma audiência com Heliodor.
The Enemies of the Pride 
Siga para o norte conforme o mapa abaixo. Você será capaz de atravessar a porta selada, representada pela estrela no mapa (aqui![]() ).
).
Notas:
|
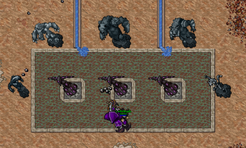
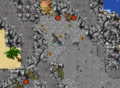
Nesta sala existem dois corredores e alguns pisos diferentes ao norte, leste, sul e oeste. Ao pisar sobre os pisos diferentes, você será levado a um outro local onde enfrentará o respectivo boss.


Os bosses em questão são os inimigos que os leões enfrentaram e derrotaram em algum momento no passado de acordo com o que descobrimos durante a Lion's Rock Quest e é durante essa quest que também recebemos as pistas dos itens que precisamos pegar de cada boss. Seu novo objetivo é derrotar os 04 bosses (em qualquer ordem) e coletar seus respectivos itens especiais.
|
|
|
|


Em posse destes itens, volte até a estátua na ante-sala que te leva até Heliodor (aqui![]() ), dê use na estátua e os itens irão desaparecer. Agora você será capaz de ter sua reunião com Heliodor, passe sobre o mosaico no centro da sala e você será levado até o rei. Diga Hi - Curse. Ele será grato por seu relatório e dirá que vai considerar perdoar Domizian.
), dê use na estátua e os itens irão desaparecer. Agora você será capaz de ter sua reunião com Heliodor, passe sobre o mosaico no centro da sala e você será levado até o rei. Diga Hi - Curse. Ele será grato por seu relatório e dirá que vai considerar perdoar Domizian.
Falando com Heliodor
 |
Jogador: Hi
Heliodor: Greetings! |
Recompensa
Volte à cidade e fale pela última vez com Domizian. Diga Hi - Lion. Ele agradecerá a sua ajuda e você receberá um Lion Mosaic. A partir de agora você também poderá vender alguns itens para ele.
Reportando a missão
|
|
Nota: Após concluir a missão An Ancient Feud você poderá usar dois atalhos para chegar no Lion Sanctum e assim enfrentar os bosses novamente a cada 20 horas.
|

 Paradise Lost
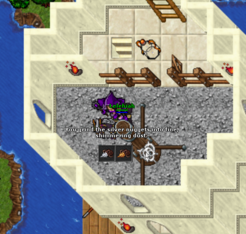
Para começar essa missão retorne até o NPC Domizian em Darashia (aqui![]() ) e fale Hi - Mission, ele vai contar que a maldição Were não parou em Darama e que existe uma ilha remota, chamada Oskayaat, ao sul de Ankrahmun que parece estar passando por problemas, ele pede que você vá até Ankrahmun e fale com o NPC Tonar que fica próximo a uma barraca à beira do mar (aqui
) e fale Hi - Mission, ele vai contar que a maldição Were não parou em Darama e que existe uma ilha remota, chamada Oskayaat, ao sul de Ankrahmun que parece estar passando por problemas, ele pede que você vá até Ankrahmun e fale com o NPC Tonar que fica próximo a uma barraca à beira do mar (aqui![]() ).
).
Falando com Domizian
|
Jogador: Hi
Domizian: Greetings, traveller! |
Tonar's Ocarina ![]()
Chegando lá, peça passagem para a ilha falando Hi - Passage - Yes. Ele vai dizer que a ilha é um lugar perigoso atualmente mas que está disposto a te levar até ela em troca de um favor, ele gostaria de resgatar a Ocarina que pertenceu a sua tataravó, mas ela foi roubada por ladrões do deserto, a única pista que Tonar consegue nos fornecer é que eles montam acampamento na área entre o norte de Ankrahmun e o sul de Darashia, perto de um pequeno oásis.
Falando com Tonar
 |
Jogador: Hi
Tonar: Greetings, traveller! |
Agora você deve ir até a Mother of Scarabs Lair (aqui![]() ) e recuperar a Ocarina para Tonar, ao chegar lá desça até o andar -2 e siga para o norte até encontrar uma área com sarcofágos (aqui
) e recuperar a Ocarina para Tonar, ao chegar lá desça até o andar -2 e siga para o norte até encontrar uma área com sarcofágos (aqui![]() ) e clique na parte superior do sarcofágo aberto da direita e você irá obter a Ocarina
) e clique na parte superior do sarcofágo aberto da direita e você irá obter a Ocarina ![]() , retorne até Tonar e fale Hi - Passage - Yes,
, retorne até Tonar e fale Hi - Passage - Yes,
Entrada da Mother of Scarabs Lair
Obtendo a Ocarina.


Reportando a missão
|
Ancient Moon Temple I - Sun 

Ao chegar a ilha sua missão deverá ser explorar o lugar e descobrir o que aconteceu, para começar a resolver esse mistério você deverá descer em uma caverna (aqui![]() ) que lembra as ruínas de um templo, haverá muitas criaturas portanto esteja preparado antes de descer. O lugar é dividido em duas áreas dedicadas ao sol e a lua, ao sul você encontrará um teleport inacessível
) que lembra as ruínas de um templo, haverá muitas criaturas portanto esteja preparado antes de descer. O lugar é dividido em duas áreas dedicadas ao sol e a lua, ao sul você encontrará um teleport inacessível  (aqui
(aqui![]() ). Para liberar o acesso a ele será preciso "pisar" em 06 mosaicos escondidos pelo local, 05 estão aqui e o 6º e último está em outra caverna cuja a entrada fica (aqui
). Para liberar o acesso a ele será preciso "pisar" em 06 mosaicos escondidos pelo local, 05 estão aqui e o 6º e último está em outra caverna cuja a entrada fica (aqui![]() ).
).
Atenção:
|
Mosaicos em Oskayaat Undercity.

Mosaico nas Murky Caverns.


1º Mosaico (aqui
 )
)
2º Mosaico (aqui
)
3º Mosaico (aqui
)
4º Mosaico (aqui
)
5º Mosaico (aqui
)
6º Mosaico (aqui
)


Ancient Moon Temple II - Moon 
Tendo obtido acesso ao andar inferior, agora você deve resolver um quebra-cabeça semelhente porém desta vez há uma ordem correta para fazê-lo. Neste andar você deve achar e usar 05 símbolos da lua nas paredes do lugar, em ordem de fases da lua, para liberar a passagem secreta (aqui![]() ).
).
| Atenção: Caso você clique nos símbolos da lua na ordem incorreta ou clique duas vezes em qualquer um deles, irá resetar seu acesso, fazendo com que você tenha que recomeçar todo o processo. |
Localizações dos símbolos.


1º Fase (aqui)


2º Fase (aqui)


3º Fase (aqui)


4º Fase (aqui)

5º Fase (aqui)


Símbolo Final (aqui)


Tendo ativado os símbolos na ordem correta, você agora ganhará acesso permanente a área secreta do templo clicando em um sexto símbolo (aqui![]() ). Aqui você encontra a NPC Werepanther Niral, fale Hi - Mission - Control, ela irá dizer que é uma das poucas que consegue controlar seus instintos e pede sua ajuda para que encontre um método de controlar a maldição e que para isso devemos ir até os Werelions em Darashia.
). Aqui você encontra a NPC Werepanther Niral, fale Hi - Mission - Control, ela irá dizer que é uma das poucas que consegue controlar seus instintos e pede sua ajuda para que encontre um método de controlar a maldição e que para isso devemos ir até os Werelions em Darashia.
Falando com Niral
 |
Jogador: Hi
Niral: Greetings, traveller! |
Ancient Ritual
Agora devemos retornar até o NPC Domizian em Darashia e falar Hi - Curse, ele irá explicar que a maldição pode ser controlada realizando um ritual que é divido em três partes: "Runes", "Instruments" e "Sacrifice".
Falando com Domizian
|
Jogador: Hi
Niral: Greetings, traveller! Jogador: Runes Jogador: Instruments Jogador: Sacrifice |
Ancient Ritual - Sun and Moon Runes ![]()
![]()
Ao questionar Domizian sobre Runes, ele irá explicar que nesta parte do ritual envolve a ativação de runas da lua, mas que apenas sacerdotes da lua saberiam executar este ritual mas diz que o rei dos Werelions talvez saiba de alguma coisa. Agora você deve ir até ele, e para isso devemos ir ao Lion Sanctum e entrar na sala do NPC Heliodor cuja entrada é um teleport no mosaico presente nesta área (aqui![]() ), basta andar sobre ele para ser teleportado.
), basta andar sobre ele para ser teleportado.
Agora fale Hi - Runes para Heliodor, ele vai dizer que entende a situação de Oskayaat e pede que você pegue os pergaminhos de Heliodor ![]() em um baú
em um baú ![]() ao norte da sala (aqui
ao norte da sala (aqui![]() ).
).
Falando com Heliodor
|
Jogador: Hi
Heliodor: Greetings! |
Agora retorne até a NPC Niral, fale Hi - Curse, ela diz que irá desenhar as runas mas que elas irão aparecer próximo a um ponto de adoração da deusa da lua na superfície da ilha.
Falando com Niral
|
Jogador: Hi
Niral: Greetings, traveller! |
Agora vá para superfície da ilha e caminhe até chegar na área de deserto (aqui![]() ), agora (Durante a Noite) ative as runas que aparecem pelo local na ordem correta (passando por cima delas) para escrever as palavras 'Sun and Moon'.
), agora (Durante a Noite) ative as runas que aparecem pelo local na ordem correta (passando por cima delas) para escrever as palavras 'Sun and Moon'.
| Atenção: Você nunca deve passar mais de uma vez em cima da mesma runa se não terá que recomeçar a sequência. |
Localização aproximada das runas.

S
(aqui)
UN
(aqui)

AND
(aqui)
M
(aqui)
OO
(aqui)
N
(aqui)


Ancient Ritual - Holy Instruments ![]()
![]()
Sobre Instruments, Domizian nos diz que é preciso ter dois instrumentos sagrados para o ritual, são eles:
- Scarab Ocarina feita a partir da casca de 01 Scarab morto
 .
. - Conch Shell Horn feito a partir de 01 Conch Shell
 e 01 Wooden Mouthpiece
  .
.
Para obter a Scarab Ocarina, volte para Ankrahmun e fale Hi - Scarab Ocarina para Tonar, ele vai pedir que você traga uma casca de Scarab intacta para que ele possa fazer a Ocarina para você.
Falando com Tonar
|
Agora você precisa matar um Scarab, você pode caçá-los em várias cavernas espalhadas por Darama, assim que matar um, pegue o corpo e traga de volta para Tonar mas preste atenção pois será preciso esperar que o Scarab atinja o segundo estágio de decomposição aonde sua aparência fique seca sem "sangue" verde em seu sprite ![]() . Quando isso acontecer fale Hi - Scarab Ocarina para Tonar e ele irá aceitar a casca e pedirá que você retorne depois. Você terá de esperar cerca de 15 Minutos, após esse tempo fale Hi - Scarab Ocarina novamente para receber o item
. Quando isso acontecer fale Hi - Scarab Ocarina para Tonar e ele irá aceitar a casca e pedirá que você retorne depois. Você terá de esperar cerca de 15 Minutos, após esse tempo fale Hi - Scarab Ocarina novamente para receber o item ![]() .
.
Tentando entregar a Scarab Shell - 1º Estágio
|
Entregando a Scarab Shell - 2º Estágio
|
Recebendo a Scarab Ocarina - 15 minutos depois
|
Agora para fazer o Conch Shell Horn será preciso juntar uma Conch Shell e uma Wooden Mouthpiece.
- A Conch Shell pode ser obtida em uma Large Turquoise Seashell
 em dois locais em Oskayaat: (aqui ou aqui). A concha também poder comprada no NPC Black Bert por 10000 gps.
 - A Wooden Mouthpiece pode ser obtida em um baú dourado
 ao oeste do depot da cidade (aqui).
Com os dois itens em mãos, use um no outro e você irá obter o Conch Shell Horn ![]() .
.
Ancient Ritual - Sacrifice 
Sobre Sacrifice, Domizian nos diz que é preciso sacrificar alguém que tenha sido tocado pela maldição Were mas que nunca tenha machucado outro ser vivo. Se você falar com a NPC Niral a respeito desse sacrifício, ela dirá que está disposto a dar sua vida pelo povo da ilha mas que gostaria que você encontrasse outra maneira de cumprir esta parte do ritual.
Para isso você deve queimar uma folha ![]() das palmeiras azuis
das palmeiras azuis  , para conseguir a folha use o canivete ou uma Kitchen Knife nas palmeiras azuis, da ilha em uma tocha
 ![]() (usar a folha da palmeira na tocha) próximo ao shrine dedicado a deusa da lua. Tendo feito isso, faça e toque os intrumentos sagrados (Conch Shell Horn e Scarab Ocarina) próximo ao shrine também.
(usar a folha da palmeira na tocha) próximo ao shrine dedicado a deusa da lua. Tendo feito isso, faça e toque os intrumentos sagrados (Conch Shell Horn e Scarab Ocarina) próximo ao shrine também.
Tendo realizado o ritual por completo, volte a falar com Niral (não precisa fazer novamente o quebra-cabeça das fases da lua) e reporte a missão falando Hi - Mission. Ela ficará agradecida e pedirá que volte no dia seguinte (20 horas reais) para conferir seu estado novamente.
Reportando a missão
|
Após as 20 Horas, retorne até a NPC e fale Hi - Curse, ela ficará agradecida e irá lhe presentear com uma Toy Ball ![]() que irá permitir que você dome uma Foxmouse que costumava ser a montaria de Niral.
que irá permitir que você dome uma Foxmouse que costumava ser a montaria de Niral.
Falando com Niral - 20 Horas Depois
|
Jogador: Hi
Niral: Greetings, traveller! |
Você irá encontrar a montaria em uma caverna cuja entrada fica em uma rachadura próxima ao farol (aqui![]() ). Chegando lá, você encontrará uma única Foxmouse, use a bola nela para domá-la.
). Chegando lá, você encontrará uma única Foxmouse, use a bola nela para domá-la.
Atenção:
|

Na mesma caverna da montaria, é possível encontrar uma passagem escondida na parede ao norte, para acessá-la é preciso usar uma Moonlight Ipomea's Stamen ![]() que por sua vez só pode ser obtida uma vez por personagem ao dar "Use" em uma Moonlight Ipomea, uma flor que só aparece no topo do vulcão de Oskayaat (aqui
que por sua vez só pode ser obtida uma vez por personagem ao dar "Use" em uma Moonlight Ipomea, uma flor que só aparece no topo do vulcão de Oskayaat (aqui![]() ) durante a Mini World Change Full Moon. Dentro da sala haverá um baú de recompensa que, caso você possua mais de uma Moonlight Ipomea's Stamen para utilizar, poderá ser aberto a cada 20h. Caso contrário, só poderá ser aberto conforme você obtenha uma flor por mês durante a Mini World Change.
) durante a Mini World Change Full Moon. Dentro da sala haverá um baú de recompensa que, caso você possua mais de uma Moonlight Ipomea's Stamen para utilizar, poderá ser aberto a cada 20h. Caso contrário, só poderá ser aberto conforme você obtenha uma flor por mês durante a Mini World Change.
Entrada da caverna.
Montaria
Achievement
Entrando na sala do baú.
Moonlight Ipomea


Extras
Moonlight Crystals
Enquanto a Mini World Change estiver ativa, todas as Were-Creatures poderão dropar Moonlight Crystals ![]() que podem ser utilizados para carregar:
que podem ser utilizados para carregar:
- Um Werewolf Amulet
 . Ele irá se transformar em um Enchanted Werewolf Amulet
  e passará a ter os atributos: Arm: 3, protection physical +6%.
 - Um Werewolf Helmet
 . Ele irá se transformar em um Enchanted Werewolf Helmet
  . O atributo deste elmo mudará conforme a escolha do personagem que o encantar. Os encantamentos possíveis são escolhidos pelas vocações. Fale "Werewolf Helmet" para o NPC Maeryn para escolher a vocação e/ou o tipo de Weapon (Axe, Club ou Sword) para o atributo de encantamento desejado. Após definido o atributo, use o Moonlight Crystals no Werewolf Helmet para modificar os atributos.
Owin, Tamru the Black & Ayana the Crimson Curse
Durante a lua cheia, um boss irá aparecer em Grimvale (Owin) e dois bosses irão aparecer em Oskayaat (Tamru the Black e Ayana the Crimson Curse), a cada 50 minutos aproximadamente.
- Boss Owin Raid 1-1.png
Owin nasce (aqui
).
Tamru the Black nasce (aqui
).
Ayana the Crimson Curse nasce (aqui
).


Manta Ray, White Lion & Foxmouse Mounts
- Ao enfrentar a boss Black Vixen, você pode dropar uma Foxtail
 que serve para domar uma Manta Ray.
 - Ao enfrentar os bosses do Lion Sanctum, você pode dropar uma Red Silk Flower
 que serve para domar um White Lion.
 - Ao concluir a missão Paradise Lost, você irá receber uma Toy Ball
 que serve para domar uma Foxmouse.
Montarias:


|