|
|||
|
|
|
||||||||||||||||||||||||


Shadows of Yalahar Quest: mudanças entre as edições
| [edição aprovada] | [Aprovação Pendente] |
 |
|||
| Linha 16: | Linha 16: | ||
|implemented = 8.5 | |implemented = 8.5 | ||
| spoiler = | | spoiler = | ||
__NOTOC__ | |||
== Requerimentos == | == Requerimentos == | ||
* [[In Service of Yalahar Quest]] até a missão 3 completa; | * [[In Service of Yalahar Quest]] até a missão 3 completa; | ||
| Linha 29: | Linha 29: | ||
* [[Dwarven Ring]] para a missão 12. | * [[Dwarven Ring]] para a missão 12. | ||
== | == Método == | ||
Para começar essa quest, você deve falar com o [[NPC]] [[Telas]], você pode encontrar ele em [[Stonehome]] (subindo {{mapa|33277,31806,7:5|aqui}}). Fale ''Mission'', ele irá contar que precisa de ajuda em uma pesquisa para criar Golems. | Para começar essa quest, você deve falar com o [[NPC]] [[Telas]], você pode encontrar ele em [[Stonehome]] (subindo {{mapa|33277,31806,7:5|aqui}}). Fale ''Mission'', ele irá contar que precisa de ajuda em uma pesquisa para criar Golems. | ||
= [[Arquivo:Golem Wrench.gif|45px|link=]] Missões [[Arquivo:Golem Wrench.gif|45px|link=]] = | |||
<table class="abas"> | |||
<tr> | |||
<td class="mostrar-aba" style="width:33%; height:70px;" data-aba="1"> | |||
<table class="abas"> | |||
<tr> | |||
<td style="border-color:#1D262D; width:25%; height:70px;">[[Arquivo:Golem Wrench.gif|45px|right|link=]]</td> | |||
<td style="border-color:#1D262D; width:50%; height:70px;">Missão 01: Errand Boy</td> | |||
<td style="border-color:#1D262D; width:25%; height:70px;">[[Arquivo:Research Notes.gif|45px|left|link=]]</td> | |||
</tr> | |||
</table> | |||
</td> | |||
<td class="mostrar-aba" style="width:33%; height:70px;" data-aba="2"> | |||
<table class="abas"> | |||
<tr> | |||
<td style="border-color:#1D262D; width:25%; height:70px;">[[Arquivo:Golem Wrench.gif|45px|right|link=]]</td> | |||
<td style="border-color:#1D262D; width:50%; height:70px;">Missão 02: A Vital Part</td> | |||
<td style="border-color:#1D262D; width:25%; height:70px;">[[Arquivo:Large Crystal (Red).gif|50px|left|link=]]</td> | |||
</tr> | |||
</table> | |||
</td> | |||
<td class="mostrar-aba" style="width:33%; height:70px;" data-aba="3"> | |||
<table class="abas"> | |||
<tr> | |||
<td style="border-color:#1D262D; width:25%; height:70px;">[[Arquivo:Golem Wrench.gif|45px|right|link=]]</td> | |||
<td style="border-color:#1D262D; width:50%; height:70px;">Missão 03: The Core Problem</td> | |||
<td style="border-color:#1D262D; width:25%; height:70px;">[[Arquivo:Earth Elemental.gif|left|link=]]</td> | |||
</tr> | |||
</table> | |||
</td> | |||
</tr> | |||
<tr> | |||
<td class="mostrar-aba" style="width:25%; height:70px;" data-aba="4"> | |||
<table class="abas"> | |||
<tr> | |||
<td style="border-color:#1D262D; width:25%; height:70px;">[[Arquivo:Golem Wrench.gif|45px|right|link=]]</td> | |||
<td style="border-color:#1D262D; width:50%; height:70px;">Missão 04: Gathering Golem Parts</td> | |||
<td style="border-color:#1D262D; width:25%; height:70px;">[[Arquivo:Worker Golem.gif|left|link=]]</td> | |||
</tr> | |||
</table> | |||
</td> | |||
<td class="mostrar-aba" style="width:25%; height:70px;" data-aba="5"> | |||
<table class="abas"> | |||
<tr> | |||
<td style="border-color:#1D262D; width:25%; height:70px;">[[Arquivo:Golem Wrench.gif|45px|right|link=]]</td> | |||
<td style="border-color:#1D262D; width:50%; height:70px;">Missão 05: Charged To Charge</td> | |||
<td style="border-color:#1D262D; width:25%; height:70px;">[[Arquivo:Energy Field.gif|45px|left|link=]]</td> | |||
</tr> | |||
</table> | |||
</td> | |||
<td class="mostrar-aba" style="width:25%; height:70px;" data-aba="6"> | |||
<table class="abas"> | |||
<tr> | |||
<td style="border-color:#1D262D; width:25%; height:70px;">[[Arquivo:Golem Wrench.gif|45px|right|link=]]</td> | |||
<td style="border-color:#1D262D; width:50%; height:70px;">Missão 06: Out of The Blue</td> | |||
<td style="border-color:#1D262D; width:25%; height:70px;">[[Arquivo:War Golem.gif|left|link=]]</td> | |||
</tr> | |||
</table> | |||
</td> | |||
</tr> | |||
<tr> | |||
<td class="mostrar-aba" style="width:25%; height:70px;" data-aba="7"> | |||
<table class="abas"> | |||
<tr> | |||
<td style="border-color:#1D262D; width:25%; height:70px;">[[Arquivo:Golem Wrench.gif|45px|right|link=]]</td> | |||
<td style="border-color:#1D262D; width:50%; height:70px;">Missão 07: Powering Up</td> | |||
<td style="border-color:#1D262D; width:25%; height:70px;">[[Arquivo:Plaguesmith.gif|70px|left|link=]]</td> | |||
</tr> | |||
</table> | |||
</td> | |||
<td class="mostrar-aba" style="width:25%; height:70px;" data-aba="8"> | |||
<table class="abas"> | |||
<tr> | |||
<td style="border-color:#1D262D; width:25%; height:70px;">[[Arquivo:Golem Wrench.gif|45px|right|link=]]</td> | |||
<td style="border-color:#1D262D; width:50%; height:70px;">Missão 08: Getting Things Stable</td> | |||
<td style="border-color:#1D262D; width:25%; height:70px;">[[Arquivo:Quara Predator.gif|70px|left|link=]]</td> | |||
</tr> | |||
</table> | |||
</td> | |||
<td class="mostrar-aba" style="width:25%; height:70px;" data-aba="9"> | |||
<table class="abas"> | |||
<tr> | |||
<td style="border-color:#1D262D; width:25%; height:70px;">[[Arquivo:Golem Wrench.gif|45px|right|link=]]</td> | |||
<td style="border-color:#1D262D; width:50%; height:70px;">Missão 09: Researching The Ritual</td> | |||
<td style="border-color:#1D262D; width:25%; height:70px;">[[Arquivo:Large Book.gif|left|link=]]</td> | |||
</tr> | |||
</table> | |||
</td> | |||
</tr> | |||
<tr> | |||
<td class="mostrar-aba" style="width:25%; height:70px;" data-aba="10"> | |||
<table class="abas"> | |||
<tr> | |||
<td style="border-color:#1D262D; width:25%; height:70px;">[[Arquivo:Golem Wrench.gif|45px|right|link=]]</td> | |||
<td style="border-color:#1D262D; width:50%; height:70px;">Missão 10: The Right Ingredients</td> | |||
<td style="border-color:#1D262D; width:25%; height:70px;">[[Arquivo:Alchemistic Table.gif|75px|left|link=]]</td> | |||
</tr> | |||
</table> | |||
</td> | |||
<td class="mostrar-aba" style="width:25%; height:70px;" data-aba="11"> | |||
<table class="abas"> | |||
<tr> | |||
<td style="border-color:#1D262D; width:25%; height:70px;">[[Arquivo:Golem Wrench.gif|45px|right|link=]]</td> | |||
<td style="border-color:#1D262D; width:50%; height:70px;">Missão 11: Take a Shower</td> | |||
<td style="border-color:#1D262D; width:25%; height:70px;">[[Arquivo:Bath Tub.gif|58px|left|link=]]</td> | |||
</tr> | |||
</table> | |||
</td> | |||
<td class="mostrar-aba" style="width:25%; height:70px;" data-aba="12"> | |||
<table class="abas"> | |||
<tr> | |||
<td style="border-color:#1D262D; width:25%; height:70px;">[[Arquivo:Golem Wrench.gif|45px|right|link=]]</td> | |||
<td style="border-color:#1D262D; width:50%; height:70px;">Missão 12: Headless</td> | |||
<td style="border-color:#1D262D; width:25%; height:70px;">[[Arquivo:Rift Worm.gif|left|link=]]</td> | |||
</tr> | |||
</table> | |||
</td> | |||
</tr> | |||
<tr> | |||
<td class="mostrar-aba" colspan="3" style="width:100%; height:70px;" data-aba="13"> | |||
<table class="abas"> | |||
<tr> | |||
<td style="border-color:#1D262D; width:40%; height:70px;">[[Arquivo:Golem Wrench.gif|45px|right|link=]]</td> | |||
<td style="border-color:#1D262D; width:20%; height:70px;">Missão 13: Fruits of Success</td> | |||
<td style="border-color:#1D262D; width:40%; height:70px;">[[Arquivo:Modified Gnarlhound.gif|45px|left|link=]]</td> | |||
</tr> | |||
</table> | |||
</td> | |||
</table> | |||
<div id="aba-1" class="aba"> | |||
== [[Arquivo:Golem Wrench.gif|45px|link=]] Missão 01: Errand Boy [[Arquivo:Golem Wrench.gif|45px|link=]] == | |||
Sua primeira missão será pedir para alguns outros NPCs que estão ajudando na pesquisa para enviarem suas notas de pesquisas para [[Telas]], a ordem de visita não importa e a medida que for pedindo para eles suas '''research notes''' seus nomes irão saindo do quest log. | Sua primeira missão será pedir para alguns outros NPCs que estão ajudando na pesquisa para enviarem suas notas de pesquisas para [[Telas]], a ordem de visita não importa e a medida que for pedindo para eles suas '''research notes''' seus nomes irão saindo do quest log. | ||
| Linha 42: | Linha 174: | ||
</gallery> | </gallery> | ||
'''Não há uma ordem certa para visitar Boveas, Cerdras, Dreadeye, Milos e Scutty.''' | |||
'''Transcrições''' | |||
* [[Telas]] em [[Stonehome]] | * [[Telas]] em [[Stonehome]] | ||
{{transcrições|npc=Telas|texto= | {{transcrições|npc=Telas|texto= | ||
| Linha 260: | Linha 192: | ||
[[Telas]]: Good bye, <personagem>.}} | [[Telas]]: Good bye, <personagem>.}} | ||
''' | '''Visitando Boveas''' | ||
* [[Boveas]] em [[Mintwallin]] | * [[Boveas]] em [[Mintwallin]] | ||
{{transcrições|npc=Boveas|texto= | {{transcrições|npc=Boveas|texto= | ||
| Linha 272: | Linha 202: | ||
[[Boveas]]: Good bye, <personagem>.}} | [[Boveas]]: Good bye, <personagem>.}} | ||
'''Visitando Cerdras''' | |||
* [[Cerdras]] em [[Carlin]] | * [[Cerdras]] em [[Carlin]] | ||
{{transcrições|npc=Cerdras|texto= | {{transcrições|npc=Cerdras|texto= | ||
| Linha 283: | Linha 213: | ||
[[Cerdras]]: Good bye, <personagem>.}} | [[Cerdras]]: Good bye, <personagem>.}} | ||
'''Visitando Dreadeye''' | |||
* [[Dreadeye]] em [[Hellgate]] | * [[Dreadeye]] em [[Hellgate]] | ||
{{transcrições|npc=Dreadeye|texto= | {{transcrições|npc=Dreadeye|texto= | ||
| Linha 295: | Linha 225: | ||
[[Dreadeye]]: Bye. Think twice before you return here.}} | [[Dreadeye]]: Bye. Think twice before you return here.}} | ||
'''Visitando Milos''' | |||
* [[Milos]] em [[Edron]] | * [[Milos]] em [[Edron]] | ||
{{transcrições|npc=Milos|texto= | {{transcrições|npc=Milos|texto= | ||
| Linha 305: | Linha 235: | ||
[[Milos]]: Good bye.}} | [[Milos]]: Good bye.}} | ||
'''Visitando Scutty''' | |||
* [[Scutty]] em [[Kazordoon]] | * [[Scutty]] em [[Kazordoon]] | ||
{{transcrições|npc=Scutty|texto= | {{transcrições|npc=Scutty|texto= | ||
| Linha 315: | Linha 245: | ||
''Personagem'': '''bye'''<br /> | ''Personagem'': '''bye'''<br /> | ||
[[Scutty]]: Yeah, bye.}} | [[Scutty]]: Yeah, bye.}} | ||
Após falar com todos os NPCs, volte até o [[Telas]] e reporte sua ''mission''. | |||
'''Transcrições''' | |||
* [[Telas]] em [[Stonehome]] | * [[Telas]] em [[Stonehome]] | ||
| Linha 324: | Linha 258: | ||
[[Telas]]: It will take some time to evaluate all those different approaches to the topic. Meanwhile, we can get on with the other tasks to advance our project. ...<br /> | [[Telas]]: It will take some time to evaluate all those different approaches to the topic. Meanwhile, we can get on with the other tasks to advance our project. ...<br /> | ||
[[Telas]]: when you are ready, just ask me for your next mission.}} | [[Telas]]: when you are ready, just ask me for your next mission.}} | ||
</div> | |||
<div id="aba-2" class="aba"> | |||
== [[Arquivo:Golem Wrench.gif|45px|link=]] Missão 02: A Vital Part [[Arquivo:Golem Wrench.gif|45px|link=]] == | |||
{{DASH|'''Obs:''' Se você quiser, pode comprar o item [[Mago Mechanic Core]][[Arquivo:Mago Mechanic Core.gif]] no [[NPC]] [[Black Bert]] por 13,000 [[gp]]s.}} | |||
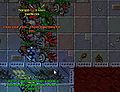
Fale novamente ''Mission'' para [[Telas]]. Agora sua missão será ir até o [[Factory Quarter]], em [[Yalahar]], e descer no circulo preto indicado no mapa.<br /> | |||
[[Arquivo:Telas13.png]] | |||
'''Transcrições''' | |||
{{transcrições|npc=Telas|texto= | {{transcrições|npc=Telas|texto= | ||
''Personagem'': '''mission'''<br /> | ''Personagem'': '''mission'''<br /> | ||
| Linha 342: | Linha 287: | ||
''Personagem'': '''bye'''<br /> | ''Personagem'': '''bye'''<br /> | ||
[[Telas]]: Good bye, <personagem>.}} | [[Telas]]: Good bye, <personagem>.}} | ||
Após descer, vá para o leste e desça novamente, depois desça novamente na escada ao sul e siga para o norte até ver uma porta selada, passe pela porta e desça novamente. Uma vez na sala, seu dever é usar o [[Telescope]] ao norte da sala, você só deve usar ele uma vez e somente quando o cristal a sua frente estiver '''vermelho'''.<br /> | |||
Após acertar o vermelho, pegue o [[Mago Mechanic Core]] usando a [[Strange Machine]] ao sudoeste da sala. | |||
[[Arquivo:Telas14.jpg]] | |||
Volte e entregue o item para [[Telas]]. | |||
'''Transcrições''' | |||
{{transcrições|npc=Telas|texto= | {{transcrições|npc=Telas|texto= | ||
| Linha 350: | Linha 304: | ||
[[Telas]]: My understanding is growing daily. For now we will incorporate this core into our construction. ...<br /> | [[Telas]]: My understanding is growing daily. For now we will incorporate this core into our construction. ...<br /> | ||
[[Telas]]: You have proven yourself to be incredibly helpful. More missions await you.}} | [[Telas]]: You have proven yourself to be incredibly helpful. More missions await you.}} | ||
</div> | |||
<div id="aba-3" class="aba"> | |||
== [[Arquivo:Golem Wrench.gif|45px|link=]] Missão 03: The Core Problem [[Arquivo:Golem Wrench.gif|45px|link=]] == | |||
{{DASH|'''Obs:''' Se você quiser, pode comprar o item [[Elemental Crystal]][[Arquivo:Elemental Crystal.gif]] no [[NPC]] [[Black Bert]] por 8,000 [[gp]]s. Você irá precisar comprar 10 elemental crystals.}} | |||
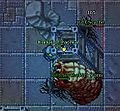
Fale novamente ''Mission'' para [[Telas]]. Neste missão, seu dever será caçar [[Earth Elemental]]s e usar uma [[pick]] em seus corpos para conseguir 10 [[Elemental Crystal]]s. Você pode encontrar [[Earth Elemental]]s na caverna ao norte de [[Edron]], {{mapa|33157,31720,7:5|aqui}}. | |||
[[Arquivo:Telas15.jpg]] | |||
'''Transcrições''' | |||
{{transcrições|npc=Telas|texto= | {{transcrições|npc=Telas|texto= | ||
''Personagem'': '''mission'''<br /> | ''Personagem'': '''mission'''<br /> | ||
| Linha 361: | Linha 326: | ||
''Personagem'': '''bye'''<br /> | ''Personagem'': '''bye'''<br /> | ||
[[Telas]]: Good bye, <personagem>.}} | [[Telas]]: Good bye, <personagem>.}} | ||
Após pegar os 10 [[Elemental Crystal]]s, volte e reporte sua missão. | |||
'''Transcrições''' | |||
{{transcrições|npc=Telas|texto= | {{transcrições|npc=Telas|texto= | ||
| Linha 368: | Linha 337: | ||
[[Telas]]: So you have brought me all 10 shards for the core! That is one step further towards the construction of our very own golem! Without your help I would never have made it this far. ...<br /> | [[Telas]]: So you have brought me all 10 shards for the core! That is one step further towards the construction of our very own golem! Without your help I would never have made it this far. ...<br /> | ||
[[Telas]]: I wish your next mission were less dangerous but sadly it isn't. But more about that when we talk about your next mission.}} | [[Telas]]: I wish your next mission were less dangerous but sadly it isn't. But more about that when we talk about your next mission.}} | ||
</div> | |||
<div id="aba-4" class="aba"> | |||
== [[Arquivo:Golem Wrench.gif|45px|link=]] Missão 04: Gathering Golem Parts [[Arquivo:Golem Wrench.gif|45px|link=]] == | |||
Fale novamente ''Mission'' para [[Telas]]. Para a sua próxima missão, [[Telas]] irá lhe dar um [[Golem Disassembler]]. Você deverá matar qualquer tipo de Golem ([[Damaged Worker Golem]] ou [[Worker Golem]]) e usar a ferramenta em seus corpos até achar 6 [[Golem Part]]s. | |||
[[Arquivo:Telas16.jpg]] | |||
'''Transcrições''' | |||
{{transcrições|npc=Telas|texto= | {{transcrições|npc=Telas|texto= | ||
''Personagem'': '''mission'''<br /> | ''Personagem'': '''mission'''<br /> | ||
| Linha 380: | Linha 357: | ||
''Personagem'': '''bye'''<br /> | ''Personagem'': '''bye'''<br /> | ||
[[Telas]]: Good bye, <personagem>.}} | [[Telas]]: Good bye, <personagem>.}} | ||
Após obter as 6 [[Golem Part]]s, reporte sua missão. | |||
'''Transcrições''' | |||
{{transcrições|npc=Telas|texto= | {{transcrições|npc=Telas|texto= | ||
| Linha 386: | Linha 367: | ||
''Personagem'': '''mission'''<br /> | ''Personagem'': '''mission'''<br /> | ||
[[Telas]]: Ah, with your newest acquisition you have brought me 6 golem parts. With that we are done and can continue with your next mission.}} | [[Telas]]: Ah, with your newest acquisition you have brought me 6 golem parts. With that we are done and can continue with your next mission.}} | ||
'''NOTA:''' Algumas mensagens como essas irão aparecer para você: | |||
* "You ruined the golem remains" - Nada acontece. | |||
* "Something was stuck in the golem" - Irá aparecer um [[Rat|rato]]. | |||
* "You salvaged some scrap metal!" - Você ganhará um [[Nail|prego]]. | |||
* "What an electrifying experience!" - Você ficará [[Electrified|eletrocutado]]. | |||
* "You have salvaged a golem part" - Você conseguirá a parte do golem. | |||
</div> | |||
<div id="aba-5" class="aba"> | |||
== [[Arquivo:Golem Wrench.gif|45px|link=]] Missão 05: Charged To Charge [[Arquivo:Golem Wrench.gif|45px|link=]] == | |||
Fale novamente ''Mission'' para [[Telas]]. A esta altura da quest, a boa notícia é que [[Telas]] descobriu um recipiente perfeito para transportar a energia que ele precisa, a má noticia é que esse recipiente é você! | |||
Ele vai precisar de 3 cargas diferentes, do tipo '''A''', '''B''' e '''C'''. Você precisa ir até o [[Alchemist Quarter]], obter a carga e retornar para [[Telas]] quantas vezes seja necessário até achar as 3 cargas. O problema é que algumas vezes você traz cargas que não são necessárias, e às vezes repetidas. Para terminar essa missão você precisa de sorte, alguns personagens completaram entre 7 e 10 viagens, outros em mais. Como compensação quando você traz a carga errada, [[Telas]] oferece dinheiro para ajudar a pagar as passagens. | |||
'''Transcrições''' | |||
{{transcrições|npc=Telas|texto= | {{transcrições|npc=Telas|texto= | ||
''Personagem'': '''mission'''<br /> | ''Personagem'': '''mission'''<br /> | ||
| Linha 399: | Linha 394: | ||
[[Telas]]: Good bye, <personagem>.}} | [[Telas]]: Good bye, <personagem>.}} | ||
'''Você receberá algo aleatório, não nesta ordem!''' | [[Arquivo:Telas18.jpg]] | ||
Desça dois andares na caverna ao sudoeste do [[Alchemist Quarter]], indicado no mapa, e siga até o sudeste do andar, onde haverá uma porta selada. Entre e você encontrará a máquina para obter a carga ao sul. | |||
Vá para cima do piso azul e pegue a carga, vá e entregue-a para [[Telas]]. Repita isso até pegar as três cargas necessárias. | |||
'''Você receberá algo aleatório, não nesta ordem!''' | |||
'''Transcrições''' | |||
{{transcrições|npc=Telas|texto= | {{transcrições|npc=Telas|texto= | ||
| Linha 434: | Linha 437: | ||
''Personagem'': '''mission'''<br /> | ''Personagem'': '''mission'''<br /> | ||
[[Telas]]: We are finished with collecting charges! Now we can proceed and your next mission awaits you!}} | [[Telas]]: We are finished with collecting charges! Now we can proceed and your next mission awaits you!}} | ||
</div> | |||
<div id="aba-6" class="aba"> | |||
== [[Arquivo:Golem Wrench.gif|45px|link=]] Missão 06: Out of The Blue [[Arquivo:Golem Wrench.gif|45px|link=]] == | |||
{{DASH|'''Obs:''' Se você quiser, pode comprar o item [[Golem Blueprint]] [[Arquivo:Golem Blueprint.gif]] no [[NPC]] [[Black Bert]] por 13,500 [[gp]]s.}} | |||
Fale novamente ''Mission'' para [[Telas]].Nesta missão, [[Telas]] precisa de um [[Golem Blueprint]] para comparar com os seus próprios planos, é hora de voltar ao [[Factory Quarter]]. | |||
[[Arquivo:missao6shadows.png]] | |||
'''Transcrições''' | |||
{{transcrições|npc=Telas|texto= | {{transcrições|npc=Telas|texto= | ||
''Personagem'': '''mission'''<br /> | ''Personagem'': '''mission'''<br /> | ||
| Linha 441: | Linha 455: | ||
''Personagem'': '''bye'''<br /> | ''Personagem'': '''bye'''<br /> | ||
[[Telas]]: Good bye, <personagem>.}} | [[Telas]]: Good bye, <personagem>.}} | ||
Desça 3 andares no ponto indicado no mapa acima, e vá para o sul, onde você encontrará uma porta selada. '''Tome cuidado''', descendo a próxima escada existem vários [[Worker Golem]]s e [[War Golem]]s, é recomendado que você venha com um grupo, especialmente um [[knight]].<br /> | |||
Seu objetivo é descer a escada e ir tudo para o norte, atrás de uma parede haverá um baú, use-o para obter o [[Golem Blueprint]]. | |||
[[Arquivo:Telas20.jpg]] | |||
'''Nota:''' Esta sala é acessível apenas para esta missão, ao completá-la você não poderá entrar novamente. | |||
Após obter o item, entregue-o para [[Telas]]. | |||
'''Transcrições''' | |||
{{transcrições|npc=Telas|texto= | {{transcrições|npc=Telas|texto= | ||
| Linha 447: | Linha 472: | ||
''Personagem'': '''mission'''<br /> | ''Personagem'': '''mission'''<br /> | ||
[[Telas]]: Yes, you've got them! That will aid my understanding of the construction of a golem. But there is still a lot to do and new missions waiting.}} | [[Telas]]: Yes, you've got them! That will aid my understanding of the construction of a golem. But there is still a lot to do and new missions waiting.}} | ||
</div> | |||
<div id="aba-7" class="aba"> | |||
== [[Arquivo:Golem Wrench.gif|45px|link=]] Missão 07: Powering Up [[Arquivo:Golem Wrench.gif|45px|link=]] == | |||
{{DASH|'''Obs:''' Se você quiser, pode comprar o item [[Old Power Core]] [[Arquivo:Old Power Core.gif]] no [[NPC]] [[Black Bert]] por 13,000 [[gp]]s.}} | |||
Para essa missão, você precisará obter um [[Old Power Core]], novamente no [[Alchemist Quarter]], em uma caverna perto da costa do lado oeste: | |||
'''Transcrições''' | |||
{{transcrições|npc=Telas|texto= | {{transcrições|npc=Telas|texto= | ||
''Personagem'': '''mission'''<br /> | ''Personagem'': '''mission'''<br /> | ||
| Linha 454: | Linha 488: | ||
''Personagem'': '''bye'''<br /> | ''Personagem'': '''bye'''<br /> | ||
[[Telas]]: Good bye, <personagem>.<br />}} | [[Telas]]: Good bye, <personagem>.<br />}} | ||
[[Arquivo:missao07shadows.png]] | |||
<gallery> | |||
Image:Telas21.jpg|Um blocker será de extrema utilidade. | |||
Image:Telas22.jpg|Você obtém o item aqui. | |||
</gallery> | |||
Após obter o item, entregue-o para [[Telas]]. | |||
'''Trancrições''' | |||
{{transcrições|npc=Telas|texto= | {{transcrições|npc=Telas|texto= | ||
| Linha 460: | Linha 505: | ||
''Personagem'': '''mission'''<br /> | ''Personagem'': '''mission'''<br /> | ||
[[Telas]]: Phenomenal! That's precisely what we need. A bit tattered and rusty but it will do perfectly. While I am busy with this, you can get on with some other missions.}} | [[Telas]]: Phenomenal! That's precisely what we need. A bit tattered and rusty but it will do perfectly. While I am busy with this, you can get on with some other missions.}} | ||
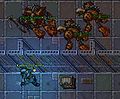
Nesta sala você enfrentará várias criaturas perigosas, como: 4 [[Mutated Human]]s, 3 [[Nightmare]]s, 3 [[Destroyer]]s e 2 [[Plaguesmith]]s, é recomendado você vir com um blocker. | |||
</div> | |||
<div id="aba-8" class="aba"> | |||
== [[Arquivo:Golem Wrench.gif|45px|link=]] Missão 08: Getting Things Stable [[Arquivo:Golem Wrench.gif|45px|link=]] == | |||
{{DASH|'''Obs:''' Se você quiser, pode comprar o item [[Stabilizer]] [[Arquivo:Stabilizer.gif]] no [[NPC]] [[Black Bert]] por 12,500 [[gp]]s.}} | |||
Fale novamente ''Mission'' para [[Telas]]. Sua próxima missão será obter um [[Stabilizer]]. Ele pode ser encontrado no [[Sunken Quarter]]. | |||
'''Transcrições''' | |||
{{transcrições|npc=Telas|texto= | {{transcrições|npc=Telas|texto= | ||
''Personagem'': '''mission'''<br /> | ''Personagem'': '''mission'''<br /> | ||
| Linha 468: | Linha 523: | ||
''Personagem'': '''bye'''<br /> | ''Personagem'': '''bye'''<br /> | ||
[[Telas]]: Good bye, <personagem>.<br /> }} | [[Telas]]: Good bye, <personagem>.<br /> }} | ||
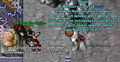
Quando você chegar ao [[Sunken Quarter]], vá para o oeste e desça, depois siga para o sul e desça 2 vezes. Vá para o leste e você verá uma porta selada, entre nela.</br>'''Esteja preparado para enfrentar''': [[Quara Constrictor]], [[Quara Hydromancer]], [[Quara Mantassin]], [[Quara Pincher]], [[Quara Predator]].<br /> | |||
[[Arquivo:shadows08.png]] | |||
O item fica em um baú no oeste da sala, pegue-o e entregue para [[Telas]]. | |||
'''Transcrições''' | |||
{{transcrições|npc=Telas|texto= | {{transcrições|npc=Telas|texto= | ||
| Linha 474: | Linha 537: | ||
''Personagem'': '''mission'''<br /> | ''Personagem'': '''mission'''<br /> | ||
[[Telas]]: Phenomenal! You must have good eyesight to have spotted this little fellow. However, don't mind my mumbling. New missions await you.}} | [[Telas]]: Phenomenal! You must have good eyesight to have spotted this little fellow. However, don't mind my mumbling. New missions await you.}} | ||
</div> | |||
<div id="aba-9" class="aba"> | |||
== [[Arquivo:Golem Wrench.gif|45px|link=]] Missão 09: Researching The Ritual [[Arquivo:Golem Wrench.gif|45px|link=]] == | |||
{{DASH|'''Obs:''' É aconselhável comprar 10 [[Headache Pill]]s [[Arquivo:Headache Pill.gif]] no [[NPC]] [[Black Bert]] por 350 [[gp]] cada antes de começar.}} | |||
Peça uma nova missão para Telas, ele vai dizer que é hora de estudar o ritual yalahari! Você faz isso na biblioteca da [[Inner City]] em [[Yalahar]], no noroeste do templo de [[Azerus]], ({{mapa|32785,31194,7:6|aqui}}), ao norte da sala de recompensa da [[In Service of Yalahar Quest]]. | |||
'''Transcrições''' | |||
{{transcrições|npc=Telas|texto= | {{transcrições|npc=Telas|texto= | ||
''Personagem'': '''mission'''<br /> | ''Personagem'': '''mission'''<br /> | ||
| Linha 488: | Linha 560: | ||
''Personagem'': '''bye'''<br /> | ''Personagem'': '''bye'''<br /> | ||
[[Telas]]: Good bye, <personagem>.<br />}} | [[Telas]]: Good bye, <personagem>.<br />}} | ||
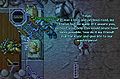
Você precisa ler seguidamente os 8 livros da sala para conseguir completar o ritual (não importa a ordem). Quando você conseguir ler um livro, fogos de artifícios estourarão em você e a seguinte mensagem aparece: | |||
<gallery> | |||
Image:Telas25.jpg|Quando o livro é lido com sucesso, a mensagem na imagem aparece. | |||
</gallery> | |||
Pode acontecer, dependendo da sorte, que você fique com dor de cabeça (estrelas sairão dos livros). Então, uma mensagem aparece e você não consegue seguir lendo o restante dos livros até que a dor de cabeça finalize (dura 1 minuto), ou até que você tome uma [[Headache Pill]]. | |||
'''Nota'''¹: Se você ficar com dor de cabeça, você deve voltar e ler todos os livros novamente, reiniciando a contagem do zero.<br /> | |||
'''Nota'''²: Criaturas como [[War Golem]], [[Enraged Bookworm]] ou [[Fire Devil]] podem ser sumonadas enquanto você está lendo. Se isso ocorrer, automaticamente terá dor de cabeça e, após matar a criatura sumonada, deverá reiniciar do zero a leitura dos livros. <br /> | |||
'''Nota'''³: Você poderá ser enviado para o [[Ghostship]]. | |||
[[Arquivo:Telas26.jpg]] | |||
Após ler todos os 8 livros corretamente, você completa o ritual usando a pena no meio da sala. | |||
[[Arquivo:Telas27.jpg]] | |||
Volte e reporte a missão para Telas. | |||
'''Transcrições''' | |||
{{transcrições|npc=Telas|texto= | {{transcrições|npc=Telas|texto= | ||
| Linha 494: | Linha 588: | ||
''Personagem'': '''mission'''<br /> | ''Personagem'': '''mission'''<br /> | ||
[[Telas]]: Impressive! To be honest, I feared a bit for your sanity, but you made it! And you are still healthy and sane! Well, at least I hope so. I fully understand if you want to take a few days off before you continue with your next mission.}} | [[Telas]]: Impressive! To be honest, I feared a bit for your sanity, but you made it! And you are still healthy and sane! Well, at least I hope so. I fully understand if you want to take a few days off before you continue with your next mission.}} | ||
</div> | |||
<div id="aba-10" class="aba"> | |||
== [[Arquivo:Golem Wrench.gif|45px|link=]] Missão 10: The Right Ingredients [[Arquivo:Golem Wrench.gif|45px|link=]] == | |||
{{DASH|'''Obs:''' Se você quiser, pode comprar os item no [[NPC]] [[Black Bert]]:</br> | |||
* [[Deep Crystal]] [[Arquivo:Deep Crystal.gif]] por 13,000 [[gp]]s.</br> | |||
* [[Dark Essence]] [[Arquivo:Dark Essence.gif]] por 17,000 [[gp]]s.</br> | |||
* [[Shadow Orb]] [[Arquivo:Shadow Orb.gif]] por 12,500 [[gp]]s.</br> | |||
* [[Bloodkiss Flower]] [[Arquivo:Bloodkiss Flower.gif]] por 10,000 [[gp]]s.</br> | |||
* [[Worm Queen Tooth]] [[Arquivo:Worm Queen Tooth.gif]] por 12,500 [[gp]]s.</br> | |||
* [[Animal Fetish]] [[Arquivo:Animal Fetish.gif]] por 10,000 [[gp]]s.</br> | |||
'''Nessa missão você precisará trazer um total de 3 ingredientes para [[Telas]] de um total de 6 possíveis. O NPC irá pedindo um item por vez, ao entregar o item ele pedirá o seguinte, assim até conseguir 3. Note que você não terá que trazer os 6, somente 3 e na ordem que o [[NPC]] pedir (vai depender da sorte).'''</br> | |||
}} | |||
Fale novamente ''Mission'' para [[Telas]]. | |||
'''Transcrições''' | |||
{{transcrições|npc=Telas|texto= | {{transcrições|npc=Telas|texto= | ||
''Personagem'': '''mission'''<br /> | ''Personagem'': '''mission'''<br /> | ||
| Linha 501: | Linha 614: | ||
[[Telas]]: Specifically, three items need to be replaced. Are you ready for your first mission?}} | [[Telas]]: Specifically, three items need to be replaced. Are you ready for your first mission?}} | ||
'''Nesta missão você tem que coletar 3 itens aleatórios, | '''Nesta missão você tem que coletar 3 itens aleatórios, abaixo estão listados todos os 6 itens possíveis e os respectivos diálogos com Telas''' | ||
==== | Clique no nome do item abaixo para ir direto aos diálogos e localização: | ||
* <p>[[#Deep Crystal|Deep Crystal]]</p> | |||
* <p>[[#Dark Essence|Dark Essence]]</p> | |||
* <p>[[#Shadow Orb|Shadow Orb]]</p> | |||
* <p>[[#Bloodkiss Flower|Bloodkiss Flower]]</p> | |||
* <p>[[#Worm Queen Tooth|Worm Queen Tooth]]</p> | |||
* <p>[[#Animal Fetish|Animal Fetish]]</p> | |||
== Deep Crystal == | |||
'''Transcrições''' | |||
{{transcrições|npc=Telas|texto= | {{transcrições|npc=Telas|texto= | ||
''Personagem'': '''mission'''<br /> | |||
[[Telas]]: Are you up to your assignment?<br /> | |||
''Personagem'': '''yes'''<br /> | ''Personagem'': '''yes'''<br /> | ||
[[Telas]]: | [[Telas]]: According to dwarven miners you might find the deep crystal somewhere in the depths under Ab'Dendriel. I have no idea where though, or even how to get there.<br /> | ||
''Personagem'': '''bye'''<br /> | ''Personagem'': '''bye'''<br /> | ||
[[Telas]]: Good bye, <personagem>.}} | [[Telas]]: Good bye, <personagem>.}} | ||
* No [[Hellgate]] você obtém o [[Deep Crystal]], ele fica na sala da [[Giant Spider]]. | |||
<gallery> | |||
Image:Telas28.png|[[Deep Crystal]], no [[Hellgate]] | |||
</gallery> | |||
'''Transcrições''' | |||
{{transcrições|npc=Telas|texto= | {{transcrições|npc=Telas|texto= | ||
| Linha 515: | Linha 648: | ||
[[Telas]]: Hello!<br /> | [[Telas]]: Hello!<br /> | ||
''Personagem'': '''mission'''<br /> | ''Personagem'': '''mission'''<br /> | ||
[[Telas]]: | [[Telas]]: I truly hope this is a deep crystal. I have to admit, all those crystals look the same to me.<br /> | ||
''Personagem'': '''bye'''<br /> | |||
[[Telas]]: Good bye, <personagem>.}} | |||
== Dark Essence == | |||
'''Transcrições''' | |||
{{transcrições|npc=Telas|texto= | |||
''Personagem'': '''mission'''<br /> | |||
[[Telas]]: Are you up to your assignment?<br /> | |||
''Personagem'': '''yes'''<br /> | |||
[[Telas]]: One of the more unpleasant components that I need is some dark essence. Some of my colleagues believe that it sometimes condenses in the depths beneath the cursed town of Drefia in the desert of the Daramian continent.<br /> | |||
''Personagem'': '''bye'''<br /> | |||
[[Telas]]: Good bye, <personagem>.}} | |||
* Em [[Drefia]] você obtém a [[Dark Essence]], para achar vá para [[Darashia]], chegando lá você descerá por esta escada ({{mapa|33007,32455,7:6|aqui}}), e continue descendo até chegar na [[Vampire's Crypt (Drefia)]]. No primeiro andar, você encontrará muitos [[vampire]]s, por isso tome cuidado. Você deve ir para o norte até achar a porta aonde está o item dentro de um [[Sarcophagus]]. | |||
<gallery> | |||
Image:Vampire's Crypt (Drefia) Caminho.png|Caminho até o item (você enfrentará muitas criaturas). | |||
Image:Telas30.png|Imagem do caixão. | |||
</gallery> | |||
'''Transcrições''' | |||
{{transcrições|npc=Telas|texto= | |||
''Personagem'': '''hi'''<br /> | |||
[[Telas]]: Hello!<br /> | |||
''Personagem'': '''mission'''<br /> | |||
[[Telas]]: By the Gods! Handle that dark essence with care! Didn't I mention it might explode? Ooops, I probably forgot to tell you! Well, whatever, I'll put it in a safe place for now. Thank you for your efforts my friend.}} | |||
== Shadow Orb == | |||
'''Transcrições''' | |||
{{transcrições|npc=Telas|texto= | {{transcrições|npc=Telas|texto= | ||
''Personagem'': '''mission'''<br /> | ''Personagem'': '''mission'''<br /> | ||
[[Telas]]: Are you up to your | [[Telas]]: Are you up to your assignment?<br /> | ||
''Personagem'': '''yes'''<br /> | ''Personagem'': '''yes'''<br /> | ||
[[Telas]]: One of the components is a shadow orb. So far, I have had no luck acquiring one. I even tried one of my more dubious contacts but he refused, saying that he would only mess with the guys in the dark cathedral if he had a death wish'. ...<br /> | [[Telas]]: One of the components is a shadow orb. So far, I have had no luck acquiring one. I even tried one of my more dubious contacts but he refused, saying that he would only mess with the guys in the dark cathedral if he had a death wish'. ...<br /> | ||
| Linha 527: | Linha 691: | ||
''Personagem'': '''bye'''<br /> | ''Personagem'': '''bye'''<br /> | ||
[[Telas]]: Good bye, <personagem>.}} | [[Telas]]: Good bye, <personagem>.}} | ||
* Na [[Dark Cathedral]] você precisa acessar o andar inferior puxando as alavancas e entrando pelo teleport para obter a [[Shadow Orb]]. | |||
[[Arquivo:Telas32.jpg]] | |||
'''Transcrições''' | |||
{{transcrições|npc=Telas|texto= | {{transcrições|npc=Telas|texto= | ||
| Linha 534: | Linha 704: | ||
[[Telas]]: Ah, a perfect shadow orb! This is exactly what we need.}} | [[Telas]]: Ah, a perfect shadow orb! This is exactly what we need.}} | ||
==== | == Bloodkiss Flower == | ||
'''Transcrições''' | |||
{{transcrições|npc=Telas|texto= | {{transcrições|npc=Telas|texto= | ||
''Personagem'': '''mission'''<br /> | ''Personagem'': '''mission'''<br /> | ||
[[Telas]]: Ready for your | [[Telas]]: Ready for your assignment?<br /> | ||
''Personagem'': '''yes'''<br /> | ''Personagem'': '''yes'''<br /> | ||
[[Telas]]: Some of the elves of Shadowthorn cultivate a plant known as bloodkiss. I need one sample for the ritual.<br /> | [[Telas]]: Some of the elves of Shadowthorn cultivate a plant known as bloodkiss. I need one sample for the ritual.<br /> | ||
''Personagem'': '''bye'''<br /> | ''Personagem'': '''bye'''<br /> | ||
[[Telas]]: Good bye, <personagem>.}} | [[Telas]]: Good bye, <personagem>.}} | ||
* Em [[Shadowthorn]], perto de [[Venore]] você acha a [[Bloodkiss Flower]] no sala da [[Time Ring Quest]]. | |||
[[Arquivo:Shadows of Yalahar Quest Missão 10 Mapa.png]] [[Arquivo:Telas35.jpg]] | |||
'''Transcrições''' | |||
{{transcrições|npc=Telas|texto= | {{transcrições|npc=Telas|texto= | ||
| Linha 552: | Linha 730: | ||
[[Telas]]: Finally! You have brought all the ingredients we need! We can talk about your next mission whenever you like.}} | [[Telas]]: Finally! You have brought all the ingredients we need! We can talk about your next mission whenever you like.}} | ||
=== Missão 11: Take a | == Worm Queen Tooth == | ||
'''Transcrições''' | |||
{{transcrições|npc=Telas|texto= | |||
''Personagem'': '''yes'''<br /> | |||
[[Telas]]: I am convinced that the tooth from a long dead rotworm queen will make an apt replacement for one of the more exotic ingredients in the Yalahari ritual. The books in the Edron academy suggest that the most likely place to find one might be deeper Fibula.<br /> | |||
''Personagem'': '''bye'''<br /> | |||
[[Telas]]: Good bye, <personagem>.}} | |||
* Em [[Fibula]], ao norte do teleporte de saída da [[Deeper Fibula Quest]], você acha a [[Worm Queen Tooth]]. Este item também pode ser comprado por 12,500 [[gp]]s com [[Black Bert]]. | |||
[[Arquivo:Telasworm.png]] [[Arquivo:Telas81.jpg]] | |||
'''Transcrições''' | |||
{{transcrições|npc=Telas|texto= | |||
''Personagem'': '''hi'''<br /> | |||
[[Telas]]: Hello!<br /> | |||
''Personagem'': '''mission'''<br /> | |||
[[Telas]]: My, this rotworm tooth looks old. But the older the better. It will certainly be sufficient for our ritual.}} | |||
== Animal Fetish == | |||
'''Transcrições''' | |||
{{transcrições|npc=Telas|texto= | |||
''Personagem'': '''mission'''<br /> | |||
[[Telas]]: Ready for your assignment?<br /> | |||
''Personagem'': '''yes'''<br /> | |||
[[Telas]]: One of the components could easily be substituted by an animal fetish. I have heard that the orcs in the Orcland use them to tame their war wolves. That's where you should start looking.<br /> | |||
''Personagem'': '''bye'''<br /> | |||
[[Telas]]: Good bye, <personagem>.}} | |||
* Em [[Orc Fortress]] você acha o [[Animal Fetish]] no primeiro andar na torre dos [[Orc Warlord]]s ao nordeste da fortaleza. | |||
{{transcrições|npc=Telas|texto= | |||
''Personagem'': '''hi'''<br /> | |||
[[Telas]]: Hello!<br /> | |||
''Personagem'': '''mission'''<br /> | |||
[[Telas]]: Phew. That fetish stinks. I'd better put it into some sort of container.}} | |||
</div> | |||
<div id="aba-11" class="aba"> | |||
== [[Arquivo:Golem Wrench.gif|45px|link=]] Missão 11: Take a Shower [[Arquivo:Golem Wrench.gif|45px|link=]] == | |||
Fale novamente ''Mission'' para [[Telas]]. Ele vai pedir que você retorne ao [[Alchemist Quarter]] em Yalahar e colete uma carga especial que irá ajuda-lo na construção de golems. | |||
'''Transcrições''' | |||
{{transcrições|npc=Telas|texto= | {{transcrições|npc=Telas|texto= | ||
''Personagem'': '''mission'''<br /> | ''Personagem'': '''mission'''<br /> | ||
| Linha 567: | Linha 794: | ||
''Personagem'': '''bye'''<br /> | ''Personagem'': '''bye'''<br /> | ||
[[Telas]]: Good bye, <personagem>.}} | [[Telas]]: Good bye, <personagem>.}} | ||
* Mais uma vez no [[Factory Quarter]] em [[Yalahar]] agora precisamos tomar uma ducha de energia. | |||
[[Arquivo:Telas36.png]] | |||
Para entrar nesta sala, você precisa dar use no botão do elevador para descer um andar. | |||
[[Arquivo:Telas37.png]] | |||
Em seguida retorne até Telas e reporte a missão. | |||
'''Transcrições''' | |||
{{transcrições|npc=Telas|texto= | {{transcrições|npc=Telas|texto= | ||
| Linha 573: | Linha 812: | ||
''Personagem'': '''mission'''<br /> | ''Personagem'': '''mission'''<br /> | ||
[[Telas]]: Ah, yes. My instruments tell me you have taken the shower! Are you ready to receive the amplifying charge?}} | [[Telas]]: Ah, yes. My instruments tell me you have taken the shower! Are you ready to receive the amplifying charge?}} | ||
</div> | |||
<div id="aba-12" class="aba"> | |||
== [[Arquivo:Golem Wrench.gif|45px|link=]] Missão 12: Headless [[Arquivo:Golem Wrench.gif|45px|link=]] == | |||
{{DASH|'''Obs:''' Se você quiser, pode comprar o item [[Golem Head]] [[Arquivo:Golem Head.gif]] no [[NPC]] [[Black Bert]] por 25,000 [[gp]]s.</br> | |||
* Por ser a missão mais complicada, muitos personagens compram o item com [[Black Bert]].}} | |||
Fale novamente ''Mission'' para [[Telas]]. | |||
'''Transcrições''' | |||
{{transcrições|npc=Telas|texto= | {{transcrições|npc=Telas|texto= | ||
''Personagem'': '''yes'''<br /> | ''Personagem'': '''yes'''<br /> | ||
| Linha 580: | Linha 829: | ||
''Personagem'': '''bye'''<br /> | ''Personagem'': '''bye'''<br /> | ||
[[Telas]]: Good bye, <personagem>.}} | [[Telas]]: Good bye, <personagem>.}} | ||
Agora ele precisa de uma [[Golem Head]] (cabeça de golem) que pode ser obtida em [[Fenrock]], no andar com tartarugas, no teleporte indicado no mapa: | |||
<gallery> | |||
Image:Telas39.png|Localização do teleporte, no primeiro andar cave | |||
</gallery> | |||
* Numa primeira etapa você precisará consertar o elevador, para isso fale '''repair''' para o Golem Servant. Ele pergunta se você está pronto para começar a trazer os itens para o conserto. Para conseguir trazer o item a tempo, você precisa usar um [[Dwarven Ring]] e dependendo de seu level, a magia [[Haste]]. Além disso, você precisa ir diretamente ao ponto em que o item fica. Para ajudar com isso, aqui vai a localização de cada item: | |||
[[Arquivo:Telas40.jpg]] | |||
* Se você for rápido o suficiente o NPC dirá: "você trouxe 1/8 dos itens, pronto para o seguinte?" e assim deve continuar até completar 8 sem erros, se você não for rápido o suficiente em algum, deverá recomeçar tudo de novo falando '''repair'''. | |||
* Uma vez completado, você pode usar o elevador atrás do NPC para acessar o andar inferior. | |||
[[Arquivo:Telas41.jpg]] | |||
* Na sala do andar inferior, você precisará alcançar a caixa no sul da sala que está cheia de [[Rift Scythes]], [[Rift Worms]] e [[War Golem]]s, muitos deles renascem cada vez que você mata, portanto não tem como matar todos na sala. Você tem duas opções: ir com um team de várias pessoas e enquanto os blockers distraem as criaturas, o resto do time pega o item ou tenta correr até o final da sala. | |||
<gallery> | |||
Image:Telas42.jpg|Escada que leva até a sala | |||
Image:Telas43.jpg|Caixa com o item, no sul da sala | |||
</gallery> | |||
Quando conseguir o item, retorne até Telas e reporte a missão. | |||
'''Transcrições''' | |||
{{transcrições|npc=Telas|texto= | {{transcrições|npc=Telas|texto= | ||
| Linha 589: | Linha 865: | ||
[[Telas]]: Good bye, <personagem>.}} | [[Telas]]: Good bye, <personagem>.}} | ||
(Espere 1 hora) | (Espere 1 hora real) | ||
{{transcrições|npc=Telas|texto= | {{transcrições|npc=Telas|texto= | ||
| Linha 600: | Linha 876: | ||
''Personagem'': '''bye'''<br /> | ''Personagem'': '''bye'''<br /> | ||
[[Telas]]: Good bye, <personagem>.}} | [[Telas]]: Good bye, <personagem>.}} | ||
</div> | |||
<div id="aba-13" class="aba"> | |||
== [[Arquivo:Golem Wrench.gif|45px|link=]] Missão 13: Fruits of Success [[Arquivo:Golem Wrench.gif|45px|link=]] == | |||
Ao entregar o último dos itens obtido na missão 12 você precisará esperar um dia tibiano (ou uma hora normal) para poder fazer a última missão. Fale novamente ''Mission'' para [[Telas]] (após um dia tibiano). | |||
'''Transcrições''' | |||
{{transcrições|npc=Telas|texto= | {{transcrições|npc=Telas|texto= | ||
| Linha 610: | Linha 892: | ||
''Personagem'': '''bye'''<br /> | ''Personagem'': '''bye'''<br /> | ||
[[Telas]]: Good bye, <personagem>.}} | [[Telas]]: Good bye, <personagem>.}} | ||
Quando [[Telas]] convidar, você poderá usar o elevador da sala atrás da porta e descer no andar em que ele está pronto para dar vida a um Golem. A honra de colocar em funcionamento o [[Unfinished Golem|Golem]] será, ao ser puxando a alavanca. O golem ganha vida e se torna um [[Telas Golem]], agore reporte a missão ao [[Telas]] e você ganhará 25000 pontos de [[experiência]] e acesso ao laboratório onde você poderá obter uma [[Golem Wrench]] em um baú e aos [[Modified Gnarlhound]], para domá-los. | |||
Além disso, você poderá negociar com [[Telas]]. | |||
'''Transcrições''' | |||
{{transcrições|npc=Telas|texto= | {{transcrições|npc=Telas|texto= | ||
| Linha 621: | Linha 909: | ||
''Personagem'': '''bye'''<br /> | ''Personagem'': '''bye'''<br /> | ||
[[Telas]]: Good bye, <personagem>.}} | [[Telas]]: Good bye, <personagem>.}} | ||
<gallery> | |||
Image:Telas50.jpg|Puxe a alavanca para dar vida ao [[Unfinished Golem|Golem]]. | |||
Image:Telas51.jpg|O Golem funcionando. | |||
Image:Telas53.jpg|Ganhando experiência. | |||
Image:Telas54.PNG|Ganhando Achievement "Golem in the Gears". | |||
</gallery> | |||
=== Depois de completar a missão 13 === | === Depois de completar a missão 13 === | ||
| Linha 635: | Linha 930: | ||
[[Telas]]: Good bye, <personagem>.}} | [[Telas]]: Good bye, <personagem>.}} | ||
</div> | |||
}} | }} | ||

Edição das 06h13min de 14 de julho de 2020
|
|
||||||||||||||||||||||||
| Recompensa: Acesso aos laboratório de Telas, Golem Wrench, habilidade de negociar com Telas, 25,000 de experiência. |
||||||||||||||||||||||||
| Localização: Vários locais. Início em Stonehome, (aqui |
||||||||||||||||||||||||
| Você enfrentará: Vários tipos de criaturas. |
||||||||||||||||||||||||
| Mini-Bosses: Nenhum. |
||||||||||||||||||||||||
| Bosses: Nenhum. |
||||||||||||||||||||||||
| Adicionado: Versão 8.5 (01 de julho de 2009) |
||||||||||||||||||||||||
|
||||||||||||||||||||||||
|
||||||||||||||||||||||||
Veja também: Quests | In Service of Yalahar Quest | Searoutes around Yalahar Quest | The Way to Yalahar Quest.
Requerimentos
- In Service of Yalahar Quest até a missão 3 completa;
- The Thieves Guild Quest completa, caso queira comprar os itens com NPC Black Bert;
- Um amigo ou um time, para missões mais difíceis;
- Key 3012 para acessar o Hellgate caso a porta esteja trancada;
- Rope ou a magia Magic Rope;
- Shovel ou Light Shovel;
- Pick para a missão 3;
- Helmet of the Deep ou Depth Galea para a missão 8;
- Key 3940 e Key 3980, se você for mandado a Fibula durante a missão 10;
- Dwarven Ring para a missão 12.
Método
Para começar essa quest, você deve falar com o NPC Telas, você pode encontrar ele em Stonehome (subindo aqui![]() ). Fale Mission, ele irá contar que precisa de ajuda em uma pesquisa para criar Golems.
). Fale Mission, ele irá contar que precisa de ajuda em uma pesquisa para criar Golems.
 Missões
|
|
|
|||||||||
|
|
|
|||||||||
|
|
|
|||||||||
|
|
|
|||||||||
|
|||||||||||


Missão 01: Errand Boy
Sua primeira missão será pedir para alguns outros NPCs que estão ajudando na pesquisa para enviarem suas notas de pesquisas para Telas, a ordem de visita não importa e a medida que for pedindo para eles suas research notes seus nomes irão saindo do quest log.
- Telas4.jpg
Fale com Milos no noroeste da Noodles Academy of Modern Magic.

Fale com Boveas na entrada de Mintwallin.

Não há uma ordem certa para visitar Boveas, Cerdras, Dreadeye, Milos e Scutty.
Transcrições
 |
Personagem: hi
Telas: Hello! Sorry I'm a bit busy. |
Visitando Boveas
- Boveas em Mintwallin
 |
Personagem: hi
Boveas: Hi! I hope you're not going to kill me! |
Visitando Cerdras
 |
Personagem: hi
Cerdras: Greetings my friend! |
Visitando Dreadeye
 |
Personagem: hi
Dreadeye: Ah, a visitor to intimidate. Splendid! |
Visitando Milos
 |
Personagem: hi
Milos: Oh hello. I hardly noticed you. I'm afraid I am a bit distracted at the moment. |
Visitando Scutty
 |
Personagem: hi
Scutty: Hi there. |
Após falar com todos os NPCs, volte até o Telas e reporte sua mission.
Transcrições
|
Personagem: hi
Telas: Hello! |
Missão 02: A Vital Part
| Obs: Se você quiser, pode comprar o item Mago Mechanic Core |
Fale novamente Mission para Telas. Agora sua missão será ir até o Factory Quarter, em Yalahar, e descer no circulo preto indicado no mapa.

Transcrições
|
Personagem: mission
Telas: I hate to admit it, but I am still unable to create some of the necessary parts. Unfortunately, modern day technology just doesn't have the complexity to recreate the Yalaharian mago-mechanic cores. ... |
Após descer, vá para o leste e desça novamente, depois desça novamente na escada ao sul e siga para o norte até ver uma porta selada, passe pela porta e desça novamente. Uma vez na sala, seu dever é usar o Telescope ao norte da sala, você só deve usar ele uma vez e somente quando o cristal a sua frente estiver vermelho.
Após acertar o vermelho, pegue o Mago Mechanic Core usando a Strange Machine ao sudoeste da sala.

Volte e entregue o item para Telas.
Transcrições
|
Personagem: hi
Telas: Hello! |
Missão 03: The Core Problem
| Obs: Se você quiser, pode comprar o item Elemental Crystal |
Fale novamente Mission para Telas. Neste missão, seu dever será caçar Earth Elementals e usar uma pick em seus corpos para conseguir 10 Elemental Crystals. Você pode encontrar Earth Elementals na caverna ao norte de Edron, aqui![]() .
.

Transcrições
|
Personagem: mission
Telas: A golem's major power source is a mix of elemental forces. ... |
Após pegar os 10 Elemental Crystals, volte e reporte sua missão.
Transcrições
|
Personagem: hi
Telas: Hello! |
Missão 04: Gathering Golem Parts
Fale novamente Mission para Telas. Para a sua próxima missão, Telas irá lhe dar um Golem Disassembler. Você deverá matar qualquer tipo de Golem (Damaged Worker Golem ou Worker Golem) e usar a ferramenta em seus corpos até achar 6 Golem Parts.

Transcrições
|
Personagem: mission
Telas: I always find new things in the Yalaharian metallurgy to amaze me. In order to construct parts that are even remotely similar I had to spend a fortune and wait years for a dwarven smith to finish them. ... |
Após obter as 6 Golem Parts, reporte sua missão.
Transcrições
|
NOTA: Algumas mensagens como essas irão aparecer para você:
- "You ruined the golem remains" - Nada acontece.
- "Something was stuck in the golem" - Irá aparecer um rato.
- "You salvaged some scrap metal!" - Você ganhará um prego.
- "What an electrifying experience!" - Você ficará eletrocutado.
- "You have salvaged a golem part" - Você conseguirá a parte do golem.
Missão 05: Charged To Charge
Fale novamente Mission para Telas. A esta altura da quest, a boa notícia é que Telas descobriu um recipiente perfeito para transportar a energia que ele precisa, a má noticia é que esse recipiente é você!
Ele vai precisar de 3 cargas diferentes, do tipo A, B e C. Você precisa ir até o Alchemist Quarter, obter a carga e retornar para Telas quantas vezes seja necessário até achar as 3 cargas. O problema é que algumas vezes você traz cargas que não são necessárias, e às vezes repetidas. Para terminar essa missão você precisa de sorte, alguns personagens completaram entre 7 e 10 viagens, outros em mais. Como compensação quando você traz a carga errada, Telas oferece dinheiro para ajudar a pagar as passagens.
Transcrições
|
Personagem: mission
Telas: Well, this one is somewhat hard to explain. The power core of the golem needs some specific charges to make it work. The good news is that I have discovered the perfect carrier for the charge. ... |

Desça dois andares na caverna ao sudoeste do Alchemist Quarter, indicado no mapa, e siga até o sudeste do andar, onde haverá uma porta selada. Entre e você encontrará a máquina para obter a carga ao sul.
Vá para cima do piso azul e pegue a carga, vá e entregue-a para Telas. Repita isso até pegar as três cargas necessárias.
Você receberá algo aleatório, não nesta ordem!
Transcrições
|
Personagem: hi
Telas: Hello! |
Responda para A-charge:
|
Telas: Excellent. You brought an A-charge. Just what we needed.
|
Responda para B-charge:
|
Telas: Exemplary! A B-charge! Incredible!
|
Responda para C-charge:
|
Telas: We have got a major C-charge! Excellent!
|
Responda para X-charge:
|
Taffy Updated: Telas: Oh, that's an X-charge. Nevermind. Although we don't need it, the academy might use it for their lightning research. Here is your share of the money I'll get from reselling it. That makes 1500 gold.
|
Responda para Y-charge (você não precisa desta carga para esta missão):
|
Telas: Though this Y-charge is quite rare we don't need it for our research. However, some independent researchers will be willing to part with a fair amount of coin for it. I'll advance you 1200 gold. I'm sure I'll get that much back from my colleague.
|
Responda para o carregador que você já voltou para Telas:
|
Telas: Hm, that is another A/B/C-charge. Though it won't advance our project it will bring us a good price from other researchers. I will give you 900 gold for that charge.
|
Depois de retornar A-, B- e C-charges:
|
Personagem: mission
Telas: We are finished with collecting charges! Now we can proceed and your next mission awaits you! |
Missão 06: Out of The Blue
| Obs: Se você quiser, pode comprar o item Golem Blueprint |
Fale novamente Mission para Telas.Nesta missão, Telas precisa de um Golem Blueprint para comparar com os seus próprios planos, é hora de voltar ao Factory Quarter.

Transcrições
|
Desça 3 andares no ponto indicado no mapa acima, e vá para o sul, onde você encontrará uma porta selada. Tome cuidado, descendo a próxima escada existem vários Worker Golems e War Golems, é recomendado que você venha com um grupo, especialmente um knight.
Seu objetivo é descer a escada e ir tudo para o norte, atrás de uma parede haverá um baú, use-o para obter o Golem Blueprint.

Nota: Esta sala é acessível apenas para esta missão, ao completá-la você não poderá entrar novamente.
Após obter o item, entregue-o para Telas.
Transcrições
|
Missão 07: Powering Up
| Obs: Se você quiser, pode comprar o item Old Power Core |
Para essa missão, você precisará obter um Old Power Core, novamente no Alchemist Quarter, em uma caverna perto da costa do lado oeste:
Transcrições
|
Personagem: mission
Telas: In order to understand a Yalaharian power core I have to disassemble one. I think there are still some old and burnt out power cores to be found in the alchemists' quarter of Yalahar. Please get me one, the state of the core is not that important. |

Um blocker será de extrema utilidade.

Você obtém o item aqui.


Após obter o item, entregue-o para Telas.
Trancrições
|
Nesta sala você enfrentará várias criaturas perigosas, como: 4 Mutated Humans, 3 Nightmares, 3 Destroyers e 2 Plaguesmiths, é recomendado você vir com um blocker.
Missão 08: Getting Things Stable
| Obs: Se você quiser, pode comprar o item Stabilizer |
Fale novamente Mission para Telas. Sua próxima missão será obter um Stabilizer. Ele pode ser encontrado no Sunken Quarter.
Transcrições
|
Personagem: mission
Telas: I hope to save myself the effort of reinventing a stabilizer small enough to fit into the golem. I will have to get an original Yalahari stabilizer or be forced to create a four legged golem, which clearly won't do. ... |
Quando você chegar ao Sunken Quarter, vá para o oeste e desça, depois siga para o sul e desça 2 vezes. Vá para o leste e você verá uma porta selada, entre nela.
Esteja preparado para enfrentar: Quara Constrictor, Quara Hydromancer, Quara Mantassin, Quara Pincher, Quara Predator.

O item fica em um baú no oeste da sala, pegue-o e entregue para Telas.
Transcrições
|
Missão 09: Researching The Ritual
| Obs: É aconselhável comprar 10 Headache Pills |
Peça uma nova missão para Telas, ele vai dizer que é hora de estudar o ritual yalahari! Você faz isso na biblioteca da Inner City em Yalahar, no noroeste do templo de Azerus, (aqui![]() ), ao norte da sala de recompensa da In Service of Yalahar Quest.
), ao norte da sala de recompensa da In Service of Yalahar Quest.
Transcrições
|
Personagem: mission
Telas: While visiting Yalahar I discovered one of their libraries in the magicians' quarter. I solved the logic puzzle that prevented unwanted intruders and began to study their rituals. ... |
Você precisa ler seguidamente os 8 livros da sala para conseguir completar o ritual (não importa a ordem). Quando você conseguir ler um livro, fogos de artifícios estourarão em você e a seguinte mensagem aparece:

Quando o livro é lido com sucesso, a mensagem na imagem aparece.

Pode acontecer, dependendo da sorte, que você fique com dor de cabeça (estrelas sairão dos livros). Então, uma mensagem aparece e você não consegue seguir lendo o restante dos livros até que a dor de cabeça finalize (dura 1 minuto), ou até que você tome uma Headache Pill.
Nota¹: Se você ficar com dor de cabeça, você deve voltar e ler todos os livros novamente, reiniciando a contagem do zero.
Nota²: Criaturas como War Golem, Enraged Bookworm ou Fire Devil podem ser sumonadas enquanto você está lendo. Se isso ocorrer, automaticamente terá dor de cabeça e, após matar a criatura sumonada, deverá reiniciar do zero a leitura dos livros.
Nota³: Você poderá ser enviado para o Ghostship.

Após ler todos os 8 livros corretamente, você completa o ritual usando a pena no meio da sala.

Volte e reporte a missão para Telas.
Transcrições
|
Missão 10: The Right Ingredients
Obs: Se você quiser, pode comprar os item no NPC Black Bert:
|
Fale novamente Mission para Telas.
Transcrições
|
Nesta missão você tem que coletar 3 itens aleatórios, abaixo estão listados todos os 6 itens possíveis e os respectivos diálogos com Telas
Clique no nome do item abaixo para ir direto aos diálogos e localização:
Deep Crystal
Transcrições
|
- No Hellgate você obtém o Deep Crystal, ele fica na sala da Giant Spider.

Deep Crystal, no Hellgate

Transcrições
|
Dark Essence
Transcrições
|
Personagem: mission
Telas: Are you up to your assignment? |
- Em Drefia você obtém a Dark Essence, para achar vá para Darashia, chegando lá você descerá por esta escada (aqui
 ), e continue descendo até chegar na Vampire's Crypt (Drefia). No primeiro andar, você encontrará muitos vampires, por isso tome cuidado. Você deve ir para o norte até achar a porta aonde está o item dentro de um Sarcophagus.
- Vampire's Crypt (Drefia) Caminho.png
Caminho até o item (você enfrentará muitas criaturas).
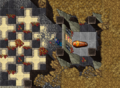
Imagem do caixão.

Transcrições
|
Shadow Orb
Transcrições
|
Personagem: mission
Telas: Are you up to your assignment? |
- Na Dark Cathedral você precisa acessar o andar inferior puxando as alavancas e entrando pelo teleport para obter a Shadow Orb.

Transcrições
|
Bloodkiss Flower
Transcrições
|
- Em Shadowthorn, perto de Venore você acha a Bloodkiss Flower no sala da Time Ring Quest.


Transcrições
|
Worm Queen Tooth
Transcrições
|
Personagem: yes
Telas: I am convinced that the tooth from a long dead rotworm queen will make an apt replacement for one of the more exotic ingredients in the Yalahari ritual. The books in the Edron academy suggest that the most likely place to find one might be deeper Fibula. |
- Em Fibula, ao norte do teleporte de saída da Deeper Fibula Quest, você acha a Worm Queen Tooth. Este item também pode ser comprado por 12,500 gps com Black Bert.


Transcrições
|
Animal Fetish
Transcrições
|
Personagem: mission
Telas: Ready for your assignment? |
- Em Orc Fortress você acha o Animal Fetish no primeiro andar na torre dos Orc Warlords ao nordeste da fortaleza.
|
Missão 11: Take a Shower
Fale novamente Mission para Telas. Ele vai pedir que você retorne ao Alchemist Quarter em Yalahar e colete uma carga especial que irá ajuda-lo na construção de golems.
Transcrições
|
Personagem: mission
Telas: I am disheartened. All my efforts to get this golem to function have been in vain! There is still something missing. Were I not a scientist I'd say it was the soul. ... |
- Mais uma vez no Factory Quarter em Yalahar agora precisamos tomar uma ducha de energia.

Para entrar nesta sala, você precisa dar use no botão do elevador para descer um andar.

Em seguida retorne até Telas e reporte a missão.
Transcrições
|
Missão 12: Headless
Obs: Se você quiser, pode comprar o item Golem Head
|
Fale novamente Mission para Telas.
Transcrições
|
Agora ele precisa de uma Golem Head (cabeça de golem) que pode ser obtida em Fenrock, no andar com tartarugas, no teleporte indicado no mapa:

Localização do teleporte, no primeiro andar cave

- Numa primeira etapa você precisará consertar o elevador, para isso fale repair para o Golem Servant. Ele pergunta se você está pronto para começar a trazer os itens para o conserto. Para conseguir trazer o item a tempo, você precisa usar um Dwarven Ring e dependendo de seu level, a magia Haste. Além disso, você precisa ir diretamente ao ponto em que o item fica. Para ajudar com isso, aqui vai a localização de cada item:
- Se você for rápido o suficiente o NPC dirá: "você trouxe 1/8 dos itens, pronto para o seguinte?" e assim deve continuar até completar 8 sem erros, se você não for rápido o suficiente em algum, deverá recomeçar tudo de novo falando repair.
- Uma vez completado, você pode usar o elevador atrás do NPC para acessar o andar inferior.

- Na sala do andar inferior, você precisará alcançar a caixa no sul da sala que está cheia de Rift Scythes, Rift Worms e War Golems, muitos deles renascem cada vez que você mata, portanto não tem como matar todos na sala. Você tem duas opções: ir com um team de várias pessoas e enquanto os blockers distraem as criaturas, o resto do time pega o item ou tenta correr até o final da sala.
Escada que leva até a sala
Caixa com o item, no sul da sala


Quando conseguir o item, retorne até Telas e reporte a missão.
Transcrições
|
(Espere 1 hora real)
|
Personagem: hi
Telas: Hello! |
Missão 13: Fruits of Success
Ao entregar o último dos itens obtido na missão 12 você precisará esperar um dia tibiano (ou uma hora normal) para poder fazer a última missão. Fale novamente Mission para Telas (após um dia tibiano).
Transcrições
|
Quando Telas convidar, você poderá usar o elevador da sala atrás da porta e descer no andar em que ele está pronto para dar vida a um Golem. A honra de colocar em funcionamento o Golem será, ao ser puxando a alavanca. O golem ganha vida e se torna um Telas Golem, agore reporte a missão ao Telas e você ganhará 25000 pontos de experiência e acesso ao laboratório onde você poderá obter uma Golem Wrench em um baú e aos Modified Gnarlhound, para domá-los.
Além disso, você poderá negociar com Telas.
Transcrições
|
Personagem: hi
Telas: Hello! |
Puxe a alavanca para dar vida ao Golem.

O Golem funcionando.

Ganhando experiência.
Ganhando Achievement "Golem in the Gears".


Depois de completar a missão 13
|
Personagem: hi
Telas: Hello! |