|
|
|
||||||||||||||||||||||||


In Service of Yalahar Quest
|
|
||||||||||||||||||||||||
Recompensa:  Yalaharian Outfits, Addons, acesso a Yalahar, acesso a todos os quarters, viajar para Yalahar utilizando outras rotas marítimas, 1000 gps, Achievements e escolher uma das três recompensas: Yalahari Mask, Yalahari Armor ou Yalahari Leg Piece. |
||||||||||||||||||||||||
| Localização: Ab'Dendriel, Ankrahmun, Carlin, Darashia, Liberty Bay, Port Hope, Thais, Venore e Yalahar. |
||||||||||||||||||||||||
| Você enfrentará: Várias criaturas de todos os quarters de Yalahar. |
||||||||||||||||||||||||
| Mini-Bosses: Nenhum. |
||||||||||||||||||||||||
| Bosses: Azerus, Diseased Bill, Diseased Dan, Diseased Fred, Morik the Gladiator e dependendo da suas escolhas: Inky, Sharptooth e Splasher. |
||||||||||||||||||||||||
| Adicionado: Versão 8.4 (10 de dezembro de 2008) |
||||||||||||||||||||||||
|
||||||||||||||||||||||||
|
||||||||||||||||||||||||

Veja também: Quests.
Requerimentos
Missão: Detour to Yalahar
- Free account
- Ter completado a 1º missão da The Explorer Society Quest, faça a primeira tarefa em Carlin e entregando uma Dwarven Pickaxe
- 500 gp
Missões: The Way to Yalahar e Searoutes Around Yalahar
- Ter completado a 1º missão da The Explorer Society Quest, seu rank deve ser novice ou superior.
- Dinheiro para viagens.
- 5 entre os seguintes itens (apenas um de cada):
Missões: In Service of Yalahar
- Rope.
- Shovel.
- Dinheiro para viagens.
- Crowbar (para 1ª missão).
- Animal Cure necessário para a 5º missão. Você deve completar a missão Nibelor 1: Breaking the Ice da The Ice Islands Quest para poder comprar este item com a NPC Siflind, comprar no mercado ou de outro jogador.
- Helmet of the Deep (para a 7ª missão).
| Nota: A cada ação feita com sucesso nas missões, a mensagem "Your questlog has been updated." aparecerá no seu Server Log e o texto encontrado no Quest Log será atualizado. |
| Legenda dos Mapas | |
| - Ponto de partida. | |
| - Locais para subir ou descer. | |
| - Passagens. | |
| - Usar Levitate. | |
| - Portais. | |
| - Objetivos. | |
Lembre-se que:
Para obter o addon do "lado bom" você deve seguir o caminho do lado bom em algumas missões.


Para obter o addon do "lado mau" você deve seguir o caminho do lado mau em algumas missões.


Método
Obs:
|
 The Way to Yalahar
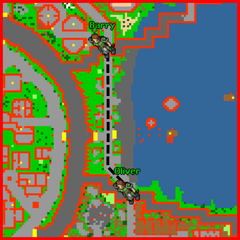
Vá até o NPC Wyrdin na Academia de Edron e peça para ele uma Mission. Ele vai mandar você ir até a cidade de Yalahar pegar alguns documentos com o representante local da Explorer Society utilizando o navio da Explorer Society de Liberty Bay. Você pode encontrar esse navio (aqui![]() ). Peça para o Captain Max levar você até Yalahar.
). Peça para o Captain Max levar você até Yalahar.


Wyrdin

Falando com Wyrdin
|
Jogador: Hi
Wyrdin: Hello, what brings you here? |
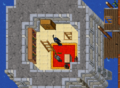
Chegando lá, procure pelo NPC Timothy, ele fica bem no centro da cidade (aqui![]() ), em frente da torre onde você pode comprar poções, ao norte do Depot.
), em frente da torre onde você pode comprar poções, ao norte do Depot.
Pergunte a ele sobre as notas da pesquisa falando Research Notes. Ele vai entregar um documento com as informações sobre Yalahar e você deve entregá-las para Wyrdin em Edron, ele vai agradecer o favor e recompensá-lo com 500 gps.


Timothy

Falando com Timothy
|
Jogador: Hi
Timothy: Oh, hello! It's a pleasure to see a visitor from the continent. |
Reportando a missão
|
Jogador: Hi
Wyrdin: Hello, what brings you here? |
| Atenção: Para ir até Yalahar, você vai precisar usar esse mesmo navio da Explorer Society de Liberty Bay. Para usar os navios normais (Venore, Thais, Carlin, etc) você deve completar a missão Searoutes around Yalahar. Com essa missão você poderá viajar direto para Yalahar sem utilizar o navio especial da Explorer Society de Liberty Bay. Ou seja, você não precisa pagar 400 gp por viagem. |
| Atenção: Após reportar a missão a Wyrdin, a missão The Way to Yalahar aparecerá como completada em seu Quest Log. |
Detour to Yalahar (Free Account)
Para acessar Yalahar com uma conta Free Account, dirija-se até a Explorer Society em Carlin e complete a primeira missão entregando uma Dwarven Pickaxe.
Com o rank Novice, vá até o NPC Wyrdin’s Apprentice em Kazordoon nesta localização aqui![]() . Fale Hi - Yalahar - Yes - Yes e ele irá te cobrar gps.
. Fale Hi - Yalahar - Yes - Yes e ele irá te cobrar gps.
O Wyrdin's Apprentice menciona ter acabado de voltar de Yalahar e fala brevemente sobre a cidade, sua experiência lá, e como ele iniciou seu próprio negócio traduzindo livros científicos. Ele também menciona ter feito um acordo com o Capitão Bluebear para oferecer passagem ao porto de Yalahar. O NPC te oferece a oportunidade de ir até a cidade, mediante um pagamento de 250 gps. Após aceitar e pagar, você recebe a senha whizzkid para dizer ao Capitão Bluebear em Thais, garantindo a viagem.
 |
Jogador: Hi
Wyrdin's Apprentice: Hm? Who's disturbing my perusal! I've just returned from Yalahar and have a lot of reading to do - make it short. |
Siga até o NPC do barco de Thais, o Captain Bluebear, e fale Hi - whizzkid - yes. Ele explica que, apesar de as autoridades de Yalahar serem rigorosas, pode fazer a viagem por 250 gps. O Capitão sugere que o jogador negocie com o Capitão Karith em Yalahar para mais rotas de navio no futuro.
|
Jogador: Hi
Captain Bluebear: Welcome on board, Madam Gisele Barbuda. Where can I sail you today? |
Searoutes Around Yalahar
Vá até o NPC Karith em Yalahar, ele fica ao lado do Captain Cookie, (aqui![]() ). Fale Hi - passage. Ele vai responder que não tem nenhuma razão para estabelecer rotas com outras cidades, mas se você conseguir provar que essas cidades "valem a pena" ele vai reconsiderar sua posição. Por isso, ele pede que você entregue um item interessante de no mínimo 5 cidades.
). Fale Hi - passage. Ele vai responder que não tem nenhuma razão para estabelecer rotas com outras cidades, mas se você conseguir provar que essas cidades "valem a pena" ele vai reconsiderar sua posição. Por isso, ele pede que você entregue um item interessante de no mínimo 5 cidades.
Falando com Karith
 |
Jogador: Hi
Karith: Hello! Tell me what's on your mind. Time is money. |
Falando com o NPC Karith.

Lembre-se que você só precisa comprar 5 itens e não tem diferença de qual cidade você vai comprar. É recomendado comprar os itens de Liberty Bay, Ab'Dendriel, Darashia, Carlin e Venore.
| Cidade | NPC | Item | Valor |
|---|---|---|---|
| Ab'Dendriel | Brasith | Bottle of Bug Milk | 200gp |
| Ankrahmun | Mehkesh | Jug of Embalming Fluid | 200gp |
| Carlin | Florentine | Bowl of Evergreen Flowers | 150gp |
| Darashia | Omur | Sample of Sand Wasp Honey | 200gp |
| Liberty Bay | Lyonel | Rum Flask | 150gp (pode ser feito) |
| Port Hope | Elephants | Tusk | -- |
| Thais | Gamon | Piece of Royal Satin | 200gp |
| Venore | Rodney & Livielle | Sample of Venorean Spice | 200gp |
Após comprar os 5 itens, volte ao NPC Karith em Yalahar e entregue os itens em qualquer ordem apenas falando Hi - Nome da Cidade - Yes. A partir de agora você poderá viajar para qualquer cidade. Para verificar para quais cidades o NPC pode levar você, fale Passage.
Entregando os itens
|
Jogador: Hi
Karith: Hello! Tell me what's on your mind. Time is money. |
| Atenção: Após entregar os itens a Karith, a missão Searoutes Around Yalahar aparecerá como completada em seu Quest Log. |
Missão 01: Something Rotten
Agora que você já tem acesso a Yalahar, você já pode iniciar as missões principais. Para isso, procure o NPC Palimuth, ele fica na entrada do palácio central ao norte do depot. Chegando lá, fale Hi - Mission - Yes - Mission, ele vai perguntar se você quer ajudá-lo com alguns problemas nos esgotos da cidade. Após aceitar a missão o NPC irá marcar os pontos no esgoto em que você deve utilizar a crowbar.

Localização do NPC Palimuth.

Palimuth.

Falando pela primeira vez com Palimuth
 |
Jogador: Hi
Palimuth: Greetings. |
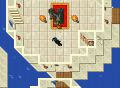
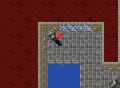
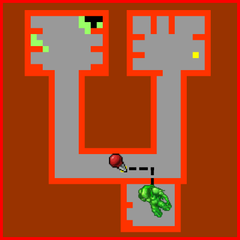
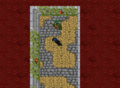
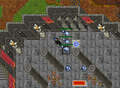
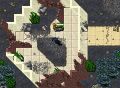
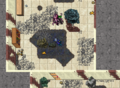
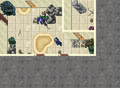
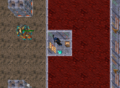
Há 04 lugares em que você deve usar uma Crowbar, eles estão marcados com um X no mapa abaixo e não são difíceis de achar, para chegar até eles você deve utilizar um dos 05 bueiros do centro da cidade (sinalizados com letras no mapa abaixo). Eles podem ser feitos em qualquer ordem, porém você precisará subir e desçer em diferentes pontos pois algumas passagens estão bloqueadas ou não existem. Após utilizar a crowbar em todos os pontos, volte até Palimuth e reporte a missão falando Hi - Mission - Yes. Os quatro pontos são mostrados abaixo:
- Ponto 1, utilize a Crowbar na parede em frente ao
 (aqui
(aqui ), conforme foto da galeria.
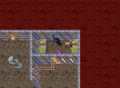
 - Ponto 2, utilize a Crowbar neste pilar
 (aqui), conforme foto da galeria.
 - Ponto 3, utilize a Crowbar no mecanismo
 (aqui), conforme foto da galeria.
 - Ponto 4, utilize a Crowbar na parede em frente ao (aqui), conforme foto da galeria.


Ponto 1.

Ponto 2.

Ponto 3.

Ponto 4.


Reportando a missão
|
Jogador: Hi
Palimuth: Greetings. |
| Atenção: Após reportar a missão a Palimuth, a missão Something Rotten aparecerá como completada em seu Quest Log. |
Missão 02: Watching the Watchmen
Fale com Palimuth sobre Mission, ele vai dizer que você precisa achar todos os 7 guardas dos quartéis da cidade e coletar os relatórios de cada um, esta é uma boa missão para explorar Yalahar. Para ver mais detalhes e a localização de todos eles, veja esta página.
Pedindo a missão
|
Jogador: Hi
Palimuth: Greetings. |
Como você ainda não pode passar pelos portões dos quarters, só existem duas entradas liberadas, a do Yalahar Foreigner Quarter e do Yalahar Magician Quarter. Você pode começar por qualquer um dos dois, porém começando pelo Yalahar Foreigner Quarter a sudoeste do NPC Palimuth você pode ir mais rápido.
Após entrar no Yalahar Foreigner Quarter, siga para sudoeste e depois vá para o norte. Quando encontrar uma pirâmide, vá para o norte e você achará o primeiro guarda. Apenas siga os grandes caminhos e faça todo o redor.
Você encontrará vários tipos de criaturas em cada quarter, as mais fortes são provavelmente os Mutated Humans e Slimes no Yalahar Alchemist Quarter.
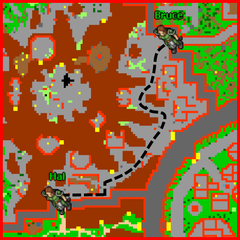
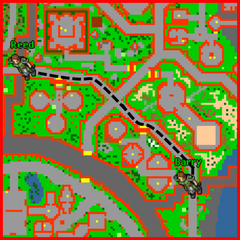
Quando encontrar os guardas nos portões entre os quarters, fale Hi - report para receber o relatório do guarda e depois pass - nome do próximo quarter para que o NPC transporte você de uma quarter para o outro, só é possível pedir passagem entre quarters vizinhos.
- Mapas
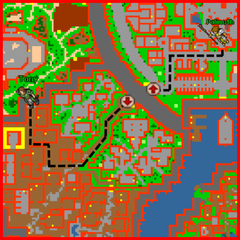
Do Foreigner para Arena Quarter

Da Arena para Alchemist Quarter
Do Alchemist para Cemetery Quarter

Do Cemetery para Magician Quarter
Do Magician para Sunken Quarter
Do Sunken para Factory Quarter

Do Factory para Trade Quarter


| Dica: Se você seguir o caminho indicado nos mapas, ao pegar o relatório de todos os guardas, você estará no Factory Quarter. Simplesmente volte para o Sunken Quarter e em seguida para o Magician Quarter e você já pode retornar para o centro da cidade. Retorne ao NPC Palimuth e reporte a missão. |
Reportando a missão
|
Jogador: Hi
Palimuth: Greetings. |
| Atenção: Após reportar a missão a Palimuth, a missão Watching the Watchmen aparecerá como completada em seu Quest Log. |
Missão 03: Death of the Deathbringer
| Obs: A partir desta missão você sempre precisa falar com Palimuth depois de receber uma missão do NPC Yalahari, caso contrário as portas seladas não irão abrir e em cada missão você também deverá escolher entre dois caminhos: o lado bom (Palimuth) ou o lado mau (Azerus). |
Fale com Palimuth sobre Mission, ele vai pedir para que você leia duas notas que estão no baú ao sudoeste de onde ele está, atrás de uma porta selada. As duas notas contam a história dos Augur (grupo ao qual o NPC Palimuth pertence) e sobre como este grupo chegou a Yalahar. As notas também explicam a situação decadente de Yalahar nos dias atuais e como surgiu o conflito atual entre os Augur e os Yalahari.
Pedindo a missão
|
Jogador: Hi
Palimuth: Greetings. |
Quando você pedir uma missão novamente, ele vai pedir para que você fale com o Yalahari para pegar uma nova missão.
|
Jogador: Hi
Palimuth: Greetings. |
Passe por um das portas atrás de Palimuth e ande para o norte, você encontrará o NPC Yalahari escoltado por dois guardas War Golems. É com ele que você sempre deve falar para iniciar uma nova missão. Ao falar Hi - Mission com ele pela primeira vez, ele também vai mandar você ler duas notas que estão em um baú ao noroeste dele atrás de uma porta selada. As duas notas contam basicamente a mesma história das duas primeiras notas de Palimuth, porém do ponto de vista dos Yalahari:.

Yalahari

Falando pela primeira vez com o Yalahari
 |
Jogador: Hi
Yalahari: Greetings. |
Ao falar Hi - Mission - Mission novamente para o Yalahari, ele mandará você ir ao Yalahar Alchemist Quarter encontrar os três contaminadores do quarter e derrotá-los. Também lhe mandará encontrar as last research notes (documentos que contém as últimas anotações dos cientistas do local antes do caos se espalhar pelo quarter) e entregar a ele.
Pedindo a missão
|
Jogador: Hi
Yalahari: Greetings. |
Agora fale Hi - Mission ao Palimuth. Ele vai liberar o acesso ao portão do Yalahar Alchemist Quarter e irá dizer para você não entregar as Last Research Notes ao Yalahari no final da missão e queimá-las em um forno qualquer, pois estas anotações podem ser altamente perigosas para o futuro de Yalahar.
Falando com Palimuth
|
Jogador: Hi
Palimuth: Greetings. |
Após falar com Palimuth siga para noroeste até chegar a entrada do Yalahar Alchemist Quarter, suba as escadas e utilize o mecanismo  para entrar no quarter. Durante o percurso você irá encontrar Death Blobs, Mutated Tigers, Mutated Humans, Slimes e vários Bog Raiders então, é aconselhável que você vá com um bom blocker ou com um shooter.
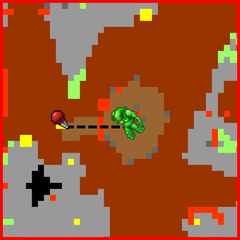
Mate os contaminadores: Diseased Fred, Diseased Bill, Diseased Dan e encontre as last research notes. Todos os três contaminadores apresentam o mesmo comportamento de um Bog Raider, porém um pouco mais forte. Caso esteja fazendo a missão em time, é fundamental que você cause o maior dano nas três criaturas, portanto é recomendado que cada membro do time mate individualmente as três criaturas.

Diseased Dan 

Localização do Diseased Dan.


Diseased Dan

Diseased Bill 


Localização do Diseased Bill.


Diseased Bill

Diseased Fred 
Localização do Diseased Fred.


Diseased Fred

Last Research Notes ![]()
Após matar o três contaminadores, vá para norte do quarter e desça a escada (aqui![]() ), ao descer, haverão vários Bog Raiders no caminho. Siga um pouco mais para norte e você irá encontrar uma porta selada (aqui
), ao descer, haverão vários Bog Raiders no caminho. Siga um pouco mais para norte e você irá encontrar uma porta selada (aqui![]() ), ao passar por ela e descer as escadas, você estará em uma sala com alguns equipamentos, um forno e um baú no canto direito da sala, ao clicar nele você receberá as last research notes
), ao passar por ela e descer as escadas, você estará em uma sala com alguns equipamentos, um forno e um baú no canto direito da sala, ao clicar nele você receberá as last research notes ![]() .
.
| Obs: No próprio local onde você encontra as last research notes, você pode utilizar o forno |
Localização das last research notes.


Encontrando as last research notes

Escolhendo um lado:
A partir de agora você deve escolher um dos lados para completar a missão.
|
|
Death of the Deathbringer - Lado Bom
Para fazer o lado bom desta missão, queime as last research notes em um fogão e fale Hi - Mission - No com Yalahari, ele ficará decepcionado com seu aparente fracasso.
|
Jogador: Hi
Yalahari: Greetings. |
Death of the Deathbringer - Lado Mau
Para fazer o lado mau desta missão, simplesmente entregue as last research notes ao Yalahari falando Hi - Mission - Yes.
|
Jogador: Hi
Yalahari: Greetings. |
| Atenção: Após reportar a missão ao Yalahari, a missão Death of the Deathbringer aparecerá como completada em seu Quest Log. |
Missão 04: Good to be Kingpin
Agora peça uma nova missão ao Yalahari falando Hi - Mission, lhe dará acesso para o Trade Gate. Ele lhe pedirá para encontrar Mr. West, e no caminho matar alguns de seus guardas, e tomar o local a força. Retorne e fale novamente com Palimuth.
Pedindo a missão ao Yalahari
|
Jogador: Hi
Yalahari: Greetings. |
Fale Hi - Mission com Palimuth. Ele lhe mandará você chegar amigavelmente até Mr. West, sem matar seus guardas, e fazer uma simples negociação para garantir boas relações comerciais para Yalahar.
Falando com Palimuth
|
Jogador: Hi
Palimuth: Greetings. |
Após falar com Palimuth vá até a entrada do esgoto do lado esquerdo do depot (aqui![]() ), vá para o sul e ande pelo esgoto até encontrar uma porta selada (aqui
), vá para o sul e ande pelo esgoto até encontrar uma porta selada (aqui![]() ). Ao passar pela porta você encontrará alguns Centipedes, Tarantulas e Slimes, se preferir você pode utilizar um anel de invisibilidade e continuar andando para o sul até chegar a uma escada (aqui
). Ao passar pela porta você encontrará alguns Centipedes, Tarantulas e Slimes, se preferir você pode utilizar um anel de invisibilidade e continuar andando para o sul até chegar a uma escada (aqui![]() ), suba até encontrar o Mr. West (aqui
), suba até encontrar o Mr. West (aqui![]() ).
).


Encontrando o Mr. West

Escolhendo um lado:
A partir de agora você deve escolher um dos lados para realizar a missão.
|
|
Good to be Kingpin - Lado Bom
Para fazer o lado bom dessa missão você deve atravessar a porta e chegar ao Mr. West, você deve simplesmente falar Hi - Mission, ele vai dizer que consegue ver os benefícios de um acordo comercial com o resto de Yalahar. Volte e relate a missão falando Hi - Mission para Palimuth e depois fale Hi - Mission novamente com o Yalahari.
Falando com Mr. West
|
Jogador: Hi
Mr. West: Wh .. What? How did you get here? Where are all the guards? You .. you could have killed me but yet you chose to talk? What a relief! ... |
Reportando a missão a Palimuth
|
Jogador: Hi
Palimuth: Greetings. |
Reportando a missão ao Yalahari
|
Jogador: Hi
Yalahari: Greetings. |
Good to be Kingpin - Lado Mau
Para realizar essa missão pelo lado mau, após atravessar a porta selada no esgoto e chegar ao Mr. West, NÃO FALE COM ELE, você deve subir mais um andar e matar pelo menos uma das criaturas: Bandits, Gang Members, Gladiators ou Smugglers. Após matar pelo menos uma das criaturas, desça e fale Hi - Mission ao Mr. West. Ele aceitará os termos impostos pelo Yalahari e pedirá que poupe sua vida. Volte e relate a missão ao Yalahari falando Hi - Mission.
Falando com Mr. West
|
Jogador: Hi
Mr. West: Murderer! But .. I give in, you won! ... |
Reportando a missão ao Yalahari
|
Jogador: Hi
Yalahari: Greetings. |
| Atenção: Após reportar a missão ao Yalahari, a missão Good to be Kingpin aparecerá como completada em seu Quest Log. |
Missão 05: Food or Fight
Fale Hi - Mission para o Yalahari, ele vai querer que você encontre um druid poderoso que vive no Yalahar Arena Quarter, pois ele é capaz de criar diversos tipos de bestas de guerra para "proteger" Yalahar.
Pedindo a missão
|
Jogador: Hi
Yalahari: Greetings. |
Agora fale Hi - Mission com Palimuth. Ele lhe pedirá pra convencer o druid a criar gado para alimentar os habitantes de Yalahar ao invés de bestas de guerra.
Falando com Palimuth
|
Jogador: Hi
Palimuth: Greetings. |
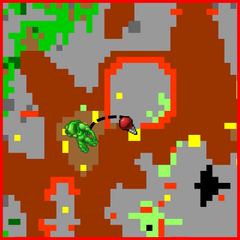
Vá até a arena no Yalahar Arena Quarter, ao entrar, contorne a arena para chegar na entrada. Ao subir as escadas você irá encontrar Gladiators no caminho, siga para esquerda e em seguida para norte até encontrar uma escada, desça e logo em seguida desça novamente na escada mais próxima. Ao descer, você vai ver uma porta selada, ao passar por ela você encontrará o druid Tamerin, diga Hi - Mission. Ele lhe pedirá para lhe entregar um Animal Cure e derrotar o gladiador Morik.


Encontrando o NPC Tamerin

Falando com Tamerin
|
Jogador: Hi
Tamerin: Hello, what brings you here? |
Animal Cure ![]()
Compre o Animal Cure da NPC Siflind, em Nibelor (aqui![]() ), por 400 gps (você precisará das missões do Barbarian Test e a missão Nibelor 1: Breaking the Ice da The Ice Islands Quest para poder comprar o item, ou pode comprá-lo no mercado ou de outros jogadores).
), por 400 gps (você precisará das missões do Barbarian Test e a missão Nibelor 1: Breaking the Ice da The Ice Islands Quest para poder comprar o item, ou pode comprá-lo no mercado ou de outros jogadores).
| Nota: Para adquirir o Animal Cure, é necessário solicitar a missão ao NPC Tamerin antes de efetuar a compra com a NPC Siflind. |
Morik the Gladiator 
Para enfrentar Morik suba dois andares de onde você encontrou o NPC Tamerin (você estará no andar +1 da arena), vá para parte leste da arena fazendo o contorno interno por cima, você irá encontrar muitos Gladiators no caminho, continue contornando a arena até chegar a uma porta selada.
Ao passar por ela, você estará no quarto de Morik. Ele não irá aparecer assim que você entrar na sala, você deve dar "use" no Armor Rack![]() para que Morik apareça. Trate-o como um Gladiator mais forte. Ao matá-lo, pegue o helmet dele
para que Morik apareça. Trate-o como um Gladiator mais forte. Ao matá-lo, pegue o helmet dele ![]() .
.


Escolhendo um lado:
A partir de agora você deve escolher um dos lados para completar a missão.
|
|
Food or Fight - Lado Bom
Após adquirir o Animal Cure e ter pegado o Morik's Helmet, retorne e entregue os itens a Tamerin falando Hi - Cure - Morik - Mission e ele irá perguntar o que ele deve criar, diga pra criar Cattle. Em seguida volte e reporte a missão a Palimuth falando Hi - Mission e em seguida Hi - Mission ao Yalahari.
|
Jogador: Hi
Tamerin: Hello, what brings you here? |
Reportando a missão a Palimuth
|
Jogador: Hi
Palimuth: Greetings. |
Reportando a missão ao Yalahari
|
Jogador: Hi
Yalahari: Greetings. |
Food or Fight - Lado Mau
Após adquirir o Animal Cure e ter pegado o Morik's Helmet, retorne e entregue os itens a Tamerin falando Hi - Cure - Morik - Mission e ele irá perguntar o que ele deve criar, diga pra criar Warbeast. Em seguida volte e reporte a missão diretamente ao Yalahari falando Hi - Mission.
|
Jogador: Hi
Tamerin: Hello, what brings you here? |
Reportando a missão a Palimuth
|
Jogador: Hi
Palimuth: Greetings. |
Reportando a missão ao Yalahari
|
Jogador: Hi
Yalahari: Greetings. |
| Atenção: Após reportar a missão ao Yalahari, a missão Food or Fight aparecerá como completada em seu Quest Log. |
Missão 06: Frightening Fuel
Fale Hi - Misson ao Yalahari, ele lhe dará um Ghost Charm e pedirá para você ir até o Yalahar Cemetery Quarter. Se você for Knight não esqueça de levar alguma arma de dano elemental. Antes de seguir para o Cemetery Quarter fale mission para o NPC Palimuth, ele irá liberar acesso ao portão do quarter e irá dizer que a ideia do Yalahari de abusar das almas torturadas para alimentar o dispositivo é doentia e fala que o charm pode ser útil para salvar as pobres almas.
Pedindo a missão
|
Jogador: Hi
Yalahari: Greetings. |
Falando com Palimuth
|
Jogador: Hi
Palimuth: Greetings. |
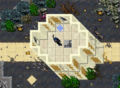
Após falar com Palimuth, pegue o Ghost Charm ![]() e vá para o Yalahar Cemetery Quarter. Chegando lá, vá para o interior da catedral localizada no centro do quarter e siga para o norte até chegar (aqui
e vá para o Yalahar Cemetery Quarter. Chegando lá, vá para o interior da catedral localizada no centro do quarter e siga para o norte até chegar (aqui![]() ) onde você encontrará um único Strange Carving (Tile)
) onde você encontrará um único Strange Carving (Tile) ![]() .
.


Strange Carving
Use o Ghost Charm no Strange Carving
Tormented Ghosts irão aparecer, mate-os e use seus corpos no Magic Forcefield


Ao usar Ghost Charm no Strange Carving (Tile), alguns Tormented Ghosts surgirão e o Ghost Charm estará em cima do Strange Carving (Tile) com a aparência de um Magic Forcefield![]() . Mate os Tormented Ghosts e use Ghost Residue (o corpo do ghost) no Ghost Charm três vezes.
. Mate os Tormented Ghosts e use Ghost Residue (o corpo do ghost) no Ghost Charm três vezes.
A cada vez que você usar o Ghost Residue, mais Tormented Ghosts irão aparecer, na terceira vez o Ghost Charm vai mudar para um Charged Ghost Charm ![]() .
.
Escolhendo um lado:
A partir de agora você deve escolher um dos lados para completar a missão.
|
|
Frightening Fuel - Lado Bom
Volte para Palimuth, fale para ele sobre a missão dizendo Hi - Mission e dê a ele o Charged Ghost Charm e seguida fale Hi - Mission com o Yalahari.
Reportando a missão a Palimuth
|
Jogador: Hi
Palimuth: Greetings. |
Reportando a missão ao Yalahari
|
Jogador: Hi
Yalahari: Greetings. |
Frightening Fuel - Lado Mau
Retorno ao palácio e dê o Charged Ghost Charm para o Yalahari falando Hi - Mission, ele ficará satisfeito com seu trabalho.
Reportando a missão ao Yalahari
|
Jogador: Hi
Yalahari: Greetings. |
| Atenção: Após reportar a missão ao Yalahari, a missão Frightening Fuel aparecerá como completada em seu Quest Log. |
Missão 07: A Fishy Mission
Requerimentos
Fale com o Yalahari para uma nova missão dizendo Hi - Mission, ele vai falar sobre relatos de ataques sofridos pelos pescadores locais pelas criaturas conhecidas como Quaras e que você deve matar seus líderes como forma de intimidação, em seguida fale Hi - Mission com Palimuth, ele vai liberar o acesso pelo portão do quarter e dizer que matar os líderes das Quaras é uma péssima ideia e que você precisa investigar a situação para descobrir os reais motivos dos ataques.
Pedindo a missão
|
Jogador: Hi
Yalahari: Greetings. |
Falando com Palimuth
|
Jogador: Hi
Palimuth: Greetings. |
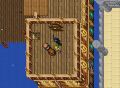
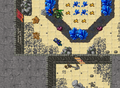
Após falar com Palimuth, vá para o leste até chegar ao Yalahar Sunken Quarter, utilize o mecanismo para passar pelo portão e continue indo para o leste, passe pela ponte e desça a escada, você vai encontrar o NPC Tarak, fale Hi - Trip - Yes com ele e você chegará em uma estrutura afundada onde encontrará quatro vortex de água, equipe seu Helmet of the Deep e pule na água.


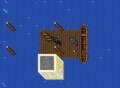
Falando com o NPC Tarak.
Entrada da área submersa. Equipe seu Helmet of the Deep e pule na água.
Área onde você chega após entrar na água e o teleport para retornar a superfície.


Escolhendo um lado:
A partir de agora você deve escolher um dos lados para completar a missão.
|
|
A Fishy Mission - Lado Bom
Siga o mapa, desça e sempre vá para noroeste. Tome cuidado pois próximo a NPC Maritima você encontrará algumas Quara Pinchers, Quara Hydromancers e Quara Predators. Continue para o oeste até encontrar a NPC Maritima. Fale Hi - Quara (Obs: Você não receberá mensagem de atualização do questlog.), após falar com a NPC Maritima, retorne e reporte a missão para Palimuth dizendo Hi - Mission.


Encontrando a NPC Maritima

Falando com Maritima
|
Jogador: Quara
Maritima: The quara in this area are a strange race that seeks inner perfection rather than a physical one. ... |
Reportando a missão a Palimuth
|
Jogador: Hi
Palimuth: Greetings. |
Reportando a missão ao Yalahari
|
Jogador: Hi
Yalahari: Greetings. |
|
|
|
|
A Fishy Mission - Lado Mau
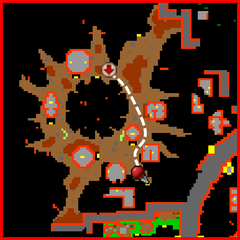
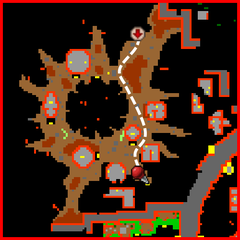
Para fazer o lado mau desta missão siga os mapas abaixo para matar os 3 bosses das Quaras: Inky, Splasher e Sharptooth, o terceiro pode dar ataques de 400+, tome cuidado se for level baixo.

Inky 
Ao entrar no Sunken Quarter, desça e siga para sudeste até chegar (aqui![]() ), lá você encontrará as escadas que o levarão até o boss. O boss está em uma sala que só pode ser acessada durante a missão. Trate esse boss da mesma maneira que uma Quara Constrictor normal.
), lá você encontrará as escadas que o levarão até o boss. O boss está em uma sala que só pode ser acessada durante a missão. Trate esse boss da mesma maneira que uma Quara Constrictor normal.
Inky

Sharptooth 
Ao entrar no Sunken Quarter, desça e siga para nordeste até chegar (aqui![]() ), lá você encontrará escadas que o levarão até o boss. O boss está em uma sala que só pode ser acessada durante a missão. Caso esteja em grupo, um knight forte deve blocar o boss enquanto um druida o cura e o resto do time ataca o boss. Para jogadores que estejam fazendo este boss sem um knight é bom atirar pela porta e sair para se curar e repetir o processo até matar o boss.
), lá você encontrará escadas que o levarão até o boss. O boss está em uma sala que só pode ser acessada durante a missão. Caso esteja em grupo, um knight forte deve blocar o boss enquanto um druida o cura e o resto do time ataca o boss. Para jogadores que estejam fazendo este boss sem um knight é bom atirar pela porta e sair para se curar e repetir o processo até matar o boss.
Sharptooth

Splasher 
Ao entrar no Sunken Quarter, desça e siga para sudoeste até chegar (aqui![]() ), lá você encontrará escadas que o levarão até o boss. O boss está em uma sala que só pode ser acessada durante a missão. Trate esse boss da mesma maneira que uma Quara Hydromancer normal.
), lá você encontrará escadas que o levarão até o boss. O boss está em uma sala que só pode ser acessada durante a missão. Trate esse boss da mesma maneira que uma Quara Hydromancer normal.
Splasher

Reportando a missão ao Yalahari
|
Jogador: Hi
Yalahari: Greetings. |
|
|
|
|
| Atenção: Após reportar a missão ao Yalahari, a missão A Fishy Mission aparecerá como completada em seu Quest Log. |
Missão 08: Dangerous Machinations
Fale com o Yalahari, Hi - Mission, ele vai pedir para você encontrar um "Pattern Crystal", que será usado para fabricar armas para ajudar a tomar o controle da cidade e reestabelecer a ordem. Depois disso vá até Palimuth e fale Hi - Mission, este vai pedir para você fazer o mesmo, só que para fabricar comida para a cidade.
Pedindo a missão
|
Jogador: Hi
Yalahari: Greetings. |
Falando com Palimuth
|
Jogador: Hi
Palimuth: Greetings. |
Após falar com Palimuth, vá para sudeste até chegar ao Yalahar Factory Quarter, utilize o mecanismo para passar pelo portão.

Escolhendo um lado:
A partir de agora você deve escolher um dos lados para completar a missão.
|
|
Dangerous Machinations - Lado Bom
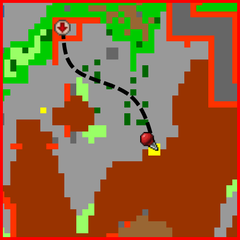
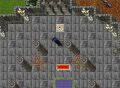
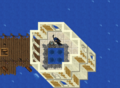
Para obter a Food Matrix, entre no Yalahar Factory Quarter e vá para o sul e desça (aqui![]() ), vá para leste e desça novamente mais um andar e vá para o sul e desça novamente mais um andar e você estará uma sala com vários Worker Golems. Caminhe para o norte e em seguida para oeste e em seguida para o norte novamente para encontrar uma porta selada (aqui
), vá para leste e desça novamente mais um andar e vá para o sul e desça novamente mais um andar e você estará uma sala com vários Worker Golems. Caminhe para o norte e em seguida para oeste e em seguida para o norte novamente para encontrar uma porta selada (aqui![]() ), ao passar por ela você encontrará um báu que contém a Food Matrix.
), ao passar por ela você encontrará um báu que contém a Food Matrix.
Food Matrix ![]()
Obtendo a Food Matrix Crystal. Cuidado! Há Worker Golems nos andares inferiores.


Obtendo a Food Matrix Crystal.

Após obter a Food Matrix Crystal, retorne para o primeiro andar inferior e vá para o norte em entre na sala com a porta selada, cuidado! há Worker Golems na sala. No norte da sala você vai encontrar uma máquina, use a Food Matrix Crystal nela e seu questlog será atualizado.

Reportando a missão a Palimuth
|
Jogador: Hi
Palimuth: Greetings. |
Reportando a missão ao Yalahari
|
Jogador: Hi
Yalahari: Greetings. |
| Atenção: Após utilizar a Food Matrix Crystal, a missão Dangerous Machinations aparecerá como completada em seu Quest Log. |
|
|
|
|
Dangerous Machinations - Lado Mau
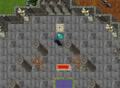
Para obter a Weapon Matrix, entre no Yalahar Factory Quarter e vá para leste e desça (aqui![]() ), desça novamente mais um andar e você estará uma sala com vários Worker Golems. Caminhe para o norte para encontrar uma porta selada (aqui
), desça novamente mais um andar e você estará uma sala com vários Worker Golems. Caminhe para o norte para encontrar uma porta selada (aqui![]() ), ao passar por ela você encontrará um báu que contém a Weapon Matrix.
), ao passar por ela você encontrará um báu que contém a Weapon Matrix.
Weapon Matrix ![]()
Obtendo a Weapon Matrix Crystal. Cuidado! Há Worker Golems nos andares inferiores.


Obtendo a Weapon Matrix Crystal.

Após obter a Weapon Matrix Crystal, suba para superfície e vá para oeste até o local indicado com a seta vermelha. Ao descer vá para o norte e entre na sala com a porta selada, cuidado! há Worker Golems na sala. No norte da sala você vai encontrar uma máquina, use a Weapon Matrix Crystal nela e seu questlog será atualizado.


Reportando a missão ao Yalahari
|
Jogador: Hi
Yalahari: Greetings. |
| Atenção: Após utilizar a Weapon Matrix Crystal, a missão Dangerous Machinations aparecerá como completada em seu Quest Log. |
|
|
|
|
Missão 09: Decision Mission
Agora você precisa decidir se vai se aliar a Palimuth ou Yalahari. Para fazer a sua escolha vá até Palimuth e fale Hi - Mission, a reação será diferente conforme a quantidade de missões que você fez para cada lado.
|
Falando com Palimuth com mais missões do lado bom
|
Falando com Palimuth com mais missões do lado mau
|
Após falar com ele, você de deve falar Mission com um dos NPCs: Palimuth OU Yalahari, eles irão perguntar se você deseja se aliar de fato a eles. Conforme a sua escolha, responda Yes.
|
Escolhendo apoiar Palimuth
|
Escolhendo apoiar o Yalahari
|
| Atenção: Após escolher um dos lados, a missão Decision Mission aparecerá como completada em seu Quest Log. |
Missão 10: The Final Battle
Chegou a hora da batalha final, dependendo da sua escolha na missão 09, fale novamente com o respectivo NPC.
|
|
The Final Battle - Lado Bom
Se você escolheu ficar do lado de Palimuth, ele irá explicar que adquiriu a informação de que os Yalahari estão planejando uma espécie de ritual para trazer entidades de outra dimensão para dominar Yalahar de uma vez por todas e que você deve impedi-los.
Falando com Palimuth
|
Jogador: Hi
Palimuth: Greetings. |
The Final Battle - Lado Mau
Após realizar as diversas missões para Azerus e escolhido seu lado, ele irá convidar você para uma celebração especial aonde você receberá sua grande recompensa.
Falando com Azerus
|
Jogador: Hi
Yalahari: Greetings. |
Após falar com os NPCs, prepare seu time, é recomendado um time formado com 10-12 jogadores de level 100 ou mais. Os mages podem usar runas como Avalanche e Thunderstorms. Com o time preparado vá para o interior do palácio central e desça (aqui![]() ), você e seu time deverão passar por duas portas: uma porta de quest e uma de level 80, em seguida vocês encontrão o teleporte que dá acesso a sala da luta final.
), você e seu time deverão passar por duas portas: uma porta de quest e uma de level 80, em seguida vocês encontrão o teleporte que dá acesso a sala da luta final.
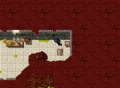
Sala da luta final

Azerus
| Atenção: Ataque Azerus somente após matar todos os summons, pois antes disso ele é extremamente difícil de ser morto. |
Estratégia:
Quando você chegar na sala, um membro do time deve clicar na Armillary Sphere ![]() no centro da sala, após alguns segundos Azerus irá aparecer junto com Rift Worms, mate-as e ignore Azerus. Depois ele se transportará para outro lugar na sala e irá sumonar Rift Broods, trate-os como Massive Energy Elementals e use Stone Shower neles enquanto continua a ignorar Azerus. Agora ele irá sumonar Rift Scythes, eles são parecidos com Grim Reapers então use GFBs. Azerus então irá sumonar War Golems. Desta vez ele estará enfraquecido, sendo muito mais fácil matá-lo, então faça isso enquanto ignora os War Golems.
no centro da sala, após alguns segundos Azerus irá aparecer junto com Rift Worms, mate-as e ignore Azerus. Depois ele se transportará para outro lugar na sala e irá sumonar Rift Broods, trate-os como Massive Energy Elementals e use Stone Shower neles enquanto continua a ignorar Azerus. Agora ele irá sumonar Rift Scythes, eles são parecidos com Grim Reapers então use GFBs. Azerus então irá sumonar War Golems. Desta vez ele estará enfraquecido, sendo muito mais fácil matá-lo, então faça isso enquanto ignora os War Golems.
Uma vez que o Azerus esteja morto, seu corpo se transformará em um Magic Forcefield ![]() . Todos os jogadores devem entrar no portal para serem teleportados para uma sala onde vários Rift Monsters poderão ser vistos. Vá ao ponto mais ao norte do lugar. Se você vir uma mensagem laranja se referindo ao exército de Azerus (Azerus' Army), você terminou a quest.
. Todos os jogadores devem entrar no portal para serem teleportados para uma sala onde vários Rift Monsters poderão ser vistos. Vá ao ponto mais ao norte do lugar. Se você vir uma mensagem laranja se referindo ao exército de Azerus (Azerus' Army), você terminou a quest.
Mensagem:
It seems by defeating Azerus you have stopped this army from entering your world! Better leave this ghastly place forever.

Observe o incrível hit que o jogador Cachero levou

Mensagem sobre o exercito de criaturas.


Reporte a missão a Palimuth e você ganhará o Yalaharian Outfit, bem como acesso à sala da recompensa.
Reportando a missão a Palimuth
|
Jogador: Hi
Palimuth: Greetings. |
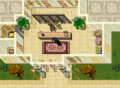
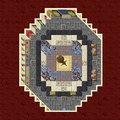
A sala da recompensa fica (aqui![]() ). Você só pode pegar UMA recompensa, então escolha cuidadosamente.
). Você só pode pegar UMA recompensa, então escolha cuidadosamente.

Sala da recompensa da quest

Recompensas
Yalaharian Outfits
Após matar Azerus e reportar sua missão para Palimuth, ele te presenteia com o Yalaharian Outfit.
Male/Female:
| Atenção: Após reportar a missão a Palimuth, a missão The Final Battle aparecerá como completada em seu Quest Log. |
Extras
Tin Lizzard Mount
Ao ganhar acesso a Yalahar, você pode caçar War Golems que podem dropar a Tin Key ![]() com a qual você doma um Tin Lizzard.
com a qual você doma um Tin Lizzard.
Montarias:

Parabéns, você concluiu a quest!
Para addons do outfit, confira outros spoilers:
- Addons 1 e 2: Blood Brothers Quest.
Para outros mistérios:
| Veja Também: Quests |