|
|
|
||||||||||||||||||||||||


In Service of Yalahar Quest: mudanças entre as edições
| [edição aprovada] | [edição aprovada] |
 Márcio Scarinni (discussão | contribs) (Pequena correção na missão 3. depois de queimar a note no fogão, deve-se falar com Yalahari e depois voltar a falar com Palimuth) |
|||
| Linha 37: | Linha 37: | ||
=== Caminho para Yalahar === | === Caminho para Yalahar === | ||
Primeira missão para obter acesso | Primeira missão para obter acesso a [[Yalahar]], por meio do barco da Explorer Society em [[Liberty Bay]]. Veja [[The Way to Yalahar Quest]]. | ||
=== Rotas de Navio para Yalahar === | === Rotas de Navio para Yalahar === | ||
Quest para poder viajar para Yalahar por navios "normais" | Quest para poder viajar para Yalahar por navios "normais" a preços mais baixos que o da Explorer Society. Veja [[Searoutes around Yalahar Quest]]. | ||
== Missão 01: Something Rotten == | == Missão 01: Something Rotten == | ||
| Linha 69: | Linha 69: | ||
Há 4 lugares que você deve usar um [[Crowbar]], eles estão | Há 4 lugares que você deve usar um [[Crowbar]], eles estão marcados com um '''X''' em seu mapa e não são difíceis de achar. | ||
<gallery> | <gallery> | ||
| Linha 98: | Linha 98: | ||
Você pode começar por qualquer lugar, mas começando pelo sudoeste você pode ir mais rápido. | Você pode começar por qualquer lugar, mas começando pelo sudoeste você pode ir mais rápido. | ||
Após entrar vá ao norte | Após entrar, vá ao norte. Quando vir uma pirâmide, vá para o norte e você achará o primeiro guarda. | ||
Apenas siga os grandes caminhos e faça todo o redor. | Apenas siga os grandes caminhos e faça todo o redor. | ||
Você encontrará vários tipos de criaturas em cada quartel, | Você encontrará vários tipos de criaturas em cada quartel, as mais fortes são provavelmente os [[Mutated Human]]s e [[Slime]]s.<br /> | ||
Quando encontrar o guarda, fale ''hi'' > ''report'' para receber o report do guarda e depois ''pass'' e o ''nome do próximo quartel''. | Quando encontrar o guarda, fale ''hi'' > ''report'' para receber o report do guarda e depois ''pass'' e o ''nome do próximo quartel''. | ||
'''Mapas: Siga as setas indicativas para achar os guardas ( | '''Mapas: Siga as setas indicativas para achar os guardas (marcados com setas verdes):''' | ||
<gallery> | <gallery> | ||
| Linha 133: | Linha 132: | ||
* [[Palimuth]]: Now leave and talk to my superior Azerus in the city centre to get your next mission. I urge you, though, to talk to me whenever he sends you on a new mission. ... | * [[Palimuth]]: Now leave and talk to my superior Azerus in the city centre to get your next mission. I urge you, though, to talk to me whenever he sends you on a new mission. ... | ||
* [[Palimuth]]: I think it is important that you hear my opinion about them. Now hurry. I suppose Azerus is already waiting.}} | * [[Palimuth]]: I think it is important that you hear my opinion about them. Now hurry. I suppose Azerus is already waiting.}} | ||
* Ele | * Ele pede para que você leia duas notas que estão no baú ao sudoeste de onde ele está. Quando você pedir uma missão novamente, ele vai pedir para que você fale com [[Azerus]] para pegar a nova missão.<br /> | ||
Entre na sala atrás de [[Palimuth]] e você encontrará | Entre na sala atrás de [[Palimuth]] e você encontrará [[Yalahari (NPC)|Yalahari]] escoltado por dois guardas. É com ele que você deve falar. Ele também vai mandar você ler duas notas que está no baú ao noroeste dele. | ||
'''LEMBRE-SE: Depois da missão 3 você precisa sempre falar com Palimuth depois de receber uma missão de Yalahari, caso contrário as portas seladas não irão abrir.''' | '''LEMBRE-SE: Depois da missão 3 você precisa sempre falar com Palimuth depois de receber uma missão de Yalahari, caso contrário as portas seladas não irão abrir.''' | ||
[[ | [[Yalahari (NPC)|Yalahari]] mandará você ir ao [[Alchemist Quarter]] encontrar os três contaminadores do quarter e derrotá-los. Também lhe mandará encontrar as ''last research notes'' (que contém as últimas anotações dos cientistas do local antes do caos se espalhar pelo quarter) e entregar a ele. | ||
=== Transcrições === | === Transcrições === | ||
{{transcrições|npc=Yalahari_(NPC)|texto= | {{transcrições|npc=Yalahari_(NPC)|texto= | ||
* ''Jogador'': '''hi''' | * ''Jogador'': '''hi''' | ||
* [[Yalahari]]: Greetings. | * [[Yalahari (NPC)|Yalahari]]: Greetings. | ||
* ''Jogador'': '''mission''' | * ''Jogador'': '''mission''' | ||
* [[Yalahari]]: With all the coming and going of strangers here, it would be quite tedious to explain everything again and again. So we have written a manifesto. ... | * [[Yalahari (NPC)|Yalahari]]: With all the coming and going of strangers here, it would be quite tedious to explain everything again and again. So we have written a manifesto. ... | ||
* [[Yalahari]]: Grab a copy from the room behind me. Let's talk about your further career in our ranks once you've read it.}} | * [[Yalahari (NPC)|Yalahari]]: Grab a copy from the room behind me. Let's talk about your further career in our ranks once you've read it.}} | ||
{{transcrições|npc=Yalahari_(NPC)|texto= | {{transcrições|npc=Yalahari_(NPC)|texto= | ||
* ''Jogador'': '''hi'' | * ''Jogador'': '''hi'' | ||
* [[Yalahari]]: Greetings. | * [[Yalahari (NPC)|Yalahari]]: Greetings. | ||
* ''Jogador'': '''mission''' | * ''Jogador'': '''mission''' | ||
* [[Yalahari]]: I'm mildly impressed by your previous deeds in our service. So I'm willing to grant you some more important missions. ... | * [[Yalahari (NPC)|Yalahari]]: I'm mildly impressed by your previous deeds in our service. So I'm willing to grant you some more important missions. ... | ||
* [[Yalahari]]: If you please us, a life of luxury as an important person in our city is ensured. If you fail, you will be replaced by someone more capable than you. ... | * [[Yalahari (NPC)|Yalahari]]: If you please us, a life of luxury as an important person in our city is ensured. If you fail, you will be replaced by someone more capable than you. ... | ||
* [[Yalahari]]: So if you are up for a challenge, ask me for a mission. | * [[Yalahari (NPC)|Yalahari]]: So if you are up for a challenge, ask me for a mission. | ||
* ''Jogador'': '''mission''' | * ''Jogador'': '''mission''' | ||
* [[Yalahari]]: The former alchemist quarter was struck by even more disasters than the rest of the city. Fires, explosions, poisonous fumes - all sorts of catastrophes. ... | * [[Yalahari (NPC)|Yalahari]]: The former alchemist quarter was struck by even more disasters than the rest of the city. Fires, explosions, poisonous fumes - all sorts of catastrophes. ... | ||
* [[Yalahari]]: The worst plague, however, are unknown diseases that have spread in this quarter and eradicated any human population. We must stop it before other quarters are afflicted. We already identified certain carriers responsible for spreading the plague. ... | * [[Yalahari (NPC)|Yalahari]]: The worst plague, however, are unknown diseases that have spread in this quarter and eradicated any human population. We must stop it before other quarters are afflicted. We already identified certain carriers responsible for spreading the plague. ... | ||
* [[Yalahari]]: It will be your task to eliminate them. This spell will protect you from becoming infected yourself. Enter the alchemist quarter and kill the three plague carriers, and at best anything else you might find there. ... | * [[Yalahari (NPC)|Yalahari]]: It will be your task to eliminate them. This spell will protect you from becoming infected yourself. Enter the alchemist quarter and kill the three plague carriers, and at best anything else you might find there. ... | ||
* [[Yalahari]]: Even more important, retrieve the last research notes that the local alchemists made before the plague killed them. They might be the key for a cure or something else.... | * [[Yalahari (NPC)|Yalahari]]: Even more important, retrieve the last research notes that the local alchemists made before the plague killed them. They might be the key for a cure or something else.... | ||
* [[Yalahari]]: At least we have to make sure that these scientists did not die in vain, and honour their researches. So please bring us these research notes. ... | * [[Yalahari (NPC)|Yalahari]]: At least we have to make sure that these scientists did not die in vain, and honour their researches. So please bring us these research notes. ... | ||
* [[Yalahari]]: Also, I will inform the guards that you are allowed to pass the centre gate to the alchemist quarter. Just use the gate mechanism to pass.}} | * [[Yalahari (NPC)|Yalahari]]: Also, I will inform the guards that you are allowed to pass the centre gate to the alchemist quarter. Just use the gate mechanism to pass.}} | ||
Agora pergunte por '''mission''' ao [[Palimuth]]. | Agora pergunte por '''mission''' ao [[Palimuth]]. | ||
Ele lhe dirá para não entregar | Ele lhe dirá para não entregar as ''last research notes'' a [[Azerus]] no final da missão, e queimá-lo num fogão qualquer, pois suas anotações podem ser altamente perigosas. | ||
=== Transcrições === | === Transcrições === | ||
{{transcrições|npc=Palimuth|texto= | {{transcrições|npc=Palimuth|texto= | ||
| Linha 172: | Linha 171: | ||
* [[Palimuth]]: I left some notes in the small room there. Get them and read them. Talk to me again when you've read the notes.}} | * [[Palimuth]]: I left some notes in the small room there. Get them and read them. Talk to me again when you've read the notes.}} | ||
Mate os contaminadores de doença ([[Diseased Fred]], [[Diseased Bill]] e [[Diseased Dan]]) e encontre | Mate os contaminadores de doença ([[Diseased Fred]], [[Diseased Bill]] e [[Diseased Dan]]) e encontre as ''[[The Alchemists' Formulas|last research notes]]''. | ||
<gallery perrow="5"> | <gallery perrow="5"> | ||
| Linha 178: | Linha 177: | ||
Imagem:Diseased2.png|Localização do [[Diseased Bill]] | Imagem:Diseased2.png|Localização do [[Diseased Bill]] | ||
Imagem:Diseased3.png|Localização do [[Diseased Fred]] | Imagem:Diseased3.png|Localização do [[Diseased Fred]] | ||
Imagem:In Service Of Yalahar Quest Missão03.png|Localização | Imagem:In Service Of Yalahar Quest Missão03.png|Localização das [[The Alchemists' Formulas|last research notes]] | ||
</gallery> | </gallery> | ||
'''NOTA:''' Durante o percurso você '''irá''' encontrar [[Death Blob]]s, [[Mutated Tiger]]s, [[Mutated Human]]s, [[slime]]s, [[Nightmare Scion]]s e '''vários''' [[Bog Raider]]s então, é aconselhável que você vá com um bom blocker ou com um shooter | '''NOTA:''' Durante o percurso você '''irá''' encontrar [[Death Blob]]s, [[Mutated Tiger]]s, [[Mutated Human]]s, [[slime]]s, [[Nightmare Scion]]s e '''vários''' [[Bog Raider]]s então, é aconselhável que você vá com um bom blocker ou com um shooter. | ||
'''A partir de agora, em todas as missões, você deverá decidir entre trabalhar para o bem ou para o mal.''' | '''A partir de agora, em todas as missões, você deverá decidir entre trabalhar para o bem ou para o mal.''' | ||
=== Transcrições === | === Transcrições === | ||
'''LADO | '''LADO MAU:''' simplesmente entregue as ''[[The Alchemists' Formulas|last research notes]]'' ao [[Yalahari (NPC)|Yalahari]]. | ||
{{transcrições|npc=Yalahari_(NPC)|texto= | {{transcrições|npc=Yalahari_(NPC)|texto= | ||
* ''Jogador'': '''hi''' | * ''Jogador'': '''hi''' | ||
* [[Yalahari]]: Greetings. | * [[Yalahari (NPC)|Yalahari]]: Greetings. | ||
* ''Jogador'': '''mission''' | * ''Jogador'': '''mission''' | ||
* [[Yalahari]]: So you have killed the plague carriers. Have you also retrieved the research papers? | * [[Yalahari (NPC)|Yalahari]]: So you have killed the plague carriers. Have you also retrieved the research papers? | ||
* ''Jogador'': '''yes''' | * ''Jogador'': '''yes''' | ||
* [[Yalahari]]: Impressive indeed! Someone with your skills will quickly raise in our ranks of helpers. You have great potential, and if you are upfor further missions, just ask for them.}} | * [[Yalahari (NPC)|Yalahari]]: Impressive indeed! Someone with your skills will quickly raise in our ranks of helpers. You have great potential, and if you are upfor further missions, just ask for them.}} | ||
'''LADO BOM:''' queime | '''LADO BOM:''' queime as ''[[The Alchemists' Formulas|last research notes]]'' em um fogão e fale com [[Yalahari (NPC)|Yalahari]]. Volte a falar com [[Palimuth]] | ||
{{transcrições|npc=Yalahari_(NPC)|texto= | {{transcrições|npc=Yalahari_(NPC)|texto= | ||
* ''Jogador'': '''hi''' | * ''Jogador'': '''hi''' | ||
* [[Yalahari]]: Greetings. | * [[Yalahari (NPC)|Yalahari]]: Greetings. | ||
* ''Jogador'': '''mission''' | * ''Jogador'': '''mission''' | ||
* [[Yalahari]]: So you have killed the plague carriers. Have you also retrieved the research papers? | * [[Yalahari (NPC)|Yalahari]]: So you have killed the plague carriers. Have you also retrieved the research papers? | ||
* ''Jogador'': '''no''' | * ''Jogador'': '''no''' | ||
* [[Yalahari]]: Hm, no sign of any notes you say? That's odd - odd and a bit suspicious. I doubt you have tried hard enough. ... | * [[Yalahari (NPC)|Yalahari]]: Hm, no sign of any notes you say? That's odd - odd and a bit suspicious. I doubt you have tried hard enough. ... | ||
* [[Yalahari]]: There are only a few chances to impress us. For those who please us great rewards are in store. If you fail though, you might lose more than you can imagine.}} | * [[Yalahari (NPC)|Yalahari]]: There are only a few chances to impress us. For those who please us great rewards are in store. If you fail though, you might lose more than you can imagine.}} | ||
<gallery> | <gallery> | ||
Image:DiseasedDan.jpg|Diseased Dan | Image:DiseasedDan.jpg|Diseased Dan | ||
| Linha 215: | Linha 214: | ||
{{transcrições|npc=Yalahari_(NPC)|texto= | {{transcrições|npc=Yalahari_(NPC)|texto= | ||
* ''Jogador'': '''hi''' | * ''Jogador'': '''hi''' | ||
* [[Yalahari]]: Greetings. | * [[Yalahari (NPC)|Yalahari]]: Greetings. | ||
* ''Jogador'': '''mission''' | * ''Jogador'': '''mission''' | ||
* [[Yalahari]]: We surely cannot allow some underworld kingpin to rule a significant part of the city. Although, I have to admit that his firm grip on the former trade quarter might be useful.... | * [[Yalahari (NPC)|Yalahari]]: We surely cannot allow some underworld kingpin to rule a significant part of the city. Although, I have to admit that his firm grip on the former trade quarter might be useful.... | ||
* [[Yalahari]]: I expect you to fight your way through his minions and to show him that we are determined and powerful enough to retake the quarter, if necessary by force. Talk to | * [[Yalahari (NPC)|Yalahari]]: I expect you to fight your way through his minions and to show him that we are determined and powerful enough to retake the quarter, if necessary by force. Talk to him after killing some of his henchmen. ... | ||
* [[Yalahari]]: I'm sure he'll understand that he will succumb to a greater power. That's how his little empire has worked after all. ... | * [[Yalahari (NPC)|Yalahari]]: I'm sure he'll understand that he will succumb to a greater power. That's how his little empire has worked after all. ... | ||
* [[Yalahari]]: Also, I will inform the guards that you are allowed to pass the centre gate to the trade quarter now. Just use the gate mechanism to pass.}} | * [[Yalahari (NPC)|Yalahari]]: Also, I will inform the guards that you are allowed to pass the centre gate to the trade quarter now. Just use the gate mechanism to pass.}} | ||
[[ | [[Yalahari (NPC)|Yalahari]] lhe dará acesso para o Trade Gate. Ele lhe pedirá para encontrar [[Mr. West]], e no caminho matar alguns de seus guardas, e tomar o local a força. | ||
Fale com [[Palimuth]]. Ele lhe mandará chegar amigavelmente até [[Mr. West]], sem matar seus guardas, e fazer uma simples negociação. | Fale com [[Palimuth]]. Ele lhe mandará chegar amigavelmente até [[Mr. West]], sem matar seus guardas, e fazer uma simples negociação. | ||
| Linha 235: | Linha 234: | ||
* [[Palimuth]]: Mr. West is not a bad man. We should be able to work out some plans to reconstruct the city's safety as soon as he overcomes his paranoia towards us.}} | * [[Palimuth]]: Mr. West is not a bad man. We should be able to work out some plans to reconstruct the city's safety as soon as he overcomes his paranoia towards us.}} | ||
'''LADO | '''LADO MAU:''' após atravessar a porta da missão, MATE alguns dos monstros ([[gladiator]], [[smuggler]], etc) e diga '''mission''' a [[Mr. West]]. Relate ao [[Yalahari (NPC)|Yalahari]]. | ||
=== Transcrições === | === Transcrições === | ||
{{transcrições|npc=Mr. West|texto= | {{transcrições|npc=Mr. West|texto= | ||
| Linha 246: | Linha 245: | ||
{{transcrições|npc=Yalahari_(NPC)|texto= | {{transcrições|npc=Yalahari_(NPC)|texto= | ||
* ''Jogador'': '''mission''' | * ''Jogador'': '''mission''' | ||
* [[Yalahari]]: I hope you gave this criminal a real scare! I'm sure he'll remember what he has to expect if he arouses our anger again. ... | * [[Yalahari (NPC)|Yalahari]]: I hope you gave this criminal a real scare! I'm sure he'll remember what he has to expect if he arouses our anger again. ... | ||
* [[Yalahari]]: You have proven yourself as quite valuable with this mission! That was just the first step on your rise through the ranks of our helpers. ... | * [[Yalahari (NPC)|Yalahari]]: You have proven yourself as quite valuable with this mission! That was just the first step on your rise through the ranks of our helpers. ... | ||
* [[Yalahari]]: Just ask me for more missions and we will see what you are capable of!}} | * [[Yalahari (NPC)|Yalahari]]: Just ask me for more missions and we will see what you are capable of!}} | ||
'''LADO BOM:''' após atravessar a porta, chegue ao [[Mr. West]] '''SEM MATAR''' os monstros e diga '''mission'''. Uma boa estratégia é atravessar o local invisível. Você também pode chegar ao NPC por uma porta nos esgotos, onde não haverá guardas. Relate a missão a [[Palimuth]] e depois fale com [[ | '''LADO BOM:''' após atravessar a porta, chegue ao [[Mr. West]] '''SEM MATAR''' os monstros e diga '''mission'''. Uma boa estratégia é atravessar o local invisível. Você também pode chegar ao NPC por uma porta nos esgotos, onde não haverá guardas. Relate a missão a [[Palimuth]] e depois fale com [[Yalahari (NPC)|Yalahari]]. | ||
==== Transcrições ==== | ==== Transcrições ==== | ||
{{transcrições|npc=Mr. West|texto= | {{transcrições|npc=Mr. West|texto= | ||
| Linha 265: | Linha 264: | ||
{{transcrições|npc=Yalahari_(NPC)|texto= | {{transcrições|npc=Yalahari_(NPC)|texto= | ||
* ''Jogador'': '''mission''' | * ''Jogador'': '''mission''' | ||
* [[Yalahari]]: So he has been too uncooperative for you? Well, you weren't the first we have sent and you won't be the last. ... | * [[Yalahari (NPC)|Yalahari]]: So he has been too uncooperative for you? Well, you weren't the first we have sent and you won't be the last. ... | ||
* [[Yalahari]]: However, if you cannot even serve us as a bully, we might have to rethink if you are the right person for us. That was a bad job and we don't tolerate many of them.}} | * [[Yalahari (NPC)|Yalahari]]: However, if you cannot even serve us as a bully, we might have to rethink if you are the right person for us. That was a bad job and we don't tolerate many of them.}} | ||
| Linha 278: | Linha 277: | ||
* ''Jogador'': '''hi''' | * ''Jogador'': '''hi''' | ||
* ''Jogador'': '''mission''' | * ''Jogador'': '''mission''' | ||
* [[Yalahari]]: As you probably noticed, once our city had a park and a zoo around a grand arena. It was a favourite pastime of our citizens to visit this quarter in their spare time. ... | * [[Yalahari (NPC)|Yalahari]]: As you probably noticed, once our city had a park and a zoo around a grand arena. It was a favourite pastime of our citizens to visit this quarter in their spare time. ... | ||
* [[Yalahari]]: Nowadays, the quarter is lost. The animals are on the loose, and an attempt to revitalise the city with new arena games resulted in a revolt of the foreign gladiators. ... | * [[Yalahari (NPC)|Yalahari]]: Nowadays, the quarter is lost. The animals are on the loose, and an attempt to revitalise the city with new arena games resulted in a revolt of the foreign gladiators. ... | ||
* [[Yalahari]]: Now all kinds of beasts roam the park, and gladiators challenge them and visitors to test their skills. One of the residents is an ancient druid that rather cares foranimals than for people. ... | * [[Yalahari (NPC)|Yalahari]]: Now all kinds of beasts roam the park, and gladiators challenge them and visitors to test their skills. One of the residents is an ancient druid that rather cares foranimals than for people. ... | ||
* [[Yalahari]]: It is said that he is able to use magic to breed animals with changed abilities and appearances. Such skills are of course quite useful for us. ... | * [[Yalahari (NPC)|Yalahari]]: It is said that he is able to use magic to breed animals with changed abilities and appearances. Such skills are of course quite useful for us. ... | ||
* [[Yalahari]]: We lack the manpower to retake all quarters, or just to defend ourselves adequately. If he bred us some guards and warbeasts, we could strengthen our position considerably. ... | * [[Yalahari (NPC)|Yalahari]]: We lack the manpower to retake all quarters, or just to defend ourselves adequately. If he bred us some guards and warbeasts, we could strengthen our position considerably. ... | ||
* [[Yalahari]]: Travel to the arena quarter and gain his assistance for us. I will inform the guards that you are allowed to pass the centre gate to the arena quarter now. Just use thegate mechanism to pass.}} | * [[Yalahari (NPC)|Yalahari]]: Travel to the arena quarter and gain his assistance for us. I will inform the guards that you are allowed to pass the centre gate to the arena quarter now. Just use thegate mechanism to pass.}} | ||
[[ | [[Yalahari (NPC)|Yalahari]] lhe dará acesso ao [[Arena and Zoo Quarter]]. Ele quer que você encontre um druid poderoso que vive lá, pois ele é capaz de criar diversos tipos de bestas de guerra para proteger Yalahar. | ||
Fale com [[Palimuth]]. Ele lhe pedirá pra convencer o druid a criar gado para alimentar os habitantes de Yalahar ao invés de bestas. | Fale com [[Palimuth]]. Ele lhe pedirá pra convencer o druid a criar gado para alimentar os habitantes de Yalahar ao invés de bestas. | ||
| Linha 297: | Linha 296: | ||
* [[Palimuth]]: Instead of breeding warbeasts, this druid should breed cattle to feed our people. Please I beg you, convince him to do that!}} | * [[Palimuth]]: Instead of breeding warbeasts, this druid should breed cattle to feed our people. Please I beg you, convince him to do that!}} | ||
Vá até a arena no quarter | Vá até a arena no quarter, encontre o druid chamado [[Tamerin]] e diga '''mission'''. Ele lhe pedirá para lhe entregar um [[Animal Cure]] e derrotar [[Morik the Gladiator]]. | ||
=== Transcrições === | === Transcrições === | ||
{{transcrições|npc=Tamerin|texto= | {{transcrições|npc=Tamerin|texto= | ||
| Linha 318: | Linha 317: | ||
Entregue os itens a [[Tamerin]] e faça sua escolha. | Entregue os itens a [[Tamerin]] e faça sua escolha. | ||
'''LADO | '''LADO MAU:''' diga para criar '''warbeast'''. | ||
'''LADO BOM:''' diga pra criar '''cattle'''. | '''LADO BOM:''' diga pra criar '''cattle'''. | ||
| Linha 339: | Linha 338: | ||
{{transcrições|npc=Yalahari_(NPC)|texto= | {{transcrições|npc=Yalahari_(NPC)|texto= | ||
* ''Jogador'': '''mission''' | * ''Jogador'': '''mission''' | ||
* [[Yalahari]]: This druid dares to affront us? We will look into this when we have enough time. But there are other things that needs to be settled. ... | * [[Yalahari (NPC)|Yalahari]]: This druid dares to affront us? We will look into this when we have enough time. But there are other things that needs to be settled. ... | ||
* [[Yalahari]]: Although, we probably should not do so after your last failure, we are willing to grant you another mission.}} | * [[Yalahari (NPC)|Yalahari]]: Although, we probably should not do so after your last failure, we are willing to grant you another mission.}} | ||
*Se warbeast | *Se warbeast | ||
=== Transcrições === | === Transcrições === | ||
{{transcrições|npc=Yalahari_(NPC)|texto= | {{transcrições|npc=Yalahari_(NPC)|texto= | ||
* ''Jogador'': '''mission''' | * ''Jogador'': '''mission''' | ||
* [[Yalahari]]: So have you won us a new ally? Excellent. I knew you would not dare to ruin this mission. Soon we might be able to strengthen our defences and even relocate some of our guards. ... | * [[Yalahari (NPC)|Yalahari]]: So have you won us a new ally? Excellent. I knew you would not dare to ruin this mission. Soon we might be able to strengthen our defences and even relocate some of our guards. ... | ||
* [[Yalahari]]: Perhaps some day soon, you lead your own unit of men. However, there are more missions that need to be accomplished. Let's talk about them.}} | * [[Yalahari (NPC)|Yalahari]]: Perhaps some day soon, you lead your own unit of men. However, there are more missions that need to be accomplished. Let's talk about them.}} | ||
== Missão 06: Frightening Fuel == | == Missão 06: Frightening Fuel == | ||
[[ | [[Yalahari (NPC)|Yalahari]] lhe dará um [[Ghost Charm]] e pedirá pra você ir para o Cemetery Quarter. Se você for [[Knight]], não esqueça de levar algumas runas de ataque ou uma [[Encantamento|arma encantada]]. | ||
Use isso no [[Strange Carving (Tile)]] atrás da sala, ({{mapa|32776,31062,7:5|aqui}}) | Use isso no [[Strange Carving (Tile)]] atrás da sala, ({{mapa|32776,31062,7:5|aqui}}) | ||
| Linha 357: | Linha 356: | ||
{{transcrições|npc=Yalahari_(NPC)|texto= | {{transcrições|npc=Yalahari_(NPC)|texto= | ||
* ''Jogador'': '''mission''' | * ''Jogador'': '''mission''' | ||
* [[Yalahari]]: The old cemetery of the city has been abandoned decades ago when the activity of the various undead there became unbearable. The reason for their appearance was never found out or researched. ... | * [[Yalahari (NPC)|Yalahari]]: The old cemetery of the city has been abandoned decades ago when the activity of the various undead there became unbearable. The reason for their appearance was never found out or researched. ... | ||
* [[Yalahari]]: However, those undead could be useful, at least some of them. Particular ghosts consist of a substance that is very similar to the energy source that powered some of our devices. ... | * [[Yalahari (NPC)|Yalahari]]: However, those undead could be useful, at least some of them. Particular ghosts consist of a substance that is very similar to the energy source that powered some of our devices. ... | ||
* [[Yalahari]]: Since we lack most of the original sources, some substitute might come in handy. Take this ghost charm and place it on the strange carving in the cemetery. ... | * [[Yalahari (NPC)|Yalahari]]: Since we lack most of the original sources, some substitute might come in handy. Take this ghost charm and place it on the strange carving in the cemetery. ... | ||
* [[Yalahari]]: Use it to attract ghosts and slay them. Then use the residues of the ghosts on the charm to capture the essence. ... | * [[Yalahari (NPC)|Yalahari]]: Use it to attract ghosts and slay them. Then use the residues of the ghosts on the charm to capture the essence. ... | ||
* [[Yalahari]]: Once it is filled, ghosts will not be attracted any longer. Then return the charm to me. I will inform the guards that you are allowed to pass the centre gate to the cemetery quarter now. Just use the gate mechanism to pass.}} | * [[Yalahari (NPC)|Yalahari]]: Once it is filled, ghosts will not be attracted any longer. Then return the charm to me. I will inform the guards that you are allowed to pass the centre gate to the cemetery quarter now. Just use the gate mechanism to pass.}} | ||
| Linha 369: | Linha 368: | ||
A cada vez que você usar o [[Ghost Residue]] aparecerá mais [[Tormented Ghost]]s, na terceira vez o [[Ghost Charm]] vai mudar para um [[Charged Ghost Charm]]. | A cada vez que você usar o [[Ghost Residue]] aparecerá mais [[Tormented Ghost]]s, na terceira vez o [[Ghost Charm]] vai mudar para um [[Charged Ghost Charm]]. | ||
'''LADO MAU:''' Dê o [[Charged Ghost Charm]] para [[Yalahari (NPC)|Yalahari]]. | |||
=== Transcrições === | |||
{{transcrições|npc=Yalahari_(NPC)|texto= | |||
* [[Yalahari (NPC)|Yalahari]]: Greetings. | |||
* ''Jogador'': '''mission''' | |||
* [[Yalahari (NPC)|Yalahari]]: Ah, what an unexpected sight. I can almost feel the energy of the charm. It will help to recover some of the past wealth. ... | |||
* [[Yalahari (NPC)|Yalahari]]: You did quite an impressive job. I'm considering to introduce you to my ma.. to my direct superior one day. But there are still other missions to fulfil.}} | |||
'''LADO BOM:''' Volte para [[Palimuth]], fale para ele sobre a missão e dê a ele o [[Charged Ghost Charm]]. | '''LADO BOM:''' Volte para [[Palimuth]], fale para ele sobre a missão e dê a ele o [[Charged Ghost Charm]]. | ||
| Linha 379: | Linha 386: | ||
{{transcrições|npc=Yalahari_(NPC)|texto= | {{transcrições|npc=Yalahari_(NPC)|texto= | ||
* ''Jogador'': '''mission''' | * ''Jogador'': '''mission''' | ||
* [[Yalahari]]: Destroyed you say? That's impossible! I'm not sure if I can trust you in this matter? One might assume, you fled from the ghosts in terror and left the charm there. ... | * [[Yalahari (NPC)|Yalahari]]: Destroyed you say? That's impossible! I'm not sure if I can trust you in this matter? One might assume, you fled from the ghosts in terror and left the charm there. ... | ||
* [[Yalahari]]: You will have to work twice as hard on your next missions to restore the trust you have lost | * [[Yalahari (NPC)|Yalahari]]: You will have to work twice as hard on your next missions to restore the trust you have lost.}} | ||
== Missão 07: A Fishy Mission == | == Missão 07: A Fishy Mission == | ||
| Linha 396: | Linha 395: | ||
{{transcrições|npc=Yalahari_(NPC)|texto= | {{transcrições|npc=Yalahari_(NPC)|texto= | ||
* ''Jogador'': '''mission''' | * ''Jogador'': '''mission''' | ||
* [[Yalahari]]: Recently, our fishermen have been attacked by a maritime race called the quara. They live in the sunken quarter and are a significant threat to our people. I ask you to enter the sunken quarter and slay all their leaders. ... | * [[Yalahari (NPC)|Yalahari]]: Recently, our fishermen have been attacked by a maritime race called the quara. They live in the sunken quarter and are a significant threat to our people. I ask you to enter the sunken quarter and slay all their leaders. ... | ||
* [[Yalahari]]: We believe that there are three leaders in this area. Your task is simple enough, so you better don't fail! ... | * [[Yalahari (NPC)|Yalahari]]: We believe that there are three leaders in this area. Your task is simple enough, so you better don't fail! ... | ||
* [[Yalahari]]: I will inform the guards that you are allowed to pass the centre gate to the sunken quarter now. Just use the gate mechanism to pass.}} | * [[Yalahari (NPC)|Yalahari]]: I will inform the guards that you are allowed to pass the centre gate to the sunken quarter now. Just use the gate mechanism to pass.}} | ||
{{transcrições|npc=Palimuth|texto= | {{transcrições|npc=Palimuth|texto= | ||
* ''Jogador'': '''mission''' | * ''Jogador'': '''mission''' | ||
| Linha 406: | Linha 405: | ||
{{transcrições|npc=Yalahari_(NPC)|texto= | {{transcrições|npc=Yalahari_(NPC)|texto= | ||
* ''Jogador'': '''mission''' | * ''Jogador'': '''mission''' | ||
* [[Yalahari]]: This will teach these fishmen who is the ruler of that area. You have earned yourself a special privilege. But we will talk about that when we speak about your next mission.}} | * [[Yalahari (NPC)|Yalahari]]: This will teach these fishmen who is the ruler of that area. You have earned yourself a special privilege. But we will talk about that when we speak about your next mission.}} | ||
Fale com [[Yalahari (NPC)|Yalahari]] para uma nova missão. A 7ª missão vai aparecer no seu Quest Log. | |||
Fale com [[Yalahari (NPC)|Yalahari]] para uma nova missão. | |||
Fale com [[Palimuth]] sobre '''mission'''. | Fale com [[Palimuth]] sobre '''mission'''. | ||
Vá até o [[Sunken Quarter]], vá para o leste, passe pela ponte, fale com [[Tarak]]: '''passage''', '''trip''', '''yes'''. | Vá até o [[Sunken Quarter]], vá para o leste, passe pela ponte, fale com [[Tarak]]: '''passage''', '''trip''', '''yes'''. | ||
Use o [[Helmet of the Deep]], pule na água. | Use o [[Helmet of the Deep]], pule na água. | ||
'''LADO MAU:''' Siga os mapas abaixo para matar os 3 bosses, [[Inky]], [[Splasher]] e [[Sharptooth]], o terceiro pode dar ataques de 400+, tome cuidado. | |||
Siga os mapas abaixo para matar os 3 bosses, [[Inky]], [[Splasher]] e [[Sharptooth]], o terceiro pode dar ataques de 400+, tome cuidado. | |||
[[Arquivo:In Service of Yalahar Quest Missão7 Mapa01.png]] | [[Arquivo:In Service of Yalahar Quest Missão7 Mapa01.png]] | ||
* Caminho é marcado com verde. | * Caminho é marcado com verde. | ||
[[Arquivo:In Service of Yalahar Quest Missão7 Mapa02.png]] | [[Arquivo:In Service of Yalahar Quest Missão7 Mapa02.png]] | ||
* Siga as | * Siga as setas verdes. | ||
[[Arquivo:In Service of Yalahar Quest Missão7 Mapa03.png]] | [[Arquivo:In Service of Yalahar Quest Missão7 Mapa03.png]] | ||
* Esteja preparado. | * Esteja preparado. | ||
| Linha 427: | Linha 423: | ||
* Leve alguns amigos com você. Nesse andar você encontra [[Quara Predator]]'s, [[Quara Pincher]]'s e [[Quara Hydromancer]]'s. | * Leve alguns amigos com você. Nesse andar você encontra [[Quara Predator]]'s, [[Quara Pincher]]'s e [[Quara Hydromancer]]'s. | ||
'''LADO BOM:''' Siga o mapa, desça sempre e vá para o oeste. A criatura mais forte que você vai encontrar é um [[Quara Predator]]. Continue para o oeste até encontrar a NPC [[Maritima]]. | |||
[[Arquivo:Maritima's place.jpg]] | [[Arquivo:Maritima's place.jpg]] | ||
| Linha 441: | Linha 436: | ||
* [[Maritima]]: However, recently the quara got mad because their area is flooded with toxic sewage from the city. If you could inform someone about it, they might stop the sewage and the quara could return to their own business.}} | * [[Maritima]]: However, recently the quara got mad because their area is flooded with toxic sewage from the city. If you could inform someone about it, they might stop the sewage and the quara could return to their own business.}} | ||
Reporte sua missão para [[Palimuth]] e [[Yalahari]]. | Reporte sua missão para [[Palimuth]] e [[Yalahari (NPC)|Yalahari]]. | ||
== Missão 08: Dangerous Machinations == | == Missão 08: Dangerous Machinations == | ||
Fale com [[Yalahari]] e peça uma '''mission''', ele vai pedir para você encontrar um "Pattern Crystal", que será usado para fabricar armas para ajudar a tomar o controle da cidade. | Fale com [[Yalahari (NPC)|Yalahari]] e peça uma '''mission''', ele vai pedir para você encontrar um "Pattern Crystal", que será usado para fabricar armas para ajudar a tomar o controle da cidade. | ||
=== Transcrições === | === Transcrições === | ||
{{transcrições|npc=Yalahari_(NPC)|texto= | {{transcrições|npc=Yalahari_(NPC)|texto= | ||
* ''Jogador'': '''mission''' | * ''Jogador'': '''mission''' | ||
* [[Yalahari]]: In the past, we had many magical factories providing the citizens with everything they needed. Now that most of these factories are shut down, we have trouble getting enough supplies. ... | * [[Yalahari (NPC)|Yalahari]]: In the past, we had many magical factories providing the citizens with everything they needed. Now that most of these factories are shut down, we have trouble getting enough supplies. ... | ||
* [[Yalahari]]: We need you to enter one of the lesser damaged factories. Go to the factory district and look for a pattern crystal used for weapon production. Use it on the factory controller. ... | * [[Yalahari (NPC)|Yalahari]]: We need you to enter one of the lesser damaged factories. Go to the factory district and look for a pattern crystal used for weapon production. Use it on the factory controller. ... | ||
* [[Yalahari]]: It will ensure that the factory will provide us with a suitable amount of weapons which we dearly need to reclaim and secure the most dangerous parts of the city. ... | * [[Yalahari (NPC)|Yalahari]]: It will ensure that the factory will provide us with a suitable amount of weapons which we dearly need to reclaim and secure the most dangerous parts of the city. ... | ||
* [[Yalahari]]: I will inform the guards that you are allowed to pass the centre gate to the factory quarter now. Just use the gate mechanism to pass.}} | * [[Yalahari (NPC)|Yalahari]]: I will inform the guards that you are allowed to pass the centre gate to the factory quarter now. Just use the gate mechanism to pass.}} | ||
Depois disso vá até [[Palimuth]] e fale '''mission''', este vai pedir para você fazer o mesmo, só que para fabricar comida para a cidade. | Depois disso vá até [[Palimuth]] e fale '''mission''', este vai pedir para você fazer o mesmo, só que para fabricar comida para a cidade. | ||
| Linha 497: | Linha 492: | ||
Ou faça o mesmo para ficar do lado de Yalahari. | Ou faça o mesmo para ficar do lado de Yalahari. | ||
{{transcrições|npc=Yalahari_(NPC)|texto= | {{transcrições|npc=Yalahari_(NPC)|texto= | ||
* [[Yalahari]]: So do you want to side with me ''jogador''? | * [[Yalahari (NPC)|Yalahari]]: So do you want to side with me ''jogador''? | ||
* ''Jogador'': '''yes'''}} | * ''Jogador'': '''yes'''}} | ||
| Linha 503: | Linha 498: | ||
{{DASH|[[Arquivo:Achievement.gif]] Se você seguiu somente o lado bom, ganhará o achievement '''"{{achievement|Follower of Palimuth}}"'''. | {{DASH|[[Arquivo:Achievement.gif]] Se você seguiu somente o lado bom, ganhará o achievement '''"{{achievement|Follower of Palimuth}}"'''. | ||
[[Arquivo:Achievement.gif]] Se você seguiu somente o lado | [[Arquivo:Achievement.gif]] Se você seguiu somente o lado mau, ganhará o achievement '''"{{achievement|Follower of Azerus}}"'''. | ||
[[Arquivo:Achievement.gif]] Se você fez missões de ambos os lados, ganhará o achievement '''"{{achievement|Turncoat}}"'''.}} | [[Arquivo:Achievement.gif]] Se você fez missões de ambos os lados, ganhará o achievement '''"{{achievement|Turncoat}}"'''.}} | ||
| Linha 511: | Linha 506: | ||
Os mages podem usar runas como Avalanche, Thunderstorms. | Os mages podem usar runas como Avalanche, Thunderstorms. | ||
Quando você chegar na sala, somente mate [[Azerus]] | Quando você chegar na sala, somente mate [[Azerus]] após matar todos os summons, pois antes disso ele é extremamente difícil de ser morto. Azerus aparece primeiro com [[Rift Worms]]. Mate-as, e ignore Azerus. Depois ele se transportará para outro lugar na sala e sumonará [[Rift Brood]]s. Trate-os como [[Massive Energy Elemental]]s e use [[Stone Shower]] neles enquanto continua a ignorar Azerus. Agora ele sumonará [[Rift Scythe]]s, eles são parecidos com Grim Reapers então use [[GFB]]s. Azerus então sumonará [[War Golem]]s. Desta vez ele estará enfraquecido, sendo muito mais fácil matá-lo, então faça isso enquanto ignora os War Golems. | ||
Uma vez que o Azerus esteja morto, seu corpo se transformará em um [[Magic Forcefield]]. Todos os jogadores devem entrar no portal, | Uma vez que o Azerus esteja morto, seu corpo se transformará em um [[Magic Forcefield]]. Todos os jogadores devem entrar no portal, e serão teleportados para uma sala onde vários Rift Monsters poderão ser vistos. Vá ao ponto mais ao norte do lugar. Se você vir uma mensagem laranja se referindo ao exército de Azerus (''Azerus' Army''), você terminou a quest. | ||
Reporte de volta ao [[NPC]] que você escolheu ajudar e você ganhará o [[Yalaharian Outfit]] bem como acesso | Reporte de volta ao [[NPC]] que você escolheu ajudar e você ganhará o [[Yalaharian Outfit]] bem como acesso à sala da recompensa. Você só pode pegar uma recompensa, então escolha cuidadosamente. | ||
<gallery> | <gallery> | ||
| Linha 545: | Linha 540: | ||
{{transcrições|npc=Yalahari_(NPC)|texto= | {{transcrições|npc=Yalahari_(NPC)|texto= | ||
* ''Jogador'': '''mission''' | * ''Jogador'': '''mission''' | ||
* [[Yalahari]]: I knew that you were smart enough to make the right decision! Your next mission will be a special one! | * [[Yalahari (NPC)|Yalahari]]: I knew that you were smart enough to make the right decision! Your next mission will be a special one! | ||
* ''Jogador'': '''mission''' | * ''Jogador'': '''mission''' | ||
* [[Yalahari]]:For your noble deeds, we would like to invite you to a special celebration ceremony. ... | * [[Yalahari (NPC)|Yalahari]]:For your noble deeds, we would like to invite you to a special celebration ceremony. ... | ||
* [[Yalahari]]: Only the most prominent Yalahari are allowed to join the festivities. I assume you can imagine what honour it is that you've been invited to join us. Meet us in the inner city's centre. ... | * [[Yalahari (NPC)|Yalahari]]: Only the most prominent Yalahari are allowed to join the festivities. I assume you can imagine what honour it is that you've been invited to join us. Meet us in the inner city's centre. ... | ||
* [[Yalahari]]: As our most trusted ally, you may pass all doors to reach the festivity hall. There you will receive your reward for the achievements you have gained so far. ... | * [[Yalahari (NPC)|Yalahari]]: As our most trusted ally, you may pass all doors to reach the festivity hall. There you will receive your reward for the achievements you have gained so far. ... | ||
* [[Yalahari]]: I'm convinced your reward will be beyond your wildest dreams. And that is just the beginning!}} | * [[Yalahari (NPC)|Yalahari]]: I'm convinced your reward will be beyond your wildest dreams. And that is just the beginning!}} | ||
}} | }} | ||
Edição das 16h58min de 25 de junho de 2016
|
|
||||||||||||||||||||||||
| Recompensa: Acesso a todos os Quartéis, 5 platinum coins, escolher uma das três recompensas: Yalahari Mask, Yalahari Armor e Yalahari Leg Piece, achievements e Yalaharian Outfits   |
||||||||||||||||||||||||
| Localização: Edron, Liberty Bay, Yalahar. |
||||||||||||||||||||||||
| Você enfrentará: Várias criaturas de todos os quartéis de Yalahar (incluindo Azerus). |
||||||||||||||||||||||||
| Mini-Bosses: Nenhum. |
||||||||||||||||||||||||
| Bosses: Nenhum. |
||||||||||||||||||||||||
| Adicionado: Versão 8.4 (10 de dezembro de 2008) |
||||||||||||||||||||||||
|
||||||||||||||||||||||||
|
||||||||||||||||||||||||
Veja também: Quests | Searoutes around Yalahar Quest | Shadows of Yalahar Quest | The Way to Yalahar Quest.
Equipamentos Requeridos
- Shovel
- Rope
- Crowbar (para 1ª missão)
- Helmet of the Deep (para 7ª missão) ou ver se tem disponível para comprar no mercado.
- Dinhero para viagens
- Entrar na Explorer Society (completar a primeira missão, seu rank deve ser novice ou superior)
- Completar o "Barbarian Test Quest" e a 1ª missão da The Ice Islands Quest ou ter um amigo que fez ou ver se tem disponível para comprar no mercado o item "Animal Cure".
Nota: A cada ação feita na missões com sucesso, a mensagem de "Your questlog has been updated." aparecerá avisando no seu Server Log e será atualizado o texto encontrado no Quest Log.
Lembre-se que:
Para obter o addon do "mal" você deve seguir o caminho do mal em algumas missões.


Para obter o addon do "bem" você deve seguir o caminho do bem em algumas missões.


Caminho para Yalahar
Primeira missão para obter acesso a Yalahar, por meio do barco da Explorer Society em Liberty Bay. Veja The Way to Yalahar Quest.
Quest para poder viajar para Yalahar por navios "normais" a preços mais baixos que o da Explorer Society. Veja Searoutes around Yalahar Quest.
Missão 01: Something Rotten
Primeiramente, fale com o Palimuth. Você pode encontrá-lo ao norte do depot.
- Ele vai perguntar se você quer ajudá-lo com alguns problemas nos esgotos da cidade.
Transcrições
 |
* Jogador: hello
|
Há 4 lugares que você deve usar um Crowbar, eles estão marcados com um X em seu mapa e não são difíceis de achar.
Spot 1, (aqui
 )
)

Spot 2, (aqui
)

Spot 3, (aqui
)

Spot 4, (aqui
)


- Volte até Palimuth. Parabéns! Primeira missão de Yalahar completa!
Missão 02: Watching the Watchmen
Transcrições
|
* Jogador: mission
|
- Você precisa achar todos os 7 guardas, uma boa missão para explorar Yalahar. Para ver mais detalhes e a localização de todos eles, veja esta página.
Você pode começar por qualquer lugar, mas começando pelo sudoeste você pode ir mais rápido.
Após entrar, vá ao norte. Quando vir uma pirâmide, vá para o norte e você achará o primeiro guarda.
Apenas siga os grandes caminhos e faça todo o redor.
Você encontrará vários tipos de criaturas em cada quartel, as mais fortes são provavelmente os Mutated Humans e Slimes.
Quando encontrar o guarda, fale hi > report para receber o report do guarda e depois pass e o nome do próximo quartel.
Mapas: Siga as setas indicativas para achar os guardas (marcados com setas verdes):
- Serviceyalahar5.jpg
Do Foreign para Arena and Zoo Quarter
- Serviceyalahar6.jpg
Da Arena para Alchemist Quarter
- Serviceyalahar7.jpg
Do Alchemist para Cemetery Quarter
- Serviceyalahar8.jpg
Do Cemetery para Magician Quarter
- Serviceyalahar9.jpg
Do Magician para Sunken Quarter
- Serviceyalahar10.jpg
Do Sunken para Factory Quarter
- Serviceyalahar11.jpg
Do Factory para Trade Quarter
Missão 03: Death of the Deathbringer
Transcrições
|
* Jogador: hi
|
|
* Jogador: hi
|
- Ele pede para que você leia duas notas que estão no baú ao sudoeste de onde ele está. Quando você pedir uma missão novamente, ele vai pedir para que você fale com Azerus para pegar a nova missão.
Entre na sala atrás de Palimuth e você encontrará Yalahari escoltado por dois guardas. É com ele que você deve falar. Ele também vai mandar você ler duas notas que está no baú ao noroeste dele.
LEMBRE-SE: Depois da missão 3 você precisa sempre falar com Palimuth depois de receber uma missão de Yalahari, caso contrário as portas seladas não irão abrir.
Yalahari mandará você ir ao Alchemist Quarter encontrar os três contaminadores do quarter e derrotá-los. Também lhe mandará encontrar as last research notes (que contém as últimas anotações dos cientistas do local antes do caos se espalhar pelo quarter) e entregar a ele.
Transcrições
 |
* Jogador: hi
|
|
* Jogador: 'hi
|
Agora pergunte por mission ao Palimuth. Ele lhe dirá para não entregar as last research notes a Azerus no final da missão, e queimá-lo num fogão qualquer, pois suas anotações podem ser altamente perigosas.
Transcrições
|
* Jogador: hi
|
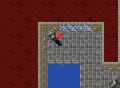
Mate os contaminadores de doença (Diseased Fred, Diseased Bill e Diseased Dan) e encontre as last research notes.
- Diseased1.png
Localização do Diseased Dan
- Diseased2.png
Localização do Diseased Bill
- Diseased3.png
Localização do Diseased Fred
- In Service Of Yalahar Quest Missão03.png
Localização das last research notes
NOTA: Durante o percurso você irá encontrar Death Blobs, Mutated Tigers, Mutated Humans, slimes, Nightmare Scions e vários Bog Raiders então, é aconselhável que você vá com um bom blocker ou com um shooter.
A partir de agora, em todas as missões, você deverá decidir entre trabalhar para o bem ou para o mal.
Transcrições
LADO MAU: simplesmente entregue as last research notes ao Yalahari.
|
* Jogador: hi
|
LADO BOM: queime as last research notes em um fogão e fale com Yalahari. Volte a falar com Palimuth
|
* Jogador: hi
|

Diseased Dan

Diseased Bill

Diseased Fred


Missão 04: Good to be Kingpin
Transcrições
|
* Jogador: hi
|
Yalahari lhe dará acesso para o Trade Gate. Ele lhe pedirá para encontrar Mr. West, e no caminho matar alguns de seus guardas, e tomar o local a força.
Fale com Palimuth. Ele lhe mandará chegar amigavelmente até Mr. West, sem matar seus guardas, e fazer uma simples negociação.
Transcrições
|
* Jogador: hi
|
LADO MAU: após atravessar a porta da missão, MATE alguns dos monstros (gladiator, smuggler, etc) e diga mission a Mr. West. Relate ao Yalahari.
Transcrições
|
* Jogador: hi
|
Transcrições
|
* Jogador: mission
|
LADO BOM: após atravessar a porta, chegue ao Mr. West SEM MATAR os monstros e diga mission. Uma boa estratégia é atravessar o local invisível. Você também pode chegar ao NPC por uma porta nos esgotos, onde não haverá guardas. Relate a missão a Palimuth e depois fale com Yalahari.
Transcrições
|
* Jogador: hi
|
|
Transcrições
|
* Jogador: mission
|
- Na imagem abaixo, caminho pelo esgoto:
Missão 05: Food or Fight
Transcrições
|
* Jogador: hi
|
Yalahari lhe dará acesso ao Arena and Zoo Quarter. Ele quer que você encontre um druid poderoso que vive lá, pois ele é capaz de criar diversos tipos de bestas de guerra para proteger Yalahar.
Fale com Palimuth. Ele lhe pedirá pra convencer o druid a criar gado para alimentar os habitantes de Yalahar ao invés de bestas.
Transcrições
|
* Jogador: hi
|
Vá até a arena no quarter, encontre o druid chamado Tamerin e diga mission. Ele lhe pedirá para lhe entregar um Animal Cure e derrotar Morik the Gladiator.
Transcrições
|
* Jogador: hi
|
Animal Cure: Compre da NPC Siflind, em Nibelor, por 400 gps (você precisará da Barbarian Test Quest e a segunda missão da The Ice Islands Quest para poder comprar ou pode ver se tem disponível no mercado).
Morik: Encontre a sala no Arena and Zoo Quarter e use o Armor Rack para que Morik apareça. Mate-o e pegue o helmet dele.
Entregue os itens a Tamerin e faça sua escolha.
LADO MAU: diga para criar warbeast.
LADO BOM: diga pra criar cattle.
Transcrições
|
* Jogador: animal cure
|
Relate a missão aos devidos NPCs.
- Se cattle
Transcrições
|
* Jogador: mission
|
|
- Se warbeast
Transcrições
|
* Jogador: mission
|
Missão 06: Frightening Fuel
Yalahari lhe dará um Ghost Charm e pedirá pra você ir para o Cemetery Quarter. Se você for Knight, não esqueça de levar algumas runas de ataque ou uma arma encantada.
Use isso no Strange Carving (Tile) atrás da sala, (aqui![]() )
)
Transcrições
|
* Jogador: mission
|

Ao usar, alguns Tormented Ghosts surgirão e o Ghost Charm estará cima do Strange Carving (Tile) com a aparência de um Magic Forcefield. Mate os Tormented Ghosts e use Ghost Residue (o corpo do ghost) no Ghost Charm três vezes.
A cada vez que você usar o Ghost Residue aparecerá mais Tormented Ghosts, na terceira vez o Ghost Charm vai mudar para um Charged Ghost Charm.
LADO MAU: Dê o Charged Ghost Charm para Yalahari.
Transcrições
|
* Yalahari: Greetings.
|
LADO BOM: Volte para Palimuth, fale para ele sobre a missão e dê a ele o Charged Ghost Charm.
Transcrições
|
|
* Jogador: mission
|
Missão 07: A Fishy Mission
Requirementos
Transcrições
|
* Jogador: mission
|
|
* Jogador: mission
|
|
* Jogador: mission
|
Fale com Yalahari para uma nova missão. A 7ª missão vai aparecer no seu Quest Log. Fale com Palimuth sobre mission. Vá até o Sunken Quarter, vá para o leste, passe pela ponte, fale com Tarak: passage, trip, yes. Use o Helmet of the Deep, pule na água.
LADO MAU: Siga os mapas abaixo para matar os 3 bosses, Inky, Splasher e Sharptooth, o terceiro pode dar ataques de 400+, tome cuidado.
Arquivo:In Service of Yalahar Quest Missão7 Mapa01.png
- Caminho é marcado com verde.
Arquivo:In Service of Yalahar Quest Missão7 Mapa02.png
- Siga as setas verdes.
Arquivo:In Service of Yalahar Quest Missão7 Mapa03.png
- Esteja preparado.
Arquivo:In Service of Yalahar Quest Missão7 Mapa04.png
- Leve alguns amigos com você. Nesse andar você encontra Quara Predator's, Quara Pincher's e Quara Hydromancer's.
LADO BOM: Siga o mapa, desça sempre e vá para o oeste. A criatura mais forte que você vai encontrar é um Quara Predator. Continue para o oeste até encontrar a NPC Maritima.
Fale hi e quara.
Transcrições
|
* Jogador: quara
|
Reporte sua missão para Palimuth e Yalahari.
Missão 08: Dangerous Machinations
Fale com Yalahari e peça uma mission, ele vai pedir para você encontrar um "Pattern Crystal", que será usado para fabricar armas para ajudar a tomar o controle da cidade.
Transcrições
|
* Jogador: mission
|
Depois disso vá até Palimuth e fale mission, este vai pedir para você fazer o mesmo, só que para fabricar comida para a cidade.
Transcrições
|
* Jogador: mission
|
- Então vá para o Factory Quarter, agora você escolhe entre fazer a missão de Azerus (Weapon Matrix) ou de Palimuth (Food Matrix):
Food Matrix
Obtendo a Food Matrix Crystal. Cuidado! Há Worker Golems nos andares inferiores.
Arquivo:Mission8FoodMatrix.png
Após obter a Food Matrix Crystal, retorne para o primeiro andar inferior e coloque a matrix na máquina ao norte da sala. Cuidado! Há Worker Golems na sala.
Arquivo:Mission8MaquinaMatrix.png
Weapon Matrix
Obtendo a Weapon Matrix Crystal. Cuidado! Há Worker Golems nos andares inferiores.
Arquivo:Mission8WeaponMatrix.png
Após obter a Weapon Matrix Crystal, vá para a mesma máquina que se coloca a "Food Matrix". Cuidado! Há Worker Golems na sala.
Arquivo:Mission8MaquinaMatrix.png
Missão 09: Decision
Você precisa decidir se vai ajudar Palimuth ou Yalahari. Para ficar do lado de Palimuth vá até ele e fale:
Transcrições
|
* Jogador: mission
|
|
Palimuth: So do you want to side with me?
|
Ou faça o mesmo para ficar do lado de Yalahari.
|
* Yalahari: So do you want to side with me jogador?
|
Após escolher, a missão 9 está completa!
|
Missão 10: The Final Battle
Tenha um time formado com 10-12 jogadores de level 100 ou mais.
Os mages podem usar runas como Avalanche, Thunderstorms.
Quando você chegar na sala, somente mate Azerus após matar todos os summons, pois antes disso ele é extremamente difícil de ser morto. Azerus aparece primeiro com Rift Worms. Mate-as, e ignore Azerus. Depois ele se transportará para outro lugar na sala e sumonará Rift Broods. Trate-os como Massive Energy Elementals e use Stone Shower neles enquanto continua a ignorar Azerus. Agora ele sumonará Rift Scythes, eles são parecidos com Grim Reapers então use GFBs. Azerus então sumonará War Golems. Desta vez ele estará enfraquecido, sendo muito mais fácil matá-lo, então faça isso enquanto ignora os War Golems.
Uma vez que o Azerus esteja morto, seu corpo se transformará em um Magic Forcefield. Todos os jogadores devem entrar no portal, e serão teleportados para uma sala onde vários Rift Monsters poderão ser vistos. Vá ao ponto mais ao norte do lugar. Se você vir uma mensagem laranja se referindo ao exército de Azerus (Azerus' Army), você terminou a quest. Reporte de volta ao NPC que você escolheu ajudar e você ganhará o Yalaharian Outfit bem como acesso à sala da recompensa. Você só pode pegar uma recompensa, então escolha cuidadosamente.

Time de Secura que completou a quest
- Rewards.jpg
Armor e Helmet

Primeiro time de Fortera com Helmet, Armor e a Legs

Observe o incrível hit que o jogador Cachero levou

Sala da recompensa da quest


Se você escolheu o lado de Palimuth
Transcrições
|
* Jogador: hi
|
Se você escolher o lado de Yalahari
Transcrições
|
* Jogador: mission
|