|
|
|
||||||||||||||||||||||||


The Roost of the Graveborn Quest: mudanças entre as edições
| [edição aprovada] | [edição aprovada] |
| Linha 219: | Linha 219: | ||
** Aproximadamente três vezes durante a luta, ao reduzir certa quantidade de vida do boss, todos os [[Pulsating Lava]]s ganharão vida e serão transformados automaticamente em [[Flame Totem]]s, independente da vida atual. | ** Aproximadamente três vezes durante a luta, ao reduzir certa quantidade de vida do boss, todos os [[Pulsating Lava]]s ganharão vida e serão transformados automaticamente em [[Flame Totem]]s, independente da vida atual. | ||
** O '''boss se cura com dano de fogo'''; como os vulcões causam dano equivalente a um '''exori''' de fogo, mantenha '''o boss sempre a pelo menos 2 SQMs dos vulcões'''. | ** O '''boss se cura com dano de fogo'''; como os vulcões causam dano equivalente a um '''exori''' de fogo, mantenha '''o boss sempre a pelo menos 2 SQMs dos vulcões'''. | ||
<gallery mode="nolines" widths="200px" heights="200px"> | |||
Arquivo:Eldritch Dragon Lord - Explicacao.jpg| Explicação | |||
Arquivo:Eldritch Dragon Lord - Explicacao Eruption.jpg| Eruption | |||
Arquivo:Eldritch Dragon Lord - Explicacao Flame Totem.jpg| Flame Totem | |||
</gallery> | |||
* '''Após luta do boss''' entre no '''teleporte verde''' e clique no [[Molten Throne]] [[Arquivo:Molten Throne.gif]] | * '''Após luta do boss''' entre no '''teleporte verde''' e clique no [[Molten Throne]] [[Arquivo:Molten Throne.gif]] | ||
<gallery mode="nolines" widths="250px" heights="250px"> | <gallery mode="nolines" widths="250px" heights="250px"> | ||

Edição das 15h19min de 17 de novembro de 2025

|
|
||||||||||||||||||||||||
| Recompensa: Acesso rápido a Draconia e hunts Outer Crypt, Inner Crypt e Unhallowed Crypt |
||||||||||||||||||||||||
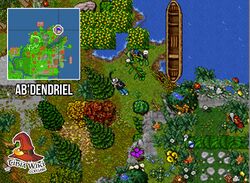
| Localização: Ab'Dendriel, Ankrahmun, Draconia, Okolnir, Plains of Havoc, Thais. |
||||||||||||||||||||||||
| Você enfrentará: Walking Dread, Crypt Construct, Haunted Hunter |
||||||||||||||||||||||||
| Mini-Bosses: |
||||||||||||||||||||||||
| Bosses: Adventurer Group, Eldritch Dragon Lord, Ice Horror, The Gravedigger, Bone Overlord. |
||||||||||||||||||||||||
| Adicionado: Versão futuro (futuro) |
||||||||||||||||||||||||
|
||||||||||||||||||||||||
Veja também: Quests.
Método
Requerimentos
 Key 3012 — necessária para acessar o Hellgate a caminho de Draconia.
 White Mushroom — recomendado para facilitar o retorno de Draconia.
 Jade Dragon Head — obtido durante a quest e obrigatoriamente necessário em todas as batalhas contra os bosses.
 Blood,
  The Holy Tible,
  Oil — recomendado para acesso rápido aos Dragon Lords da Pits of Inferno.
Walk of Death
Sua jornada começa em Ab'Dendriel, com o NPC S'Zallar M'Andar, localizado em (aqui![]() ). Fale com ele dizendo: hi - unrest - yes.
). Fale com ele dizendo: hi - unrest - yes.
NPC S'Zallar M'Andar

 |
Jogador: Hi
S'Zallar M'Andar: Human! The ancient spirits are in unrest. |
S’Zallar M’Andar sente uma grande perturbação entre os espíritos dos dragões antigos e pede sua ajuda para investigar o cemitério dos dragões, um local sagrado onde ele não pode entrar.
|
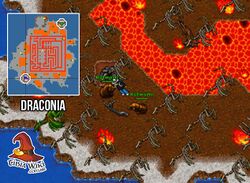
Siga até Draconia (aqui![]() ) para descobrir a origem da inquietação. Ao chegar em Draconia, se comunique com o S’Zallar M’Andar usando o
) para descobrir a origem da inquietação. Ao chegar em Draconia, se comunique com o S’Zallar M’Andar usando o ![]() Jade Dragon Head.
Jade Dragon Head.
Chegada em Draconia

|
S'Zallar M'Andar: You arrived. Great! Now investigate the Dragon Cemetery for a hint about what is going on there.
|
S’Zallar M’Andar agradece sua chegada e instrui você a investigar o Dragon Cemetery em busca de pistas sobre o que está causando a inquietação entre os espíritos dos dragões.
Digging Deeper
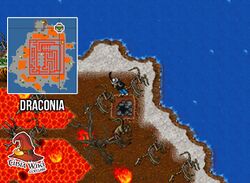
Desça o buraco ao nordeste (aqui![]() ), depois continue descendo mais dois andares (aqui
), depois continue descendo mais dois andares (aqui![]() e aqui
e aqui![]() ) em um caminho único até encontrar o NPC Dragon Ancestor Spirit.
) em um caminho único até encontrar o NPC Dragon Ancestor Spirit.
Buraco Dragon Ancestor
Caminho Dragon Ancestor
Dragon Ancestor


Fale hi - spirit.
 |
Jogador: Hi
Dragon Ancestor Spirit: This one knows you came here for the disturbance of the spirit world! |
Ancestor Spirit revela que os espíritos dos antigos dragões estão presos por uma força sombria que manipula a vida e a morte. Ele menciona que quatro dragões ancestrais: Myzareth, Zharvorin, Elyrax e Scarith tiveram suas almas corrompidas. Para libertá-los, você precisará buscar os locais onde cada um vinculou sua essência, interagindo com seus tesouros sagrados.
Volte até S'Zallar M'Andar em Ab'Dendriel e fale com ele dizendo: hi - mission
|
Jogador: Hi
S'Zallar M'Andar: Ah, the unscaled adventurer! I know, you are here to talk about our mission or have you lost your talisman? |
S’Zallar confirma a gravidade da situação e orienta você a se sintonizar com a energia das almas ancestrais.
Para isso, é necessário encontrar os quatro tesouros sagrados dos dragões e tocá-los enquanto estiver com o Jade Dragon Head em seu inventário.
![]()
![]()
![]()
![]()
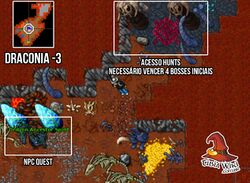
Cada um está localizado em um teleporte verde liberado após vencer a luta de cada um dos bosses.
Clique no menu para ter mais informações abaixo.
|
|
|
|


1º - The First Dragon
- Local: Thais – Subsolo de Greenshore (aqui
 )
)
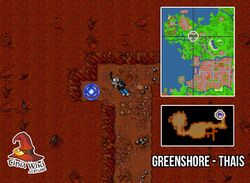
Local Adventurer Group
TP Adventurer's Group


- Requerimentos:
- Leve sua Jade Dragon Head contigo.
- Leve sua
- Proteções:
 Fire,
Fire,  Energy,
  Ice,
Ice,  Earth,
  Physical,
  Holy.
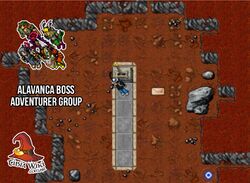
Holy. - Mecânica:
- Dentro da sala haverá um grupo de cinco criaturas, cada uma representando uma vocação:
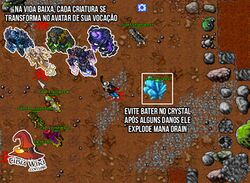
- Quando qualquer criatura atingir a vida vermelha, ela se transformará em um Avatar da respectiva vocação, passando a causar apenas ataques críticos e sofrer menos dano.
| Sorcerer | Druid | Monk | Paladin | Knight |
|---|---|---|---|---|
Fiona Firstdream |
Grendel Greenlunch |
Nigel Neverguess |
Percy Peacetinker |
Yorik Youngbook |
| Avatar of Storm |
Avatar of Nature |
Avatar of Balance |
Avatar of Light |
Avatar of Steel |
| Atenção: Definam uma ordem para levar cada criatura ao red e transformá-la em avatar. Como os avatares aplicam golpes críticos em todos os ataques, lidar com dois ou mais ao mesmo tempo pode ser fatal. Mantendo apenas um avatar ativo por vez, a batalha se torna muito mais controlada e segura. |
Explicação

- Após derrotar todas as cinco criaturas, surgirá a criatura final: Fatal Bug
 .
. - Ao fim da luta use o teleporte verde ao sul da sala e clique na Charred Skull
 para concluir esta etapa e habilitar o reporte da missão.

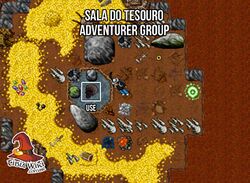
Charred Skull

Report your progress
Para reportar a missão, você pode usar sua Jade Dragon Head ou reportar diretamente a missão no NPC S'Zallar M'Andar com hi - mission.
|
Jogador: Hi
S'Zallar M'Andar: Ah, the unscaled adventurer! I know, you are here to talk about our mission or have you lost your talisman? |
2º - Under Fire
- Local: Plains of Havoc - Dragon Lords Pits of Inferno (aqui)
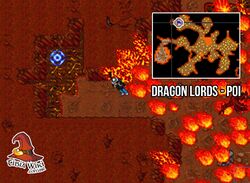
Local Eldritch Dragon Lord
TP Eldritch Dragon Lord


- Requerimentos:
- Ter vencido a batalha do boss Adventurer Group.
- Leve sua Jade Dragon Head contigo.
- Para acesso rápido: Blood, The Holy Tible, Oil
- Proteções: Fire
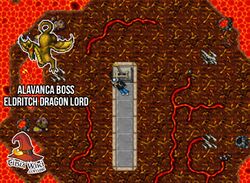
- Mecânica:
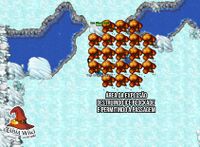
 Enfrente o boss Eldritch Dragon Lord.
- Existem 4 Pulsating Lavas (vulcões) espalhados pela sala.
- A cada turno, os Pulsating Lava ganham vida, tornando-se uma Eruption e, por fim, um Flame Totem quando acumula vida suficiente.
 →
→  →
→ 
- Caso existam 3 ou mais Flame Totems ativos ao mesmo tempo, o boss se tornará imortal.
- Controle o dano no boss e mantenha ao menos 2 Pulsating Lava enfraquecidos para garantir que o boss permaneça sempre mortal.
- Aproximadamente três vezes durante a luta, ao reduzir certa quantidade de vida do boss, todos os Pulsating Lavas ganharão vida e serão transformados automaticamente em Flame Totems, independente da vida atual.
- O boss se cura com dano de fogo; como os vulcões causam dano equivalente a um exori de fogo, mantenha o boss sempre a pelo menos 2 SQMs dos vulcões.


Explicação

Eruption
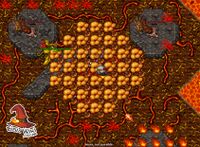
Flame Totem


- Após luta do boss entre no teleporte verde e clique no Molten Throne

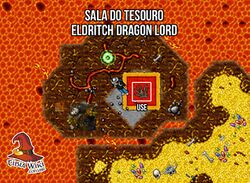
Molten Throne

Report your progress
Para reportar a missão, você pode usar sua ![]() Jade Dragon Head ou reportar diretamente a missão no NPC S'Zallar M'Andar com hi - mission.
Jade Dragon Head ou reportar diretamente a missão no NPC S'Zallar M'Andar com hi - mission.
|
Jogador: Hi
S'Zallar M'Andar: Ah, the unscaled adventurer! I know, you are here to talk about our mission or have you lost your talisman? |
3º - The Frozen Hoard
- Local: Svarground - Okolnir (aqui)
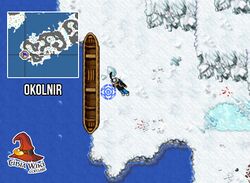
Local Ice Horror
TP Ice Horror


- Requerimentos:
- Ter vencido a batalha do boss Eldritch Dragon Lord.
- Leve sua Jade Dragon Head contigo.
 Fire Bombs.
- Proteções: Ice,
 Death
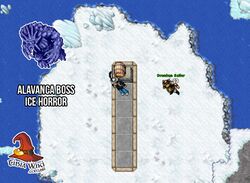
Death - Mecânica:
- Seu objetivo é derrotar o boss Ice Horror
 .
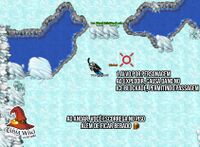
. - Para chegar até ele, será necessário atravessar duas barreiras de Ice Blockades.
- Para destruir um Ice Blockade, posicione-se próximo e aguarde um alvo aparecer perto da barreira.
- O dano do alvo destruirá o Ice Blockade.
- Quando o alvo surgir, saia imediatamente de cima: a explosão criará um buraco que causa root e o efeito de congelado se o jogador estiver sobre ele.
- Após remover ambas as barreiras, recomenda-se que o time se posicione em um canto da sala.
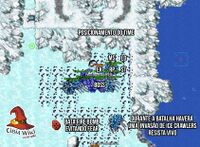
- O boss possui alta resiliência no início da luta.
- Além do seu dano, os próprios alvos também causam dano no boss.
- Utilize Fire Bombs nos pés para evitar o efeito de Fear.
- Ao atingir certa quantidade de vida, o boss fará surgir uma invasão de Ice Crawlers. Sobreviva por alguns segundos até que os alvos e seus danos as eliminem, deixando a batalha mais tranquila.
- Seu objetivo é derrotar o boss Ice Horror

Mecânica Alvo - Escorregar - Drunk
Alvo destruindo Ice Blockade

Root ao pisar no piso destruído
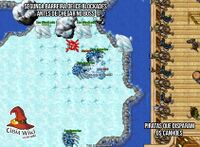
Segunda barreira
Posicionamento do time
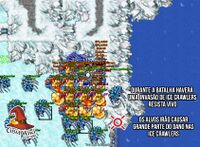
Invasão Ice Crawlers


- Após luta do boss entre no teleporte verde e clique no Draconic Rattle


Draconic Rattle

Report your progress
Para reportar a missão, você pode usar sua ![]() Jade Dragon Head ou reportar diretamente a missão no NPC S'Zallar M'Andar com hi - mission.
Jade Dragon Head ou reportar diretamente a missão no NPC S'Zallar M'Andar com hi - mission.
|
Jogador: Hi
S'Zallar M'Andar: Ah, the unscaled adventurer! I know, you are here to talk about our mission or have you lost your talisman? |
4º - The Last Dragon Soul
- Local: Ankrahmun - Esquerda Terramite (aqui)
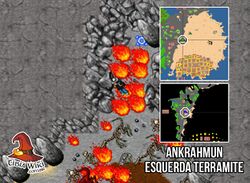
Local The Gravedigger
TP The Gravedigger


- Requerimentos:
- Ter vencido a batalha do boss Ice Horror.
- Leve sua Jade Dragon Head contigo.
- Proteções: Death
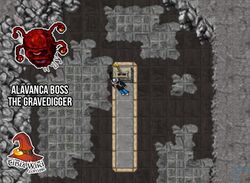
- Mecânica:
- Quanto mais cargas o jogador acumular, maior será o dano recebido.
- O boss não pode permanecer próximo ao totem.
- Não deixe o boss atravessar a fumaça, pois isso o fará ganhar cargas.
- Ao alcançar 10 cargas, o boss se torna extremamente poderoso.
- Dano de Mortes de jogadores faz o boss recuperar sua vida.
- Após luta do boss entre no teleporte verde e clique no Gilded Wig

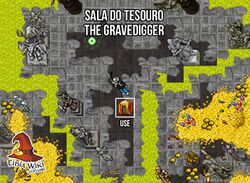
Gilded Wig

Report your progress
Para reportar a missão, você pode usar sua ![]() Jade Dragon Head ou reportar diretamente a missão no NPC S'Zallar M'Andar com hi - mission.
Jade Dragon Head ou reportar diretamente a missão no NPC S'Zallar M'Andar com hi - mission.
|
Jogador: Hi
S'Zallar M'Andar: Ah, the unscaled adventurer! I know, you are here to talk about our mission or have you lost your talisman? |
The Graveborn's Puppeteer
Após matar os 4 bosses retorne até o NPC S'Zallar M'Andar e solicite a nova missão dizendo: hi - mission.
|
Jogador: Hi
S'Zallar M'Andar: Ah, the unscaled adventurer! I know, you are here to talk about our mission or have you lost your talisman? |
A partir deste momento, o NPC S'Zallar M'Andar oferecerá uma passagem direta para Draconia.
Fale: hi - passage - yes
|
Jogador: Hi
S'Zallar M'Andar: Ah, the unscaled adventurer! I know, you are here to talk about our mission or have you lost your talisman? |
Antes de prosseguir, confirme se sua missão foi atualizada no questlog.
Você também ganhou acesso às hunts: para entrar na Outer Crypt, utilize o teleporte à esquerda logo após o NPC Dragon Ancestor Spirit.
Dragon Ancestor
Agora chegou o momento de enfrentar o boss final, o Bone Overlord, localizado em Outer Crypt (aqui![]() ).
).
No strings attached
Reporte ao NPC S'Zallar M'Andar : hi - mission - reward - yes para assim completar a missão e pegar sua recompensa.
|
Jogador: Hi
S'Zallar M'Andar: Ah, the unscaled adventurer! I know, you are here to talk about our mission or have you lost your talisman? |
| Recompensa: 1 Crypt Rune, entre Fiery Crypt Rune Icy Crypt Rune Deathly Crypt Rune Ancient Crypt Rune Necromantic Crypt Rune
|
Utilidades
Acesso às hunts
O acesso às hunts é garantido após derrotar o quarto boss, o The Gravedigger, durante a missão The Last Dragon Soul.
- Para acessar a hunt Outer Crypt, basta entrar no teleport à esquerda.
- Para acessar a hunt Unhallowed Crypt, utilize um Cryptic Fossil.
- Para acessar a hunt Inner Crypt, utilize um Fetid Heart.
Ao usar esses itens, você recebe 5 acessos à hunt correspondente. Cada vez que entrar pelo teleporte, um acesso será consumido.
Forjando Armas Crypt
Para forjar armas Crypt, você precisa reunir os 5 tipos diferentes de Crypt Runes:
Após reunir todas, siga até o NPC Dragon Ancestor Spirit em Dracônia e diga: hi - trade - yes.
|
Jogador: Hi
Dragon Ancestor Spirit: I am aware of what brings you here. So let us trade, mortal. |
Ao completar a troca, você poderá receber um dos seguintes itens:
| Arma | Quantidade | % |
|---|---|---|
| 82 | 15.8% | |
| 79 | 15.3% | |
| 76 | 14.7% | |
| 75 | 14.5% | |
| 73 | 14.1% | |
| 69 | 13.3% | |
| 64 | 12.4% |