|
|
|
||||||||||||||||||||||||


The Gravedigger of Drefia Quest: mudanças entre as edições
| [edição aprovada] | [edição aprovada] |
m |
|||
| (29 revisões intermediárias por um outro usuário não estão sendo mostradas) | |||
| Linha 1: | Linha 1: | ||
{{Infobox_Quest|List={{{1|}}}|GetValue={{{GetValue|}}} | {{Infobox_Quest|List={{{1|}}}|GetValue={{{GetValue|}}} | ||
| name = The Gravedigger of Drefia Quest | | name = The Gravedigger of Drefia Quest | ||
| reward = 1 | | reward = 1.500 pontos de [[experiência]], 02 [[Small Emerald]]s, [[Small Ruby]], 03 [[Black Pearl]]s, [[Nail Case]] e um [[Achievement]]. | ||
| location = [[Drefia]]. | | location = [[Drefia]]<noinclude>.</noinclude> | ||
| lvl = 50 | | lvl = 50 | ||
| lvlreq = 100+ | | lvlreq = 100+ | ||
| Linha 9: | Linha 9: | ||
| teamnote = | | teamnote = | ||
| dif = 2 | | dif = 2 | ||
| imgleg = | | imgleg = Tibian Shield | ||
| quests = | | quests = | ||
| implemented = 10.1 | | implemented = 10.1 | ||
| premium = sim | | premium = sim | ||
| dangers = [[Gravedigger]], [[Demon Skeleton]], [[White Shade]], [[Zombie]], [[Necromancer]], [[Tarnished Spirit]], [[Shadow Pupil]], [[Blood Priest]], [[Blood Hand]], [[Vampire]], [[Vampire Bride]], [[Vampire Viscount]], [[Banshee]], [[Lich]], [[Death Blob]] e outros. | | dangers = [[Gravedigger]], [[Demon Skeleton]], [[White Shade]], [[Zombie]], [[Necromancer]], [[Tarnished Spirit]], [[Shadow Pupil]], [[Blood Priest]], [[Blood Hand]], [[Vampire]], [[Vampire Bride]], [[Vampire Viscount]], [[Banshee]], [[Lich]], [[Death Blob]] e outros. | ||
| mini = [[Necromancer Servant]]. | |||
| bosses = Nenhum. | |||
| legend = Drefia, a cidade em ruínas, corrompida pelo mal e lar dos necromancers pode mostrar com facilidade o lado negro do ser humano. Com a dor e sofrimento, aliado a disciplina e aos conhecimentos de rituais e experimentos diabólicos, fizeram as pessoas terem a ganância de tornar um Deus. Mentiras foram contadas e um antigo necromancer foi traído. Morto, voltou a vida, convencendo e iludindo guerreiros a se aventurar em uma terra proibida em busca de um encantamento especial que poderá lhe dar um novo corpo. Porém você poderá contar nos dedos da sua mão a verdades que ele diz. | | legend = Drefia, a cidade em ruínas, corrompida pelo mal e lar dos necromancers pode mostrar com facilidade o lado negro do ser humano. Com a dor e sofrimento, aliado a disciplina e aos conhecimentos de rituais e experimentos diabólicos, fizeram as pessoas terem a ganância de tornar um Deus. Mentiras foram contadas e um antigo necromancer foi traído. Morto, voltou a vida, convencendo e iludindo guerreiros a se aventurar em uma terra proibida em busca de um encantamento especial que poderá lhe dar um novo corpo. Porém você poderá contar nos dedos da sua mão a verdades que ele diz. | ||
| spoiler = | | spoiler = | ||
| Linha 20: | Linha 22: | ||
* [[Rope]] | * [[Rope]] | ||
* [[Shovel]] | * [[Shovel]] | ||
* | * 03 Parcels ou a magia [[Levitate]]. | ||
* | * 02 [[Ghoul Snack]]s. | ||
* | * 02 [[Demonic Skeletal Hand]]. | ||
* | * 02 [[Half-Eaten Brain]]s. | ||
* | * 04 [[Blood Tincture in a Vial]]. | ||
* | * 01 [[Pieces of Magic Chalk]]. | ||
* | * 01 [[Yellowed Bone]] ou 01 [[Large Yellowed Bone]]. | ||
== Caminho para Drefia == | |||
Para iniciar a quest, você deve ir para Drefia, para chegar lá, saia de Darashia e vá para oeste e suba ({{mapa|33049,32428,7:2|aqui}}), com uma corda. Em seguida caminhe um pouco mais para oeste até ({{mapa|33031,32426,6:2|aqui}}), suba usando três parcels ou a magia [[Levitate]]. Agora vá para o norte e desça ({{mapa|33027,32417,5:2|aqui}}) e desça novamente no próximo buraco, vá para o sul e desça ({{mapa|33027,32420,7:2|aqui}}), por fim siga para sudoeste, suba a escada ({{mapa|33018,32429,8:2|aqui}}) e você estará em Drefia. | |||
<gallery mode="nolines" perrow="4" widths="246px" heights="246px"> | |||
Arquivo:The Gravedigger of Drefia Quest Mapa 0-1-1.png | |||
Arquivo:The Gravedigger of Drefia Quest Mapa 0-1-2.png | |||
Arquivo:The Gravedigger of Drefia Quest Mapa 0-1-3.png | |||
Arquivo:The Gravedigger of Drefia Quest Mapa 0-1-4.png | |||
Arquivo:The Gravedigger of Drefia Quest Mapa 0-1-5.png | |||
Arquivo:The Gravedigger of Drefia Quest Mapa 0-1-6.png | |||
Arquivo:The Gravedigger of Drefia Quest Mapa 0-1-7.png | |||
</gallery> | |||
Em seguida caminhe em direção ao sul e desça nas ruínas ({{mapa|33017,32454,7:2|aqui}}). Próximo a escada, você irá ver um buraco, Use sua [[shovel|pá]] ({{mapa|33020,32453,8:2|aqui}}) e desça. Você irá encontrar o NPC [[Omrabas]], ele é apenas uma caveira no chão, fale '''Hi - Mission - Yes''' para iniciar a quest. | |||
== Volume 1 == | == Volume 1 == | ||
Comece arranjando os seguintes itens: | Comece arranjando os seguintes itens: | ||
* | * 02 [[Ghoul Snack]]s. | ||
* | * 02 [[Demonic Skeletal Hand]]s. | ||
* | * 02 [[Half-Eaten Brain]]s. | ||
=== Chapter 1: Sharpen Elbows === | === Chapter 1: Sharpen Elbows === | ||
Ele vai dizer que precisa de algumas partes do corpo humano. [[Omrabas]] vai lhe pedir 02 [[Ghoul Snack]]s [[Arquivo:Ghoul Snack.gif|link=]], que podem ser obtidos caçando [[Ghoul]]s. Simplesmente entregue-os a ele para completar a missão. | |||
[[ | |||
[[Arquivo: | |||
'''Falando com Omrabas''' | |||
''' | |||
{{transcrições|npc=Omrabas|texto= | {{transcrições|npc=Omrabas|texto= | ||
| Linha 77: | Linha 66: | ||
[[Omrabas]]: First, I need two arms. Ghouls usually carry some as a snack. Two ghoul snacks should not be hard to get! Return when you have them.}} | [[Omrabas]]: First, I need two arms. Ghouls usually carry some as a snack. Two ghoul snacks should not be hard to get! Return when you have them.}} | ||
''Para entregar os | '''Reportando a missão - Para entregar os Ghoul Snacks''' | ||
{{transcrições|npc=Omrabas|texto= | {{transcrições|npc=Omrabas|texto= | ||
| Linha 86: | Linha 75: | ||
=== Chapter 2: Coming In Handy === | === Chapter 2: Coming In Handy === | ||
[[Omrabas]] percebeu que os [[Ghoul Snack]]s não servem para fazer mãos, então pediu um novo ingrediente: | Fale '''Hi''' novamente para [[Omrabas]], ele percebeu que os [[Ghoul Snack]]s não servem para fazer mãos, então pediu um novo ingrediente: 02 [[Demonic Skeletal Hand]]s [[Arquivo:Demonic Skeletal Hand.gif|link=]], que podem ser obtidas facilmente caçando [[Demon Skeleton]]s. Entregue-as para concluir a missão falando '''Hi - Yes - Mission'''. | ||
''' | '''Falando com Omrabas''' | ||
{{transcrições|npc=Omrabas|texto= | {{transcrições|npc=Omrabas|texto= | ||
''Jogador:'' ''' | ''Jogador:'' '''Hi'''<br/> | ||
[[Omrabas]]: Ah, young friend, I found a solution! Find me two demonic | [[Omrabas]]: Ah, young friend, I found a solution! Find me two demonic skeletal hands. That should do it. Now run along!}} | ||
''Para entregar as | '''Reportando a missão - Para entregar as Demonic Skeletal Hands''' | ||
{{transcrições|npc=Omrabas|texto= | {{transcrições|npc=Omrabas|texto= | ||
| Linha 100: | Linha 89: | ||
[[Omrabas]]: Ah hello again! You look as if you could, er, lend me a hand or two? Yes?</br> | [[Omrabas]]: Ah hello again! You look as if you could, er, lend me a hand or two? Yes?</br> | ||
''Jogador:'' '''Yes'''</br> | ''Jogador:'' '''Yes'''</br> | ||
[[Omrabas]]: Yes. Those will be adequate. Talk to me again if you want to continue with your next ''''' | [[Omrabas]]: Yes. Those will be adequate. Talk to me again if you want to continue with your next mission.</br> | ||
''Jogador:'' '''Mission'''</br> | |||
''(Continua na próxima missão)''}} | |||
=== Chapter 3: Heartfelt === | === Chapter 3: Heartfelt === | ||
Agora | Agora [[Omrabas]] precisa de um coração. Ele diz que seu próprio coração foi escondido por alguém, e sabe onde encontrá-lo. | ||
'''Falando com Omrabas''' | |||
''' | |||
{{transcrições|npc=Omrabas|texto= | {{transcrições|npc=Omrabas|texto= | ||
| Linha 123: | Linha 105: | ||
[[Omrabas]]: Crash the amphoras to find my heart, and bring it to me.}} | [[Omrabas]]: Crash the amphoras to find my heart, and bring it to me.}} | ||
'' | Então, ele pede que você destrua algumas [[Dust Amphora|Amphoras]] [[Arquivo:Dust Amphora.gif|link=]] em uma vala comum no subsolo de sua antiga casa. Siga, então, para a construção indicada no mapa, ({{mapa|32987,32389,7:2|aqui}}). Chegando lá, use [[Levitate]] para subir. Desça dois andares e siga as orientações do mapa abaixo. Passando o teleport, você terá '''05 minutos''' para pegar o coração, vá quebrando todas as [[Dust Amphora]]s do local até obter o [[Omrabas' Heart]] [[Arquivo:Omrabas' Heart.gif|link=]]. | ||
<gallery mode="nolines" widths="246px" heights="246px"> | |||
Arquivo:The Gravedigger of Drefia Quest Mapa 1-3-1.png | |||
Arquivo:The Gravedigger of Drefia Quest Mapa 1-3-2.png | |||
Arquivo:The Gravedigger of Drefia Quest Mapa 1-3-3.png | |||
</gallery> | |||
= | <gallery mode="nolines"> | ||
Arquivo:The Gravedigger of Drefia Quest 1-3-1.png | |||
Arquivo:The Gravedigger of Drefia Quest 1-3-2.png | |||
Arquivo:The Gravedigger of Drefia Quest 1-3-3.png | |||
Arquivo:The Gravedigger of Drefia Quest 1-3-4.png | |||
</gallery> | |||
Retorne ao [[Omrabas]] e entregue o coração a ele falando '''Hi - Yes - Mission'''. | |||
'''Reportando a missão - Para entregar o Omrabas' Heart''' | |||
{{transcrições|npc=Omrabas|texto= | |||
''Jogador:'' '''Hi'''</br> | |||
[[Omrabas]]: Yes? What is it? Lost something? Or do you have my undead heart?</br> | |||
''Jogador:'' '''Yes'''</br> | |||
[[Omrabas]]: Ah... <sighs> Very good. Just say the word when you are ready for the next mission.</br> | |||
''Jogador:'' '''Mission'''</br> | |||
''(Continua na próxima missão)''}} | |||
=== Chapter 4: Brained Up and Ready === | |||
Fale '''Mission''' para [[Omrabas]], desta vez ele precisa de um cérebro. Para tal, ele pede que você consiga 02 [[Half-Eaten Brain]]s [[Arquivo:Half-Eaten Brain.gif|link=]], que podem ser dropados de [[Zombie]]s. | |||
''' | '''Falando com Omrabas''' | ||
{{transcrições|npc=Omrabas|texto= | {{transcrições|npc=Omrabas|texto= | ||
| Linha 151: | Linha 143: | ||
[[Omrabas]]: Use two half-eaten brains with the Brain Heater Machine in the Necromancer halls and bring me the fused, stimulated brain. Now go!}} | [[Omrabas]]: Use two half-eaten brains with the Brain Heater Machine in the Necromancer halls and bring me the fused, stimulated brain. Now go!}} | ||
'' | Assim que tiver as duas metades de cérebro, você precisará ir até a [[Brain Heater Machine]] [[Arquivo:Brain Heater Machine.gif|link=]] que fica em uma sala nos '''Necromancer Halls''' ({{mapa|33023,32332,10:2|aqui}}). Com as duas metades de cérebro em mãos, siga as orientações dos mapas e chegando lá, coloque as duas metades sobre os altares deitados (conforme a animação abaixo) e dê "use" na máquina para obter o [[Stimulated Brain]] [[Arquivo:Stimulated Brain.gif|link=]]. | ||
<gallery mode="nolines" widths="246px" heights="246px"> | |||
Arquivo:The Gravedigger of Drefia Quest Mapa 1-4-1.png | |||
Arquivo:The Gravedigger of Drefia Quest Mapa 1-4-2.png | |||
Arquivo:The Gravedigger of Drefia Quest Mapa 1-4-3.png | |||
Arquivo:The Gravedigger of Drefia Quest Mapa 1-4-4.png | |||
</gallery> | |||
<gallery mode="nolines"> | |||
Arquivo:The Gravedigger of Drefia Quest 1-4-1.png | |||
Arquivo:The Gravedigger of Drefia Quest 1-4-2.gif | |||
</gallery> | |||
Retorne ao [[Omrabas]] e entregue o cérebro a ele falando '''Hi - Yes - Mission'''. | |||
'''Reportando a missão - Entregando o Stimulated Brain''' | |||
{{transcrições|npc=Omrabas|texto= | {{transcrições|npc=Omrabas|texto= | ||
''Jogador:'' '''Hi'''</br> | ''Jogador:'' '''Hi'''</br> | ||
[[Omrabas]]: Yes, yes, hello. Tell me if you | [[Omrabas]]: Yes, yes, hello. Tell me if you lost something. If not, do you have that stimulated brain with you?</br> | ||
''Jogador:'' '''Yes'''</br> | ''Jogador:'' '''Yes'''</br> | ||
[[Omrabas]]: Ah, very nice specimen. Good. Here is a token of my gratitude. Now, ready to take on the next ''''' | [[Omrabas]]: Ah, very nice specimen. Good. Here is a token of my gratitude. Now, ready to take on the next mission?</br> | ||
''Jogador:'' '''Mission'''</br> | |||
''(Continua na próxima missão)''}} | |||
=== Chapter 5: Snaky Intestines === | === Chapter 5: Snaky Intestines === | ||
Agora para terminar sua reunião de ingredientes, [[Omrabas]] solicitará algo vivo que possa servir de intestino. Ele vai lhe entregar um [[Empty Storage Flask|Storage Flask]] [[Arquivo:Empty Storage Flask.gif|link=]], que você deverá usar em uma [[Snake]] viva (Caso você seja Druid ou Sorcerer pode summonar uma e dar use nela). Ao usar o flask em uma snake, você terá um [[Full Storage Flask]] [[Arquivo:Full Storage Flask.gif|link=]]. | |||
{{DASH|'''Aviso:''' Caso o personagem perca de alguma forma o [[Full Storage Flask]], ele pode retornar no NPC [[Omrabas]] para pegar um novo [[Empty Storage Flask|Storage Flask]], basta dizer "Hi - Lost" para ele dar um novo frasco. Com o frasco na mão, basta repetir o procedimento acima.}} | {{DASH|'''Aviso:''' Caso o personagem perca de alguma forma o [[Full Storage Flask]], ele pode retornar no NPC [[Omrabas]] para pegar um novo [[Empty Storage Flask|Storage Flask]], basta dizer "Hi - Lost" para ele dar um novo frasco. Com o frasco na mão, basta repetir o procedimento acima.}} | ||
''' | '''Falando com Omrabas''' | ||
{{transcrições|npc=Omrabas|texto= | {{transcrições|npc=Omrabas|texto= | ||
| Linha 173: | Linha 182: | ||
[[Omrabas]]: I will need something that can be adequately used as intestines. Something alive. Stuff it into this storage flask and return it to me!}} | [[Omrabas]]: I will need something that can be adequately used as intestines. Something alive. Stuff it into this storage flask and return it to me!}} | ||
''Entregando o | Depois de usar o frasco numa [[Snake]], fale novamente com o NPC para completar a missão falando '''Hi - Yes - Mission'''. | ||
'''Reportando a missão - Entregando o Full Storage Flask''' | |||
{{transcrições|npc=Omrabas|texto= | {{transcrições|npc=Omrabas|texto= | ||
| Linha 180: | Linha 191: | ||
''Jogador:'' '''Yes'''</br> | ''Jogador:'' '''Yes'''</br> | ||
[[Omrabas]]: Ah... interesting. A snake? Not bad, not bad at all. ...</br> | [[Omrabas]]: Ah... interesting. A snake? Not bad, not bad at all. ...</br> | ||
[[Omrabas]]: Right. Now, we need to waken the old powers through ritual. Let me know when you are ready for this ''''' | [[Omrabas]]: Right. Now, we need to waken the old powers through ritual. Let me know when you are ready for this mission.</br> | ||
''Jogador:'' '''Mission'''</br> | |||
''(Continua na próxima missão)''}} | |||
== Volume 2 == | == Volume 2 == | ||
Comece arranjando os seguintes itens: | |||
* 04 [[Blood Tincture in a Vial]]. | |||
* 01 [[Pieces of Magic Chalk]]. | |||
[[ | * 01 [[Yellowed Bone]] ou 01 [[Large Yellowed Bone]]. | ||
=== Chapter 1: Dragon Hallowtosis === | === Chapter 1: Dragon Hallowtosis === | ||
Fale '''Mission''' para [[Omrabas]], todos os ingredientes necessários foram coletados. Agora, você precisa ajudar [[Omrabas]] a fazer o ritual. Você precisará sacrificar cinco coisas diferentes nos cinco altares de Drefia, localizados no andar em que o mapa forma uma estrela de cinco pontas. | |||
'''Falando com Omrabas''' | |||
''' | |||
{{transcrições|npc=Omrabas|texto= | {{transcrições|npc=Omrabas|texto= | ||
| Linha 219: | Linha 213: | ||
[[Omrabas]]: In a first step, it will involve retrieving specific artefacts of dark magic and hallowing the altars of the dark powers with them. ...</br> | [[Omrabas]]: In a first step, it will involve retrieving specific artefacts of dark magic and hallowing the altars of the dark powers with them. ...</br> | ||
[[Omrabas]]: After that, you will have to speak an ancient incantation to animate the body and fuse my soul within. ...</br> | [[Omrabas]]: After that, you will have to speak an ancient incantation to animate the body and fuse my soul within. ...</br> | ||
[[Omrabas]]: But first things first. Are you ready to | [[Omrabas]]: But first things first. Are you ready to undertake the hallowing of the five altars?</br> | ||
''Jogador:'' '''Undertake'''</br> | ''Jogador:'' '''Undertake'''</br> | ||
[[Omrabas]]: Good! Let's not waste time. The first altar you must hallow is the Dragonsoul Altar, at the eastern side of the room. ...</br> | [[Omrabas]]: Good! Let's not waste time. The first altar you must hallow is the Dragonsoul Altar, at the eastern side of the room. ...</br> | ||
| Linha 226: | Linha 220: | ||
[[Omrabas]]: In the Dragonbone Cemetery, OBVIOUSLY! Must I explain EVERYTHING to you? Now go!}} | [[Omrabas]]: In the Dragonbone Cemetery, OBVIOUSLY! Must I explain EVERYTHING to you? Now go!}} | ||
'' | No primeiro altar, você precisará sacrificar [[Small Dragon Tear|três lágrimas de dragão]] [[Arquivo:Small Dragon Tear.gif|link=]]. Para obtê-las, você deve ir até o Dragonbone Cemetery. Siga as instruções do mapa. Chegando lá, você passará por um portal mas e descerá em um buraco. Você terá '''10 minutos''' para conseguir as três lágrimas. Abra os dois corpos humanos presentes no local, em um deles haverá um documento e no outro uma pá, agora cave a areia nos três locais indicados abaixo. | ||
<gallery mode="nolines" widths="246px" heights="246px"> | |||
Arquivo:The Gravedigger of Drefia Quest Mapa 2-1-1.png | |||
Arquivo:The Gravedigger of Drefia Quest Mapa 2-1-2.png | |||
Arquivo:The Gravedigger of Drefia Quest Mapa 2-1-3.png | |||
Arquivo:The Gravedigger of Drefia Quest Mapa 2-1-4.png | |||
</gallery> | |||
= | <gallery mode="nolines"> | ||
Arquivo:The Gravedigger of Drefia Quest 2-1-1.png | |||
Arquivo:The Gravedigger of Drefia Quest 2-1-2.png | |||
Arquivo:The Gravedigger of Drefia Quest 2-1-3.png | |||
Arquivo:The Gravedigger of Drefia Quest 2-1-4.png | |||
Arquivo:The Gravedigger of Drefia Quest 2-1-5.png | |||
</gallery> | |||
Agora você deve ir até o primeiro altar, o '''Dragonsoul Altar''', que é um dos cinco altares do pentagrama de Drefia. Siga as instruções do mapa e quando chegar lá, vá para o altar '''número 1''' ({{mapa|33036,32402,11:2|aqui}}). Simplesmente use as lágrimas no altar para completar sua missão. | |||
<gallery mode="nolines" widths="196px" heights="196px"> | |||
Arquivo:The Gravedigger of Drefia Quest Mapa 2-1-5.png | |||
Arquivo:The Gravedigger of Drefia Quest Mapa 2-1-6.png | |||
Arquivo:The Gravedigger of Drefia Quest Mapa 2-1-7.png | |||
Arquivo:The Gravedigger of Drefia Quest Mapa 2-1-8.png | |||
Arquivo:The Gravedigger of Drefia Quest Mapa 2-1-9.png | |||
</gallery> | |||
<gallery mode="nolines"> | |||
Arquivo:The Gravedigger of Drefia Quest 2-1-6.png | |||
</gallery> | |||
[[ | Retorne ao [[Omrabas]] para novas instruções falando '''Hi - Yes'''. | ||
''' | '''Reportando a missão''' | ||
{{transcrições|npc=Omrabas|texto= | |||
''Jogador:'' '''Hi'''</br> | |||
[[Omrabas]]: Ah hello! Well done there, I felt the old powers settling down. Now, ready to hallow the next altar?</br> | |||
''Jogador:'' '''Yes'''</br> | |||
''(Continua na próxima missão)''}} | |||
=== Chapter 2: Holy Smokes === | |||
Agora [[Omrabas]] irá instruí-lo a obter 01 [[Hallowed Bone]] [[Arquivo:Hallowed Bone.gif|link=]] e usá-lo no altar correto. Para conseguir um [[Hallowed Bone]], você precisa usar 01 [[Yellowed Bone]] [[Arquivo:Yellowed Bone.gif|link=]] '''ou''' 01 [[Large Yellowed Bone]] [[Arquivo:Large Yellowed Bone.gif|link=]] - que pode ser encontrado por toda parte em [[Drefia]] - em uma das [[Hallowed Bonepile|quatro pilhas de ossos]] [[Arquivo:Hallowed Bonepile.gif|link=]] indicadas em uma das imagens abaixo. | |||
'''Falando com Omrabas''' | |||
''' | |||
{{transcrições|npc=Omrabas|texto= | {{transcrições|npc=Omrabas|texto= | ||
[[Omrabas]]: Ah hello! Well done there, I felt the old powers settling down. Now, ready to hallow the next altar?</br> | |||
[[Omrabas]]: Ah hello! Well done there, I felt the old powers settling down. Now, | |||
''Jogador:'' '''Yes'''</br> | ''Jogador:'' '''Yes'''</br> | ||
[[Omrabas]]: I expected no less. Next is the Bonemarrow Altar, where the Dark Lord feasts upon the hallowed bones of...err. ...</br> | [[Omrabas]]: I expected no less. Next is the Bonemarrow Altar, where the Dark Lord feasts upon the hallowed bones of...err. ...</br> | ||
| Linha 266: | Linha 275: | ||
[[Omrabas]]: Then, place the hallowed bone on the firebasin of the Bonemarrow Altar so the Dark Lord can consume it and grants us his power. Return to me after that.}} | [[Omrabas]]: Then, place the hallowed bone on the firebasin of the Bonemarrow Altar so the Dark Lord can consume it and grants us his power. Return to me after that.}} | ||
'' | Com um [[Yellowed Bone]] '''ou''' [[Large Yellowed Bone]] em mãos, siga para o local indicado no mapa abaixo (dentro da cave principal em Drefia). Chegando lá, você deverá usar seu [[Yellowed Bone]] '''ou''' [[Large Yellowed Bone]] em uma das [[Hallowed Bonepile|quatro pilhas de ossos]] indicadas na imagem abaixo. '''Nota:''' Alguns [[Yellowed Bone]]s podem ser encontrados no próprio local. | ||
<gallery mode="nolines" widths="246px" heights="246px"> | |||
Arquivo:The Gravedigger of Drefia Quest Mapa 2-2-1.png | |||
Arquivo:The Gravedigger of Drefia Quest Mapa 2-2-2.png | |||
Arquivo:The Gravedigger of Drefia Quest Mapa 2-2-3.png | |||
Arquivo:The Gravedigger of Drefia Quest Mapa 2-2-4.png | |||
</gallery> | |||
<gallery mode="nolines"> | |||
Arquivo:The Gravedigger of Drefia Quest 2-2-1.png | |||
</gallery> | |||
Agora você deve ir até o segundo altar, o '''Bonemarrow Altar''', que é um dos cinco altares do pentagrama de Drefia. Siga as instruções do mapa e quando chegar lá, vá para o altar '''número 2''' ({{mapa|33031,32422,11:2|aqui}}). Use seu [[Hallowed Bone]] na [[Blazing Altar Bazin|caldeira]] [[Arquivo:Blazing Altar Bazin.gif|link=]] para completar sua missão. | |||
<gallery mode="nolines" widths="246px" heights="246px"> | |||
Arquivo:The Gravedigger of Drefia Quest Mapa 2-2-5.png | |||
Arquivo:The Gravedigger of Drefia Quest Mapa 2-2-6.png | |||
</gallery> | |||
<gallery mode="nolines"> | |||
Arquivo:The Gravedigger of Drefia Quest 2-2-2.png | |||
</gallery> | |||
Retorne ao [[Omrabas]] para novas instruções falando '''Hi - Blood - Yes'''. | |||
'''Reportando a missão''' | |||
{{transcrições|npc=Omrabas|texto= | {{transcrições|npc=Omrabas|texto= | ||
''Jogador:'' '''Hi'''</br> | ''Jogador:'' '''Hi'''</br> | ||
[[Omrabas]]: Ah, welcome, welcome! I felt that one! The Dark Lord is pleased with the gift you brought, so now we can proceed with everything as planned. ...</br> | [[Omrabas]]: Ah, welcome, welcome! I felt that one! The Dark Lord is pleased with the gift you brought, so now we can proceed with everything as planned. ...</br> | ||
[[Omrabas]]: If it had gone wrong though, he would have had your guts for gart... er... well, here you are, so - ready to get some | [[Omrabas]]: If it had gone wrong though, he would have had your guts for gart... er... well, here you are, so - ready to get some blood flowing?</br> | ||
''Jogador:'' '''Blood'''</br> | ''Jogador:'' '''Blood'''</br> | ||
[[Omrabas]]: Yes, I said blood. Important ingredient in necromantic rituals, usually. ...</br> | [[Omrabas]]: Yes, I said blood. Important ingredient in necromantic rituals, usually. ...</br> | ||
[[Omrabas]]: You need to spill some vials of blood tincture for this task. Probably means killing blood priests to get those vials. | [[Omrabas]]: You need to spill some vials of blood tincture for this task. Probably means killing blood priests to get those vials. Ready to do this?</br> | ||
}} | ''Jogador:'' '''Yes'''</br> | ||
''(Continua na próxima missão)''}} | |||
=== Chapter 3: Let There Be Blood! === | === Chapter 3: Let There Be Blood! === | ||
A missão agora é um pouco mais simples. Para ela, são necessários | A missão agora é um pouco mais simples. Para ela, são necessários 04 [[Blood Tincture in a Vial]] [[Arquivo:Blood Tincture in a Vial.gif|link=]], que podem ser dropados de [[Blood Hand]]s e [[Blood Priest]]s, você poderá encontrá-los em uma boa quantidade, ({{mapa|33032,32371,10:2|aqui}}). | ||
''' | '''Falando com Omrabas''' | ||
{{transcrições|npc=Omrabas|texto= | {{transcrições|npc=Omrabas|texto= | ||
| Linha 301: | Linha 326: | ||
[[Omrabas]]: Then, toll the Bloodgong north of the sacrificial stones to set the dark flows going. Return to me after that.}} | [[Omrabas]]: Then, toll the Bloodgong north of the sacrificial stones to set the dark flows going. Return to me after that.}} | ||
'' | Agora você deve ir até o terceiro altar, o '''Bloodgong Altar''', que é um dos cinco altares do pentagrama de Drefia. Siga as instruções do mapa e quando chegar lá, vá para o altar '''número 3''' ({{mapa|32998,32421,11:2|aqui}}). Use os 04 [[Blood Tincture in a Vial]], um para cada [[Sacrificial Stone|altar manchado com sangue]] [[Arquivo:Sacrificial Stone 1.gif|link=]] conforme indicado na imagem abaixo, e depois, simplesmente dê "Use" no [[Bloodgong Statue|gongo]] [[Arquivo:Bloodgong Statue.gif|link=]] que fica na parte norte do altar para completar sua missão. | ||
<gallery mode="nolines" widths="196px" heights="196px"> | |||
Arquivo:The Gravedigger of Drefia Quest Mapa 2-3-1.png | |||
Arquivo:The Gravedigger of Drefia Quest Mapa 2-3-2.png | |||
Arquivo:The Gravedigger of Drefia Quest Mapa 2-3-3.png | |||
Arquivo:The Gravedigger of Drefia Quest Mapa 2-3-4.png | |||
Arquivo:The Gravedigger of Drefia Quest Mapa 2-3-5.png | |||
</gallery> | |||
= | <gallery mode="nolines"> | ||
Arquivo:The Gravedigger of Drefia Quest 2-3-1.png | |||
Arquivo:The Gravedigger of Drefia Quest 2-3-2.png | |||
</gallery> | |||
[[ | Retorne ao [[Omrabas]] para novas instruções falando '''Hi - Yes'''. | ||
'''Reportando a missão''' | |||
[[ | {{transcrições|npc=Omrabas|texto= | ||
''Jogador:'' '''Hi'''</br> | |||
[[Omrabas]]: Ah, it is invigorating to fell the dark flows, rushing through Drefia, once again! Capital. This has earned you a reward. ...</br> | |||
[[Omrabas]]: Now, the next mission awaits, yes?</br> | |||
''Jogador:'' '''Yes'''</br> | |||
''(Continua na próxima missão)''}} | |||
[[Arquivo: | === Chapter 4: A Taste Of Ashes === | ||
Para consagrar o quarto altar, você precisará de [[Shadow Ashes]] [[Arquivo:Shadow Ashes.gif|link=]]. Para obtê-la, você precisará, primeiro, de [[Pieces of Magic Chalk]] [[Arquivo:Pieces of Magic Chalk.gif|link=]], que podem ser dropadas de [[Blood Hand]]s, [[Blood Priest]]s e [[Shadow Pupil]]s. Você pode caçá-los ({{mapa|33032,32371,10:2|aqui}}). | |||
'''Falando com Omrabas''' | |||
''' | |||
{{transcrições|npc=Omrabas|texto= | {{transcrições|npc=Omrabas|texto= | ||
''Jogador:'' '''Yes'''</br> | ''Jogador:'' '''Yes'''</br> | ||
[[Omrabas]]: Excellent. To bind the earthly powers, we, I mean you, must worship at the Fireglass Altar. ...</br> | [[Omrabas]]: Excellent. To bind the earthly powers, we, I mean you, must worship at the Fireglass Altar. ...</br> | ||
| Linha 336: | Linha 365: | ||
[[Omrabas]]: Gather the resulting ashes from the Shadow Hearth, and scatter them on the Fireglass Altar's sacrificial stones. Then return here.}} | [[Omrabas]]: Gather the resulting ashes from the Shadow Hearth, and scatter them on the Fireglass Altar's sacrificial stones. Then return here.}} | ||
'' | Com o item em mãos, siga para o local conhecido como '''Ember Chamber''', indicado no mapa abaixo. Cuidado quando chegar lá, pois uma grande quantidade de criaturas irá atacá-lo. Depois de derrotá-las, simplesmente use suas [[Pieces of Magic Chalk]] no [[Searing Fire|fogo cor-de-rosa]] [[Arquivo:Searing Fire.gif|link=]] para obter as [[Shadow Ashes]]. | ||
<gallery mode="nolines" widths="196px" heights="196px"> | |||
Arquivo:The Gravedigger of Drefia Quest Mapa 2-4-1.png | |||
Arquivo:The Gravedigger of Drefia Quest Mapa 2-4-2.png | |||
Arquivo:The Gravedigger of Drefia Quest Mapa 2-4-3.png | |||
Arquivo:The Gravedigger of Drefia Quest Mapa 2-4-4.png | |||
Arquivo:The Gravedigger of Drefia Quest Mapa 2-4-5.png | |||
</gallery> | |||
= | <gallery mode="nolines"> | ||
Arquivo:The Gravedigger of Drefia Quest 2-4-1.png | |||
</gallery> | |||
Siga para o | Agora você deve ir até o quarto altar, o '''Fireglass Altar''', que é um dos cinco altares do pentagrama de Drefia. Siga as instruções do mapa e quando chegar lá, vá para o altar '''número 4''' ({{mapa|32994,32404,11:2|aqui}}). Simplesmente use as [[Shadow Ashes]] nos dois altares (um ao norte e outro ao sul) para completar sua missão. | ||
<gallery mode="nolines" widths="246px" heights="246px"> | |||
Arquivo:The Gravedigger of Drefia Quest Mapa 2-4-6.png | |||
Arquivo:The Gravedigger of Drefia Quest Mapa 2-4-7.png | |||
</gallery> | |||
<gallery mode="nolines"> | |||
Arquivo:The Gravedigger of Drefia Quest 2-4-2.png | |||
Arquivo:The Gravedigger of Drefia Quest 2-4-3.png | |||
</gallery> | |||
[[ | Retorne ao [[Omrabas]] para novas instruções falando '''Hi - Yes'''. | ||
'''Reportando a missão''' | |||
[[ | {{transcrições|npc=Omrabas|texto= | ||
''Jogador:'' '''Hi'''</br> | |||
[[Omrabas]]: Ah, finally. Exceptional! Don't you feel the earth awakening to our call? No? Oh. ...</br> | |||
[[Omrabas]]: Anyway, you succeeded in hallowing the Fireglass Altar! Only one altar remains to be hallowed! Shall we proceed?</br> | |||
''Jogador:'' '''Yes'''</br> | |||
''(Continua na próxima missão)''}} | |||
=== Chapter 5: The Darkness Awaits === | |||
Arquivo: | Finalmente, o último altar. [[Omrabas]] lhe entregará uma [[Omrabas' Bone Key|chave]] [[Arquivo:Omrabas' Bone Key.gif|link=]] e um [[Old Parchment (Drefia)|pergaminho]] [[Arquivo:Old Parchment (Drefia).gif|link=]]. Você precisa encontrar 03 [[Candle Made of Human Tallow|Candles Made of Human Tallow]] [[Arquivo:Candle Made of Human Tallow.gif|link=]], as quais você identificará com o [[Old Parchment (Drefia)|pergaminho]] que ele lhe deu. | ||
Arquivo: | |||
Arquivo: | |||
'''Falando com Omrabas''' | |||
''' | |||
{{transcrições|npc=Omrabas|texto= | {{transcrições|npc=Omrabas|texto= | ||
''Jogador:'' '''Yes'''</br> | ''Jogador:'' '''Yes'''</br> | ||
[[Omrabas]]: <reverential> The final altar that remains to be hallowed... the Shadowthrone. ...</br> | [[Omrabas]]: <reverential> The final altar that remains to be hallowed... the Shadowthrone. ...</br> | ||
| Linha 379: | Linha 416: | ||
[[Omrabas]]: And take this parchment. Identify the right candles with it, take three with you and place one in front of the three shadowthrone statues, starting counterclockwise. Now go!}} | [[Omrabas]]: And take this parchment. Identify the right candles with it, take three with you and place one in front of the three shadowthrone statues, starting counterclockwise. Now go!}} | ||
Siga para o local indicado no mapa. Quando chegar lá, você verá uma [[Closed Trapdoor|Trapdoor]] [[Arquivo:Closed Trapdoor.gif|link=]]. Use sua [[Omrabas' Bone Key|chave]] nela para descer. Você vai cair numa sala cheia de velas. Vá usando seu [[Old Parchment (Drefia)|pergaminho]] em todas elas até encontrar as [[Candle Made of Human Tallow|Candles Made of Human Tallow]] e quando encontrá-las, 03 delas irão aparecer em sua backpack. | |||
<gallery mode="nolines" widths="196px" heights="196px"> | |||
Arquivo:The Gravedigger of Drefia Quest Mapa 2-5-1.png | |||
Arquivo:The Gravedigger of Drefia Quest Mapa 2-5-2.png | |||
Arquivo:The Gravedigger of Drefia Quest Mapa 2-5-3.png | |||
Arquivo:The Gravedigger of Drefia Quest Mapa 2-5-4.png | |||
Arquivo:The Gravedigger of Drefia Quest Mapa 2-5-5.png | |||
</gallery> | |||
= | <gallery mode="nolines"> | ||
Arquivo:The Gravedigger of Drefia Quest 2-5-1.png | |||
Arquivo:The Gravedigger of Drefia Quest 2-5-2.png | |||
Arquivo:The Gravedigger of Drefia Quest 2-5-3.png | |||
</gallery> | |||
Agora você deve ir até o quinto altar, o '''Bonemarrow Altar''', que é um dos cinco altares do pentagrama de Drefia. Siga as instruções do mapa e quando chegar lá, vá para o altar '''número 5''' ({{mapa|33014,32387,11:2|aqui}}). Lá, você verá [[Shadowy Statue|três estátuas pretas]] [[Arquivo:Shadowy Statue.gif|link=]]. Use cada vela em uma das estátuas, em sentido anti-horário, conforme a ordem indicada abaixo, para completar sua missão. | |||
[[ | |||
<gallery mode="nolines" widths="196px" heights="196px"> | |||
Arquivo:The Gravedigger of Drefia Quest Mapa 2-5-6.png | |||
Arquivo:The Gravedigger of Drefia Quest Mapa 2-5-7.png | |||
Arquivo:The Gravedigger of Drefia Quest Mapa 2-5-8.png | |||
Arquivo:The Gravedigger of Drefia Quest Mapa 2-5-9.png | |||
Arquivo:The Gravedigger of Drefia Quest Mapa 2-5-10.png | |||
</gallery> | |||
<gallery mode="nolines"> | |||
Arquivo:The Gravedigger of Drefia Quest 2-5-4.png | |||
Arquivo:The Gravedigger of Drefia Quest 2-5-5.png | |||
Arquivo:The Gravedigger of Drefia Quest 2-5-6.png | |||
</gallery> | |||
Retorne ao [[Omrabas]] para novas instruções falando '''Hi - Scroll'''. | |||
'''Reportando a missão''' | |||
[[ | {{transcrições|npc=Omrabas|texto= | ||
''Jogador:'' '''Hi'''</br> | |||
[[Omrabas]]: Yes! YES! I have felt that! The altars are alive again! Well done! ...</br> | |||
[[Omrabas]]: We are close now. Only one important thing remains: the incantation itself. We need the scroll for that.</br> | |||
''Jogador:'' '''Scroll'''</br> | |||
'' | ''(Continua na próxima missão)''}} | ||
== Volume 3 == | |||
Os ingredientes já foram coletados e os altares já estão prontos. Tudo o que você tem a fazer agora é obter o pergaminho completo com o encantamento. | |||
=== Chapter 1: By Rite Of Blood === | |||
[[Omrabas]] dirá que, nos tempos antigos, ele e mais quatro amigos eram poderosos necromantes e cada um ficou com um pedaço do encantamento que você precisa realizar. Você deverá falar com cada um dos quatro necromantes e realizar tarefas para eles em troca de seu respectivo pedaço do encantamento. | |||
[[ | |||
''' | '''Falando com Omrabas''' | ||
{{transcrições|npc=Omrabas|texto= | {{transcrições|npc=Omrabas|texto= | ||
''Jogador:'' '''Scroll'''</br> | ''Jogador:'' '''Scroll'''</br> | ||
[[Omrabas]]: Well, it is a rather long story. The short version: I had friends - no need to snigger. ...</br> | [[Omrabas]]: Well, it is a rather long story. The short version: I had friends - no need to snigger. ...</br> | ||
| Linha 438: | Linha 480: | ||
[[Omrabas]]: Go find a blood priest you can talk to. Ask him, but subtly. And never tell anyone what the scroll does!}} | [[Omrabas]]: Go find a blood priest you can talk to. Ask him, but subtly. And never tell anyone what the scroll does!}} | ||
'' | O primeiro necromante é [[Tomruk The Ruddy]]. Para chegar até ele, siga as instruções dos mapas abaixo, a partir da entrada do andar principal dos Necromancer Halls de Drefia, siga para leste, sul e contorne o local indo para oeste e norte até chegar a uma escada ({{mapa|32968,32409,10:2|aqui}}). | ||
<gallery mode="nolines" widths="196px" heights="196px"> | |||
Arquivo:The Gravedigger of Drefia Quest Mapa 3-1-1.png | |||
Arquivo:The Gravedigger of Drefia Quest Mapa 3-1-2.png | |||
Arquivo:The Gravedigger of Drefia Quest Mapa 3-1-3.png | |||
Arquivo:The Gravedigger of Drefia Quest Mapa 3-1-4.png | |||
Arquivo:The Gravedigger of Drefia Quest Mapa 3-1-5.png | |||
</gallery> | |||
Fale '''Hi - Scroll - Yes''' para [[Tomruk The Ruddy|Tomruk]], ele revelará que possui mesmo o que você precisa, mas só entregará se você lhe fizer um favor. Ele vai entregar de 02 [[Blood Vial|frascos]], que você deverá encher com sangue de dois locais diferentes de Drefia. | |||
'''Falando com Tomruk The Ruddy - 1º Diálogo''' | |||
{{transcrições|npc=Tomruk The Ruddy|texto= | {{transcrições|npc=Tomruk The Ruddy|texto= | ||
| Linha 447: | Linha 501: | ||
[[Tomruk The Ruddy]]: Well, this piece here is a rather fascinating thing - see those strange blood stains? - ...</br> | [[Tomruk The Ruddy]]: Well, this piece here is a rather fascinating thing - see those strange blood stains? - ...</br> | ||
[[Tomruk The Ruddy]]: My predecessors have had it for quite a while without finding out more - I was hoping to investigate, but there's always so much to do! ...</br> | [[Tomruk The Ruddy]]: My predecessors have had it for quite a while without finding out more - I was hoping to investigate, but there's always so much to do! ...</br> | ||
[[Tomruk The Ruddy]]: Ah, so you want it, too? Well, do me a favour: fetch two samples and assist in my experiment, in exchange for the scroll piece. | [[Tomruk The Ruddy]]: Ah, so you want it, too? Well, do me a favour: fetch two samples and assist in my experiment, in exchange for the scroll piece. Yes?</br> | ||
''Jogador:'' '''Yes'''</br> | ''Jogador:'' '''Yes'''</br> | ||
[[Tomruk The Ruddy]]: Sanguine! I need two different blood samples - The first one from the necromancer's pure blood chamber. ...</br> | [[Tomruk The Ruddy]]: Sanguine! I need two different blood samples - The first one from the necromancer's pure blood chamber. ...</br> | ||
| Linha 454: | Linha 508: | ||
[[Tomruk The Ruddy]]: Take these two sterilised vials, one for each blood basin. Oh, I wish I could go myself! Come back when you have filled both vials.}} | [[Tomruk The Ruddy]]: Take these two sterilised vials, one for each blood basin. Oh, I wish I could go myself! Come back when you have filled both vials.}} | ||
''Depois de pegar o sangue | O primeiro lugar do qual você deve coletar o sangue é conhecido como '''The Necromancer's Pure Blood Chamber''', fica na parte sudeste dos Necromancer Halls, basta voltar por onde veio, mais ao invés de ir para o norte, continue andando para leste conforme o mapa abaixo até chegar ({{mapa|33038,32439,10:2|aqui}}). Depois, você deverá ir ao segundo local, que fica nas '''Drefia Vampire Crypts''', siga as orientações do mapa abaixo. Chegando lá, use o segundo frasco no poço de sangue ({{mapa|32930,32447,12:2|aqui}}) para enchê-lo. | ||
{{DASH|'''Atenção:''' Você deve usar '''01 [[Blood Vial|frasco]] em cada local'''. Se usar os dois [[Blood Vial|frascos]] em qualquer um dos dois locais, retorne ao NPC [[Tomruk The Ruddy]] e relate a falha ('''Hi - Fail - Yes''') e então você receberá novos frascos.}} | |||
<gallery mode="nolines" widths="246px" heights="246px"> | |||
Arquivo:The Gravedigger of Drefia Quest Mapa 3-1-6.png|Caminho para o 1º Local | |||
Arquivo:The Gravedigger of Drefia Quest Mapa 3-1-7.png|Caminho para o 2º Local | |||
Arquivo:The Gravedigger of Drefia Quest Mapa 3-1-8.png|Caminho para o 2º Local | |||
Arquivo:The Gravedigger of Drefia Quest Mapa 3-1-9.png|Caminho para o 2º Local | |||
</gallery> | |||
<gallery mode="nolines"> | |||
Arquivo:The Gravedigger of Drefia Quest 3-1-1.png|1º Local | |||
Arquivo:The Gravedigger of Drefia Quest 3-1-2.png|2º Local | |||
</gallery> | |||
Volte até a sala do NPC [[Tomruk The Ruddy]] e fale '''Hi - Yes'''. Você irá entregar os frascos a ele. Em seguida, ele lhe entregará outro recipiente com sangue, um [[Tainted Blood Essence]] [[Arquivo:Tainted Blood Essence.gif|link=]], você deverá usá-lo nas quatro maiores [[Blood Pagoda|pagodas manchadas com sangue]] [[Arquivo:Blood Pagoda.gif|link=]]. Depois disso, use a alavanca da parte norte da sala. | |||
'''Falando com Tomruk The Ruddy - 2º Diálogo - Depois de pegar o sangue''' | |||
{{transcrições|npc=Tomruk The Ruddy|texto= | {{transcrições|npc=Tomruk The Ruddy|texto= | ||
| Linha 464: | Linha 536: | ||
[[Tomruk The Ruddy]]: Dab some drops from it on to the four blood pagodas in the inner circle here. Then pull the lightning lever over there.}} | [[Tomruk The Ruddy]]: Dab some drops from it on to the four blood pagodas in the inner circle here. Then pull the lightning lever over there.}} | ||
''Depois de usar o sangue | <gallery mode="nolines"> | ||
Arquivo:The Gravedigger of Drefia Quest 3-1-3.png | |||
Arquivo:The Gravedigger of Drefia Quest 3-1-4.png | |||
</gallery> | |||
Fale com Tomruk novamente, diga '''Hi - Yes'''. Ele pedirá um tempo. Diga '''Hi - Yes''' novamente para que ele lhe entregue seu pedaço do encantamento. | |||
'''Falando com Tomruk The Ruddy - 3º Diálogo - Depois de usar o sangue nas pagodas''' | |||
{{transcrições|npc=Tomruk The Ruddy|texto= | {{transcrições|npc=Tomruk The Ruddy|texto= | ||
| Linha 475: | Linha 554: | ||
[[Tomruk The Ruddy]]: Give me a minute or two to retrieve it.}} | [[Tomruk The Ruddy]]: Give me a minute or two to retrieve it.}} | ||
''Para pegar o pedaço do encantamento | '''Falando com Tomruk The Ruddy - 4º Diálogo - Para pegar o pedaço do encantamento''' | ||
{{transcrições|npc=Tomruk The Ruddy|texto= | {{transcrições|npc=Tomruk The Ruddy|texto= | ||
| Linha 483: | Linha 562: | ||
[[Tomruk The Ruddy]]: My heart bleeds to part from it. Here. Extend your hand - I'll just retrieve some blood from in exchange - HOLD STILL.}} | [[Tomruk The Ruddy]]: My heart bleeds to part from it. Here. Extend your hand - I'll just retrieve some blood from in exchange - HOLD STILL.}} | ||
'' | Retorne ao NPC [[Omrabas]] para reportar a missão falando '''Hi - Yes - Yes'''. | ||
'''Reportando a missão''' | |||
{{transcrições|npc=Omrabas|texto= | {{transcrições|npc=Omrabas|texto= | ||
| Linha 489: | Linha 570: | ||
[[Omrabas]]: Yes? Do you have the scroll piece?</br> | [[Omrabas]]: Yes? Do you have the scroll piece?</br> | ||
''Jogador:'' '''Yes'''</br> | ''Jogador:'' '''Yes'''</br> | ||
[[Omrabas]]: This is it! This is it! Well done, well done! And now, on to the next scroll piece, yes?}} | [[Omrabas]]: This is it! This is it! Well done, well done! And now, on to the next scroll piece, yes?</br> | ||
''Jogador:'' '''Yes'''</br> | |||
''(Continua na próxima missão)''}} | |||
=== Chapter 2: It Takes Two === | === Chapter 2: It Takes Two === | ||
[[Omrabas]] dirá que para conseguir o segundo fragmento do encantamento, você deve encontrar um NPC Shadow Pupil. Para chegar até ele, siga as instruções dos mapas. | |||
'''Falando com Omrabas''' | |||
{{transcrições|npc=Omrabas|texto= | |||
''Jogador:'' '''Yes'''</br> | |||
[[Omrabas]]: Hah, developed a taste for it, have you? I believe the next scroll piece was hidden somewhere, my old friend being of a somewhat distrustful nature. ...</br> | |||
[[Omrabas]]: The scent may not be lost, though - ask a shadow pupil if he can help - but be careful. ...</br> | |||
[[Omrabas]]: Those shadow pupils are - strange. Try to find one who will answer and not kill you!}} | |||
[[ | O segundo necromante é [[Oblivion]]. Para chegar até ele, siga as instruções dos mapas abaixo, a partir da entrada do andar principal dos Necromancer Halls de Drefia, siga para o norte até chegar em uma área remota ({{mapa|33024,32310,10:2|aqui}}). | ||
<gallery mode="nolines" widths="246px" heights="246px"> | |||
Arquivo:The Gravedigger of Drefia Quest Mapa 3-2-1.png | |||
Arquivo:The Gravedigger of Drefia Quest Mapa 3-2-2.png | |||
Arquivo:The Gravedigger of Drefia Quest Mapa 3-2-3.png | |||
Arquivo:The Gravedigger of Drefia Quest Mapa 3-2-4.png | |||
<gallery mode="nolines"> | |||
Arquivo:Gravedigger | |||
Arquivo:Gravedigger | |||
Arquivo:Gravedigger | |||
</gallery> | </gallery> | ||
Fale '''Hi - Scroll - Yes''' para [[Oblivion]], ele pedirá para você ir até um cemitério que fica nas '''Drefia Vampire Crypts''' e checar três túmulos específicos em busca de três palavras. | |||
'''Falando com Oblivion - 1º Diálogo''' | |||
''' | |||
' | |||
{{transcrições|npc=Oblivion|texto= | {{transcrições|npc=Oblivion|texto= | ||
[[Oblivion]]: A shadow preceded you. You | ''Jogador:'' '''Hi'''</br> | ||
[[Oblivion]]: A shadow preceded you. You wish?</br> | |||
''Jogador:'' '''Scroll'''</br> | ''Jogador:'' '''Scroll'''</br> | ||
[[Oblivion]]: Lost. Hidden. The keys are shadow names. Find them, they will talk to me and reveal what is hidden. Will you go on that | [[Oblivion]]: Lost. Hidden. The keys are shadow names. Find them, they will talk to me and reveal what is hidden. Will you go on that quest?</br> | ||
''Jogador:'' '''Yes'''</br> | ''Jogador:'' '''Yes'''</br> | ||
[[Oblivion]]: Then into the vampire crypts, deep down, you must go. ...</br> | [[Oblivion]]: Then into the vampire crypts, deep down, you must go. ...</br> | ||
| Linha 545: | Linha 610: | ||
[[Oblivion]]: The third: the lost beauty of Dunesea. It must be remembered, the shadows command it. Go now.}} | [[Oblivion]]: The third: the lost beauty of Dunesea. It must be remembered, the shadows command it. Go now.}} | ||
''Depois de ir nos túmulos | Siga, então, para o local indicado abaixo, um cemitério que fica nas '''Drefia Vampire Crypts'''. Chegando lá, você deverá ir até os locais indicados abaixo. Simplesmente dê "Use" nos três túmulos ({{mapa|32954,32413,13:2|1º Túmulo}}, {{mapa|32952,32384,13:2|2º Túmulo}} e {{mapa|32970,32388,13:2|3º Túmulo}}), em qualquer ordem, para receber as mensagens e concluir essa parte da missão, conforme as imagens abaixo. | ||
<gallery mode="nolines" widths="246px" heights="246px"> | |||
Arquivo:The Gravedigger of Drefia Quest Mapa 3-2-5.png | |||
Arquivo:The Gravedigger of Drefia Quest Mapa 3-2-6.png | |||
Arquivo:The Gravedigger of Drefia Quest Mapa 3-2-7.png | |||
Arquivo:The Gravedigger of Drefia Quest Mapa 3-2-8.png | |||
</gallery> | |||
<gallery mode="nolines"> | |||
Arquivo:The Gravedigger of Drefia Quest 3-2-1.png|Bronze | |||
Arquivo:The Gravedigger of Drefia Quest 3-2-2.png|Floating | |||
Arquivo:The Gravedigger of Drefia Quest 3-2-3.png|Takesha Antishu | |||
</gallery> | |||
Retorne até o NPC [[Oblivion]] e fale separadamente as palavras encontradas nos túmulos na ordem pedida ('''Hi - Yes - Bronze - Floating - Takesha Antishu'''). | |||
'''Falando com Oblivion - 2º Diálogo - Depois de ir nos túmulos''' | |||
{{transcrições|npc=Oblivion|texto= | {{transcrições|npc=Oblivion|texto= | ||
| Linha 561: | Linha 643: | ||
[[Oblivion]]: No coal is burned in his honour. Find his resting place and dig near it. Now go.}} | [[Oblivion]]: No coal is burned in his honour. Find his resting place and dig near it. Now go.}} | ||
Ele lhe dirá que o que você procura está próximo do túmulo do "Akab". Para chegar lá, siga as orientações do mapa. Cave ao lado do [[Grave Stone|túmulo]] [[Arquivo:Grave Stone.gif|link=]] e ao sul do [[Empty Coal Basin]] [[Arquivo:Empty Coal Basin.gif|link=]] ({{mapa|32990,32452,10:2|aqui}}) para obter o pedaço do encantamento. | |||
<gallery mode="nolines" widths="246px" heights="246px"> | |||
Arquivo:The Gravedigger of Drefia Quest Mapa 3-2-9.png | |||
</gallery> | |||
= | <gallery mode="nolines"> | ||
Arquivo:The Gravedigger of Drefia Quest 3-2-4.png | |||
</gallery> | |||
Retorne ao NPC [[Omrabas]] para reportar a missão falando '''Hi - Yes - Yes'''. | |||
'''Reportando a missão''' | |||
{{transcrições|npc=Omrabas|texto= | |||
''Jogador:'' '''Hi'''</br> | |||
[[Omrabas]]: Ah, hello! I take it you have the next scroll piece for me, yes?</br> | |||
''Jogador:'' '''Yes'''</br> | |||
[[Omrabas]]: Indeed it is! The second scroll piece! Splendid! Here you go - for your trouble. ...</br> | |||
[[Omrabas]]: And now, on to the next scroll piece, yes?</br> | |||
''Jogador:'' '''Yes'''</br> | |||
''(Continua na próxima missão)''}} | |||
=== Chapter 3: All Good Things Are Three === | |||
Desta vez, [[Omrabas]] pedirá para você recuperar a parte do encantamento que ele mesmo escondeu. Por isso, ele lhe dará uma [[Omrabas' Copper Key|chave]] [[Arquivo:Omrabas' Copper Key.gif|link=]] para que você possa entrar em sua antiga base, que fica ao nordeste da biblioteca dos '''Necromancer Halls''' de [[Drefia]] ({{mapa|33009,32392,10:2|aqui}}). | |||
[[ | |||
[[Arquivo: | |||
''' | '''Falando com Omrabas''' | ||
{{transcrições|npc=Omrabas|texto= | {{transcrições|npc=Omrabas|texto= | ||
''Jogador:'' '''Yes'''</br> | ''Jogador:'' '''Yes'''</br> | ||
[[Omrabas]]: Good! As you can imagine, I had a scroll piece, too. I hid it in my old quarters, northwest of the library. ...</br> | [[Omrabas]]: Good! As you can imagine, I had a scroll piece, too. I hid it in my old quarters, northwest of the library. ...</br> | ||
| Linha 599: | Linha 678: | ||
[[Omrabas]]: Beneath one of the chests is a secret stash, under a loose stone tile. The scroll piece should be inside. Off you go.}} | [[Omrabas]]: Beneath one of the chests is a secret stash, under a loose stone tile. The scroll piece should be inside. Off you go.}} | ||
' | Siga para o local indicado no mapa abaixo e use a [[Omrabas' Copper Key|chave]] na [[Ornate Door with a Keyhole|porta]] [[Arquivo:Ornate Door with a Keyhole.gif|link=]] para entrar. Depois de entrar, procure por uma rachadura no chão na sala ao noroeste, ela fica escondida embaixo de um baú. Você deverá dar "Use" nessa rachadura e então, uma mensagem aparecerá dizendo que alguém roubou o pedaço do fragmento, e que esse alguém está no dormitório dos estudantes. | ||
{{ | Para chegar ao dormitório siga para o local indicado no mapa. Chegando lá, haverá um portal ({{mapa|33018,32438,10:2|aqui}}), passe por ele e desça as escadas. Você enfrentará algumas criaturas, dentre elas, um [[Necromancer Servant]]. Mate-o para obter o [[Incantation Fragment]] [[Arquivo:Incantation Fragment.gif|link=]]. | ||
[[ | |||
[[ | |||
=== | <gallery mode="nolines" widths="196px" heights="196px"> | ||
Arquivo:The Gravedigger of Drefia Quest Mapa 3-3-1.png | |||
Arquivo:The Gravedigger of Drefia Quest Mapa 3-3-2.png | |||
Arquivo:The Gravedigger of Drefia Quest Mapa 3-3-3.png | |||
Arquivo:The Gravedigger of Drefia Quest Mapa 3-3-4.png | |||
Arquivo:The Gravedigger of Drefia Quest Mapa 3-3-5.png | |||
</gallery> | |||
<gallery mode="nolines"> | |||
Arquivo:The Gravedigger of Drefia Quest 3-3-1.gif | |||
Arquivo:The Gravedigger of Drefia Quest 3-3-2.png | |||
Arquivo:The Gravedigger of Drefia Quest 3-3-3.png | |||
Arquivo:The Gravedigger of Drefia Quest 3-3-4.png | |||
</gallery> | |||
Retorne ao [[Omrabas]] para reportar a missão falando '''Hi - Yes - Yes'''. | |||
'''Reportando a missão''' | |||
< | {{transcrições|npc=Omrabas|texto= | ||
''Jogador:'' '''Hi'''</br> | |||
[[Omrabas]]: Hello - what? You have the scroll piece, you say?</br> | |||
''Jogador:'' '''Yes'''</br> | |||
[[Omrabas]]: Oh, praise the Dark Lord! It is my scroll piece! Give it here! You can have this instead. ...</br> | |||
[[Omrabas]]: Ahh, that feels GOOD. Now, only two pieces left to hunt down! On to the next scroll piece, yes?</br> | |||
</ | ''Jogador:'' '''Yes'''</br> | ||
''(Continua na próxima missão)''}} | |||
[[Arquivo: | === Chapter 4: Four Down, One To Go === | ||
[[Omrabas]] vai lhe pedir para falar com uma NPC Priestess que está com o quarto fragmento do encantamento. Mas ela só irá te atender se você estiver vestido como um [[Necromancer]], portanto [[Omrabas]] lhe entregará uma [[Torn Magic Cape|capa]] [[Arquivo:Torn Magic Cape.gif|link=]], a qual deverá estar em sua mochila quando você for falar com a NPC. | |||
'''Falando com Omrabas''' | |||
''' | |||
{{transcrições|npc=Omrabas|texto= | {{transcrições|npc=Omrabas|texto= | ||
''Jogador:'' '''Yes'''</br> | ''Jogador:'' '''Yes'''</br> | ||
[[Omrabas]]: Hahah, eager for it, I like that! ...</br> | [[Omrabas]]: Hahah, eager for it, I like that! ...</br> | ||
| Linha 641: | Linha 723: | ||
[[Omrabas]]: Oh, one more thing! They only talk to you when you look like a fellow summoner. It's dangerous to go without a cape. Use this.}} | [[Omrabas]]: Oh, one more thing! They only talk to you when you look like a fellow summoner. It's dangerous to go without a cape. Use this.}} | ||
'' | A terceira necromante é [[Elyen Ravenlock]]. Para chegar até ela, siga as instruções dos mapas abaixo, a partir da entrada do andar principal dos Necromancer Halls de Drefia, siga para o norte até chegar a uma escada ({{mapa|32995,32383,10:2|aqui}}). Desça, você será atacado por algumas criaturas, em seguida vá para nordeste para encontrar a NPC. | ||
<gallery mode="nolines" widths="196px" heights="196px"> | |||
Arquivo:The Gravedigger of Drefia Quest Mapa 3-4-1.png | |||
Arquivo:The Gravedigger of Drefia Quest Mapa 3-4-2.png | |||
Arquivo:The Gravedigger of Drefia Quest Mapa 3-4-3.png | |||
Arquivo:The Gravedigger of Drefia Quest Mapa 3-4-4.png | |||
Arquivo:The Gravedigger of Drefia Quest Mapa 3-4-5.png | |||
</gallery> | |||
Antes de falar com ela, dê "Use" na capa que [[Omrabas]] lhe entregou. Fale '''Hi - Yes - Artefact - Yes''' para [[Elyen Ravenlock]], ela lhe entregará uma [[Flute Made of a Single Bone|flauta]] [[Arquivo:Flute Made of a Single Bone.gif|link=]], que você deverá usar em 05 obeliscos que ficam nos '''Gardens of Night'''. | |||
'''Falando com Elyen Ravenlock - 1º Diálogo''' | |||
{{transcrições|npc=Elyen Ravenlock|texto= | {{transcrições|npc=Elyen Ravenlock|texto= | ||
| Linha 647: | Linha 741: | ||
[[Elyen Ravenlock]]: Hello, brother. You come with a question to me, I believe?</br> | [[Elyen Ravenlock]]: Hello, brother. You come with a question to me, I believe?</br> | ||
''Jogador:'' '''Yes'''</br> | ''Jogador:'' '''Yes'''</br> | ||
[[Elyen Ravenlock]]: And what is it you want? Do you bring news from the undead, or do you seek a dark artefact?</br> | |||
[[Elyen Ravenlock]]: And what is it you want? Do you bring news from the | |||
''Jogador:'' '''Artefact'''</br> | ''Jogador:'' '''Artefact'''</br> | ||
[[Elyen Ravenlock]]: The scroll piece there? The symbols look promising, but it is incomplete. ...</br> | [[Elyen Ravenlock]]: The scroll piece there? The symbols look promising, but it is incomplete. ...</br> | ||
[[Elyen Ravenlock]]: It is of little use to us. But it seems to be of interest to you ...</br> | [[Elyen Ravenlock]]: It is of little use to us. But it seems to be of interest to you ...</br> | ||
[[Elyen Ravenlock]]: In exchange for the scroll piece, you must assist me with something. | [[Elyen Ravenlock]]: In exchange for the scroll piece, you must assist me with something. Agreed?</br> | ||
''Jogador:'' '''Yes'''</br> | ''Jogador:'' '''Yes'''</br> | ||
[[Elyen Ravenlock]]: I would have to sing to the Dark Shrines, but I cannot. ...</br> | [[Elyen Ravenlock]]: I would have to sing to the Dark Shrines, but I cannot. ...</br> | ||
| Linha 660: | Linha 752: | ||
[[Elyen Ravenlock]]: If you have done that, you may have the scroll piece. Now go.}} | [[Elyen Ravenlock]]: If you have done that, you may have the scroll piece. Now go.}} | ||
''Depois de usar a flauta nos obeliscos | Para chegar lá, vá para leste e norte e novamente para o leste até chegar ({{mapa|33062,32348,10:2|aqui}}). Siga para o norte e você já encontrará o primeiro obelisco. Fique em frente aos obeliscos e dê "Use" na flauta até obter a mensagem: '''<screeeech><squeak><squeaaaaal>'''. | ||
<gallery mode="nolines" widths="246px" heights="246px"> | |||
Arquivo:The Gravedigger of Drefia Quest Mapa 3-4-6.png | |||
Arquivo:The Gravedigger of Drefia Quest Mapa 3-4-7.png | |||
</gallery> | |||
<gallery mode="nolines"> | |||
Arquivo:The Gravedigger of Drefia Quest 3-4-1.png | |||
Arquivo:The Gravedigger of Drefia Quest 3-4-2.png | |||
Arquivo:The Gravedigger of Drefia Quest 3-4-3.png | |||
Arquivo:The Gravedigger of Drefia Quest 3-4-4.png | |||
Arquivo:The Gravedigger of Drefia Quest 3-4-5.png | |||
</gallery> | |||
Depois de usar a flauta em todos os 05 obeliscos, volte até a NPC [[Elyen Ravenlock]] e fale '''Hi - Yes'''. | |||
'''Falando com Elyen Ravenlock - 2º Diálogo - Depois de usar a flauta nos obeliscos''' | |||
{{transcrições|npc=Elyen Ravenlock|texto= | {{transcrições|npc=Elyen Ravenlock|texto= | ||
| Linha 669: | Linha 778: | ||
[[Elyen Ravenlock]]: I will take the flute back. Our bargain stands. You may take the scroll.}} | [[Elyen Ravenlock]]: I will take the flute back. Our bargain stands. You may take the scroll.}} | ||
'' | Agora você poderá passar pelos pisos pretos. O [[Incantation Fragment]] [[Arquivo:Incantation Fragment.gif|link=]] estará dentro das [[Drawers]] [[Arquivo:Drawers.gif|link=]]. | ||
<gallery mode="nolines"> | |||
Arquivo:Gravedigger Vol3 Cap4 Imagem6.png | |||
</gallery> | |||
Retorne até o [[Omrabas]] para reportar a missão falando '''Hi - Yes - Yes'''. | |||
'''Reportando a missão''' | |||
{{transcrições|npc=Omrabas|texto= | {{transcrições|npc=Omrabas|texto= | ||
''Jogador:'' '''Hi'''</br> | ''Jogador:'' '''Hi'''</br> | ||
[[Omrabas]]: Hello, young apprentice. Do you have that scroll piece from the ''''' | [[Omrabas]]: Hello, young apprentice. Do you have that scroll piece from the priestess?</br> | ||
''Jogador:'' '''Yes'''</br> | |||
[[Omrabas]]: Ahhh, capital, capital. Good girl for keeping it for me. I'll take back my cape now, thank you. ...</br> | |||
[[Omrabas]]: Now - the final part of the scroll! Ready to go retrieve it?</br> | |||
''Jogador:'' '''Yes'''</br> | ''Jogador:'' '''Yes'''</br> | ||
''(Continua na próxima missão)''}} | |||
=== Chapter 5: Covered Up Real Nice === | === Chapter 5: Covered Up Real Nice === | ||
[[Omrabas]] vai lhe pedir para falar com um NPC White Shade que está com o quinto e último fragmento do encantamento. Mas para conseguir que ele te entregue o fragmento, você precisará usar "palavras mágicas" para agradar o NPC. | |||
'''Falando com Omrabas''' | |||
''' | |||
{{transcrições|npc=Omrabas|texto= | {{transcrições|npc=Omrabas|texto= | ||
''Jogador:'' '''Yes'''</br> | ''Jogador:'' '''Yes'''</br> | ||
[[Omrabas]]: That's the spirit! Speaking of which, you will have to look for a White Shade ...</br> | [[Omrabas]]: That's the spirit! Speaking of which, you will have to look for a White Shade ...</br> | ||
| Linha 711: | Linha 811: | ||
[[Omrabas]]: 'Friendship lives forever.' Silly, really. Untrue, as well. ...</br> | [[Omrabas]]: 'Friendship lives forever.' Silly, really. Untrue, as well. ...</br> | ||
[[Omrabas]]: Anyway, say those three words - don't make me repeat them - and the old softie will tell you where the scroll is. Pathetic.}} | [[Omrabas]]: Anyway, say those three words - don't make me repeat them - and the old softie will tell you where the scroll is. Pathetic.}} | ||
O quarto necromante é [[Zarifan]]. Para chegar até ele, siga as instruções dos mapas abaixo, você precisará sair de Drefia pois o NPC está localizado na parte sul das ruínas da cidade. Voltando pelo caminho pelo qual você veio para Drefia no início da quest, siga um pouco para o sul até chegar a uma escada ({{mapa|33091,32450,7:2|aqui}}), suba e vá para sudoeste até encontrar outra ({{mapa|33072,32458,6:2|aqui}}). Suba e vá para oeste e desça tudo novamente, você estará na parte sul de Drefia e será atacado por algumas criaturas, em seguida vá para sudoeste e desça ({{mapa|33051,32471,7:2|aqui}}). | |||
<gallery mode="nolines" perrow="4" widths="246px" heights="246px"> | |||
Arquivo:The Gravedigger of Drefia Quest Mapa 3-5-1.png | |||
Arquivo:The Gravedigger of Drefia Quest Mapa 3-5-2.png | |||
Arquivo:The Gravedigger of Drefia Quest Mapa 3-5-3.png | |||
Arquivo:The Gravedigger of Drefia Quest Mapa 3-5-4.png | |||
</gallery> | |||
Siga desçendo as escadas conforme os mapas abaixo até eventualmente encontrar um buraco ({{mapa|33043,32486,10:2|aqui}}), use sua [[Shovel|pá]] e desça, aqui você encontrará o NPC [[Zarifan]]. | |||
<gallery mode="nolines" perrow="4" widths="246px" heights="246px"> | |||
Arquivo:The Gravedigger of Drefia Quest Mapa 3-5-5.png | |||
Arquivo:The Gravedigger of Drefia Quest Mapa 3-5-6.png | |||
Arquivo:The Gravedigger of Drefia Quest Mapa 3-5-7.png | |||
Arquivo:The Gravedigger of Drefia Quest Mapa 3-5-8.png | |||
</gallery> | |||
Para conseguir que o NPC lhe diga aonde encontrar o pedaço do encantamento, você deverá falar as tais "palavras mágicas" mencionadas por [[Omrabas]], diga '''Hi - Magic - Friendship - Lives - Forever''' e ele lhe dirá que seu pedaço do encantamento está enterrado em um triângulo formado por pedras em uma das cavernas mais ao leste de [[Drefia]]. | |||
'''Falando com Zarifan''' | |||
{{transcrições|npc=Zarifan|texto= | {{transcrições|npc=Zarifan|texto= | ||
''Jogador:'' '''Hi'''</br> | ''Jogador:'' '''Hi'''</br> | ||
[[Zarifan]]: ... ... hello... | [[Zarifan]]: ... ... hello...magic... words?</br> | ||
''Jogador:'' '''Magic'''</br> | ''Jogador:'' '''Magic'''</br> | ||
[[Zarifan]]: ...Tell me...the first... magic word.</br> | [[Zarifan]]: ...Tell me...the first... magic word.</br> | ||
| Linha 727: | Linha 849: | ||
[[Zarifan]]: And say hello... to... my old friend... Omrabas.}} | [[Zarifan]]: And say hello... to... my old friend... Omrabas.}} | ||
''Depois de pegar o primeiro fragmento | Volte para a superfície, vá para leste e desça ({{mapa|33074,32473,7:2|aqui}}). Siga, então, as instruções dos mapas abaixo e chegando lá, basta usar sua pá no centro do triângulo das pedras para obter [[Torn Incantation Fragment|parte do fragmento]] [[Arquivo:Torn Incantation Fragment.gif|link=]]. | ||
<gallery mode="nolines" widths="196px" heights="196px"> | |||
Arquivo:The Gravedigger of Drefia Quest Mapa 3-5-9.png | |||
Arquivo:The Gravedigger of Drefia Quest Mapa 3-5-10.png | |||
Arquivo:The Gravedigger of Drefia Quest Mapa 3-5-11.png | |||
Arquivo:The Gravedigger of Drefia Quest Mapa 3-5-12.png | |||
Arquivo:The Gravedigger of Drefia Quest Mapa 3-5-13.png | |||
</gallery> | |||
<gallery mode="nolines"> | |||
Arquivo:The Gravedigger of Drefia Quest 3-5-1.png | |||
</gallery> | |||
Agora você deverá retornar até o [[Omrabas]]. Para sua surpresa, ele dirá que este não é o fragmento completo, e que você precisa encontrar a outra parte dele. | |||
'''Reportando a missão - Depois de pegar o primeiro fragmento''' | |||
{{transcrições|npc=Omrabas|texto= | {{transcrições|npc=Omrabas|texto= | ||
''Jogador:'' '''Hi'''</br> | ''Jogador:'' '''Hi'''</br> | ||
[[Omrabas]]: Welcome, welcome! Finally! The last scroll piece.... you do | [[Omrabas]]: Welcome, welcome! Finally! The last scroll piece.... you do have it, haven't you?</br> | ||
''Jogador:'' '''Yes'''</br> | ''Jogador:'' '''Yes'''</br> | ||
[[Omrabas]]: I am so excited! Finally, we - wait. What is this? That... is not the complete scroll piece. ...</br> | [[Omrabas]]: I am so excited! Finally, we - wait. What is this? That... is not the complete scroll piece. ...</br> | ||
| Linha 738: | Linha 876: | ||
[[Omrabas]]: There must be. Go look there. Next to the fiveserrated room, a small library. Go go go!}} | [[Omrabas]]: There must be. Go look there. Next to the fiveserrated room, a small library. Go go go!}} | ||
''Depois de pegar o segundo fragmento | Siga para o local indicado no mapa abaixo, na área principal de Drefia. Use sua [[Shovel|pá]] na pilha de pedras para descer ({{mapa|32995,32449,10:2|aqui}}). Dê "Use" em uma das estantes para recuperar [[Crumpled Paper|o pedaço do último fragmento]] [[Arquivo:Crumpled Paper.gif|link=]] do encantamento. | ||
<gallery mode="nolines" widths="246px" heights="246px"> | |||
Arquivo:The Gravedigger of Drefia Quest Mapa 3-5-14.png | |||
Arquivo:The Gravedigger of Drefia Quest Mapa 3-5-15.png | |||
Arquivo:The Gravedigger of Drefia Quest Mapa 3-5-16.png | |||
Arquivo:The Gravedigger of Drefia Quest Mapa 3-5-17.png | |||
</gallery> | |||
<gallery mode="nolines"> | |||
Arquivo:The Gravedigger of Drefia Quest 3-5-2.png | |||
Arquivo:The Gravedigger of Drefia Quest 3-5-3.png | |||
</gallery> | |||
Use um papel no outro para obter o último [[Incantation Fragment]] [[Arquivo:Incantation Fragment.gif|link=]] e volte até o [[Omrabas]] para prosseguir para a parte final da quest. Fale '''Hi - Restore - Yes'''. | |||
'''Reportando a missão - Depois de pegar o segundo fragmento''' | |||
{{transcrições|npc=Omrabas|texto= | {{transcrições|npc=Omrabas|texto= | ||
''Jogador:'' '''Hi'''</br> | ''Jogador:'' '''Hi'''</br> | ||
[[Omrabas]]: Don't keep me waiting. The last scroll piece - were you able to | [[Omrabas]]: Don't keep me waiting. The last scroll piece - were you able to restore it?</br> | ||
''Jogador:'' '''Restore'''</br> | ''Jogador:'' '''Restore'''</br> | ||
[[Omrabas]]: I knew it! I knew I had made a copy! Oh, I am so clever! ...</br> | [[Omrabas]]: I knew it! I knew I had made a copy! Oh, I am so clever! ...</br> | ||
[[Omrabas]]: Now, watch this. <mumbles darkly> THERE. THE COMPLETE INCANTATION SCROLL. ...</br> | [[Omrabas]]: Now, watch this. <mumbles darkly> THERE. THE COMPLETE INCANTATION SCROLL. ...</br> | ||
[[Omrabas]]: You have done well. Only one thing remains, and you shall be rich beyond your dreams. | [[Omrabas]]: You have done well. Only one thing remains, and you shall be rich beyond your dreams. Ready for the really final task?</br> | ||
''Jogador:'' '''Yes'''</br> | ''Jogador:'' '''Yes'''</br> | ||
[[Omrabas]]: Then let's go. Take my skull and the incantation scroll to the working station in the fiveserrated room ...</br> | [[Omrabas]]: Then let's go. Take my skull and the incantation scroll to the working station in the fiveserrated room ...</br> | ||
| Linha 752: | Linha 906: | ||
[[Omrabas]]: AND I shall be made whole, and YOU shall be RICH!}} | [[Omrabas]]: AND I shall be made whole, and YOU shall be RICH!}} | ||
[[Omrabas]] dirá que finalmente você tem tudo para realizar o ritual, e lhe entregará uma [[Omrabas' Talking Skull|Skull]] e um [[Incantation Scroll|pergaminho com o encantamento]]. Você precisará ir até o pentagrama mais uma vez, chegando lá, coloque a [[Omrabas' Talking Skull|Skull]] sobre o altar de sacrifício e use o [[Incantation Scroll]]. Você será surpreendido novamente quando uma [[Chicken|galinha]] aparecer. | [[Omrabas]] dirá que finalmente você tem tudo para realizar o ritual, e lhe entregará uma [[Omrabas' Talking Skull|Skull]] [[Arquivo:Omrabas' Talking Skull.gif|link=]] e um [[Incantation Scroll|pergaminho com o encantamento]] [[Arquivo:Incantation Scroll.gif|link=]]. Você precisará ir até o pentagrama mais uma vez, chegando lá, coloque a [[Omrabas' Talking Skull|Skull]] sobre o altar de sacrifício e use o [[Incantation Scroll]] nela. Você será surpreendido novamente quando uma [[Chicken|galinha]] aparecer. | ||
<gallery mode="nolines" widths="196px" heights="196px"> | |||
Arquivo:The Gravedigger of Drefia Quest Mapa 3-5-18.png | |||
Arquivo:The Gravedigger of Drefia Quest Mapa 3-5-19.png | |||
Arquivo:The Gravedigger of Drefia Quest Mapa 3-5-20.png | |||
Arquivo:The Gravedigger of Drefia Quest Mapa 3-5-21.png | |||
Arquivo:The Gravedigger of Drefia Quest Mapa 3-5-22.png | |||
</gallery> | |||
<gallery mode="nolines"> | |||
Arquivo:The Gravedigger of Drefia Quest 3-5-4.png | |||
</gallery> | |||
Vá até o [[Omrabas]] pela última vez. Ele ficará furioso porque o encantamento não deu certo, e dirá que a culpa é toda sua. Mesmo assim, ele vai lhe entregar um [[Nail Case]] [[Arquivo:Nail Case.gif|link=]], que você poderá usar para domar uma montaria específica. | |||
''' | '''Reportando a missão''' | ||
{{transcrições|npc=Omrabas|texto= | {{transcrições|npc=Omrabas|texto= | ||
| Linha 769: | Linha 930: | ||
[[Omrabas]]: <sobs drily> I never want to see you again! You and your dirty gravedigger hands! Take this, you ungrateful, useless, imbecile... human! ...</br> | [[Omrabas]]: <sobs drily> I never want to see you again! You and your dirty gravedigger hands! Take this, you ungrateful, useless, imbecile... human! ...</br> | ||
[[Omrabas]]: Now... get out! And never, ever, dare come back! You ruined EVERYTHING!}} | [[Omrabas]]: Now... get out! And never, ever, dare come back! You ruined EVERYTHING!}} | ||
{{DASH|[[Arquivo:Achievement.gif|link=]] Após completar a quest, você receberá o achievement '''"{{Achievement|Gravedigger}}"'''.}} | |||
= Extras = | |||
<span class="titulo-quest">'''The Hellgrip Mount'''</span></br> | |||
Ao completar a quest, Omrabas irá lhe dar um [[Nail Case]] [[Arquivo:Nail Case.gif|link=]] com a qual você doma uma [[Gravedigger]]. | |||
'''Montarias:'''</br> | |||
[[Arquivo:The Hellgrip.gif|link=]]</br> | |||
{{DASH|[[Arquivo:Achievement.gif|link=]] Após domar uma Gravedigger, você receberá o achievement '''"{{Achievement|Blacknailed}}"'''.}} | |||
<span class="titulo-quest">'''Parabéns, você concluiu a quest!'''</span></br> | |||
Para outros mistérios: | |||
{{Veja|Quests}} | |||
}} | }} | ||


Edição atual tal como às 23h59min de 11 de junho de 2025
|
|
||||||||||||||||||||||||
| Recompensa: 1.500 pontos de experiência, 02 Small Emeralds, Small Ruby, 03 Black Pearls, Nail Case e um Achievement. |
||||||||||||||||||||||||
| Localização: Drefia. |
||||||||||||||||||||||||
| Você enfrentará: Gravedigger, Demon Skeleton, White Shade, Zombie, Necromancer, Tarnished Spirit, Shadow Pupil, Blood Priest, Blood Hand, Vampire, Vampire Bride, Vampire Viscount, Banshee, Lich, Death Blob e outros. |
||||||||||||||||||||||||
| Mini-Bosses: Necromancer Servant. |
||||||||||||||||||||||||
| Bosses: Nenhum. |
||||||||||||||||||||||||
| Adicionado: Versão 10.1 (17 de julho de 2013) |
||||||||||||||||||||||||
|
||||||||||||||||||||||||
|
||||||||||||||||||||||||

Veja também: Quests.
Equipamento Necessário
- Rope
- Shovel
- 03 Parcels ou a magia Levitate.
- 02 Ghoul Snacks.
- 02 Demonic Skeletal Hand.
- 02 Half-Eaten Brains.
- 04 Blood Tincture in a Vial.
- 01 Pieces of Magic Chalk.
- 01 Yellowed Bone ou 01 Large Yellowed Bone.
Caminho para Drefia
Para iniciar a quest, você deve ir para Drefia, para chegar lá, saia de Darashia e vá para oeste e suba (aqui![]() ), com uma corda. Em seguida caminhe um pouco mais para oeste até (aqui
), com uma corda. Em seguida caminhe um pouco mais para oeste até (aqui![]() ), suba usando três parcels ou a magia Levitate. Agora vá para o norte e desça (aqui
), suba usando três parcels ou a magia Levitate. Agora vá para o norte e desça (aqui![]() ) e desça novamente no próximo buraco, vá para o sul e desça (aqui
) e desça novamente no próximo buraco, vá para o sul e desça (aqui![]() ), por fim siga para sudoeste, suba a escada (aqui
), por fim siga para sudoeste, suba a escada (aqui![]() ) e você estará em Drefia.
) e você estará em Drefia.


Em seguida caminhe em direção ao sul e desça nas ruínas (aqui![]() ). Próximo a escada, você irá ver um buraco, Use sua pá (aqui
). Próximo a escada, você irá ver um buraco, Use sua pá (aqui![]() ) e desça. Você irá encontrar o NPC Omrabas, ele é apenas uma caveira no chão, fale Hi - Mission - Yes para iniciar a quest.
) e desça. Você irá encontrar o NPC Omrabas, ele é apenas uma caveira no chão, fale Hi - Mission - Yes para iniciar a quest.
Volume 1
Comece arranjando os seguintes itens:
- 02 Ghoul Snacks.
- 02 Demonic Skeletal Hands.
- 02 Half-Eaten Brains.
Chapter 1: Sharpen Elbows
Ele vai dizer que precisa de algumas partes do corpo humano. Omrabas vai lhe pedir 02 Ghoul Snacks ![]() , que podem ser obtidos caçando Ghouls. Simplesmente entregue-os a ele para completar a missão.
, que podem ser obtidos caçando Ghouls. Simplesmente entregue-os a ele para completar a missão.
Falando com Omrabas
|
Jogador: Hi
Omrabas: At last, a visitor! Welcome to my... humble abode. |
Reportando a missão - Para entregar os Ghoul Snacks
Chapter 2: Coming In Handy
Fale Hi novamente para Omrabas, ele percebeu que os Ghoul Snacks não servem para fazer mãos, então pediu um novo ingrediente: 02 Demonic Skeletal Hands ![]() , que podem ser obtidas facilmente caçando Demon Skeletons. Entregue-as para concluir a missão falando Hi - Yes - Mission.
, que podem ser obtidas facilmente caçando Demon Skeletons. Entregue-as para concluir a missão falando Hi - Yes - Mission.
Falando com Omrabas
|
Jogador: Hi
Omrabas: Ah, young friend, I found a solution! Find me two demonic skeletal hands. That should do it. Now run along! |
Reportando a missão - Para entregar as Demonic Skeletal Hands
Chapter 3: Heartfelt
Agora Omrabas precisa de um coração. Ele diz que seu próprio coração foi escondido por alguém, e sabe onde encontrá-lo.
Falando com Omrabas
|
Jogador: Mission
Omrabas: I need my heart back. I know where they have hidden it. Too afraid to destroy my beating heart, hah! ... |
Então, ele pede que você destrua algumas Amphoras ![]() em uma vala comum no subsolo de sua antiga casa. Siga, então, para a construção indicada no mapa, (aqui
em uma vala comum no subsolo de sua antiga casa. Siga, então, para a construção indicada no mapa, (aqui![]() ). Chegando lá, use Levitate para subir. Desça dois andares e siga as orientações do mapa abaixo. Passando o teleport, você terá 05 minutos para pegar o coração, vá quebrando todas as Dust Amphoras do local até obter o Omrabas' Heart
). Chegando lá, use Levitate para subir. Desça dois andares e siga as orientações do mapa abaixo. Passando o teleport, você terá 05 minutos para pegar o coração, vá quebrando todas as Dust Amphoras do local até obter o Omrabas' Heart ![]() .
.


Retorne ao Omrabas e entregue o coração a ele falando Hi - Yes - Mission.
Reportando a missão - Para entregar o Omrabas' Heart
Chapter 4: Brained Up and Ready
Fale Mission para Omrabas, desta vez ele precisa de um cérebro. Para tal, ele pede que você consiga 02 Half-Eaten Brains ![]() , que podem ser dropados de Zombies.
, que podem ser dropados de Zombies.
Falando com Omrabas
Assim que tiver as duas metades de cérebro, você precisará ir até a Brain Heater Machine  que fica em uma sala nos Necromancer Halls (aqui
![]() ). Com as duas metades de cérebro em mãos, siga as orientações dos mapas e chegando lá, coloque as duas metades sobre os altares deitados (conforme a animação abaixo) e dê "use" na máquina para obter o Stimulated Brain
). Com as duas metades de cérebro em mãos, siga as orientações dos mapas e chegando lá, coloque as duas metades sobre os altares deitados (conforme a animação abaixo) e dê "use" na máquina para obter o Stimulated Brain ![]() .
.


Retorne ao Omrabas e entregue o cérebro a ele falando Hi - Yes - Mission.
Reportando a missão - Entregando o Stimulated Brain
Chapter 5: Snaky Intestines
Agora para terminar sua reunião de ingredientes, Omrabas solicitará algo vivo que possa servir de intestino. Ele vai lhe entregar um Storage Flask ![]() , que você deverá usar em uma Snake viva (Caso você seja Druid ou Sorcerer pode summonar uma e dar use nela). Ao usar o flask em uma snake, você terá um Full Storage Flask
, que você deverá usar em uma Snake viva (Caso você seja Druid ou Sorcerer pode summonar uma e dar use nela). Ao usar o flask em uma snake, você terá um Full Storage Flask ![]() .
.
| Aviso: Caso o personagem perca de alguma forma o Full Storage Flask, ele pode retornar no NPC Omrabas para pegar um novo Storage Flask, basta dizer "Hi - Lost" para ele dar um novo frasco. Com o frasco na mão, basta repetir o procedimento acima. |
Falando com Omrabas
Depois de usar o frasco numa Snake, fale novamente com o NPC para completar a missão falando Hi - Yes - Mission.
Reportando a missão - Entregando o Full Storage Flask
|
Jogador: Hi
Omrabas: Hello, hello. Let's come to the point - did you find me some intestines? |
Volume 2
Comece arranjando os seguintes itens:
- 04 Blood Tincture in a Vial.
- 01 Pieces of Magic Chalk.
- 01 Yellowed Bone ou 01 Large Yellowed Bone.
Chapter 1: Dragon Hallowtosis
Fale Mission para Omrabas, todos os ingredientes necessários foram coletados. Agora, você precisa ajudar Omrabas a fazer o ritual. Você precisará sacrificar cinco coisas diferentes nos cinco altares de Drefia, localizados no andar em que o mapa forma uma estrela de cinco pontas.
Falando com Omrabas
|
Jogador: Mission
Omrabas: Good. As you may have gathered, the body parts you brought need to be assembled to form a whole body. ... |
No primeiro altar, você precisará sacrificar três lágrimas de dragão ![]() . Para obtê-las, você deve ir até o Dragonbone Cemetery. Siga as instruções do mapa. Chegando lá, você passará por um portal mas e descerá em um buraco. Você terá 10 minutos para conseguir as três lágrimas. Abra os dois corpos humanos presentes no local, em um deles haverá um documento e no outro uma pá, agora cave a areia nos três locais indicados abaixo.
. Para obtê-las, você deve ir até o Dragonbone Cemetery. Siga as instruções do mapa. Chegando lá, você passará por um portal mas e descerá em um buraco. Você terá 10 minutos para conseguir as três lágrimas. Abra os dois corpos humanos presentes no local, em um deles haverá um documento e no outro uma pá, agora cave a areia nos três locais indicados abaixo.


Agora você deve ir até o primeiro altar, o Dragonsoul Altar, que é um dos cinco altares do pentagrama de Drefia. Siga as instruções do mapa e quando chegar lá, vá para o altar número 1 (aqui![]() ). Simplesmente use as lágrimas no altar para completar sua missão.
). Simplesmente use as lágrimas no altar para completar sua missão.


Retorne ao Omrabas para novas instruções falando Hi - Yes.
Reportando a missão
|
Jogador: Hi
Omrabas: Ah hello! Well done there, I felt the old powers settling down. Now, ready to hallow the next altar? |
Chapter 2: Holy Smokes
Agora Omrabas irá instruí-lo a obter 01 Hallowed Bone ![]() e usá-lo no altar correto. Para conseguir um Hallowed Bone, você precisa usar 01 Yellowed Bone
e usá-lo no altar correto. Para conseguir um Hallowed Bone, você precisa usar 01 Yellowed Bone ![]() ou 01 Large Yellowed Bone
ou 01 Large Yellowed Bone ![]() - que pode ser encontrado por toda parte em Drefia - em uma das quatro pilhas de ossos
- que pode ser encontrado por toda parte em Drefia - em uma das quatro pilhas de ossos ![]() indicadas em uma das imagens abaixo.
indicadas em uma das imagens abaixo.
Falando com Omrabas
|
Omrabas: Ah hello! Well done there, I felt the old powers settling down. Now, ready to hallow the next altar?
Jogador: Yes |
Com um Yellowed Bone ou Large Yellowed Bone em mãos, siga para o local indicado no mapa abaixo (dentro da cave principal em Drefia). Chegando lá, você deverá usar seu Yellowed Bone ou Large Yellowed Bone em uma das quatro pilhas de ossos indicadas na imagem abaixo. Nota: Alguns Yellowed Bones podem ser encontrados no próprio local.


Agora você deve ir até o segundo altar, o Bonemarrow Altar, que é um dos cinco altares do pentagrama de Drefia. Siga as instruções do mapa e quando chegar lá, vá para o altar número 2 (aqui![]() ). Use seu Hallowed Bone na caldeira
). Use seu Hallowed Bone na caldeira  para completar sua missão.


Retorne ao Omrabas para novas instruções falando Hi - Blood - Yes.
Reportando a missão
|
Jogador: Hi
Omrabas: Ah, welcome, welcome! I felt that one! The Dark Lord is pleased with the gift you brought, so now we can proceed with everything as planned. ... |
Chapter 3: Let There Be Blood!
A missão agora é um pouco mais simples. Para ela, são necessários 04 Blood Tincture in a Vial ![]() , que podem ser dropados de Blood Hands e Blood Priests, você poderá encontrá-los em uma boa quantidade, (aqui
, que podem ser dropados de Blood Hands e Blood Priests, você poderá encontrá-los em uma boa quantidade, (aqui![]() ).
).
Falando com Omrabas
|
Jogador: Yes
Omrabas: Ah, I knew you were a sturdy fellow! Necromancer material if ever I saw one! ... |
Agora você deve ir até o terceiro altar, o Bloodgong Altar, que é um dos cinco altares do pentagrama de Drefia. Siga as instruções do mapa e quando chegar lá, vá para o altar número 3 (aqui![]() ). Use os 04 Blood Tincture in a Vial, um para cada altar manchado com sangue
). Use os 04 Blood Tincture in a Vial, um para cada altar manchado com sangue ![]() conforme indicado na imagem abaixo, e depois, simplesmente dê "Use" no gongo
conforme indicado na imagem abaixo, e depois, simplesmente dê "Use" no gongo  que fica na parte norte do altar para completar sua missão.


Retorne ao Omrabas para novas instruções falando Hi - Yes.
Reportando a missão
Chapter 4: A Taste Of Ashes
Para consagrar o quarto altar, você precisará de Shadow Ashes ![]() . Para obtê-la, você precisará, primeiro, de Pieces of Magic Chalk
. Para obtê-la, você precisará, primeiro, de Pieces of Magic Chalk ![]() , que podem ser dropadas de Blood Hands, Blood Priests e Shadow Pupils. Você pode caçá-los (aqui
, que podem ser dropadas de Blood Hands, Blood Priests e Shadow Pupils. Você pode caçá-los (aqui![]() ).
).
Falando com Omrabas
|
Jogador: Yes
Omrabas: Excellent. To bind the earthly powers, we, I mean you, must worship at the Fireglass Altar. ... |
Com o item em mãos, siga para o local conhecido como Ember Chamber, indicado no mapa abaixo. Cuidado quando chegar lá, pois uma grande quantidade de criaturas irá atacá-lo. Depois de derrotá-las, simplesmente use suas Pieces of Magic Chalk no fogo cor-de-rosa ![]() para obter as Shadow Ashes.
para obter as Shadow Ashes.


Agora você deve ir até o quarto altar, o Fireglass Altar, que é um dos cinco altares do pentagrama de Drefia. Siga as instruções do mapa e quando chegar lá, vá para o altar número 4 (aqui![]() ). Simplesmente use as Shadow Ashes nos dois altares (um ao norte e outro ao sul) para completar sua missão.
). Simplesmente use as Shadow Ashes nos dois altares (um ao norte e outro ao sul) para completar sua missão.


Retorne ao Omrabas para novas instruções falando Hi - Yes.
Reportando a missão
Chapter 5: The Darkness Awaits
Finalmente, o último altar. Omrabas lhe entregará uma chave ![]() e um pergaminho
e um pergaminho ![]() . Você precisa encontrar 03 Candles Made of Human Tallow
. Você precisa encontrar 03 Candles Made of Human Tallow ![]() , as quais você identificará com o pergaminho que ele lhe deu.
, as quais você identificará com o pergaminho que ele lhe deu.
Falando com Omrabas
|
Jogador: Yes
Omrabas: <reverential> The final altar that remains to be hallowed... the Shadowthrone. ... |
Siga para o local indicado no mapa. Quando chegar lá, você verá uma Trapdoor ![]() . Use sua chave nela para descer. Você vai cair numa sala cheia de velas. Vá usando seu pergaminho em todas elas até encontrar as Candles Made of Human Tallow e quando encontrá-las, 03 delas irão aparecer em sua backpack.
. Use sua chave nela para descer. Você vai cair numa sala cheia de velas. Vá usando seu pergaminho em todas elas até encontrar as Candles Made of Human Tallow e quando encontrá-las, 03 delas irão aparecer em sua backpack.


Agora você deve ir até o quinto altar, o Bonemarrow Altar, que é um dos cinco altares do pentagrama de Drefia. Siga as instruções do mapa e quando chegar lá, vá para o altar número 5 (aqui![]() ). Lá, você verá três estátuas pretas
). Lá, você verá três estátuas pretas  . Use cada vela em uma das estátuas, em sentido anti-horário, conforme a ordem indicada abaixo, para completar sua missão.


Retorne ao Omrabas para novas instruções falando Hi - Scroll.
Reportando a missão
Volume 3
Os ingredientes já foram coletados e os altares já estão prontos. Tudo o que você tem a fazer agora é obter o pergaminho completo com o encantamento.
Chapter 1: By Rite Of Blood
Omrabas dirá que, nos tempos antigos, ele e mais quatro amigos eram poderosos necromantes e cada um ficou com um pedaço do encantamento que você precisa realizar. Você deverá falar com cada um dos quatro necromantes e realizar tarefas para eles em troca de seu respectivo pedaço do encantamento.
Falando com Omrabas
|
Jogador: Scroll
Omrabas: Well, it is a rather long story. The short version: I had friends - no need to snigger. ... |
O primeiro necromante é Tomruk The Ruddy. Para chegar até ele, siga as instruções dos mapas abaixo, a partir da entrada do andar principal dos Necromancer Halls de Drefia, siga para leste, sul e contorne o local indo para oeste e norte até chegar a uma escada (aqui![]() ).
).


Fale Hi - Scroll - Yes para Tomruk, ele revelará que possui mesmo o que você precisa, mas só entregará se você lhe fizer um favor. Ele vai entregar de 02 frascos, que você deverá encher com sangue de dois locais diferentes de Drefia.
Falando com Tomruk The Ruddy - 1º Diálogo
 |
Jogador: Hi
Tomruk The Ruddy: Hello hello! Always good to see fresh blood! What brings you here? |
O primeiro lugar do qual você deve coletar o sangue é conhecido como The Necromancer's Pure Blood Chamber, fica na parte sudeste dos Necromancer Halls, basta voltar por onde veio, mais ao invés de ir para o norte, continue andando para leste conforme o mapa abaixo até chegar (aqui![]() ). Depois, você deverá ir ao segundo local, que fica nas Drefia Vampire Crypts, siga as orientações do mapa abaixo. Chegando lá, use o segundo frasco no poço de sangue (aqui
). Depois, você deverá ir ao segundo local, que fica nas Drefia Vampire Crypts, siga as orientações do mapa abaixo. Chegando lá, use o segundo frasco no poço de sangue (aqui![]() ) para enchê-lo.
) para enchê-lo.
| Atenção: Você deve usar 01 frasco em cada local. Se usar os dois frascos em qualquer um dos dois locais, retorne ao NPC Tomruk The Ruddy e relate a falha (Hi - Fail - Yes) e então você receberá novos frascos. |

Caminho para o 1º Local

Caminho para o 2º Local
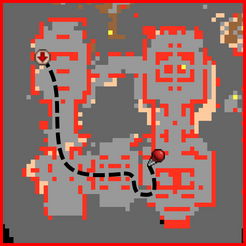
Caminho para o 2º Local
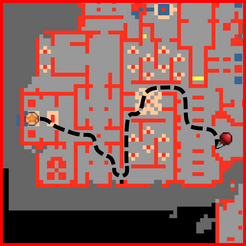
Caminho para o 2º Local


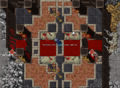
1º Local

2º Local


Volte até a sala do NPC Tomruk The Ruddy e fale Hi - Yes. Você irá entregar os frascos a ele. Em seguida, ele lhe entregará outro recipiente com sangue, um Tainted Blood Essence ![]() , você deverá usá-lo nas quatro maiores pagodas manchadas com sangue
, você deverá usá-lo nas quatro maiores pagodas manchadas com sangue ![]() . Depois disso, use a alavanca da parte norte da sala.
. Depois disso, use a alavanca da parte norte da sala.
Falando com Tomruk The Ruddy - 2º Diálogo - Depois de pegar o sangue
|
Jogador: Hi
Tomruk The Ruddy: Hello hello! Did you bring those blood samples? |


Fale com Tomruk novamente, diga Hi - Yes. Ele pedirá um tempo. Diga Hi - Yes novamente para que ele lhe entregue seu pedaço do encantamento.
Falando com Tomruk The Ruddy - 3º Diálogo - Depois de usar o sangue nas pagodas
|
Jogador: Hi
Tomruk The Ruddy: Hello hello! Well now, painted all those blood pagodas properly? |
Falando com Tomruk The Ruddy - 4º Diálogo - Para pegar o pedaço do encantamento
|
Jogador: Hi
Tomruk The Ruddy: Hello hell- oh, you've come for the scroll, haven't you? |
Retorne ao NPC Omrabas para reportar a missão falando Hi - Yes - Yes.
Reportando a missão
Chapter 2: It Takes Two
Omrabas dirá que para conseguir o segundo fragmento do encantamento, você deve encontrar um NPC Shadow Pupil. Para chegar até ele, siga as instruções dos mapas.
Falando com Omrabas
|
Jogador: Yes
Omrabas: Hah, developed a taste for it, have you? I believe the next scroll piece was hidden somewhere, my old friend being of a somewhat distrustful nature. ... |
O segundo necromante é Oblivion. Para chegar até ele, siga as instruções dos mapas abaixo, a partir da entrada do andar principal dos Necromancer Halls de Drefia, siga para o norte até chegar em uma área remota (aqui![]() ).
).


Fale Hi - Scroll - Yes para Oblivion, ele pedirá para você ir até um cemitério que fica nas Drefia Vampire Crypts e checar três túmulos específicos em busca de três palavras.
Falando com Oblivion - 1º Diálogo
 |
Jogador: Hi
Oblivion: A shadow preceded you. You wish? |
Siga, então, para o local indicado abaixo, um cemitério que fica nas Drefia Vampire Crypts. Chegando lá, você deverá ir até os locais indicados abaixo. Simplesmente dê "Use" nos três túmulos (1º Túmulo![]() , 2º Túmulo
, 2º Túmulo![]() e 3º Túmulo
e 3º Túmulo![]() ), em qualquer ordem, para receber as mensagens e concluir essa parte da missão, conforme as imagens abaixo.
), em qualquer ordem, para receber as mensagens e concluir essa parte da missão, conforme as imagens abaixo.


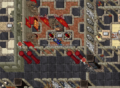
Bronze

Floating

Takesha Antishu


Retorne até o NPC Oblivion e fale separadamente as palavras encontradas nos túmulos na ordem pedida (Hi - Yes - Bronze - Floating - Takesha Antishu).
Falando com Oblivion - 2º Diálogo - Depois de ir nos túmulos
|
Jogador: Hi
Oblivion: Yes. Have you gone there and found what you sought? |
Ele lhe dirá que o que você procura está próximo do túmulo do "Akab". Para chegar lá, siga as orientações do mapa. Cave ao lado do túmulo ![]() e ao sul do Empty Coal Basin
e ao sul do Empty Coal Basin ![]() (aqui
(aqui![]() ) para obter o pedaço do encantamento.
) para obter o pedaço do encantamento.


Retorne ao NPC Omrabas para reportar a missão falando Hi - Yes - Yes.
Reportando a missão
Chapter 3: All Good Things Are Three
Desta vez, Omrabas pedirá para você recuperar a parte do encantamento que ele mesmo escondeu. Por isso, ele lhe dará uma chave ![]() para que você possa entrar em sua antiga base, que fica ao nordeste da biblioteca dos Necromancer Halls de Drefia (aqui
para que você possa entrar em sua antiga base, que fica ao nordeste da biblioteca dos Necromancer Halls de Drefia (aqui![]() ).
).
Falando com Omrabas
|
Jogador: Yes
Omrabas: Good! As you can imagine, I had a scroll piece, too. I hid it in my old quarters, northwest of the library. ... |
Siga para o local indicado no mapa abaixo e use a chave na porta ![]() para entrar. Depois de entrar, procure por uma rachadura no chão na sala ao noroeste, ela fica escondida embaixo de um baú. Você deverá dar "Use" nessa rachadura e então, uma mensagem aparecerá dizendo que alguém roubou o pedaço do fragmento, e que esse alguém está no dormitório dos estudantes.
para entrar. Depois de entrar, procure por uma rachadura no chão na sala ao noroeste, ela fica escondida embaixo de um baú. Você deverá dar "Use" nessa rachadura e então, uma mensagem aparecerá dizendo que alguém roubou o pedaço do fragmento, e que esse alguém está no dormitório dos estudantes.
Para chegar ao dormitório siga para o local indicado no mapa. Chegando lá, haverá um portal (aqui![]() ), passe por ele e desça as escadas. Você enfrentará algumas criaturas, dentre elas, um Necromancer Servant. Mate-o para obter o Incantation Fragment
), passe por ele e desça as escadas. Você enfrentará algumas criaturas, dentre elas, um Necromancer Servant. Mate-o para obter o Incantation Fragment ![]() .
.


Retorne ao Omrabas para reportar a missão falando Hi - Yes - Yes.
Reportando a missão
|
Jogador: Hi
Omrabas: Hello - what? You have the scroll piece, you say? |
Chapter 4: Four Down, One To Go
Omrabas vai lhe pedir para falar com uma NPC Priestess que está com o quarto fragmento do encantamento. Mas ela só irá te atender se você estiver vestido como um Necromancer, portanto Omrabas lhe entregará uma capa ![]() , a qual deverá estar em sua mochila quando você for falar com a NPC.
, a qual deverá estar em sua mochila quando você for falar com a NPC.
Falando com Omrabas
|
Jogador: Yes
Omrabas: Hahah, eager for it, I like that! ... |
A terceira necromante é Elyen Ravenlock. Para chegar até ela, siga as instruções dos mapas abaixo, a partir da entrada do andar principal dos Necromancer Halls de Drefia, siga para o norte até chegar a uma escada (aqui![]() ). Desça, você será atacado por algumas criaturas, em seguida vá para nordeste para encontrar a NPC.
). Desça, você será atacado por algumas criaturas, em seguida vá para nordeste para encontrar a NPC.


Antes de falar com ela, dê "Use" na capa que Omrabas lhe entregou. Fale Hi - Yes - Artefact - Yes para Elyen Ravenlock, ela lhe entregará uma flauta ![]() , que você deverá usar em 05 obeliscos que ficam nos Gardens of Night.
, que você deverá usar em 05 obeliscos que ficam nos Gardens of Night.
Falando com Elyen Ravenlock - 1º Diálogo
 |
Jogador: Hi
Elyen Ravenlock: Hello, brother. You come with a question to me, I believe? |
Para chegar lá, vá para leste e norte e novamente para o leste até chegar (aqui![]() ). Siga para o norte e você já encontrará o primeiro obelisco. Fique em frente aos obeliscos e dê "Use" na flauta até obter a mensagem: <screeeech><squeak><squeaaaaal>.
). Siga para o norte e você já encontrará o primeiro obelisco. Fique em frente aos obeliscos e dê "Use" na flauta até obter a mensagem: <screeeech><squeak><squeaaaaal>.


Depois de usar a flauta em todos os 05 obeliscos, volte até a NPC Elyen Ravenlock e fale Hi - Yes.
Falando com Elyen Ravenlock - 2º Diálogo - Depois de usar a flauta nos obeliscos
|
Jogador: Hi
Elyen Ravenlock: Hello, brother. You have finished the dance? |
Agora você poderá passar pelos pisos pretos. O Incantation Fragment ![]() estará dentro das Drawers
estará dentro das Drawers ![]() .
.

Retorne até o Omrabas para reportar a missão falando Hi - Yes - Yes.
Reportando a missão
|
Jogador: Hi
Omrabas: Hello, young apprentice. Do you have that scroll piece from the priestess? |
Chapter 5: Covered Up Real Nice
Omrabas vai lhe pedir para falar com um NPC White Shade que está com o quinto e último fragmento do encantamento. Mas para conseguir que ele te entregue o fragmento, você precisará usar "palavras mágicas" para agradar o NPC.
Falando com Omrabas
|
Jogador: Yes
Omrabas: That's the spirit! Speaking of which, you will have to look for a White Shade ... |
O quarto necromante é Zarifan. Para chegar até ele, siga as instruções dos mapas abaixo, você precisará sair de Drefia pois o NPC está localizado na parte sul das ruínas da cidade. Voltando pelo caminho pelo qual você veio para Drefia no início da quest, siga um pouco para o sul até chegar a uma escada (aqui![]() ), suba e vá para sudoeste até encontrar outra (aqui
), suba e vá para sudoeste até encontrar outra (aqui![]() ). Suba e vá para oeste e desça tudo novamente, você estará na parte sul de Drefia e será atacado por algumas criaturas, em seguida vá para sudoeste e desça (aqui
). Suba e vá para oeste e desça tudo novamente, você estará na parte sul de Drefia e será atacado por algumas criaturas, em seguida vá para sudoeste e desça (aqui![]() ).
).


Siga desçendo as escadas conforme os mapas abaixo até eventualmente encontrar um buraco (aqui![]() ), use sua pá e desça, aqui você encontrará o NPC Zarifan.
), use sua pá e desça, aqui você encontrará o NPC Zarifan.


Para conseguir que o NPC lhe diga aonde encontrar o pedaço do encantamento, você deverá falar as tais "palavras mágicas" mencionadas por Omrabas, diga Hi - Magic - Friendship - Lives - Forever e ele lhe dirá que seu pedaço do encantamento está enterrado em um triângulo formado por pedras em uma das cavernas mais ao leste de Drefia.
Falando com Zarifan
|
Jogador: Hi
Zarifan: ... ... hello...magic... words? |
Volte para a superfície, vá para leste e desça (aqui![]() ). Siga, então, as instruções dos mapas abaixo e chegando lá, basta usar sua pá no centro do triângulo das pedras para obter parte do fragmento
). Siga, então, as instruções dos mapas abaixo e chegando lá, basta usar sua pá no centro do triângulo das pedras para obter parte do fragmento ![]() .
.


Agora você deverá retornar até o Omrabas. Para sua surpresa, ele dirá que este não é o fragmento completo, e que você precisa encontrar a outra parte dele.
Reportando a missão - Depois de pegar o primeiro fragmento
|
Jogador: Hi
Omrabas: Welcome, welcome! Finally! The last scroll piece.... you do have it, haven't you? |
Siga para o local indicado no mapa abaixo, na área principal de Drefia. Use sua pá na pilha de pedras para descer (aqui![]() ). Dê "Use" em uma das estantes para recuperar o pedaço do último fragmento
). Dê "Use" em uma das estantes para recuperar o pedaço do último fragmento ![]() do encantamento.
do encantamento.


Use um papel no outro para obter o último Incantation Fragment ![]() e volte até o Omrabas para prosseguir para a parte final da quest. Fale Hi - Restore - Yes.
e volte até o Omrabas para prosseguir para a parte final da quest. Fale Hi - Restore - Yes.
Reportando a missão - Depois de pegar o segundo fragmento
|
Jogador: Hi
Omrabas: Don't keep me waiting. The last scroll piece - were you able to restore it? |
Omrabas dirá que finalmente você tem tudo para realizar o ritual, e lhe entregará uma Skull ![]() e um pergaminho com o encantamento
e um pergaminho com o encantamento ![]() . Você precisará ir até o pentagrama mais uma vez, chegando lá, coloque a Skull sobre o altar de sacrifício e use o Incantation Scroll nela. Você será surpreendido novamente quando uma galinha aparecer.
. Você precisará ir até o pentagrama mais uma vez, chegando lá, coloque a Skull sobre o altar de sacrifício e use o Incantation Scroll nela. Você será surpreendido novamente quando uma galinha aparecer.


Vá até o Omrabas pela última vez. Ele ficará furioso porque o encantamento não deu certo, e dirá que a culpa é toda sua. Mesmo assim, ele vai lhe entregar um Nail Case ![]() , que você poderá usar para domar uma montaria específica.
, que você poderá usar para domar uma montaria específica.
Reportando a missão
|
Jogador: Hi
Omrabas: It failed! IT FAILED! WHY? What have you done! This must be your fault! ... |
Extras
The Hellgrip Mount
Ao completar a quest, Omrabas irá lhe dar um Nail Case ![]() com a qual você doma uma Gravedigger.
com a qual você doma uma Gravedigger.
Montarias:

Parabéns, você concluiu a quest!
Para outros mistérios:
| Veja Também: Quests |